初学stm32之封装GPIO口
2018-04-02 20:08
176 查看
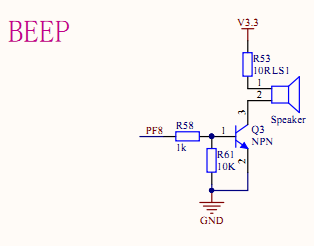
经过两天的学习,我发现对于stm32来讲它的GPIO口在配置过程中一些代码复用率非常高,所以就对GPIO口的使用(通用型输出和普通型输入)进行封装,进而加快系统的设计。此文章主要是对LED灯,独立按键,蜂鸣器进行模块化编程,还望对大家有所帮助,请参考电路图查看代码。

1 gpio.h#include "gpio.h"
//GPIO初始化,GPIOx的第Pin位,Mode 1 输入,Mode 0 输出
void Gpio_Init(GPIO_TypeDef * GPIOx, uint8_t Pin, uint8_t Mode)
{
switch(Mode)
{
case 1:
GPIOx->MODER &=~ (3<<(Pin+Pin));
GPIOx->PUPDR &=~ (3<<(Pin+Pin));
break;
case 0:
GPIOx->MODER &=~ (3<<(Pin+Pin));
GPIOx->MODER |= (1<<(Pin+Pin));
GPIOF->OTYPER &=~ (1<<Pin);
GPIOx->OSPEEDR |= (3<<(Pin+Pin));
GPIOx->PUPDR &=~ (3<<(Pin+Pin));
break;
default: break;
}
}
void Led_Init(void)
{
RCC->AHB1ENR |= (9<<2); //开启GPIOF与GPIOC时钟
Gpio_Init(GPIOF,6,0);
Gpio_Init(GPIOF,9,0);
Gpio_Init(GPIOF,10,0);
Gpio_Init(GPIOC,0,0);
//初始化时关闭所有灯
GPIOF->ODR |= (1<<6);
GPIOF->ODR |= (1<<9);
GPIOF->ODR |= (1<<10);
GPIOC->ODR |= (1<<0);
}
void Beep_Init(void)
{
RCC->AHB1ENR |= (1<<5);
Gpio_Init(GPIOF,8,0);
}
//按键初始化 key1与PA0相连,key2-key4与PE2-PE3对应相连
void Key_Init(void)
{
RCC->AHB1ENR |= (1<<0);//开启GPIOA时钟
RCC->AHB1ENR |= (1<<4);
Gpio_Init(GPIOA,0,1);
Gpio_Init(GPIOE,2,1);
Gpio_Init(GPIOE,3,1);
Gpio_Init(GPIOE,4,1);
}
2 gpio.h#ifndef GPIO_H
#define GPIO_H
#include "stm32f4xx.h"
//LED反转
#define LED1_TOGGLE() GPIOF->ODR ^= (1<<6)
#define LED2_TOGGLE() GPIOF->ODR ^= (1<<9)
#define LED3_TOGGLE() GPIOF->ODR ^= (1<<10)
#define LED4_TOGGLE() GPIOC->ODR ^= (1<<0)
#define BEEP_TOGGLE() GPIOF->ODR ^= (1<<8)
//LED亮灭
#define LED1(x) x?(GPIOF->ODR &=~ (1<<6)):(GPIOF->ODR |= (1<<6))
#define LED2(x) x?(GPIOF->ODR &=~ (1<<9)):(GPIOF->ODR |= (1<<9))
#define LED3(x) x?(GPIOF->ODR &=~ (1<<10)):(GPIOF->ODR |= (1<<10))
#define LED4(x) x?(GPIOC->ODR &=~ (1<<0)):(GPIOC->ODR |= (1<<0))
#define BEEP(x) x?(GPIOF->ODR |= (1<<8)):(GPIOF->ODR &=~ (1<<8))
//按键判断
#define KEY1() (GPIOA->IDR & (1<<0))
#define KEY2() !(GPIOE->IDR & (1<<2))
#define KEY3() !(GPIOE->IDR & (1<<3))
#define KEY4() !(GPIOE->IDR & (1<<4))
void Led_Init(void);
void Key_Init(void);
void Beep_Init(void);
#endif
3 main.c/**********************************************************
*————————————————————按键控制LED1灯————————————————————————
* 里面包含两种消抖处理的方式,为入门级别学习
* 按键按下的时候蜂鸣器发出响声,同时LED1的亮灭发生转变
***********************************************************/
#include "main.h"
void delay_ms(uint32_t ms)
{
uint64_t Time = ms * 16800;
while(Time--);
}
void delay_us(uint32_t us)
{
uint64_t Time = us * 16.8f;
while(Time--);
}
int main(void)
{
uint16_t i = 0;
uint16_t count = 0;
Led_Init();
Beep_Init();
Key_Init();
BEEP(0);
while (1)
{
// 注释部分为第一种按键处理方式
// if(KEY1())
// {
// delay_ms(10);
// if(KEY1())
// {
// BEEP(1);
// LED1_TOGGLE();
// }
// while(KEY1());
// BEEP(0);
// }
delay_ms(1);
i++;
if(i>10)
{
if(KEY1())
{
count++;
}
else
{
count = 0;
BEEP(0);
}
if(count > 20)
{
BEEP(1);
LED1_TOGGLE();
count = 0;
while(KEY1());
}
i = 0;
}
}
}
#ifdef USE_FULL_ASSERT
/**
* @brief Reports the name of the source file and the source line number
* where the assert_param error has occurred.
* @param file: pointer to the source file name
* @param line: assert_param error line source number
* @retval None
*/
void assert_failed(uint8_t* file, uint32_t line)
{
/* User can add his own implementation to report the file name and line number,
ex: printf("Wrong parameters value: file %s on line %d\r\n", file, line) */
/* Infinite loop */
while (1)
{
}
}
#endif
/**
* @}
*/
/**
* @}
*/
/************************ (C) COPYRIGHT HOLMES *****END OF FILE****/

相关文章推荐
- 初学stm32
- 初学IOS_UI基础,滑动面板_自动翻页封装版_有GIF图_有源文件
- Android初学----封装显示Fragment的工具类
- 封装对STM32的Flash读写操作
- STM32 小于100引脚封装的 AD参考电压问题
- STM32的定时器时基功能封装
- 初学Python字符串封装
- stm32之初学
- stm32 初学笔记(寄存器)--感悟
- [stm32] 利用uc-gui封装画图和画线函数移植51上的模拟动画
- STM32学习(1) 将外设封装成Arduino风格的类库
- 初学IOS_UI基础_多组table_封装版本_有GIF图_有源文件
- 初学STM32遇到的一些问题
- 初学JDBC,JDBC工具类的简单封装
- 封装计算数组的类_初学
- 使用C++封装库在MDK上建STM32开发工程
- 20130218-初学STM32遇到的一些问题
- 初学 stm32 的USB 开发
- STM32封装自己的库函数(GPIO初始化)
- STM32初学之Sys_Tick配置