js实现图片无缝轮播效果
2018-04-02 17:37
826 查看
1.设置好html,用一个div装下4个图片,这里用4个div代替:
并设置好样式(给id为container的div加上相对定位,id为ul的div加上绝对定位,图片滚动超过container时,要将多余的图片隐藏,因此要设置overflow:hidden):
2.实现图片向左无缝滚动:利用定时器setinterval设置每过一定时间如100ms,向左移动2px,因此前面设置ul的定位为绝对定位,才可以设置left减少2px即为向左移动。var opicDiv=document.getElementById('ul');
var timer=nll;
function left() {
opicDiv.style.left=opicDiv.offsetLeft-2+'px';
}
timer=setInterval(left,100);若是在container中不设置overflow:hidden则会出现如下情况:
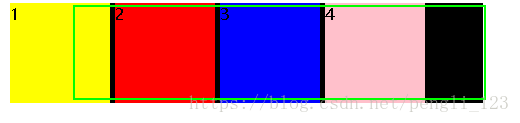
超过绿色框的图片不能隐藏。
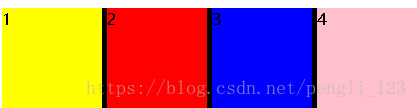
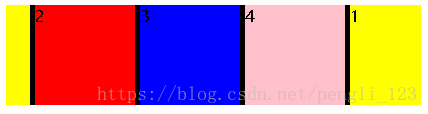
3.但这时候图片一只向左滚动会将container中的空白底露出,就是上图的黑色部分。因此将图片拼接起来,在div1,2,3,4的后面再接上同样的div1,2,3,4,这时候由于id为ul的div宽度不够,因此新接的div被挤到下一排,因此要增加id为ul的div的宽度
这样就接上了。但图片始终有播放完的时候,这样还是会出现黑底。因此当图片放完前四张图时立马将图片复位,即在left绝对值大于ul宽度一半的时候,将ul的left设置为0:
5.接下来实现将鼠标放在图片上滚动停止,鼠标离开滚动继续
只需要设置鼠标停放在图片上时将计时器停止,离开时重新开始计时器
6.完整代码如下:<!DOCTYPE HTML>
<html>
<style type="text/css">
#container{
overflow: hidden;
position: relative;
width: 415px;
height: 100px;
background-color: black;
margin: 0 auto;
}
.pic{
width: 100px;
height: 100px;
display: inline-block;
}
#ul{
position: absolute;
width: 415px;
height: 100px;
}
</style>
<body>
<div id="container">
<div id="ul">
<div class="pic" style="background-color: yellow">1</div>
<div class="pic" style="background-color: red">2</div>
<div class="pic"style="background-color: blue">3</div>
<div class="pic"style="background-color: pink">4</div>
</div>
</div>
</body>
<script>
var opicDiv=document.getElementById('ul');
var picLen=opicDiv.getElementsByTagName('div')
var timer=null;
opicDiv.innerHTML=opicDiv.innerHTML+opicDiv.innerHTML;
opicDiv.style.width=picLen.length*105-5+'px';//乘以105并且减5是计算了边距
function left() { opicDiv.style.left=opicDiv.offsetLeft-2+'px'; if(opicDiv.offsetLeft<-opicDiv.offsetWidth) opicDiv.style.left=0+'px'; }
timer=setInterval(left,100);
opicDiv.onmouseout=function () {
timer=setInterval(left,100);
}
opicDiv.onmouseover=function () {
clearInterval(timer);
}
</script>
</html>
<div id="container">
<div id="ul">
<div class="pic" style="background-color: yellow">1</div>
<div class="pic" style="background-color: red">2</div>
<div class="pic"style="background-color: blue">1</div>
<div class="pic"style="background-color: pink">2</div>
</div>

</div>
并设置好样式(给id为container的div加上相对定位,id为ul的div加上绝对定位,图片滚动超过container时,要将多余的图片隐藏,因此要设置overflow:hidden):
<style type="text/css">
#container{
overflow:hidden;
position: relative;
width: 415px;
height: 100px;
background-color: black;
margin: 0 auto;
}
.pic{
width: 100px;
height: 100px;
display: inline-block;
}
#ul{
position: absolute;
width: 415px;
height: 100px;
}
</style>2.实现图片向左无缝滚动:利用定时器setinterval设置每过一定时间如100ms,向左移动2px,因此前面设置ul的定位为绝对定位,才可以设置left减少2px即为向左移动。var opicDiv=document.getElementById('ul');
var timer=nll;
function left() {
opicDiv.style.left=opicDiv.offsetLeft-2+'px';
}
timer=setInterval(left,100);若是在container中不设置overflow:hidden则会出现如下情况:
超过绿色框的图片不能隐藏。
3.但这时候图片一只向左滚动会将container中的空白底露出,就是上图的黑色部分。因此将图片拼接起来,在div1,2,3,4的后面再接上同样的div1,2,3,4,这时候由于id为ul的div宽度不够,因此新接的div被挤到下一排,因此要增加id为ul的div的宽度
var picLen=opicDiv.getElementsByTagName('div')
opicDiv.innerHTML=opicDiv.innerHTML+opicDiv.innerHTML;
opicDiv.style.width=picLen.length*105-5+'px';//乘以105并且减5是计算了边距效果:这样就接上了。但图片始终有播放完的时候,这样还是会出现黑底。因此当图片放完前四张图时立马将图片复位,即在left绝对值大于ul宽度一半的时候,将ul的left设置为0:
function left() {
opicDiv.style.left=opicDiv.offsetLeft-2+'px';
if(opicDiv.offsetLeft<-opicDiv.offsetWidth)
opicDiv.style.left=0+'px';
}这样就实现了无缝滚动效果。5.接下来实现将鼠标放在图片上滚动停止,鼠标离开滚动继续
只需要设置鼠标停放在图片上时将计时器停止,离开时重新开始计时器
6.完整代码如下:<!DOCTYPE HTML>
<html>
<style type="text/css">
#container{
overflow: hidden;
    position: relative;
width: 415px;
height: 100px;
background-color: black;
margin: 0 auto;
}
.pic{
width: 100px;
height: 100px;
display: inline-block;
}
#ul{
position: absolute;
width: 415px;
height: 100px;
}
</style>
<body>
<div id="container">
<div id="ul">
<div class="pic" style="background-color: yellow">1</div>
<div class="pic" style="background-color: red">2</div>
<div class="pic"style="background-color: blue">3</div>
<div class="pic"style="background-color: pink">4</div>
</div>
</div>
</body>
<script>
var opicDiv=document.getElementById('ul');
var picLen=opicDiv.getElementsByTagName('div')
var timer=null;
opicDiv.innerHTML=opicDiv.innerHTML+opicDiv.innerHTML;
opicDiv.style.width=picLen.length*105-5+'px';//乘以105并且减5是计算了边距
function left() {
opicDiv.style.left=opicDiv.offsetLeft-2+'px';
if(opicDiv.offsetLeft<-opicDiv.offsetWidth)
opicDiv.style.left=0+'px';
}
timer=setInterval(left,100);
opicDiv.onmouseout=function () {
timer=setInterval(left,100);
}
opicDiv.onmouseover=function () {
clearInterval(timer);
}
</script>
</html>

相关文章推荐
- js实现淘宝首页图片轮播效果
- jQuery实现图片轮播效果代码(基于jquery.pack.js插件)
- js实现有过渡渐变效果的图片轮播相册(兼容IE,ff)
- 用JS实现图片轮播效果代码(一)
- 原生js和jquery实现图片轮播淡入淡出效果
- js实现点击左右按钮轮播图片效果实例
- js实现点击左右按钮轮播图片效果实例
- 原生js实现图片层叠轮播切换效果
- js日常小练习:实现图片的轮播效果
- JS原生代码实现图片轮播无缝切换的一种思路
- 原生JS实现图片轮播与淡入效果的简单实例
- js实现图片的无缝轮播滚动
- JS实现简易图片轮播效果的方法
- JS实现图片轮播效果
- 分别用css3、JS实现图片简单的无缝轮播功效
- 基于vue.js实现图片轮播效果
- 基于vue.js实现图片轮播效果
- 基于cssSlidy.js插件实现响应式手机图片轮播效果
- js实现按钮控制图片向左、向右、向上、向下无缝轮播
- js实现图片轮播效果