Kubernetes平台配置Tensorflow的GPU集群
2018-03-22 17:37
537 查看
注:宿主机操作系统为Centos 7.4
安装nvidia驱动:
CentOS 7.4 Nvidia显卡安装步骤:
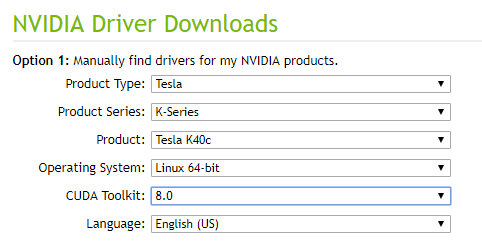
本文以Centos 7.4系统下为TeslaK40c安装cuda 8.0套件对应的nvidia驱动为例,按下图选择。
该驱动对应的下载链接如下:
http://us.download.nvidia.com/XFree86/Linux-x86_64/384.66/NVIDIA-Linux-x86_64-384.66.run
将nvidiafb注释掉。
#blacklist nvidiafb
然后在文件尾添加以下语句:
blacklist nouveau
options nouveau modeset=0
$ sudo dracut /boot/initramfs-$(uname-r).img --force
可用以下指令查看是否设置成功(后面的数字为3即可,第一个数字是上次的设置):
$ runlevel
$ sudo ./NVIDIA-Linux-x86_64-384.66.run
安装过程中,选择accept,其余默认选择yes,安装DKMS内核模块和32位兼容库。
$ sudo ./NVIDIA-Linux-x86_64-384.66.run --uninstall
选择yes,出现error不影响,继续执行。卸载完后重启。
选择runfile(local),如下:
链接:
https://developer.nvidia.com/compute/cuda/8.0/Prod2/local_installers/cuda_8.0.61_375.26_linux-run
出现readme,按q退出。安装选项如下,注意不要安装nvidia驱动!!!
$ sudo cp cuda/lib64/libcudnn*/usr/local/cuda/lib64
$ sudo chmod a+r/usr/local/cuda/include/cudnn.h /usr/local/cuda/lib64/libcudnn*
添加以下内容:
export CUDA_HOME=/usr/local/cuda-8.0
export PATH=/usr/local/cuda-8.0/bin:$PATH
export LD_LIBRARY_PATH=/usr/local/cuda-8.0/lib64:$LD_LIBRARY_PATH
export LD_LIBRARY_PATH=/usr/local/cuda-8.0/lib:$LD_LIBRARY_PATH
$ make
$ cd ~/NVIDIA_CUDA-8.0_Samples
$ ./bin/x86_64/linux/release/deviceQuery
执行以下指令安装kernel-devel包:
$ sudo yum install kernel-devel-$(uname -r)
$ sudo yum install epel-release
$ sudo yum install dkms
$ sudo rm -rf /usr/local/cuda*
验证:
$ nvcc --version
如果提示:bash: nvcc: command not found...则卸载成功。
$ sudo systemctl stop kube
4000
let kube-proxy kube-apiserver kube-controller-manager kube-scheduler
$ sudo systemctl start kubelet kube-proxy kube-apiserver kube-controller-manager kube-scheduler
$ sudo systemctl status kubelet kube-proxy kube-apiserver kube-controller-manager kube-scheduler
若以上各服务的status均为active(running),则启动成功。
如上图,Capacity中的alpha.kubernetes.io/nvidia-gpu不为0说明Kubernetes发现了该节点上的GPU资源(若alpha.kubernetes.io/nvidia-gpu为0,可以尝试重装nvidia驱动或者再次重启kubelet服务。一般节点重启后会找不到GPU 资源,先运行一下GPU再重启kubelet服务就好,原因没有搞清楚,但实践证明是起作用的。。。)。
a) 建议使用1.4.1-gpu版本的tensorflow镜像,latest-gpu使用cuda 9.0,会有很多不兼容;
b) GPU资源相关部分为alpha.kubernetes.io/nvidia-gpu;
c) 除此之外,还需要指定容器内的LD_LIBRARY_PATH 环境变量的值,否则默认镜像内的LD_LIBRARY_PATH可能不包含挂载点,导致程序找不到libcuda.so文件
d) 还有volumes部分对应的是宿主机上的路径,volumeMounts部分对应容器内的挂载点。其中,data文件夹用于存放程序代码以及训练数据,cuda的so文件和nvidia的so文件在宿主机上的具体路径要根据实际情况而定。这里由于cuda只需要用到libcuda,因此只挂载单个文件。需要用到的nvidia的so文件不太清楚有哪些,所以全部挂载进去。
$ sudo mkdir /usr/local/nvidia
$ sudo cp /usr/lib64/*nvidia* /usr/local/nvidia/
$ sudo cp -r /usr/lib64/nvidia /usr/local/nvidia/
需要注意的是,前面安装驱动的方法会把so文件装到/usr/lib64文件夹内,但是直接挂载/usr/lib64整个文件夹会导致libc冲突,建议如果直接挂在文件夹的话,将相关so文件复制到其他新建文件夹在进行挂载。
$ kubectl create -f tf-gpu.yaml
当有多个节点具有GPU资源时,不一定在执行命令的节点上运行容器,可以通过dashboard查看。
$ docker ps
可以看到容器的CONTAINER ID,如dba2998c91ab
然后执行以下指令进入容器,其中dba是CONTAINER ID的前3位:
$ docker exec -it dba bash
root@gpu-pod:/notebook# python /data/mnist.py
若无报错,且tensorlfow输出内容包括与以下内容相似的语句则证明容器内可以运行GPU版的tensorflow了。

2.https://community.mellanox.com/docs/DOC-2911#jive_content_id_Required_Software
3.https://kubernetes.io/cn/docs/tasks/manage-gpus/scheduling-gpus/
4.https://zhuanlan.zhihu.com/p/27376696
from __future__ import division
from __future__ import print_function
import argparse
import sys
import tempfile
from tensorflow.examples.tutorials.mnist import input_data
import tensorflow as tf
FLAGS = None
def deepnn(x):
"""deepnn builds the graph for a deep net for classifying digits.
Args:
x: an input tensor with the dimensions (N_examples, 784), where 784 is the
number of pixels in a standard MNIST image.
Returns:
A tuple (y, keep_prob). y is a tensor of shape (N_examples, 10), with values
equal to the logits of classifying the digit into one of 10 classes (the
digits 0-9). keep_prob is a scalar placeholder for the probability of
dropout.
"""
# Reshape to use within a convolutional neural net.
# Last dimension is for "features" - there is only one here, since images are
# grayscale -- it would be 3 for an RGB image, 4 for RGBA, etc.
with tf.name_scope('reshape'):
x_image = tf.reshape(x, [-1, 28, 28, 1])
# First convolutional layer - maps one grayscale image to 32 feature maps.
with tf.name_scope('conv1'):
W_conv1 = weight_variable([5, 5, 1, 32])
b_conv1 = bias_variable([32])
h_conv1 = tf.nn.relu(conv2d(x_image, W_conv1) + b_conv1)
# Pooling layer - downsamples by 2X.
with tf.name_scope('pool1'):
h_pool1 = max_pool_2x2(h_conv1)
# Second convolutional layer -- maps 32 feature maps to 64.
with tf.name_scope('conv2'):
W_conv2 = weight_variable([5, 5, 32, 64])
b_conv2 = bias_variable([64])
h_conv2 = tf.nn.relu(conv2d(h_pool1, W_conv2) + b_conv2)
# Second pooling layer.
with tf.name_scope('pool2'):
h_pool2 = max_pool_2x2(h_conv2)
# Fully connected layer 1 -- after 2 round of downsampling, our 28x28 image
# is down to 7x7x64 feature maps -- maps this to 1024 features.
with tf.name_scope('fc1'):
W_fc1 = weight_variable([7 * 7 * 64, 1024])
b_fc1 = bias_variable([1024])
h_pool2_flat = tf.reshape(h_pool2, [-1, 7 * 7 * 64])
h_fc1 = tf.nn.relu(tf.matmul(h_pool2_flat, W_fc1) + b_fc1)
# Dropout - controls the complexity of the model, prevents co-adaptation of
# features.
with tf.name_scope('dropout'):
keep_prob = tf.placeholder(tf.float32)
h_fc1_drop = tf.nn.dropout(h_fc1, keep_prob)
# Map the 1024 features to 10 classes, one for each digit
with tf.name_scope('fc2'):
W_fc2 = weight_variable([1024, 10])
b_fc2 = bias_variable([10])
y_conv = tf.matmul(h_fc1_drop, W_fc2) + b_fc2
return y_conv, keep_prob
def conv2d(x, W):
"""conv2d returns a 2d convolution layer with full stride."""
return tf.nn.conv2d(x, W, strides=[1, 1, 1, 1], padding='SAME')
def max_pool_2x2(x):
"""max_pool_2x2 downsamples a feature map by 2X."""
return tf.nn.max_pool(x, ksize=[1, 2, 2, 1],
strides=[1, 2, 2, 1], padding='SAME')
def weight_variable(shape):
"""weight_variable generates a weight variable of a given shape."""
initial = tf.truncated_normal(shape, stddev=0.1)
return tf.Variable(initial)
def bias_variable(shape):
"""bias_variable generates a bias variable of a given shape."""
initial = tf.constant(0.1, shape=shape)
return tf.Variable(initial)
def main(_):
# Import data
mnist = input_data.read_data_sets(FLAGS.data_dir)
# Create the model
x = tf.placeholder(tf.float32, [None, 784])
# Define loss and optimizer
y_ = tf.placeholder(tf.int64, [None])
# Build the graph for the deep net
y_conv, keep_prob = deepnn(x)
with tf.name_scope('loss'):
cross_entropy = tf.losses.sparse_softmax_cross_entropy(
labels=y_, logits=y_conv)
cross_entropy = tf.reduce_mean(cross_entropy)
with tf.name_scope('adam_optimizer'):
train_step = tf.train.AdamOptimizer(1e-4).minimize(cross_entropy)
with tf.name_scope('accuracy'):
correct_prediction = tf.equal(tf.argmax(y_conv, 1), y_)
correct_prediction = tf.cast(correct_prediction, tf.float32)
accuracy = tf.reduce_mean(correct_prediction)
graph_location = tempfile.mkdtemp()
print('Saving graph to: %s' % graph_location)
train_writer = tf.summary.FileWriter(graph_location)
train_writer.add_graph(tf.get_default_graph())
with tf.Session() as sess:
sess.run(tf.global_variables_initializer())
for i in range(20000):
batch = mnist.train.next_batch(50)
if i % 100 == 0:
train_accuracy = accuracy.eval(feed_dict={
x: batch[0], y_: batch[1], keep_prob: 1.0})
print('step %d, training accuracy %g' % (i, train_accuracy))
train_step.run(feed_dict={x: batch[0], y_: batch[1], keep_prob: 0.5})
print('test accuracy %g' % accuracy.eval(feed_dict={
x: mnist.test.images, y_: mnist.test.labels, keep_prob: 1.0}))
if __name__ == '__main__':
parser = argparse.ArgumentParser()
parser.add_argument('--data_dir', type=str,
default='/data/MNIST_data',
help='Directory for storing input data')
FLAGS, unparsed = parser.parse_known_args()
tf.app.run(main=main, argv=[sys.argv[0]] + unparsed)
安装nvidia驱动:
CentOS 7.4 Nvidia显卡安装步骤:1 在英伟达官网下载相应驱动:
http://www.nvidia.com/Download/index.aspx?lang=en-us本文以Centos 7.4系统下为TeslaK40c安装cuda 8.0套件对应的nvidia驱动为例,按下图选择。
该驱动对应的下载链接如下:
http://us.download.nvidia.com/XFree86/Linux-x86_64/384.66/NVIDIA-Linux-x86_64-384.66.run
2 屏蔽默认带有的nouveau:
$ sudo vim /lib/modprobe.d/dist-blacklist.conf将nvidiafb注释掉。
#blacklist nvidiafb
然后在文件尾添加以下语句:
blacklist nouveau
options nouveau modeset=0
3 重建initramfs image步骤:
$ sudo mv /boot/initramfs-$(uname -r).img/boot/initramfs-$(uname -r).img.bak$ sudo dracut /boot/initramfs-$(uname-r).img --force
4 修改运行级别为文本模式:
$ sudo systemctl set-defaultmulti-user.target可用以下指令查看是否设置成功(后面的数字为3即可,第一个数字是上次的设置):
$ runlevel
5 重新启动, 使用root用户登陆:
$ sudo reboot6 进入下载的驱动所在目录:
$ sudo chmod +x NVIDIA-Linux-x86_64-384.66.run$ sudo ./NVIDIA-Linux-x86_64-384.66.run
安装过程中,选择accept,其余默认选择yes,安装DKMS内核模块和32位兼容库。
7 重新启动:
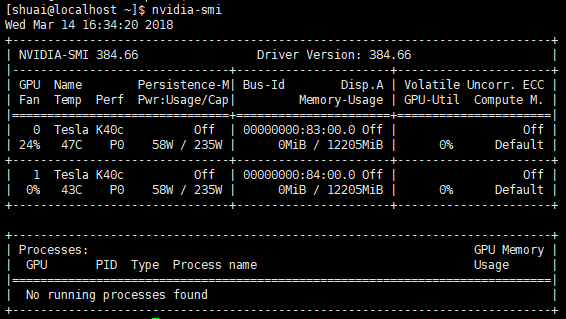
$ sudo reboot8 验证,结果如下图则成功:
$ nvidia-smi备注:
通过该方式安装nvidia驱动,卸载方式如下:$ sudo ./NVIDIA-Linux-x86_64-384.66.run --uninstall
选择yes,出现error不影响,继续执行。卸载完后重启。
安装cuda和cuDNN:
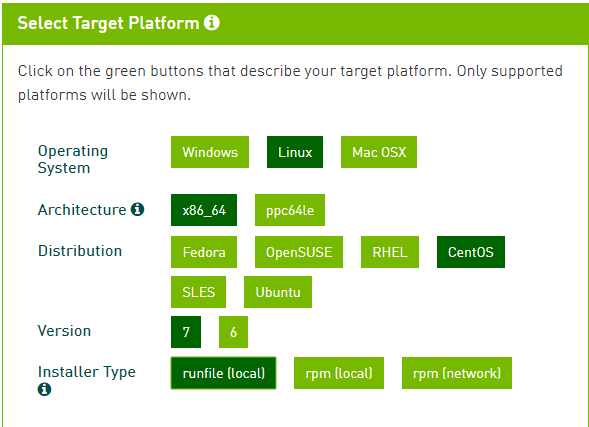
1下载cuda Toolkit安装包:
https://developer.nvidia.com/cuda-80-ga2-download-archive选择runfile(local),如下:
链接:
https://developer.nvidia.com/compute/cuda/8.0/Prod2/local_installers/cuda_8.0.61_375.26_linux-run
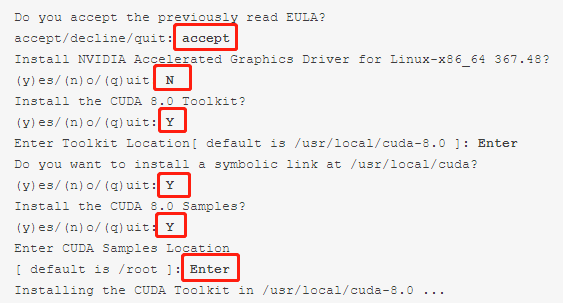
2安装指令如下:
$ sudo sh cuda_8.0.61_375.26_linux-run出现readme,按q退出。安装选项如下,注意不要安装nvidia驱动!!!
3下载cuDNN安装包,需要注册(这里选用cudnn-8.0-linux-x64-v6.0版,下载的后缀名可能不一样,直接改成.tgz就可以):
https://developer.nvidia.com/cudnn4 解压生成cuda文件夹:
$ tar -zxvf cudnn-8.0-linux-x64-v6.0.tgz5 拷贝文件到CUDA安装目录:
$ sudo cp cuda/include/cudnn.h/usr/local/cuda/include$ sudo cp cuda/lib64/libcudnn*/usr/local/cuda/lib64
$ sudo chmod a+r/usr/local/cuda/include/cudnn.h /usr/local/cuda/lib64/libcudnn*
6 配置环境变量:
$ vim ~/.bashrc添加以下内容:
export CUDA_HOME=/usr/local/cuda-8.0
export PATH=/usr/local/cuda-8.0/bin:$PATH
export LD_LIBRARY_PATH=/usr/local/cuda-8.0/lib64:$LD_LIBRARY_PATH
export LD_LIBRARY_PATH=/usr/local/cuda-8.0/lib:$LD_LIBRARY_PATH
7执行以下指令:
$ source ~/.bashrc8 验证,结果显示PASS则cuda安装成功:
$ cd~/NVIDIA_CUDA-8.0_Samples/1_Utilities/deviceQuery/$ make
$ cd ~/NVIDIA_CUDA-8.0_Samples
$ ./bin/x86_64/linux/release/deviceQuery
备注:
1 若提示以下错误:
“error:unable tofind the kernel source tree for the currently running kernel. please make sureyou have installed the kernel source files for your kernel and that htey areproperly configured; on red hat linux system, for example, be sure you have the'kernel-source' or 'kernel-devel' RPM installed. if you know the correct kernelsource files are installed ,you may specify the kernel source path with the'--kernel-source-path' command line option.“执行以下指令安装kernel-devel包:
$ sudo yum install kernel-devel-$(uname -r)
2 报错“Error: Package:1:nvidia-kmod-375.51-2.el7.x86_64 (cuda) Requires: dkms“
安装dkms依赖:$ sudo yum install epel-release
$ sudo yum install dkms
3 卸载cuda:
$ sudo sh cuda_8.0.61_375.26_linux-run--uninstall –silent$ sudo rm -rf /usr/local/cuda*
验证:
$ nvcc --version
如果提示:bash: nvcc: command not found...则卸载成功。
配置Kubernetes:
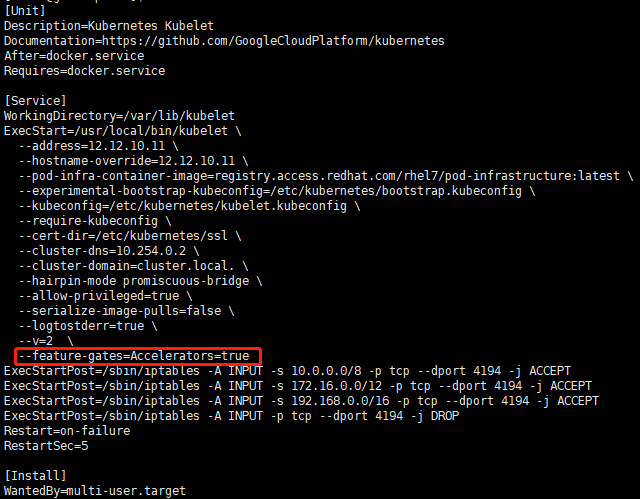
1 开启Accelerators:
在kubernetes的kube-apiserver.service、kube-controller-manager.service、kube-scheduler.service、kubelet.service、kube-proxy.service服务配置文件(重点是kubelet.service文件,node节点只需要重启kubelet和kube-proxy服务)中加入“--feature-gates=Accelerators=true”,配置文件类似下图:2 Kubernetes服务重启:
重启以上各服务(只需要重启本节点的服务即可):$ sudo systemctl stop kube
4000
let kube-proxy kube-apiserver kube-controller-manager kube-scheduler
$ sudo systemctl start kubelet kube-proxy kube-apiserver kube-controller-manager kube-scheduler
$ sudo systemctl status kubelet kube-proxy kube-apiserver kube-controller-manager kube-scheduler
若以上各服务的status均为active(running),则启动成功。
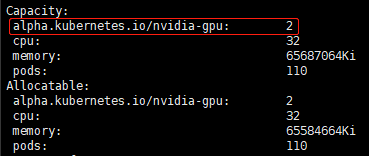
3 查看该节点(12.12.10.14)的资源是否包含GPU:
$ kubectl describe node 12.12.10.14如上图,Capacity中的alpha.kubernetes.io/nvidia-gpu不为0说明Kubernetes发现了该节点上的GPU资源(若alpha.kubernetes.io/nvidia-gpu为0,可以尝试重装nvidia驱动或者再次重启kubelet服务。一般节点重启后会找不到GPU 资源,先运行一下GPU再重启kubelet服务就好,原因没有搞清楚,但实践证明是起作用的。。。)。
4 配置yaml文件:
apiVersion: v1
kind: Pod
metadata:
name: gpu-pod
spec:
containers:
- name: gpu-container
image: tensorflow/tensorflow:1.4.1-gpu
env:
- name: LD_LIBRARY_PATH
value: /usr/local/nvidia/lib64:/usr/local/cuda-8.0/lib64
resources:
limits:
alpha.kubernetes.io/nvidia-gpu: 1
volumeMounts:
- mountPath: /data
name: data
- mountPath: /usr/local/nvidia/lib64
name: nvidia
- mountPath: /usr/local/cuda-8.0/lib64/libcuda.so
name: libcuda-so
- mountPath: /usr/local/cuda-8.0/lib64/libcuda.so.1
name: libcuda-so-1
- mountPath: /usr/local/cuda-8.0/lib64/libcuda.so.384.66
name: libcuda-so-384-66
volumes:
- name: data
hostPath:
path: /home/shuai/data
- name: nvidia
hostPath:
path: /usr/local/nvidia
- name: libcuda-so
hostPath:
path: /usr/lib64/libcuda.so
- name: libcuda-so-1
hostPath:
path: /usr/lib64/libcuda.so.1
- name: libcuda-so-384-66
hostPath:
path: /usr/lib64/libcuda.so.384.66
如果使用私有docker-registry,需要在k8s中添加secret:
$ rm -rf ~/.docker/config.json
$ kubectl create secret docker-registry docker-hosted --docker-server=12.12.10.13:1234 --docker-username=admin --docker-password=admin123 --docker-email=test@test.com
其中,docker-hosted为secret名字,docker-server为私有docker-registry的ip+port。然后在yaml文件中加入secret。
imagePullSecrets:
- name: docker-hosted
如果有多个不同docker-registry,可以一起都添加进来,imagePullSecrets和container并列。
a) 建议使用1.4.1-gpu版本的tensorflow镜像,latest-gpu使用cuda 9.0,会有很多不兼容;
b) GPU资源相关部分为alpha.kubernetes.io/nvidia-gpu;
c) 除此之外,还需要指定容器内的LD_LIBRARY_PATH 环境变量的值,否则默认镜像内的LD_LIBRARY_PATH可能不包含挂载点,导致程序找不到libcuda.so文件
d) 还有volumes部分对应的是宿主机上的路径,volumeMounts部分对应容器内的挂载点。其中,data文件夹用于存放程序代码以及训练数据,cuda的so文件和nvidia的so文件在宿主机上的具体路径要根据实际情况而定。这里由于cuda只需要用到libcuda,因此只挂载单个文件。需要用到的nvidia的so文件不太清楚有哪些,所以全部挂载进去。
$ sudo mkdir /usr/local/nvidia
$ sudo cp /usr/lib64/*nvidia* /usr/local/nvidia/
$ sudo cp -r /usr/lib64/nvidia /usr/local/nvidia/
需要注意的是,前面安装驱动的方法会把so文件装到/usr/lib64文件夹内,但是直接挂载/usr/lib64整个文件夹会导致libc冲突,建议如果直接挂在文件夹的话,将相关so文件复制到其他新建文件夹在进行挂载。
5 创建pod:
在任意节点上执行:$ kubectl create -f tf-gpu.yaml
当有多个节点具有GPU资源时,不一定在执行命令的节点上运行容器,可以通过dashboard查看。
6 进入容器:
在容器运行的节点上执行:$ docker ps
可以看到容器的CONTAINER ID,如dba2998c91ab
然后执行以下指令进入容器,其中dba是CONTAINER ID的前3位:
$ docker exec -it dba bash
7 运行tensorflow程序:
以data文件夹中的mnist.py程序(程序内容见附录)为例:root@gpu-pod:/notebook# python /data/mnist.py
若无报错,且tensorlfow输出内容包括与以下内容相似的语句则证明容器内可以运行GPU版的tensorflow了。
参考资料:
1.http://wap.sciencenet.cn/blogview.aspx?id=10036252.https://community.mellanox.com/docs/DOC-2911#jive_content_id_Required_Software
3.https://kubernetes.io/cn/docs/tasks/manage-gpus/scheduling-gpus/
4.https://zhuanlan.zhihu.com/p/27376696
附录:
mnist.pyfrom __future__ import absolute_importfrom __future__ import division
from __future__ import print_function
import argparse
import sys
import tempfile
from tensorflow.examples.tutorials.mnist import input_data
import tensorflow as tf
FLAGS = None
def deepnn(x):
"""deepnn builds the graph for a deep net for classifying digits.
Args:
x: an input tensor with the dimensions (N_examples, 784), where 784 is the
number of pixels in a standard MNIST image.
Returns:
A tuple (y, keep_prob). y is a tensor of shape (N_examples, 10), with values
equal to the logits of classifying the digit into one of 10 classes (the
digits 0-9). keep_prob is a scalar placeholder for the probability of
dropout.
"""
# Reshape to use within a convolutional neural net.
# Last dimension is for "features" - there is only one here, since images are
# grayscale -- it would be 3 for an RGB image, 4 for RGBA, etc.
with tf.name_scope('reshape'):
x_image = tf.reshape(x, [-1, 28, 28, 1])
# First convolutional layer - maps one grayscale image to 32 feature maps.
with tf.name_scope('conv1'):
W_conv1 = weight_variable([5, 5, 1, 32])
b_conv1 = bias_variable([32])
h_conv1 = tf.nn.relu(conv2d(x_image, W_conv1) + b_conv1)
# Pooling layer - downsamples by 2X.
with tf.name_scope('pool1'):
h_pool1 = max_pool_2x2(h_conv1)
# Second convolutional layer -- maps 32 feature maps to 64.
with tf.name_scope('conv2'):
W_conv2 = weight_variable([5, 5, 32, 64])
b_conv2 = bias_variable([64])
h_conv2 = tf.nn.relu(conv2d(h_pool1, W_conv2) + b_conv2)
# Second pooling layer.
with tf.name_scope('pool2'):
h_pool2 = max_pool_2x2(h_conv2)
# Fully connected layer 1 -- after 2 round of downsampling, our 28x28 image
# is down to 7x7x64 feature maps -- maps this to 1024 features.
with tf.name_scope('fc1'):
W_fc1 = weight_variable([7 * 7 * 64, 1024])
b_fc1 = bias_variable([1024])
h_pool2_flat = tf.reshape(h_pool2, [-1, 7 * 7 * 64])
h_fc1 = tf.nn.relu(tf.matmul(h_pool2_flat, W_fc1) + b_fc1)
# Dropout - controls the complexity of the model, prevents co-adaptation of
# features.
with tf.name_scope('dropout'):
keep_prob = tf.placeholder(tf.float32)
h_fc1_drop = tf.nn.dropout(h_fc1, keep_prob)
# Map the 1024 features to 10 classes, one for each digit
with tf.name_scope('fc2'):
W_fc2 = weight_variable([1024, 10])
b_fc2 = bias_variable([10])
y_conv = tf.matmul(h_fc1_drop, W_fc2) + b_fc2
return y_conv, keep_prob
def conv2d(x, W):
"""conv2d returns a 2d convolution layer with full stride."""
return tf.nn.conv2d(x, W, strides=[1, 1, 1, 1], padding='SAME')
def max_pool_2x2(x):
"""max_pool_2x2 downsamples a feature map by 2X."""
return tf.nn.max_pool(x, ksize=[1, 2, 2, 1],
strides=[1, 2, 2, 1], padding='SAME')
def weight_variable(shape):
"""weight_variable generates a weight variable of a given shape."""
initial = tf.truncated_normal(shape, stddev=0.1)
return tf.Variable(initial)
def bias_variable(shape):
"""bias_variable generates a bias variable of a given shape."""
initial = tf.constant(0.1, shape=shape)
return tf.Variable(initial)
def main(_):
# Import data
mnist = input_data.read_data_sets(FLAGS.data_dir)
# Create the model
x = tf.placeholder(tf.float32, [None, 784])
# Define loss and optimizer
y_ = tf.placeholder(tf.int64, [None])
# Build the graph for the deep net
y_conv, keep_prob = deepnn(x)
with tf.name_scope('loss'):
cross_entropy = tf.losses.sparse_softmax_cross_entropy(
labels=y_, logits=y_conv)
cross_entropy = tf.reduce_mean(cross_entropy)
with tf.name_scope('adam_optimizer'):
train_step = tf.train.AdamOptimizer(1e-4).minimize(cross_entropy)
with tf.name_scope('accuracy'):
correct_prediction = tf.equal(tf.argmax(y_conv, 1), y_)
correct_prediction = tf.cast(correct_prediction, tf.float32)
accuracy = tf.reduce_mean(correct_prediction)
graph_location = tempfile.mkdtemp()
print('Saving graph to: %s' % graph_location)
train_writer = tf.summary.FileWriter(graph_location)
train_writer.add_graph(tf.get_default_graph())
with tf.Session() as sess:
sess.run(tf.global_variables_initializer())
for i in range(20000):
batch = mnist.train.next_batch(50)
if i % 100 == 0:
train_accuracy = accuracy.eval(feed_dict={
x: batch[0], y_: batch[1], keep_prob: 1.0})
print('step %d, training accuracy %g' % (i, train_accuracy))
train_step.run(feed_dict={x: batch[0], y_: batch[1], keep_prob: 0.5})
print('test accuracy %g' % accuracy.eval(feed_dict={
x: mnist.test.images, y_: mnist.test.labels, keep_prob: 1.0}))
if __name__ == '__main__':
parser = argparse.ArgumentParser()
parser.add_argument('--data_dir', type=str,
default='/data/MNIST_data',
help='Directory for storing input data')
FLAGS, unparsed = parser.parse_known_args()
tf.app.run(main=main, argv=[sys.argv[0]] + unparsed)

相关文章推荐
- 在阿里云上轻松部署Kubernetes GPU集群,遇见TensorFlow
- Ubuntu16.04配置tensorflow利用GPU加速教程
- tensorflow基于GPU环境配置
- Hadoop基础教程-第5章 YARN:资源调度平台(5.3 YARN集群配置)(草稿)
- TensorFlow-GPU环境配置之二——CUDA环境配置
- tensorflow中使用tf.ConfigProto()配置Session运行参数&&GPU设备指定
- Caffe-SSD(single-shot-multibox)在Windows平台下的配置(CPU和GPU)与训练记录
- 深度学习- win10+Anoconda3-2.4.0+cuda8.0+TensorFlow-GPU+Pycharm2016测试Demo-GPU加速环境配置
- Linux常用命令(实用,配置tensorflow环境使用服务器GPU预备知识)
- ubuntu 配置 tensorflow-gpu
- Ubuntu16.04 配置tensorflow1.0 gpu版本
- win7配置tensorflow-gpu版本出现问题解决
- 10分钟快速搭建Kubernetes容器集群平台
- Ubuntu14.04下支持GTX1070 GPU加速Tensorflow环境配置
- tensorflow GPU环境配置
- 深度学习篇——Tensorflow-GPU配置
- Ubuntu下kubernetes集群配置
- 学习笔记(三)ubuntu16.04下Anaconda及tensorflowGPU版本的安装配置
- tensorflow_gpu(cpu)+keras for windows 配置过程