linux下安装nginx 源码包安装/yum安装
2018-03-20 09:34
239 查看
什么是Nginx?Nginx ("engine x") 是一个高性能的 HTTP 和 反向代理 服务器,也是一个 IMAP/POP3/SMTP 代理服务器,在高连接并发的情况下Nginx 是 Apache 服务器不错的替代品.其特点是占有内存少,并发能力强,事实上nginx的并发能力确实在同类型的网页服务器中表现较好.目前中国大陆使用nginx网站用户有:新浪、网易、 腾讯,另外知名的微网志Plurk也使用nginx。
Nginx 作为 负载均衡 服务器:
Nginx 既可以在内部直接支持 Rails 和 PHP 程序对外进行服务,也可以支持作为 HTTP 代理服务器对外进行服务。 Nginx 采用 C 进行编写, 不论是系统资源开销还是 CPU 使用效率都比 Perlbal 要好很多。作为邮件代理服务器:
Nginx 同时也是一个非常优秀的邮件代理服务器(最早开发这个产品的目的之一也是作为邮件代理服务器), Last.fm 描述了成功并且美妙的使用经验。Nginx 是一个安装非常简单,配置文件非常简洁(还能够支持perl语法), Bugs非常少的服务器: Nginx 启动特别容易,并且几乎可以做到 7*24 不间断运行,即使运行数个月也不需要重新启动。 你还能够不间断服务的情况下进行软件版本的升级。
Nginx的安装
=================================== 源码包安装 ===================================
模块依赖性Nginx需要依赖下面3个包
1. gzip 模块需要 zlib 库 ( 下载: http://www.zlib.net/ )
2. rewrite 模块需要 pcre 库 ( 下载: http://www.pcre.org/ )
3. ssl 功能需要 openssl 库 ( 下载: http://www.openssl.org/ )
Nginx包下载: http://nginx.org/en/download.html
依赖包安装顺序依次为:openssl、zlib、pcre, 然后安装Nginx包.
第一步: 下载安装所需包
nginx-1.10.0.tar.gz
openssl-fips-2.0.12.tar.gz
pcre2-10.20.tar.gz
zlib-1.2.8.tar.gz
第二步:依次安装openssl-fips-2.0.12.tar.gz, zlib-1.2.8.tar.gz, pcre2-10.20.tar.gz,
nginx-1.10.0.tar.gz
1.安装openssl-fips-2.0.12.tar.gz
[root@localhost mrms]# tar -zxvf openssl-fips-2.0.12.tar.gz
[root@localhost mrms]# cd openssl-fips-2.0.12
[root@localhost openssl-fips-2.0.12]# ./config
[root@localhost openssl-fips-2.0.12]# make(如果报错提示没装GCC的话,需要先安装GCC[root@localhost openssl-fips-2.0.12]# yum -y install gcc[root@localhost openssl-fips-2.0.12]# yum -y install gcc-c++[root@localhost openssl-fips-2.0.12]# yum install make
)
[root@localhost openssl-fips-2.0.12]# make
[root@localhost openssl-fips-2.0.12]# make install
2.安装 zlib-1.2.8.tar.gz
[root@localhost mrms]# tar -xf zlib-1.2.8.tar.gz
[root@localhost mrms]# cd zlib-1.2.8
[root@localhost zlib-1.2.8]# ./configure
[root@localhost zlib-1.2.8]# make
[root@localhost zlib-1.2.8]# make install
3.安装 pcre2-10.20.tar.gz
[root@localhost mrms]# tar -zxvf pcre2-10.20.tar.gz
[root@localhost mrms]# cd pcre2-10.20
[root@localhost pcre2-10.20]# ./configure
[root@localhost pcre2-10.20]# make
[root@localhost pcre2-10.20]# make install
[root@localhost pcre2-10.20]# yum -y install pcre-devel
4.安装 nginx-1.10.0.tar.gz
[root@localhost mrms]# tar -zxvf nginx-1.10.0.tar.gz
[root@localhost mrms]# cd nginx-1.10.0
[root@localhost nginx-1.10.0]# ./configure --with-pcre=../pcre2-10.20 --with-zlib=../zlib-1.2.8 --with-openssl=../openssl-fips-2.0.12
(如果pcre安装报错,那就把第一段 with 去除)
[root@localhost nginx-1.10.0]# make
[root@localhost nginx-1.10.0]# make install
至此Nginx的安装完成!
第三步:检测是否安装成功
[root@localhost nginx-1.10.0]# cd /usr/local/nginx/sbin
[root@localhost sbin]# ./nginx -t
出现如下所示提示,表示安装成功

=============== yum安装 ========================================
yum search vsftpd
yum -y install nginx.x86_64
修改端口号
修改 nginx.conf 文件实现。
在 Linux 上该文件的路径为 /usr/local/nginx/conf/nginx.conf,Windows 下 安装目录\conf\nginx.conf。
yum路径为: /etc/nginx/conf.d/nginx.conf
修改默认端口 80 为 8983
修改 访问路径 如果url为 192.168.1.1:8983/fileserver 则相当于访问 192.168.1.1:8983/usr/webServer/fileserver
url中的 / 相当于 /usr/webServer

启动nginx
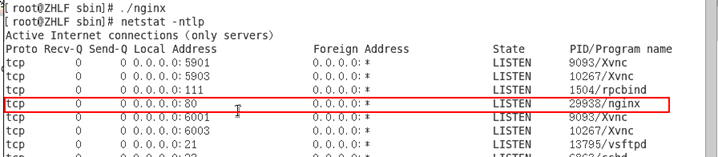
[root@localhost sbin]# ./nginx
yum 安装 直接输入命令 service nginx restart
查看端口
[root@localhost sbin]# netstat -ntlp
结果如下
更改配置重启nginx
kill -HUP 主进程号或进程号文件路径或者使用cd /usr/local/nginx/sbin./nginx -s reload判断配置文件是否正确 nginx -t -c /usr/local/nginx/conf/nginx.conf或者cd /usr/local/nginx/sbin./nginx -t
关闭nginx
查询nginx主进程号
ps -ef | grep nginx
从容停止 kill -QUIT 主进程号
快速停止 kill -TERM 主进程号
强制停止 kill -9 nginx
Nginx 作为 负载均衡 服务器:
Nginx 既可以在内部直接支持 Rails 和 PHP 程序对外进行服务,也可以支持作为 HTTP 代理服务器对外进行服务。 Nginx 采用 C 进行编写, 不论是系统资源开销还是 CPU 使用效率都比 Perlbal 要好很多。作为邮件代理服务器:
Nginx 同时也是一个非常优秀的邮件代理服务器(最早开发这个产品的目的之一也是作为邮件代理服务器), Last.fm 描述了成功并且美妙的使用经验。Nginx 是一个安装非常简单,配置文件非常简洁(还能够支持perl语法), Bugs非常少的服务器: Nginx 启动特别容易,并且几乎可以做到 7*24 不间断运行,即使运行数个月也不需要重新启动。 你还能够不间断服务的情况下进行软件版本的升级。
Nginx的安装
=================================== 源码包安装 ===================================
模块依赖性Nginx需要依赖下面3个包
1. gzip 模块需要 zlib 库 ( 下载: http://www.zlib.net/ )
2. rewrite 模块需要 pcre 库 ( 下载: http://www.pcre.org/ )
3. ssl 功能需要 openssl 库 ( 下载: http://www.openssl.org/ )
Nginx包下载: http://nginx.org/en/download.html
依赖包安装顺序依次为:openssl、zlib、pcre, 然后安装Nginx包.
第一步: 下载安装所需包
nginx-1.10.0.tar.gz
openssl-fips-2.0.12.tar.gz
pcre2-10.20.tar.gz
zlib-1.2.8.tar.gz
第二步:依次安装openssl-fips-2.0.12.tar.gz, zlib-1.2.8.tar.gz, pcre2-10.20.tar.gz,
nginx-1.10.0.tar.gz
1.安装openssl-fips-2.0.12.tar.gz
[root@localhost mrms]# tar -zxvf openssl-fips-2.0.12.tar.gz
[root@localhost mrms]# cd openssl-fips-2.0.12
[root@localhost openssl-fips-2.0.12]# ./config
[root@localhost openssl-fips-2.0.12]# make(如果报错提示没装GCC的话,需要先安装GCC[root@localhost openssl-fips-2.0.12]# yum -y install gcc[root@localhost openssl-fips-2.0.12]# yum -y install gcc-c++[root@localhost openssl-fips-2.0.12]# yum install make
)
[root@localhost openssl-fips-2.0.12]# make
[root@localhost openssl-fips-2.0.12]# make install
2.安装 zlib-1.2.8.tar.gz
[root@localhost mrms]# tar -xf zlib-1.2.8.tar.gz
[root@localhost mrms]# cd zlib-1.2.8
[root@localhost zlib-1.2.8]# ./configure
[root@localhost zlib-1.2.8]# make
[root@localhost zlib-1.2.8]# make install
3.安装 pcre2-10.20.tar.gz
[root@localhost mrms]# tar -zxvf pcre2-10.20.tar.gz
[root@localhost mrms]# cd pcre2-10.20
[root@localhost pcre2-10.20]# ./configure
[root@localhost pcre2-10.20]# make
[root@localhost pcre2-10.20]# make install
[root@localhost pcre2-10.20]# yum -y install pcre-devel
4.安装 nginx-1.10.0.tar.gz
[root@localhost mrms]# tar -zxvf nginx-1.10.0.tar.gz
[root@localhost mrms]# cd nginx-1.10.0
[root@localhost nginx-1.10.0]# ./configure --with-pcre=../pcre2-10.20 --with-zlib=../zlib-1.2.8 --with-openssl=../openssl-fips-2.0.12
(如果pcre安装报错,那就把第一段 with 去除)
[root@localhost nginx-1.10.0]# make
[root@localhost nginx-1.10.0]# make install
至此Nginx的安装完成!
第三步:检测是否安装成功
[root@localhost nginx-1.10.0]# cd /usr/local/nginx/sbin
[root@localhost sbin]# ./nginx -t
出现如下所示提示,表示安装成功
=============== yum安装 ========================================
yum search vsftpd
yum -y install nginx.x86_64
修改端口号
修改 nginx.conf 文件实现。
在 Linux 上该文件的路径为 /usr/local/nginx/conf/nginx.conf,Windows 下 安装目录\conf\nginx.conf。
yum路径为: /etc/nginx/conf.d/nginx.conf
修改默认端口 80 为 8983
修改 访问路径 如果url为 192.168.1.1:8983/fileserver 则相当于访问 192.168.1.1:8983/usr/webServer/fileserver
url中的 / 相当于 /usr/webServer
启动nginx
[root@localhost sbin]# ./nginx
yum 安装 直接输入命令 service nginx restart
查看端口
[root@localhost sbin]# netstat -ntlp
结果如下
更改配置重启nginx
kill -HUP 主进程号或进程号文件路径或者使用cd /usr/local/nginx/sbin./nginx -s reload判断配置文件是否正确 nginx -t -c /usr/local/nginx/conf/nginx.conf或者cd /usr/local/nginx/sbin./nginx -t
关闭nginx
查询nginx主进程号
ps -ef | grep nginx
从容停止 kill -QUIT 主进程号
快速停止 kill -TERM 主进程号
强制停止 kill -9 nginx

相关文章推荐
- linux 源码安装 Nginx
- Linux下源码安装nginx服务器以及部分配置
- 玩转linux主机--nginx源码安装
- linux中nginx的安装(源码安装)及简单应用(二)
- Linux下nginx源码包安装
- Linux+Nginx+MySql+Php既LNMP源码安装
- Linux下源码安装nginx-1.9.11
- linux 上源码安装Nginx (concat模块) js、css多个请求合并为一个请求
- linux下软件的源码编译安装(以nginx源码安装为实例)
- Linux下最新版php5.6源码安装与apache/nginx集成教程
- Linux 源码安装nginx
- Linux下源码安装Nginx的步骤
- Linux源码安装Nginx0.8.54
- linux下源码安装nginx
- Linux+Nginx+MySql+Php既LNMP源码安装
- linux的源码安装步骤(以安装nginx为例)
- 图解Linux下源码安装PHP7.0.9 +Nginx
- Linux服务器架设篇之(二)–源码安装Web服务器Nginx
- wdOS系统下源码编译安装LNAMP(linux+nginx+apache+mysql+php)
- Linux下Nginx源码安装