Linux下源码安装nginx服务器以及部分配置
2016-05-20 00:03
886 查看
Nginx ("engine x") 是一个高性能的HTTP和反向代理服务器,也是一个IMAP/POP3/SMTP服务器。Nginx是由Igor Sysoev为俄罗斯访问量第二的Rambler.ru站点开发的,第一个公开版本0.1.0发布于2004年10月4日。其将源代码以类BSD许可证的形式发布,因它的稳定性、丰富的功能集、示例配置文件和低系统资源的消耗而闻名。2011年6月1日,nginx 1.0.4发布。
Nginx是一款轻量级的Web 服务器/反向代理服务器及电子邮件(IMAP/POP3)代理服务器,并在一个BSD-like 协议下发行。由俄罗斯的程序设计师Igor Sysoev所开发,供俄国大型的入口网站及搜索引擎Rambler(俄文:Рамблер)使用。其特点是占有内存少,并发能力强,事实上nginx的并发能力确实在同类型的网页服务器中表现较好,中国大陆使用nginx网站用户有:京东、新浪、网易、腾讯、淘宝等。
一、这里为大家演示nginx的源码安装过程:
首先是要去网上download安装所需要的软件包,这里默认为大家yum源已经配好。
1、#download nginx-1.8.1.tar.gz &&tar -zxf nginx-1.8.1.tar.gz #下载并解压软件包
2、# cd nginx-1.8.1/src/core/ #修改配置文件,这里是将版本号进行了自定义
修改配置文件nginx-1.8.1/src/core/nginx.h
#define nginx_version 1008001
#define NGINX_VERSION "1.8.1"
#define NGINX_VER "nginx/" NGINX_VERSION
修改如下所示:
#define nginx_version 1008001
#define NGINX_VERSION "1.8.1"
#define NGINX_VER "nginx/"
3、#cd auto/cc/
修改配置文件:vimauto/cc/gcc的179行文件
178 # debug
179 CFLAGS="$CFLAGS -g"
修改如下所示:
178 # debug
179 #CFLAGS="$CFLAGS -g" #将这一行注释掉
4、执行configure文件
[root@pt2 nginx-1.8.1]# ./configure--prefix=/usr/local/lnmp/nginx --with-http_ssl_module--with-http_stub_status_module #进行编译并制定目录与参数
# ./configure --prefix=/usr/local/lnmp/nginx--with-http_ssl_module --with-http_stub_status_module --add-module=/root/nginx-sticky-module-1.0 #需要sticky时加上这个参数,指向文件存放的位置
5、#make && make install
二、安装完成好以后,我们进行相关的配置:
1、首先把nginx的启动脚本路径加入到环境变量中,
# vim ~/.bash_profile
PATH:/usr/bin:/usr/sbin:/bin:/usr/local/lnmp/nginx/sbin #在这句后面加入nginx的sbin路径
# source ~/.bash_profile #把更改的文件刷新一遍就可以使用了
[root@pt1 conf]# nginx #开启nginx服务,默认端口为80,注意不要和httpd服务冲突
测试结果可以看到信息:

编辑/etc/security/limits.conf文件,增加条目 如下:
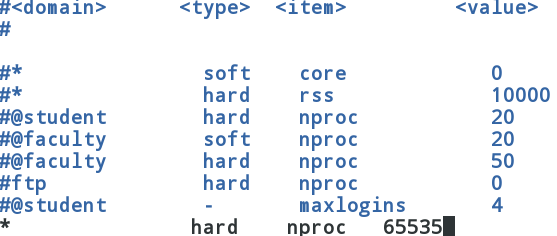
编辑nginx配置文件nginx.conf
查看系统所允许的最大数

下面是压测结果:
[root@pt1 html]# ab -n 10000 -c 1000http://172.25.9.109/index.html
This is ApacheBench, Version 2.3<$Revision: 655654 $>
Copyright 1996 Adam Twiss, Zeus TechnologyLtd, http://www.zeustech.net/ Licensed to The Apache Software Foundation,http://www.apache.org/
Benchmarking 172.25.9.109 (be patient)
Completed 1000 requests
Completed 2000 requests
Completed 3000 requests
Completed 4000 requests
Completed 5000 requests
Completed 6000 requests
Completed 7000 requests
Completed 8000 requests
Completed 9000 requests
Completed 10000 requests
Finished 10000 requests
Server Software: nginx
Server Hostname: 172.25.9.109
Server Port: 80
Document Path: /index.html
Document Length: 56 bytes
Concurrency Level: 1000
Time taken for tests: 0.961 seconds
Complete requests: 10000
Failed requests: 985
(Connect: 0, Receive: 0, Length: 985, Exceptions: 0)
Write errors: 0
Non-2xx responses: 985
Total transferred: 2878845 bytes
HTML transferred: 691802 bytes
Requests per second: 10405.95 [#/sec] (mean)
Time per request: 96.099 [ms] (mean)
Time per request: 0.096 [ms] (mean, across all concurrentrequests)
Transfer rate: 2925.50 [Kbytes/sec] received
Connection Times (ms)
min mean[+/-sd] median max
Connect: 0 7 7.5 5 36
Processing: 2 11 9.9 8 216
Waiting: 1 9 9.8 6 215
Total: 6 18 15.8 12 229
Percentage of the requests served within acertain time (ms)
50% 12
66% 14
75% 16
80% 17
90% 56
95% 62
98% 63
99% 64
100% 229 (longest request)
编辑配置文件nginx.conf
server {
listen 443 ssl; #监听端口,这里为https的请求
server_name localhost;
ssl_certificate cert.pem; #证书
ssl_certificate_key cert.pem; #钥匙
ssl_session_cache shared:SSL:1m;
ssl_session_timeout 5m;
ssl_ciphers HIGH:!aNULL:!MD5;
ssl_prefer_server_ciphers on;
location / {
root html;
index index.html index.htm; #默认发布页文件
}
生成自定义证书,并把它移动到/usr/local/lnmp/nginx/conf/下:
[root@pt1 conf]# cd /etc/pki/tls/certs/
[root@pt1 certs]# make cert.pem
umask 77 ; \
PEM1=`/bin/mktemp/tmp/openssl.XXXXXX` ; \
PEM2=`/bin/mktemp/tmp/openssl.XXXXXX` ; \
/usr/bin/opensslreq -utf8 -newkey rsa:2048 -keyout $PEM1 -nodes -x509 -days 365 -out $PEM2-set_serial 0 ; \
cat$PEM1 > cert.pem ; \
echo"" >> cert.pem ; \
cat$PEM2 >> cert.pem ; \
rm-f $PEM1 $PEM2
Generating a 2048 bit RSA private key
....+++
..............................+++
writing new private key to'/tmp/openssl.6aOmZy'
-----
You are about to be asked to enterinformation that will be incorporated
into your certificate request.
What you are about to enter is what iscalled a Distinguished Name or a DN.
There are quite a few fields but you canleave some blank
For some fields there will be a defaultvalue,
If you enter '.', the field will be leftblank.
-----
Country Name (2 letter code) [XX]:CN #国家
State or Province Name (full name)[]:Shaanxi #省份
Locality Name (eg, city) [DefaultCity]:xi'an #城市
Organization Name (eg, company) [DefaultCompany Ltd]:server #公司
Organizational Unit Name (eg, section)[]:server1 #组织
Common Name (eg, your name or your server'shostname) []:server1 #个人名字
Email Address []:server@163.com #邮箱
[root@pt1 certs]# ls
ca-bundle.crt cert.pem Makefile
ca-bundle.trust.crt make-dummy-cert renew-dummy-cert
[root@pt1 certs]# mv cert.pem/usr/local/lnmp/nginx/conf/ #将生成的文件移动到nginx的配置文件目录下
[root@pt1 conf]# nginx -t #检查nginx配置文件语法是否有错
nginx: the configuration file/usr/local/lnmp/nginx/conf/nginx.conf syntax is ok
nginx: configuration file/usr/local/lnmp/nginx/conf/nginx.conf test is successful
[root@pt1 conf]# nginx -s reload #重载nginx
编辑配置文件nginx.conf
server {
listen 80; #监听80端口
server_name wwwNaN.com alias pt.com; #以wwwNaN.com或pt.com来访问的去下面 /virualhost/wwwNaN.com目录查找
location / {
root /virualhost/wwwNaN.com;
index index.html index.htm;
}
}
server {
listen 80; #监听80端口
server_name wwwNaN1.com; #以wwwNaN1.com来访问的去下面 /virualhost/wwwNaN1.com目录查找
location / {
root /virualhost/wwwNaN1.com;
index index.html index.htm;
}
}
[root@pt1 conf]# nginx -t #检查nginx配置文件语法是否有错nginx: the configuration file/usr/local/lnmp/nginx/conf/nginx.conf syntax is oknginx: configuration file/usr/local/lnmp/nginx/conf/nginx.conf test is successful[root@pt1 conf]# nginx -s reload #重载nginx
[root@pt1 conf]# mkdir -p/virualhost/wwwNaN.com #创建虚拟主机目录
[root@pt1 conf]# mkdir -p/virualhost/wwwNaN1.com #创建虚拟主机目录
[root@pt1 conf]# touch /virualhost/wwwNaN.com/index.html
[root@pt1 conf]# touch /virualhost/wwwNaN1.com/index.html
[root@pt1 conf]# echo wwwNaN.com >/virualhost/wwwNaN.com/index.html #测试页文件
[root@pt1 conf]# echo wwwNaN1.com >/virualhost/wwwNaN1.com/index.html #测试页文件
本文出自 “ptallrights” 博客,请务必保留此出处http://ptallrights.blog.51cto.com/11151122/1775242
Nginx是一款轻量级的Web 服务器/反向代理服务器及电子邮件(IMAP/POP3)代理服务器,并在一个BSD-like 协议下发行。由俄罗斯的程序设计师Igor Sysoev所开发,供俄国大型的入口网站及搜索引擎Rambler(俄文:Рамблер)使用。其特点是占有内存少,并发能力强,事实上nginx的并发能力确实在同类型的网页服务器中表现较好,中国大陆使用nginx网站用户有:京东、新浪、网易、腾讯、淘宝等。
一、这里为大家演示nginx的源码安装过程:
首先是要去网上download安装所需要的软件包,这里默认为大家yum源已经配好。
1、#download nginx-1.8.1.tar.gz &&tar -zxf nginx-1.8.1.tar.gz #下载并解压软件包
2、# cd nginx-1.8.1/src/core/ #修改配置文件,这里是将版本号进行了自定义
修改配置文件nginx-1.8.1/src/core/nginx.h
#define nginx_version 1008001
#define NGINX_VERSION "1.8.1"
#define NGINX_VER "nginx/" NGINX_VERSION
修改如下所示:
#define nginx_version 1008001
#define NGINX_VERSION "1.8.1"
#define NGINX_VER "nginx/"
3、#cd auto/cc/
修改配置文件:vimauto/cc/gcc的179行文件
178 # debug
179 CFLAGS="$CFLAGS -g"
修改如下所示:
178 # debug
179 #CFLAGS="$CFLAGS -g" #将这一行注释掉
4、执行configure文件
[root@pt2 nginx-1.8.1]# ./configure--prefix=/usr/local/lnmp/nginx --with-http_ssl_module--with-http_stub_status_module #进行编译并制定目录与参数
# ./configure --prefix=/usr/local/lnmp/nginx--with-http_ssl_module --with-http_stub_status_module --add-module=/root/nginx-sticky-module-1.0 #需要sticky时加上这个参数,指向文件存放的位置
5、#make && make install
二、安装完成好以后,我们进行相关的配置:
1、首先把nginx的启动脚本路径加入到环境变量中,
# vim ~/.bash_profile
PATH:/usr/bin:/usr/sbin:/bin:/usr/local/lnmp/nginx/sbin #在这句后面加入nginx的sbin路径
# source ~/.bash_profile #把更改的文件刷新一遍就可以使用了
[root@pt1 conf]# nginx #开启nginx服务,默认端口为80,注意不要和httpd服务冲突
测试结果可以看到信息:
编辑/etc/security/limits.conf文件,增加条目 如下:
编辑nginx配置文件nginx.conf
查看系统所允许的最大数
下面是压测结果:
[root@pt1 html]# ab -n 10000 -c 1000http://172.25.9.109/index.html
This is ApacheBench, Version 2.3<$Revision: 655654 $>
Copyright 1996 Adam Twiss, Zeus TechnologyLtd, http://www.zeustech.net/ Licensed to The Apache Software Foundation,http://www.apache.org/
Benchmarking 172.25.9.109 (be patient)
Completed 1000 requests
Completed 2000 requests
Completed 3000 requests
Completed 4000 requests
Completed 5000 requests
Completed 6000 requests
Completed 7000 requests
Completed 8000 requests
Completed 9000 requests
Completed 10000 requests
Finished 10000 requests
Server Software: nginx
Server Hostname: 172.25.9.109
Server Port: 80
Document Path: /index.html
Document Length: 56 bytes
Concurrency Level: 1000
Time taken for tests: 0.961 seconds
Complete requests: 10000
Failed requests: 985
(Connect: 0, Receive: 0, Length: 985, Exceptions: 0)
Write errors: 0
Non-2xx responses: 985
Total transferred: 2878845 bytes
HTML transferred: 691802 bytes
Requests per second: 10405.95 [#/sec] (mean)
Time per request: 96.099 [ms] (mean)
Time per request: 0.096 [ms] (mean, across all concurrentrequests)
Transfer rate: 2925.50 [Kbytes/sec] received
Connection Times (ms)
min mean[+/-sd] median max
Connect: 0 7 7.5 5 36
Processing: 2 11 9.9 8 216
Waiting: 1 9 9.8 6 215
Total: 6 18 15.8 12 229
Percentage of the requests served within acertain time (ms)
50% 12
66% 14
75% 16
80% 17
90% 56
95% 62
98% 63
99% 64
100% 229 (longest request)
编辑配置文件nginx.conf
server {
listen 443 ssl; #监听端口,这里为https的请求
server_name localhost;
ssl_certificate cert.pem; #证书
ssl_certificate_key cert.pem; #钥匙
ssl_session_cache shared:SSL:1m;
ssl_session_timeout 5m;
ssl_ciphers HIGH:!aNULL:!MD5;
ssl_prefer_server_ciphers on;
location / {
root html;
index index.html index.htm; #默认发布页文件
}
生成自定义证书,并把它移动到/usr/local/lnmp/nginx/conf/下:
[root@pt1 conf]# cd /etc/pki/tls/certs/
[root@pt1 certs]# make cert.pem
umask 77 ; \
PEM1=`/bin/mktemp/tmp/openssl.XXXXXX` ; \
PEM2=`/bin/mktemp/tmp/openssl.XXXXXX` ; \
/usr/bin/opensslreq -utf8 -newkey rsa:2048 -keyout $PEM1 -nodes -x509 -days 365 -out $PEM2-set_serial 0 ; \
cat$PEM1 > cert.pem ; \
echo"" >> cert.pem ; \
cat$PEM2 >> cert.pem ; \
rm-f $PEM1 $PEM2
Generating a 2048 bit RSA private key
....+++
..............................+++
writing new private key to'/tmp/openssl.6aOmZy'
-----
You are about to be asked to enterinformation that will be incorporated
into your certificate request.
What you are about to enter is what iscalled a Distinguished Name or a DN.
There are quite a few fields but you canleave some blank
For some fields there will be a defaultvalue,
If you enter '.', the field will be leftblank.
-----
Country Name (2 letter code) [XX]:CN #国家
State or Province Name (full name)[]:Shaanxi #省份
Locality Name (eg, city) [DefaultCity]:xi'an #城市
Organization Name (eg, company) [DefaultCompany Ltd]:server #公司
Organizational Unit Name (eg, section)[]:server1 #组织
Common Name (eg, your name or your server'shostname) []:server1 #个人名字
Email Address []:server@163.com #邮箱
[root@pt1 certs]# ls
ca-bundle.crt cert.pem Makefile
ca-bundle.trust.crt make-dummy-cert renew-dummy-cert
[root@pt1 certs]# mv cert.pem/usr/local/lnmp/nginx/conf/ #将生成的文件移动到nginx的配置文件目录下
[root@pt1 conf]# nginx -t #检查nginx配置文件语法是否有错
nginx: the configuration file/usr/local/lnmp/nginx/conf/nginx.conf syntax is ok
nginx: configuration file/usr/local/lnmp/nginx/conf/nginx.conf test is successful
[root@pt1 conf]# nginx -s reload #重载nginx
编辑配置文件nginx.conf
server {
listen 80; #监听80端口
server_name wwwNaN.com alias pt.com; #以wwwNaN.com或pt.com来访问的去下面 /virualhost/wwwNaN.com目录查找
location / {
root /virualhost/wwwNaN.com;
index index.html index.htm;
}
}
server {
listen 80; #监听80端口
server_name wwwNaN1.com; #以wwwNaN1.com来访问的去下面 /virualhost/wwwNaN1.com目录查找
location / {
root /virualhost/wwwNaN1.com;
index index.html index.htm;
}
}
[root@pt1 conf]# nginx -t #检查nginx配置文件语法是否有错nginx: the configuration file/usr/local/lnmp/nginx/conf/nginx.conf syntax is oknginx: configuration file/usr/local/lnmp/nginx/conf/nginx.conf test is successful[root@pt1 conf]# nginx -s reload #重载nginx
[root@pt1 conf]# mkdir -p/virualhost/wwwNaN.com #创建虚拟主机目录
[root@pt1 conf]# mkdir -p/virualhost/wwwNaN1.com #创建虚拟主机目录
[root@pt1 conf]# touch /virualhost/wwwNaN.com/index.html
[root@pt1 conf]# touch /virualhost/wwwNaN1.com/index.html
[root@pt1 conf]# echo wwwNaN.com >/virualhost/wwwNaN.com/index.html #测试页文件
[root@pt1 conf]# echo wwwNaN1.com >/virualhost/wwwNaN1.com/index.html #测试页文件
本文出自 “ptallrights” 博客,请务必保留此出处http://ptallrights.blog.51cto.com/11151122/1775242

相关文章推荐
- #内存管理的艺术# 之 Nginx slab的实现 --- 第五篇“基于页的内存释放”
- Nginx配置
- LVS Nginx HAProxy 优缺点
- nginx 跨域配置
- Nginx初探之安装
- 【 Nginx 】proxy_cache 模块的使用记录
- Nginx 关于 Rewrite 执行顺序详解
- SaltStack 实践课程二 PHP+NGINX
- nginx 获取远程地址
- nginx学习笔记五(nginx的事件模块定义)
- centos7 yum 方式安装nginx
- centos7 yum 方式安装nginx
- nginx 下 bootstrap fa 字体异常问题
- nginx rewrite 指令
- nginx port_in_redirect
- 实例讲解Nginx下的rewrite规则
- 详解Linux下安装配置Nginx
- nginx和php互动过程;
- nginx服务器安装及配置文件详解(转载)
- Nginx安装与配置文件解析