Windows下activemq搭建及应用场景
2018-03-13 17:00
531 查看
一:搭建及运行
1:解压下载好的activemq压缩包
2:进入${dir}/apache-activemq-5.5.0/bin目录,双击运行activemq.bat,
等待出现:

3:进入http://127.0.0.1:8161/admin/(这是activemq自带的一个web项目,进入的账号密码在配置文件中指定,稍后会讲),
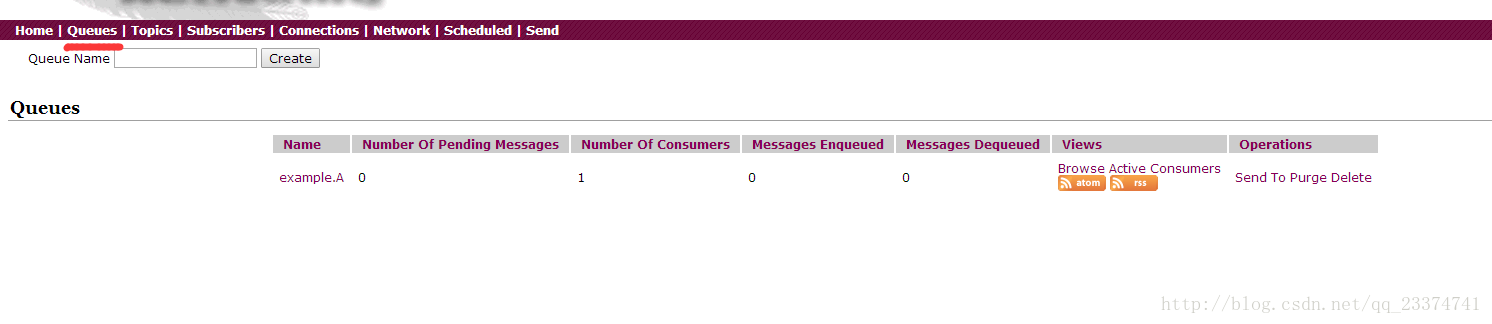
图中红色标识的是:当前服务器有那些主题,及该主题的生产消费情况。主题可在自己的web项目中指定,稍后会讲。
二:开始建立自己的web工程
2.1:建立maven项目,引入jar,具体如下:

2.2:然后修改application-context,xml,主要是在项目中配置activemq
到这一步基本完成了整合,具体要注意的步骤有一下几点:
3.1: org.apache.activemq.ActiveMQConnectionFactory:是连接工厂,该类的构造方法传递了连接服务的用户名和密码,服务器的ip,注意该ip可以是个集群.用户名密码的指定配置在${dir}\apache-activemq-5.9.0\conf\activemq.xml中的<broker></broker>标签内添加如下标签:
<plugins>
<simpleAuthenticationPlugin>
<users>
<authenticationUser username="lcm" password="lcm" groups="admins"></authenticationUser>
</users>
</simpleAuthenticationPlugin>
</plugins>
3.2:activemq.xml文件中的用户名密码与自己项目配置文件里关于activemq配置的用户名密码一致,然后连接工厂的第三个参数为activemq的服务器ip,它采用tcp连接,并且failover进行集群,并附带超时参数2000ms,其中的连接端口可以更改,具体在:${dir}\apache-activemq-5.9.0\conf\activemq.xml的

3.3:构造队列:org.apache.activemq.command.ActiveMQQueue:构造方法中指定了自己队列的名称
3.4:整合jms:
<constructor-arg index="0" ref="jmsTemplate" />
<constructor-arg index="1" ref="destination" />
</bean>
<bean id="messageReceiver" class="activemq.consumer.MessageReceiver"> 3.6:最后将自己的监听类和配置activemq的消息队列及actiemq的连接工厂整合到jms监听中<bean class="org.springframework.jms.listener.SimpleMessageListenerContainer">
<property name="connectionFactory" ref="connectionFactory" />
<property name="destinationName" value="myQueueName" /><!--消费发送者指定的队列名称-->
<property name="messageListener" ref="messageReceiver" />
</bean>
四:项目中的使用场景及额外注意步骤:
activemq是在高并发下将请求处理的队列化,它自身处理多线程等一系列问题,所以我们直接用即可,监听好它的消息,然后一步步将队列中的请求消费完。
提到高并发就不由想到nginx,有了nginx负载不就完了吗?为什么还用消息队列呢?
答案如下:1:系统的瓶颈往往出在数据库,nginx的架构适合于多系统多数据库,对于数据库集群可适用,但这会导致数据同步等一系列问题增多.activemq针对的是单数据库,比如有些场景只使用了一个数据库(类似一些中心数据库),mq使用场景图如下:
2:比如持久层数据库和redis同步时,如果出现大量请求,数据同步方案也可以放在activemq队列中处理,防止并发出现的问题
五:注意事项
使用activemq时,需防止单机宕机导致数据丢失,所以需要处理额外步骤:
1:需要做集群
2:做数据持久化,持久方案有多种,目前推荐activemq自带的KahaDB方式处理
1:解压下载好的activemq压缩包
2:进入${dir}/apache-activemq-5.5.0/bin目录,双击运行activemq.bat,
等待出现:
3:进入http://127.0.0.1:8161/admin/(这是activemq自带的一个web项目,进入的账号密码在配置文件中指定,稍后会讲),
图中红色标识的是:当前服务器有那些主题,及该主题的生产消费情况。主题可在自己的web项目中指定,稍后会讲。
二:开始建立自己的web工程
2.1:建立maven项目,引入jar,具体如下:
<project xmlns="http://maven.apache.org/POM/4.0.0" xmlns:xsi="http://www.w3.org/2001/XMLSchema-instance"
xsi:schemaLocation="http://maven.apache.org/POM/4.0.0 http://maven.apache.org/maven-v4_0_0.xsd"> <modelVersion>4.0.0</modelVersion>
<groupId>web_pro</groupId>
<artifactId>pro</artifactId>
<packaging>war</packaging>
<version>1.0-SNAPSHOT</version>
<name>pro Maven Webapp</name>
<url>http://maven.apache.org</url>
<properties>
<spring.version>4.2.5.RELEASE</spring.version>
<mybatis.version>3.2.7</mybatis.version>
<shiro.version>1.2.5</shiro.version>
<slf4j.version>1.7.7</slf4j.version>
<jedis.version>2.7.2</jedis.version>
<log4j.version>1.2.17</log4j.version>
<project.build.sourceEncoding>UTF-8</project.build.sourceEncoding>
</properties>

<dependencies>

<dependency>
<groupId>redis.clients</groupId>
<artifactId>jedis</artifactId>
<version>${jedis.version}</version>
</dependency>

<!--   <dependency>
<groupId>junit</groupId>
<artifactId>junit</artifactId>
<version>4.12</version>
<scope>test</scope>
</dependency>-->

<dependency>
<groupId>org.springframework</groupId>
<artifactId>spring-context</artifactId>
<version>4.2.1.RELEASE</version>
</dependency>

<dependency>
<groupId>org.springframework</groupId>
<artifactId>spring-web</artifactId>
<version>4.2.1.RELEASE</version>
</dependency>

<dependency>
<groupId>org.springframework</groupId>
<artifactId>spring-webmvc</artifactId>
<version>4.2.1.RELEASE</version>
</dependency>

<dependency>
<groupId>org.springframework</groupId>
<artifactId>spring-websocket</artifactId>
<version>4.2.1.RELEASE</version>
</dependency>

<dependency>
<groupId>org.springframework.security</groupId>
<artifactId>spring-security-web</artifactId>
<version>3.0.2.RELEASE</version>
</dependency>

<dependency>
<groupId>org.springframework.security</groupId>
<artifactId>spring-security-config</artifactId>
<version>3.0.2.RELEASE</version>
</dependency>

<dependency>
<groupId>org.springframework.security</groupId>
<artifactId>spring-security-taglibs</artifactId>
<version>3.0.2.RELEASE</version>
</dependency>

<dependency>
<groupId>org.springframework</groupId>
<artifactId>spring-orm</artifactId>
<version>4.2.1.RELEASE</version>
</dependency>

<!--   <dependency>
<groupId>org.hibernate</groupId>
<artifactId>hibernate-core</artifactId>
<version>5.0.1.Final</version>
</dependency>

<dependency>
<groupId>mysql</groupId>
<artifactId>mysql-connector-java</artifactId>
<version>5.1.44</version>
</dependency> -->

<dependency>
<groupId>org.slf4j</groupId>
<artifactId>slf4j-log4j12</artifactId>
<version>1.7.25</version>
</dependency>

<dependency>
<groupId>net.sourceforge.jexcelapi</groupId>
<artifactId>jxl</artifactId>
<version>2.6.12</version>
</dependency>

<dependency>
<groupId>com.mchange</groupId>
<artifactId>c3p0</artifactId>
<version>0.9.5.2</version>
</dependency>

<dependency>
<groupId>javax.servlet</groupId>
<artifactId>javax.servlet-api</artifactId>
<version>4.0.0</version>
<scope>provided</scope>
</dependency>

<dependency>
<groupId>javax.servlet</groupId>
<artifactId>jstl</artifactId>
<version>1.2</version>
</dependency>

<dependency>
<groupId>javax.servlet.jsp</groupId>
<artifactId>jsp-api</artifactId>
<version>2.2</version>
<scope>provided</scope>
</dependency>

<!-- <dependency>
<groupId>org.apache.struts</groupId>
<artifactId>struts2-core</artifactId>
<version>2.5.13</version>
</dependency> -->

<dependency>
<groupId>com.fasterxml.jackson.core</groupId>
<artifactId>jackson-core</artifactId>
<version>2.9.1</version>
</dependency>

<dependency>
<groupId>com.fasterxml.jackson.core</groupId>
<artifactId>jackson-annotations</artifactId>
<version>2.9.1</version>
</dependency>

<dependency>
<groupId>com.fasterxml.jackson.core</groupId>
<artifactId>jackson-databind</artifactId>
<version>2.9.1</version>
</dependency>

<dependency>
<groupId>commons-io</groupId>
<artifactId>commons-io</artifactId>
<version>2.5</version>
</dependency>

<dependency>
<groupId>commons-codec</groupId>
<artifactId>commons-codec</artifactId>
<version>1.10</version>
</dependency>

<dependency>
<groupId>commons-fileupload</groupId>
<artifactId>commons-fileupload</artifactId>
<version>1.3.3</version>
</dependency>

<dependency>
<groupId>org.aspectj</groupId>
<artifactId>aspectjrt</artifactId>
<version>1.8.10</version>
</dependency>

<!--<dependency>
<groupId>com.octo.captcha</groupId>
<artifactId>jcaptcha</artifactId>
<version>1.0</version>
</dependency>-->

<dependency>
<groupId>net.sf.json-lib</groupId>
<artifactId>json-lib</artifactId>
<version>2.4</version>
<classifier>jdk15</classifier>
</dependency>
<!-- mybatis -->
<dependency>
<groupId>org.mybatis</groupId>
<artifactId>mybatis</artifactId>
<version>${mybatis.version}</version>
</dependency>

<!-- mybatis-spring -->
<dependency>
<groupId>org.mybatis</groupId>
<artifactId>mybatis-spring</artifactId>
<version>1.2.2</version>
</dependency>

<!-- 分页 -->
<dependency>
<groupId>com.github.pagehelper</groupId>
<artifactId>pagehelper</artifactId>
<version>5.1.2</version>
</dependency>
<!-- mysql 数据连接 -->
<dependency>
<groupId>mysql</groupId>
<artifactId>mysql-connector-java</artifactId>
<version>5.1.21</version>
</dependency>

<!-- 阿里 连接池 -->
<dependency>
<groupId>com.alibaba</groupId>
<artifactId>druid</artifactId>
<version>1.1.3</version>
</dependency>
<!-- c3p0 -->
<dependency>
<groupId>com.mchange</groupId>
<arti
d9d3
factId>c3p0</artifactId>
<version>0.9.5.2</version>
</dependency>
<!-- mybatis逆向工程jar包 -->
<dependency>
<groupId>org.mybatis.generator</groupId>
<artifactId>mybatis-generator-core</artifactId>
<version>1.3.4</version>
</dependency>

<!--      <dependency>
<groupId>junit</groupId>
<artifactId>junit</artifactId>
<version>4.9</version>
<scope>test</scope>
</dependency>   -->
<dependency>
<groupId>org.springframework</groupId>
<artifactId>spring-test</artifactId>
<version> 3.2.4.RELEASE  </version>
<scope>provided</scope>
</dependency>

<dependency>
<groupId>org.junit.jupiter</groupId>
<artifactId>junit-jupiter-api</artifactId>
<version>RELEASE</version>
</dependency>
<dependency>
<groupId>junit</groupId>
<artifactId>junit</artifactId>
<version>4.12</version>
</dependency>
<dependency>
<groupId>com.alibaba</groupId>
<artifactId>fastjson</artifactId>
<version>1.2.39</version>
</dependency>

<!-- 极光推送 -->
<dependency>
<groupId>cn.jpush.api</groupId>
<artifactId>jpush-client</artifactId>
<version>3.2.17</version>
</dependency>

<dependency>
<groupId>cn.jpush.api</groupId>
<artifactId>jiguang-common</artifactId>
<version>1.0.3</version>
</dependency>
<dependency>
<groupId>io.netty</groupId>
<artifactId>netty-all</artifactId>
<version>4.1.6.Final</version>
<scope>compile</scope>
</dependency>
<dependency>
<groupId>com.google.code.gson</groupId>
<artifactId>gson</artifactId>
<version>2.3</version>
</dependency>
<!--压缩图片-->
<dependency>
<groupId>net.coobird</groupId>
<artifactId>thumbnailator</artifactId>
<version>0.4.8</version>
</dependency>

<dependency>
<groupId>org.apache.poi</groupId>
<artifactId>poi</artifactId>
<version>3.17</version>
</dependency>

<dependency>
<groupId>net.sourceforge.jexcelapi</groupId>
<artifactId>jxl</artifactId>
<version>2.6.12</version>
</dependency>

<!--   方法1
<dependency>
<groupId>pull-parser</groupId>
<artifactId>pull-parser</artifactId>
<version>2.1.10</version>
</dependency>
<dependency>
<groupId>dom4j</groupId>
<artifactId>dom4j</artifactId>
<version>1.5</version>
<exclusions>
<exclusion>
<groupId>pull-parser</groupId>
<artifactId>pull-parser</artifactId>
</exclusion>
</exclusions>
</dependency>-->
<!--方法二-->
<dependency>
<groupId>dom4j</groupId>
<artifactId>dom4j</artifactId>
<version>1.6.1</version>
</dependency>
<dependency>
<groupId>org.testng</groupId>
<artifactId>testng</artifactId>
<version>RELEASE</version>
</dependency>

<!--消息队列-->
<dependency>
<groupId>org.apache.activemq</groupId>
<artifactId>activemq-all</artifactId>
<version>5.9.0</version>
</dependency>
<dependency>
<groupId>org.apache.activemq</groupId>
<artifactId>activemq-pool</artifactId>
<version>5.9.0</version>
</dependency>

<dependency>
<groupId>org.springframework</groupId>
<artifactId>spring-jms</artifactId>
<version>4.2.1.RELEASE</version>
</dependency>

</dependencies>
<build>
<plugins>
<plugin>
<groupId>org.apache.maven.plugins</groupId>
<artifactId>maven-compiler-plugin</artifactId>
<version>3.2</version>
<configuration>
<source>1.7</source>
<target>1.7</target>
</configuration>
</plugin>
<!-- mybatis 逆向工程maven工具 -->
<plugin>
<groupId>org.mybatis.generator</groupId>
<artifactId>mybatis-generator-maven-plugin</artifactId>
<version>1.3.5</version>
<dependencies>
<dependency>
<groupId>mysql</groupId>
<artifactId>mysql-connector-java</artifactId>
<version>5.1.21</version>
</dependency>
</dependencies>
<configuration>
<overwrite>true</overwrite>
</configuration>
</plugin>
</plugins>
<finalName>pro</finalName>
</build>
</project>
注意:上面的pom.xml主要是引入了这几个包
2.2:然后修改application-context,xml,主要是在项目中配置activemq
<beans xmlns="http://www.springframework.org/schema/beans"
xmlns:xsi="http://www.w3.org/2001/XMLSchema-instance" xmlns:mvc="http://www.springframework.org/schema/mvc"
xmlns:context="http://www.springframework.org/schema/context"
xmlns:aop="http://www.springframework.org/schema/aop" xmlns:tx="http://www.springframework.org/schema/tx"
xmlns:task="http://www.springframework.org/schema/task"
xsi:schemaLocation="http://www.springframework.org/schema/beans http://www.springframework.org/schema/beans/spring-beans-4.0.xsd http://www.springframework.org/schema/mvc http://www.springframework.org/schema/mvc/spring-mvc-4.0.xsd http://www.springframework.org/schema/context http://www.springframework.org/schema/context/spring-context-4.0.xsd http://www.springframework.org/schema/aop http://www.springframework.org/schema/aop/spring-aop-4.0.xsd http://www.springframework.org/schema/tx http://www.springframework.org/schema/tx/spring-tx-4.0.xsd http://www.springframework.org/schema/task http://www.springframework.org/schema/task/spring-task-4.0.xsd">
<!-- 开启扫描 -->
<context:component-scan base-package="activemq" />
<!-- Activemq 连接工厂 -->
<bean id="activeMQConnectionFactory" class="org.apache.activemq.ActiveMQConnectionFactory">
<constructor-arg value="lcm" /><!--用户名权限验证,在mq配置文件对应-->
<constructor-arg value="lcm" />
<constructor-arg value="failover:(tcp://localhost:61616,tcp://localhost:61617)?timeout=2000" /><!--配置集群,以,分割-->
</bean>

<!-- ConnectionFactory Definition -->
<bean id="connectionFactory"
class="org.springframework.jms.connection.CachingConnectionFactory">
<constructor-arg ref="activeMQConnectionFactory" />
</bean>
<!-- Default Destination Queue Definition -->
<!-- 测试配置多个Destination -->
<bean id="destination" class="org.apache.activemq.command.ActiveMQQueue">
<constructor-arg index="0" value="myQueueName" /><!--自己的主题-->
</bean>
<!-- JmsTemplate Definition -->
<bean id="jmsTemplate" class="org.springframework.jms.core.JmsTemplate">
<property name="connectionFactory" ref="connectionFactory" />
<property name="defaultDestination" ref="destination" />
</bean>
<!-- Message Sender Definition -->
<bean id="messageSender" class="activemq.publisher.MessageSender">
<constructor-arg index="0" ref="jmsTemplate" />
<constructor-arg index="1" ref="destination" />
</bean>
<!-- 消息监听器,主要监听的目的地址 Message Receiver Definition -->
<bean id="messageReceiver" class="activemq.consumer.MessageReceiver">
</bean>
<bean class="org.springframework.jms.listener.SimpleMessageListenerContainer">
<property name="connectionFactory" ref="connectionFactory" />
<property name="destinationName" value="myQueueName" /><!--消费发送者指定的主题-->
<property name="messageListener" ref="messageReceiver" />
</bean>
</beans>
三:解释配置文件
到这一步基本完成了整合,具体要注意的步骤有一下几点:
3.1: org.apache.activemq.ActiveMQConnectionFactory:是连接工厂,该类的构造方法传递了连接服务的用户名和密码,服务器的ip,注意该ip可以是个集群.用户名密码的指定配置在${dir}\apache-activemq-5.9.0\conf\activemq.xml中的<broker></broker>标签内添加如下标签:
<plugins>
<simpleAuthenticationPlugin>
<users>
<authenticationUser username="lcm" password="lcm" groups="admins"></authenticationUser>
</users>
</simpleAuthenticationPlugin>
</plugins>
3.2:activemq.xml文件中的用户名密码与自己项目配置文件里关于activemq配置的用户名密码一致,然后连接工厂的第三个参数为activemq的服务器ip,它采用tcp连接,并且failover进行集群,并附带超时参数2000ms,其中的连接端口可以更改,具体在:${dir}\apache-activemq-5.9.0\conf\activemq.xml的
3.3:构造队列:org.apache.activemq.command.ActiveMQQueue:构造方法中指定了自己队列的名称
3.4:整合jms:
<bean id="jmsTemplate" class="org.springframework.jms.core.JmsTemplate">
<property name="connectionFactory" ref="connectionFactory" />
<property name="defaultDestination" ref="destination" />
</bean>
3.5:再接着整合自己编写的消息接受类和发送类,这个两个类主要是是实现了一些监听方法,然后做自己的业务处理<bean id="messageSender" class="activemq.publisher.MessageSender">
<constructor-arg index="0" ref="jmsTemplate" />
<constructor-arg index="1" ref="destination" />
</bean>
<bean id="messageReceiver" class="activemq.consumer.MessageReceiver"> 3.6:最后将自己的监听类和配置activemq的消息队列及actiemq的连接工厂整合到jms监听中<bean class="org.springframework.jms.listener.SimpleMessageListenerContainer">
<property name="connectionFactory" ref="connectionFactory" />
<property name="destinationName" value="myQueueName" /><!--消费发送者指定的队列名称-->
<property name="messageListener" ref="messageReceiver" />
</bean>
四:项目中的使用场景及额外注意步骤:
activemq是在高并发下将请求处理的队列化,它自身处理多线程等一系列问题,所以我们直接用即可,监听好它的消息,然后一步步将队列中的请求消费完。
提到高并发就不由想到nginx,有了nginx负载不就完了吗?为什么还用消息队列呢?
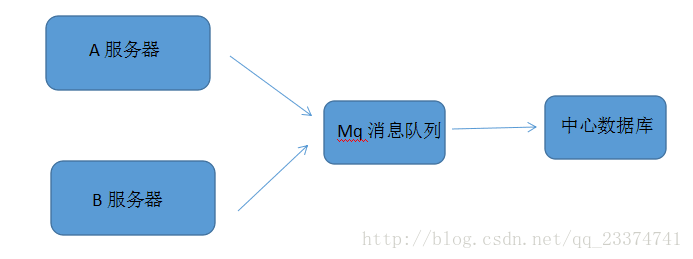
答案如下:1:系统的瓶颈往往出在数据库,nginx的架构适合于多系统多数据库,对于数据库集群可适用,但这会导致数据同步等一系列问题增多.activemq针对的是单数据库,比如有些场景只使用了一个数据库(类似一些中心数据库),mq使用场景图如下:
2:比如持久层数据库和redis同步时,如果出现大量请求,数据同步方案也可以放在activemq队列中处理,防止并发出现的问题
五:注意事项
使用activemq时,需防止单机宕机导致数据丢失,所以需要处理额外步骤:
1:需要做集群
2:做数据持久化,持久方案有多种,目前推荐activemq自带的KahaDB方式处理

相关文章推荐
- 搭建Android应用开发环境(Windows)
- activemq-5.13 在windows下部署应用
- 大数据应用之Windows平台Hbase客户端Eclipse开发环境搭建
- NFS应用场景及环境搭建
- Sphinx+Scws 搭建千万级准实时搜索&应用场景详解
- 【hadoop之翊】——windows 7使用eclipse下hadoop应用开发环境搭建
- windows 7下python-activemq-stomp环境的搭建和测试
- EasyPlayerPro(Windows)流媒体播放器功能介绍及应用场景
- activeMQ的应用场景
- 详解Windows Service Wrapper(winsw.exe)及应用场景
- EasyPlayerPro(Windows)流媒体播放器功能介绍及应用场景
- 搭建Windows下Android应用开发环境——Eclipse/Android/ADT
- 在Windows上搭建Android应用开发环境
- 菜鸟学Linux十:Sendmail服务器的搭建之在Linux和Windows系统上邮件收发的应用
- windows下ACtiveMQ服务器搭建
- 消息队列中间件--ActiveMQ--介绍及应用场景
- Android应用开发 第一讲上 Windows下搭建android开发环境 .
- [置顶] Yolo的搭建和在Windows下封装以及工程应用
- 大数据应用之Windows平台Hbase客户端Eclipse开发环境搭建
- Sphinx+Scws 搭建千万级准实时搜索&应用场景详解