Unity使用C#实现简单Scoket连接及服务端与客户端通讯
2018-03-05 19:50
791 查看
简介:
网络编程是个很有意思的事情,偶然翻出来很久之前刚开始看Socket的时候写的一个实例,贴出来吧
Unity中实现简单的Socket连接,c#中提供了丰富的API,直接上代码。
服务端代码: Thread connectThread;//当前服务端监听子线程
public string address;//当前地址
public int port;//当前本地端口
TcpClient romoteClient;//远程客户端
// Use this for initialization
void Start()
{
connectThread = new Thread(InitServerSocket);
connectThread.Start();
}
/// <summary>
/// 实例化服务端Socket
/// </summary>
public void InitServerSocket()
{
int bufferSize = 8192;//缓冲区大小
IPAddress ip = IPAddress.Parse(address);
//新建TCP连接,并开启监听子线程
TcpListener tcpListener = new TcpListener(ip, port);
tcpListener.Start();
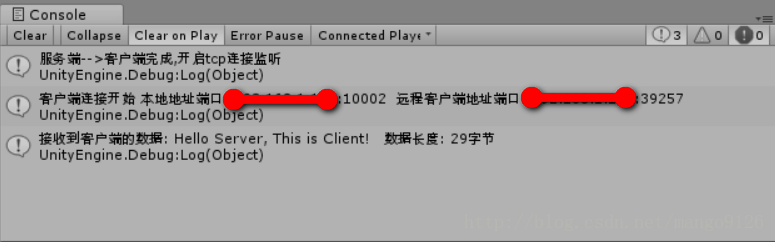
Debug.Log("服务端-->客户端完成,开启tcp连接监听");
//如果有远程客户端连接,此时得到其对象用于通讯
romoteClient = tcpListener.AcceptTcpClient();
Debug.Log("客户端连接开始 本地地址端口: " + romoteClient.Client.LocalEndPoint + " 远程客户端地址端口: " + romoteClient.Client.RemoteEndPoint);
NetworkStream stream = romoteClient.GetStream();
do
{
try
{
//获取与客户端连接数据
byte[] buffer = new byte[bufferSize];
int byteRead = stream.Read(buffer, 0, bufferSize);
if (byteRead == 0)
{
Debug.Log("客户端断开");
break;
}
string msg = Encoding.UTF8.GetString(buffer, 0, byteRead);
Debug.Log("接收到客户端的数据: " + msg + " 数据长度: " + byteRead + "字节");
}
catch (Exception ex)
{
Debug.Log("客户端异常: " + ex.Message);
//客户端出现异常或者断开的时候,关闭线程防止溢出
tcpListener.Stop();
break;
}
} while (true);
}
/// <summary>
/// 服务器端根据当前连接的远程客户端发送消息
/// </summary>
public void SendMessageToClient()
{
if (romoteClient != null)
{
romoteClient.Client.Send(Encoding.UTF8.GetBytes("Hello Client ,This is Server!"));
}
}
/// <summary>
/// 销毁时关闭监听线程及连接
/// </summary>
void OnDestroy()
{
if (romoteClient != null)
romoteClient.Close();
if (connectThread != null)
connectThread.Abort();
}客户端代码: public string serverAddress;//服务器地址
public int port;//服务器端口
private TcpClient localClient;//当前tcp客户端
private
4000
Thread receiveThread;//接收服务器消息线程
private byte[] resultBuffer = new byte[1024];//服务器返回流字节
private string resultStr;//服务器返回字符串
void Start()
{
//连接至服务端
InitClientSocket();
}
/// <summary>
/// 销毁时操作
/// </summary>
private void OnDestroy()
{
if (localClient != null)
localClient.Close();
if (receiveThread != null)
receiveThread.Abort();
}
/// <summary>
/// 客户端实例化Socket连接
/// </summary>
private void InitClientSocket()
{
localClient = new TcpClient();
try
{
//当前客户端连接的服务器地址与远程端口
localClient.Connect(IPAddress.Parse(serverAddress), port);
//开始接收服务器消息子线程
receiveThread = new Thread(SocketReceiver);
receiveThread.Start();
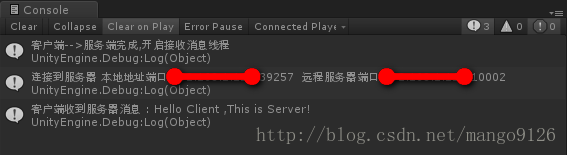
Debug.Log("客户端-->服务端完成,开启接收消息线程");
}
catch (Exception ex)
{
Debug.Log("客户端连接服务器异常: " + ex.Message);
}
Debug.Log("连接到服务器 本地地址端口:" + localClient.Client.LocalEndPoint + " 远程服务器端口:" + localClient.Client.RemoteEndPoint);
}
/// <summary>
/// 客户端发送消息到服务器
/// </summary>
private void SendMessageToServer()
{
try
{
string clientStr = "Hello Server, This is Client!";
//获取当前客户端的流对象,然后将要发送的字符串转化为byte[]写入发送
NetworkStream stream = localClient.GetStream();
byte[] buffer = Encoding.UTF8.GetBytes(clientStr);
stream.Write(buffer, 0, buffer.Length);
}
catch (Exception ex)
{
Debug.Log("发送消息时服务器产生异常: " + ex.Message);
}
}
/// <summary>
/// 客户端检测收到服务器信息子线程
/// </summary>
private void SocketReceiver()
{
if (localClient != null)
{
while (true)
{
if (localClient.Client.Connected == false)
break;
//在循环中,
localClient.Client.Receive(resultBuffer);
resultStr = Encoding.UTF8.GetString(resultBuffer);
Debug.Log("客户端收到服务器消息 : " + resultStr);
}
}
}此时,面板填入服务端的地址及端口,运行服务端,再运行客户端,客户端点击发送消息,服务器收到消息,服务端发送消息后,客户端收到消息。本人是在两台机器上进行测试,Debug如下:
服务端:
客户端:
注意事项:
1.服务端和客户端的地址不要写错
2.服务端的端口确保未被占用
3.在进行通讯的时候,要保持字符串编码格式一致
4.子线程的生命周期,记得销毁,为了保证在主线程销毁同时销毁子线程可以使用thread.IsBackground = true
网络编程是个很有意思的事情,偶然翻出来很久之前刚开始看Socket的时候写的一个实例,贴出来吧
Unity中实现简单的Socket连接,c#中提供了丰富的API,直接上代码。
服务端代码: Thread connectThread;//当前服务端监听子线程
public string address;//当前地址
public int port;//当前本地端口
TcpClient romoteClient;//远程客户端
// Use this for initialization
void Start()
{
connectThread = new Thread(InitServerSocket);
connectThread.Start();
}
/// <summary>
/// 实例化服务端Socket
/// </summary>
public void InitServerSocket()
{
int bufferSize = 8192;//缓冲区大小
IPAddress ip = IPAddress.Parse(address);
//新建TCP连接,并开启监听子线程
TcpListener tcpListener = new TcpListener(ip, port);
tcpListener.Start();
Debug.Log("服务端-->客户端完成,开启tcp连接监听");
//如果有远程客户端连接,此时得到其对象用于通讯
romoteClient = tcpListener.AcceptTcpClient();
Debug.Log("客户端连接开始 本地地址端口: " + romoteClient.Client.LocalEndPoint + " 远程客户端地址端口: " + romoteClient.Client.RemoteEndPoint);
NetworkStream stream = romoteClient.GetStream();
do
{
try
{
//获取与客户端连接数据
byte[] buffer = new byte[bufferSize];
int byteRead = stream.Read(buffer, 0, bufferSize);
if (byteRead == 0)
{
Debug.Log("客户端断开");
break;
}
string msg = Encoding.UTF8.GetString(buffer, 0, byteRead);
Debug.Log("接收到客户端的数据: " + msg + " 数据长度: " + byteRead + "字节");
}
catch (Exception ex)
{
Debug.Log("客户端异常: " + ex.Message);
//客户端出现异常或者断开的时候,关闭线程防止溢出
tcpListener.Stop();
break;
}
} while (true);
}
/// <summary>
/// 服务器端根据当前连接的远程客户端发送消息
/// </summary>
public void SendMessageToClient()
{
if (romoteClient != null)
{
romoteClient.Client.Send(Encoding.UTF8.GetBytes("Hello Client ,This is Server!"));
}
}
/// <summary>
/// 销毁时关闭监听线程及连接
/// </summary>
void OnDestroy()
{
if (romoteClient != null)
romoteClient.Close();
if (connectThread != null)
connectThread.Abort();
}客户端代码: public string serverAddress;//服务器地址
public int port;//服务器端口
private TcpClient localClient;//当前tcp客户端
private
4000
Thread receiveThread;//接收服务器消息线程
private byte[] resultBuffer = new byte[1024];//服务器返回流字节
private string resultStr;//服务器返回字符串
void Start()
{
//连接至服务端
InitClientSocket();
}
/// <summary>
/// 销毁时操作
/// </summary>
private void OnDestroy()
{
if (localClient != null)
localClient.Close();
if (receiveThread != null)
receiveThread.Abort();
}
/// <summary>
/// 客户端实例化Socket连接
/// </summary>
private void InitClientSocket()
{
localClient = new TcpClient();
try
{
//当前客户端连接的服务器地址与远程端口
localClient.Connect(IPAddress.Parse(serverAddress), port);
//开始接收服务器消息子线程
receiveThread = new Thread(SocketReceiver);
receiveThread.Start();
Debug.Log("客户端-->服务端完成,开启接收消息线程");
}
catch (Exception ex)
{
Debug.Log("客户端连接服务器异常: " + ex.Message);
}
Debug.Log("连接到服务器 本地地址端口:" + localClient.Client.LocalEndPoint + " 远程服务器端口:" + localClient.Client.RemoteEndPoint);
}
/// <summary>
/// 客户端发送消息到服务器
/// </summary>
private void SendMessageToServer()
{
try
{
string clientStr = "Hello Server, This is Client!";
//获取当前客户端的流对象,然后将要发送的字符串转化为byte[]写入发送
NetworkStream stream = localClient.GetStream();
byte[] buffer = Encoding.UTF8.GetBytes(clientStr);
stream.Write(buffer, 0, buffer.Length);
}
catch (Exception ex)
{
Debug.Log("发送消息时服务器产生异常: " + ex.Message);
}
}
/// <summary>
/// 客户端检测收到服务器信息子线程
/// </summary>
private void SocketReceiver()
{
if (localClient != null)
{
while (true)
{
if (localClient.Client.Connected == false)
break;
//在循环中,
localClient.Client.Receive(resultBuffer);
resultStr = Encoding.UTF8.GetString(resultBuffer);
Debug.Log("客户端收到服务器消息 : " + resultStr);
}
}
}此时,面板填入服务端的地址及端口,运行服务端,再运行客户端,客户端点击发送消息,服务器收到消息,服务端发送消息后,客户端收到消息。本人是在两台机器上进行测试,Debug如下:
服务端:
客户端:
注意事项:
1.服务端和客户端的地址不要写错
2.服务端的端口确保未被占用
3.在进行通讯的时候,要保持字符串编码格式一致
4.子线程的生命周期,记得销毁,为了保证在主线程销毁同时销毁子线程可以使用thread.IsBackground = true

相关文章推荐
- 使用Unity3D内置Network实现简单的客户端与服务端相连接
- 使用socket实现简单的客户端和服务端通信(C#语言)
- Socket编程简单实现服务端客户端连接
- Socket 服务端使用多线程实现多客户端通讯实例
- 使用unity UGUI 利用Socket 实现 多客户端通讯
- Netty实现服务端客户端长连接通讯及心跳检测
- 通过netty实现服务端与客户端的长连接通讯,及心跳检测。
- 使用简单的ServiceSockt实现服务端与客户端的通信
- Socket 服务端使用多线程实现多客户端通讯实例
- 【网络编程】使用流式套接字实现简单的客户端/服务端通信过程
- 使用流式套接字实现简单的客户端/服务端通信过程
- 简单的socket连接,实现服务端可以获得多个客户端连接(备份,方便以后查询)
- PHP基于socket实现的简单客户端和服务端通讯功能示例
- C#使用Socket实现服务器与多个客户端通信(简单的聊天系统)
- C# client 与java netty 服务端的简单通信,客户端采用Unity。
- C#编写Windows服务程序 (服务端),客户端使用 消息队列 实现淘宝 订单全链路效果
- Netty实现服务端客户端长连接通讯及心跳检测
- 通过netty实现服务端与客户端的长连接通讯,及心跳检测。
- Untiy中用C#实现TCP通讯(Socket通讯)服务端与客户端皆可
- linux c下简单实现服务端与多客户端同时连接