Creating Your First Blockchain with Java. Part 2 — Transactions.
2018-02-28 08:43
537 查看
In this second tutorial we will :Create a simple wallet.
Send signed transactions using our blockchain.
Feel extra cool.
All of the above will result in our own crypto coin ! (sorta)

Don’t worry this will actually be pretty bare-bones, but longer than the last tutorial ! tl;dr Github.Carrying on from last tutorial, we have a basic verifiable Blockchain. But currently our chain only stores rather useless messages. Today we are going to replace this data with transactions ( our block will be able to hold multiple transactions ), allowing us to create a very simple crypto-currency. We will call our new coin : “NoobCoin”.This tutorial assumes you have followed the other tutorial.
Dependencies: You will need to import bounceycastle (here is a mini tutorial on how to do so) and GSON.
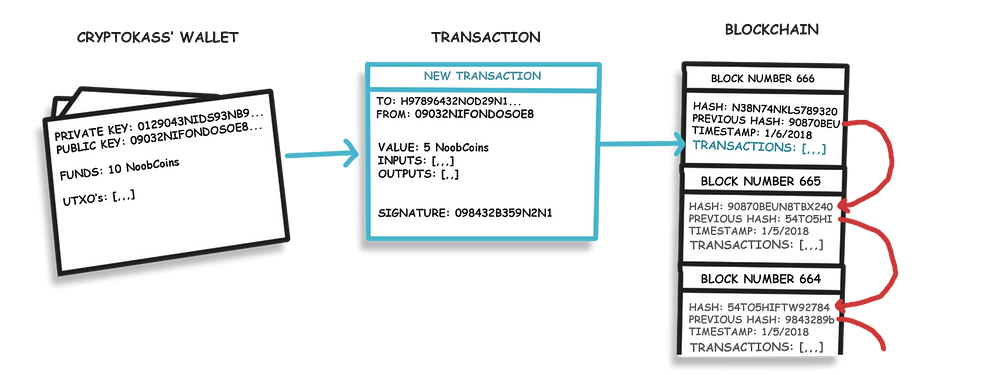
Don’t worry about the information on the transaction, that will be explained soon :)So let’s create a Wallet Class to hold our public key and private keys:Be sure to import java.security.* !!!What are the public and private keys for ?For our ‘noobcoin’ the public key will act as our address. It’s OK to share this public key with others to receive payment. Our private key is used to sign our transactions, so that nobody can spend our noobcoins other than the owner of the private key. Users will have to keep their private key Secret ! We also send our public key along with the transaction and it can be used to verify that our signature is valid and data has not been tampered with.
The private key is used to sign the data we don’t want to be tampered with. The public key is used to verify the signature.We generate our private and public keys in a KeyPair. We will use Elliptic-curve cryptography to Generate our KeyPairs. Let’s append a generateKeyPair() method to our Wallet class and call it in the constructor:All you need to understand about this method is it uses Java.security.KeyPairGenerator to generate an Elliptic Curve KeyPair. This methods makes and sets our Public and Private keys. Nifty.Now that we have the outlines of our wallet class let’s have a look at transactions.NoobCoin > Cash ? :D
The public key(address) of the receiver of funds.
The value/amount of funds to be transferred.
Inputs, which are references to previous transactions that prove the sender has funds to send.
Outputs, which shows the amount relevant addresses received in the transaction. ( These outputs are referenced as inputs in new transactions )
A cryptographic signature, that proves the owner of the address is the one sending this transaction and that the data hasn’t been changed. ( for example: preventing a third party from changing the amount sent )
Let’s create this new Transaction class:We should also create empty TransactionInput and TransactionOutputclasses, don’t worry we can fill them in later.Our transaction class will also contain relevant methods for generating/verifying the signature and verifying the transaction.But wait…

We also can check signatures, when we check the blockchain’s validity

‘Is signature verified’ should be true. Hopefully.Time to pat your self on the back. Now we just need to create/verify the outputs and inputs and then store the transaction in the Blockchain.

And generate transactions for us…
Feel free to add some other functionalities to your wallet, like keeping a record of your transaction history.

An updated chain validity check that takes into account transactions.
Some test transactions to see that everything is working.
Those are some long methods…
Send signed transactions using our blockchain.
Feel extra cool.
All of the above will result in our own crypto coin ! (sorta)
Don’t worry this will actually be pretty bare-bones, but longer than the last tutorial ! tl;dr Github.Carrying on from last tutorial, we have a basic verifiable Blockchain. But currently our chain only stores rather useless messages. Today we are going to replace this data with transactions ( our block will be able to hold multiple transactions ), allowing us to create a very simple crypto-currency. We will call our new coin : “NoobCoin”.This tutorial assumes you have followed the other tutorial.
Dependencies: You will need to import bounceycastle (here is a mini tutorial on how to do so) and GSON.
1.Preparing a Wallet
In crypto-currencies, coin ownership is transfered on the Blockchain as transactions, participants have an address which funds can be sent to and from. In their basic form wallets can just store these addresses, most wallets however, are also software able to make new transactions on the Blockchain.Don’t worry about the information on the transaction, that will be explained soon :)So let’s create a Wallet Class to hold our public key and private keys:Be sure to import java.security.* !!!What are the public and private keys for ?For our ‘noobcoin’ the public key will act as our address. It’s OK to share this public key with others to receive payment. Our private key is used to sign our transactions, so that nobody can spend our noobcoins other than the owner of the private key. Users will have to keep their private key Secret ! We also send our public key along with the transaction and it can be used to verify that our signature is valid and data has not been tampered with.
The private key is used to sign the data we don’t want to be tampered with. The public key is used to verify the signature.We generate our private and public keys in a KeyPair. We will use Elliptic-curve cryptography to Generate our KeyPairs. Let’s append a generateKeyPair() method to our Wallet class and call it in the constructor:All you need to understand about this method is it uses Java.security.KeyPairGenerator to generate an Elliptic Curve KeyPair. This methods makes and sets our Public and Private keys. Nifty.Now that we have the outlines of our wallet class let’s have a look at transactions.NoobCoin > Cash ? :D
2. Transactions & Signatures
Each transaction will carry a certain amount of data:The public key(address) of the sender of funds.The public key(address) of the receiver of funds.
The value/amount of funds to be transferred.
Inputs, which are references to previous transactions that prove the sender has funds to send.
Outputs, which shows the amount relevant addresses received in the transaction. ( These outputs are referenced as inputs in new transactions )
A cryptographic signature, that proves the owner of the address is the one sending this transaction and that the data hasn’t been changed. ( for example: preventing a third party from changing the amount sent )
Let’s create this new Transaction class:We should also create empty TransactionInput and TransactionOutputclasses, don’t worry we can fill them in later.Our transaction class will also contain relevant methods for generating/verifying the signature and verifying the transaction.But wait…
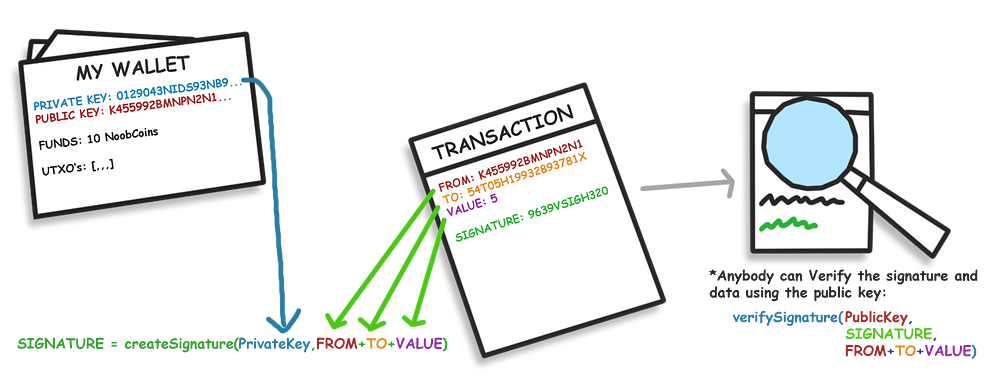
What is the purpose of signatures and how do they work ?
Signatures perform two very important tasks on our blockchain: Firstly, theyallow only the owner to spend their coins, secondly, they prevent others from tampering with their submitted transaction before a new block is mined (at the point of entry).The private key is used to sign the data and the public key can be used to verify its integrity.For example: Bob wants to send 2 NoobCoins to Sally, so their wallet software generates this transaction and submits it to miners to include in the next block. A miner attempts to change the recipient of the 2 coins to John. However, luckily, Bob had signed the transaction data with his private key, allowing anybody to verify if the transaction data has been changed using Bob’s public key (as no other persons public key will be able to verify the transaction).We can see (from the previous code block,) that our signature will be a bunch of bytes, so let’s create a method to generate them. First thing we will need are a few helper functions in StringUtil class :Don’t worry too much about understanding the contents of these methods. All you really need to know is : applyECDSASig takes in the senders private key and string input, signs it and returns an array of bytes. verifyECDSASig takes in the signature, public key and string data and returns true or false if the signature is valid. getStringFromKey returns encoded string from any key.Now let’s utilize these signature methods in our Transaction class, by appending a generateSignature() and verifiySignature() methods:In reality, you may want to sign more information, like the outputs/inputs used and/or time-stamp ( for now we are just signing the bare minimum )Signatures will be verified by miners as a new transaction are added to a block.We also can check signatures, when we check the blockchain’s validity
3.Testing the Wallets and Signatures:
Now we are almost halfway done Let’s test a few things are working. In the NoobChain class let’s add some new variables and replace the content of our main method :be sure to remember to add boncey castle as a security provider.We created two wallets, walletA and walletB then printed walletA’s private and public keys. Generated a Transaction and signed it using walletA’s public key. ̶F̶i̶n̶a̶l̶l̶y̶ ̶w̶e̶ ̶c̶r̶o̶s̶s̶e̶d̶ ̶o̶u̶r̶ ̶f̶i̶n̶g̶e̶r̶s̶ ̶a̶n̶d̶ ̶h̶o̶p̶e̶d̶ ̶e̶v̶e̶r̶y̶t̶h̶i̶n̶g̶ ̶w̶o̶r̶k̶e̶d̶ ̶o̶u̶t̶.̶Your output should look something like this :‘Is signature verified’ should be true. Hopefully.Time to pat your self on the back. Now we just need to create/verify the outputs and inputs and then store the transaction in the Blockchain.
4. Inputs & Outputs 1: How crypto currency is owned…
For you to own 1 bitcoin, you have to receive 1 Bitcoin. The ledger doesn’t really add one bitcoin to you and minus one bitcoin from the sender, the sender referenced that he/she previously received one bitcoin, then a transaction output was created showing that 1 Bitcoin was sent to your address. (Transaction inputs are references to previous transaction outputs.).Your wallets balance is the sum of all the unspent transaction outputs addressed to you.From this point on we will follow bitcoins convention and call unspent transaction outputs: UTXO’s.So let’s create a TransactionInput Class:This class will be used to reference TransactionOutputs that have not yet been spent. The transactionOutputId will be used to find the relevant TransactionOutput, allowing miners to check your ownership.And a TransactionOutputs Class:Transaction outputs will show the final amount sent to each party from the transaction. These, when referenced as inputs in new transactions, act as proof that you have coins to send.5. Inputs & Outputs 2: Processing the transaction…
Blocks in the chain may receive many transactions and the blockchain might be very, very long, it could take eons to process a new transaction because we have to find and check its inputs. To get around this we will keep an extra collection of all unspent transactions that can be used as inputs. In our NoobChain class add this collection of all UTXOs:HashMaps allow us to use a key to find a value, but you will need to import java.util.HashMap;Okay, time to get down to the nitty gritty…Let’s put everything together to process the transaction with a processTransaction boolean method in our Transaction Class:we also added a getInputsValue float method.…With this method we perform some checks to ensure that the transaction is valid, then gather inputs and generating outputs. (See commented lines in the code for more insight).Importantly, towards the end, we discard Inputs from our list of UTXO’s,meaning a transaction output can only be used once as an input… Hence the full value of the inputs must be used, so the sender sends ‘change’ back to themselves.Red arrows are Outputs. Notice that Green Inputs are references to previous outputs.Finally let’s update our wallet to:Gather our balance ( by looping through the UTXOs list and checking if a transaction output isMine())And generate transactions for us…
Feel free to add some other functionalities to your wallet, like keeping a record of your transaction history.
6. Adding transactions to our blocks:
Now we have a working transaction system, we need to implement it into our blockchain. We should replace the useless data we had in our blocks with an ArrayList of transactions. However there may be 1000s of transactions in a single block, too many to include in our hash calculation… but don’t worry we can use the merkle root of the transactions (you can quickly read about about merkle trees here *soon*).Let’s add a helper method to generate the merkleroot in StringUtils:*I will replace this soon, with an actual merkleroot but this method will work for now.Now let’s implement our Block Class changes:Notice we also updated our Block constructor as we no longer need pass in string data and included the merkle root in the calculate hash method.Our addTransaction boolean method will add the transactions and will only return true if the transaction has been successfully added.Hurrah every component we need, to make transactions on our blockchain has now be implemented !7. The Grand Finale (In the beginning there was noobcoin):
We should test sending coins to and from wallets, and update our blockchain validity check. But first we need a way to introduce new coins into the mix. There are many ways to create new coins, on the bitcoin blockchain for example: miners can include a transaction to themselves as a reward for each block mined. For now though, we will just release all the coins we wish to have, in the first block (the genesis block). Just like bitcoin we will hard code the genesis block.Let’s update our NoobChain class with everything it needs:A Genesis block which release 100 Noobcoins to walletA.An updated chain validity check that takes into account transactions.
Some test transactions to see that everything is working.
Those are some long methods…

相关文章推荐
- Creating Your First Blockchain with Java. Part 1.
- Exception in createBlockOutputStream 04 java.io.IOException: Bad connect ack with firstBadLink
- Creating Your First Maya Plug-in in Visual Studio with cmake
- Build Your First Mobile App With Ionic 2 & Angular 2 - Part 2
- [Ember] Creating Your First Ember.js Project with Ember-CLI
- Your First Concordion.Net Project (Part 5)-Running Specs with Gallio
- Build Your First Mobile App With Ionic 2 & Angular 2 - Part 3
- Build Your First Mobile App With Ionic 2 & Angular 2 - Part 4
- Build Your First Mobile App With Ionic 2 & Angular 2 - Part 5
- Creating your first Web Service provider and consumer in LotusScript and Java.
- How to Build Your Own Blockchain 1 Creating, Storing, Syncing, Displaying, Mining, and Proving Work
- Build Your First Mobile App With Ionic 2 & Angular 2 - Part 6
- Build Your First Mobile App With Ionic 2 & Angular 2 - Part 7
- How to Build Your Own Blockchain Part 2 — Syncing Chains From Different Nodes
- How to Build Your Own Blockchain Part 3 — Writing Nodes that Mine and Talk
- How to Build Your Own Blockchain Part 4.1 — Bitcoin Proof of Work Difficulty Explained
- How to Build Your Own Blockchain Part 4.2 — Ethereum Proof of Work Difficulty Explained
- Getting Started: Creating and Attaching Your First BlockStorage Volume
- Build Your First Mobile App With Ionic 2 & Angular 2 - Part 1
- # Writing your first Django app--part 3 about view