【SSH网上商城】分页显示图片
2018-01-30 15:47
288 查看
前言
商城项目图片分页显示必不可少,整理一个实例,以便理解和应用。实现
1、配置SSH环境
①创建web项目。②引入jar包和配置文件。
③配置基本信息。包括:web.xml、applicationContext.xml、jdbc.properties、log4j.properties、struts.xml。
<?xml version="1.0" encoding="UTF-8"?>
<web-app xmlns:xsi="http://www.w3.org/2001/XMLSchema-instance"
xmlns="http://java.sun.com/xml/ns/javaee"
xsi:schemaLocation="http://java.sun.com/xml/ns/javaee http://java.sun.com/xml/ns/javaee/web-app_3_0.xsd" id="WebApp_ID" version="3.0">
<display-name>shop</display-name>
<!-- 配置Spring监听器 -->
<listener>
<listener-class>org.springframework.web.context.ContextLoaderListener</listener-class>
</listener>
<context-param>
<param-name>contextConfigLocation</param-name>
<param-value>classpath:applicationContext.xml</param-value>
</context-param>
<!-- 配置Strutes2核心过滤器 -->
<filter>
<filter-name>struts2</filter-name>
<filter-class>org.apache.struts2.dispatcher.ng.filter.StrutsPrepareAndExecuteFilter</filter-class>
</filter>
<filter-mapping>
<filter-name>struts2</filter-name>
<url-pattern>/*</url-pattern>
<dispatcher>FORWARD</dispatcher>
<dispatcher>REQUEST</dispatcher>
</filter-mapping>
</web-app>
上面的代码是配置了Struts2核心过滤器和Spring监听器的web.xml文件内容。
<?xml version="1.0" encoding="UTF-8"?>
<beans xmlns="http://www.springframework.org/schema/beans"
xmlns:xsi="http://www.w3.org/2001/XMLSchema-instance" xmlns:context="http://www.springframework.org/schema/context"
xmlns:aop="http://www.springframework.org/schema/aop" xmlns:tx="http://www.springframework.org/schema/tx"
xsi:schemaLocation="http://www.springframework.org/schema/beans http://www.springframework.org/schema/beans/spring-beans.xsd http://www.springframework.org/schema/context http://www.springframework.org/schema/context/spring-context.xsd http://www.springframework.org/schema/aop http://www.springframework.org/schema/aop/spring-aop.xsd http://www.springframework.org/schema/tx http://www.springframework.org/schema/tx/spring-tx.xsd">
<!-- 配置连接池: -->
<!-- 引入外部属性文件 -->
<context:property-placeholder location="classpath:jdbc.properties" />
<!-- 配置C3P0连接池: -->
<bean id="dataSource" class="com.mchange.v2.c3p0.ComboPooledDataSource">
<property name="driverClass" value="${jdbc.driver}" />
<property name="jdbcUrl" value="${jdbc.url}" />
<property name="user" value="${jdbc.user}" />
<property name="password" value="${jdbc.password}" />
</bean>

<!-- Hibernate的相关信息 -->
<bean id="sessionFactory"
class="org.springframework.orm.hibernate3.LocalSessionFactoryBean">
<!-- 注入连接池 -->
<property name="dataSource" ref="dataSource" />
<!-- 配置Hibernate的其他的属性 -->
<property name="hibernateProperties">
<props>
<prop key="hibernate.dialect">org.hibernate.dialect.MySQLDialect</prop>
<prop key="hibernate.show_sql">true</prop>
<prop key="hibernate.format_sql">true</prop>
<prop key="hibernate.connection.autocommit">false</prop>
<prop key="hibernate.hbm2ddl.auto">update</prop>
</props>
</property>
<!-- 配置Hibernate的映射文件 -->
<property name="mappingResources">
<list>
<value>cn/jujianfei/product/vo/Product.hbm.xml</value>
</list>
</property>
</bean>

<!-- 事务管理: -->
<!-- 事务管理器 -->
<bean id="transactionManager"
class="org.springframework.orm.hibernate3.HibernateTransactionManager">
<property name="sessionFactory" ref="sessionFactory" />
</bean>

<!-- 开启注解事务 -->
<tx:annotation-driven transaction-manager="transactionManager" />

<!-- Action的配置 =========================== -->

<!-- 首页访问的Action -->
<bean id="productAction" class="cn.jujianfei.product.action.ProductAction"
scope="prototype">
<property name="productService" ref="productService" />
</bean>

<!-- Service的配置 =========================== -->
<bean id="productService" class="cn.jujianfei.product.service.ProductService">
<property name="productDao" ref="productDao" />
</bean>

<!-- Dao的配置 =========================== -->
<bean id="productDao" class="cn.jujianfei.product.dao.ProductDao">
<property name="sessionFactory" ref="sessionFactory" />
</bean>
</beans>
从上面代码中我们可以看到,里面已经不是纯净的applicationContext.xml了,它已经包含了本实例所需的基本配置,添加的内容包括:Hibernate的映射信息和类的管理信息(Action、Service和Dao)。
//jdbc.properties文件
jdbc.driver = com.mysql.jdbc.Driver
jdbc.url = jdbc:mysql:///shop
jdbc.user = root
jdbc.password =jujianfei
###log4j.properties文件###
### direct log messages to stdout ###
log4j.appender.stdout=org.apache.log4j.ConsoleAppender
log4j.appender.stdout.Target=System.out
log4j.appender.stdout.layout=org.apache.log4j.PatternLayout
log4j.appender.stdout.layout.ConversionPattern=%d{ABSOLUTE} %5p %c{1}:%L - %m%n

### direct messages to file mylog.log ###
log4j.appender.file=org.apache.log4j.FileAppender
log4j.appender.file.File=c:/mylog.log
log4j.appender.file.layout=org.apache.log4j.PatternLayout
log4j.appender.file.layout.ConversionPattern=%d{ABSOLUTE} %5p %c{1}:%L - %m%n

### set log levels - for more verbose logging change 'info' to 'debug' ###

log4j.rootLogger=info, stdout
以下代码是添加了本实例所需的基本配置后的struts.xml文件。
<?xml version="1.0" encoding="UTF-8" ?>
<!DOCTYPE struts PUBLIC
"-//Apache Software Foundation//DTD Struts Configuration 2.3//EN"
"http://struts.apache.org/dtds/struts-2.3.dtd">
<struts>
<constant name="struts.devMode" value="false" />

<package name="shop" extends="struts-default" namespace="/">
<!-- 配置用户模块的Action -->
<action name="product_*" class="productAction" method="{1}">
<result name="findProducts">/WEB-INF/index.jsp</result>
</action>
</package>
</struts>
至此,SSH环境配置完成。
2、编写实现代码
①项目结构如图1-1所示,代码也在下文中逐一列出。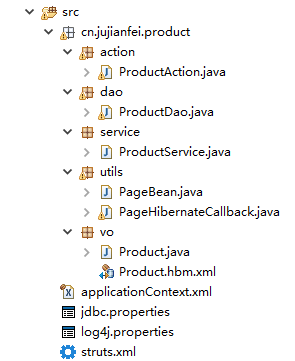
图1-1 项目结构图
public class ProductAction extends ActionSupport {
// 注入商品的Service
private ProductService productService;

public void setProductService(ProductService productService) {
this.productService = productService;
}

// 接收页数
private int page = 1;

public void setPage(int page) {
this.page = page;
}

public String findProducts() {
PageBean<Product> pageBean = productService.findByPage(page);
// 将PageBean存入到值栈中:
ActionContext.getContext().getValueStack().set("pageBean", pageBean);
return "findProducts";
}
}
@Transactional
public class ProductService {
// 注入ProductDao
private ProductDao productDao;
public void setProductDao(ProductDao productDao) {
this.productDao = productDao;
}
// 带有分页查询商品
public PageBean<Product> findByPage(int page) {
PageBean<Product> pageBean = new PageBean<Product>();
// 设置当前页数:
pageBean.setPage(page);
// 设置每页显示记录数:
int limit = 8;
pageBean.setLimit(limit);
// 设置总记录数:
int totalCount = 0;
totalCount = productDao.findCount();
pageBean.setTotalCount(totalCount);
// 设置总页数:
int totalPage = 0;
// Math.ceil(totalCount / limit);
if (totalCount % limit == 0) {
totalPage = totalCount / limit;
} else {
totalPage = totalCount / limit + 1;
}
pageBean.setTotalPage(totalPage);
// 每页显示的数据集合:
// 从哪开始:
int begin = (page - 1) * limit;
List<Product> list = productDao.findByPageCid(begin, limit);
pageBean.setList(list);
return pageBean;
}
}public class ProductDao extends HibernateDaoSupport {
// 查询商品的总数
public Integer findCount() {
String hql = "from Product";
List<Product> list = this.getHibernateTemplate().find(hql);
if (list != null && list.size() > 0) {
return list.size();
}
return 0;
}
// 根据分类id查询商品的集合
public List<Product> findByPageCid(int begin, int limit) {
String hql = "from Product";
// 分页另一种写法:
List<Product> list = this.getHibernateTemplate().execute(
new PageHibernateCallback<Product>(hql, new Object[] {}, begin, limit));
if (list != null && list.size() > 0) {
return list;
}
return null;
}
}工具类PageBean封装了分页功能所需基本数据;
PageHibernateCllback利用Hibernate提供的分页查询功能封装了实现方法。
public class PageBean<T> {
private int page;       // 当前页数
private int totalCount; // 总记录数
private int totalPage;  // 总页数
private int limit;      // 每页显示的记录数
private List<T> list;   // 每页显示数据的集合

//getter和setter方法省略......
}
public class PageHibernateCallback<T> implements HibernateCallback<List<T>> {
private String hql; //hql语句
private Object[] params; //参数数组
private int startIndex; //页面开始索引
private int pageSize; //一次检索的数量
public PageHibernateCallback(String hql, Object[] params, int startIndex, int pageSize) {
super();
this.hql = hql;
this.params = params;
this.startIndex = startIndex;
this.pageSize = pageSize;
}
public List<T> doInHibernate(Session session) throws HibernateException,
SQLException {
// 1 执行hql语句
Query query = session.createQuery(hql);
// 2 实际参数
if (params != null) {
for (int i = 0; i < params.length; i++) {
query.setParameter(i, params[i]);
}
}
// 3 分页
query.setFirstResult(startIndex);
query.setMaxResults(pageSize);
return query.list();
}
}以下代码是实体类Product和映射文件Product.hbm.xml文件内容。
public class Product {
private Integer pid;
private String pname;
private Double market_price;
private Double shop_price;
private String image;
private String pdesc;
private Integer is_hot;
private Date pdate;

//getter和setter方法省略......
}
<?xml version="1.0" encoding="UTF-8"?> <!DOCTYPE hibernate-mapping PUBLIC "-//Hibernate/Hibernate Mapping DTD 3.0//EN" "http://www.hibernate.org/dtd/hibernate-mapping-3.0.dtd"> <hibernate-mapping> <class name="cn.jujianfei.product.vo.Product" table="product"> <id name="pid"> <generator class="native" /> </id> <property name="pname" /> <property name="market_price" /> <property name="shop_price" /> <property name="image" /> <property name="pdesc" /> <property name="is_hot" /> <property name="pdate" /> </class> </hibernate-mapping>
至此后台代码基本完成。
②添加用于显示图片的jsp文件和用于访问的jsp文件。在WEB-INF目录下新建index.jsp文件,核心代码如下:
<%@ taglib prefix="s" uri="/struts-tags"%>
<!DOCTYPE HTML PUBLIC "-//W3C//DTD HTML 4.01 Transitional//EN">
<html>
<head>

<base href="<%=basePath%>">
<title>test page</title>
<link href="${pageContext.request.contextPath}/css/common.css"
rel="stylesheet" type="text/css" />
<link href="${pageContext.request.contextPath}/css/product.css"
rel="stylesheet" type="text/css" />
</head>

<body>
<div class="container productList">
<div class="span18 last">
<div id="result" class="result table clearfix">
<ul>
<s:iterator var="p" value="pageBean.list">
<li><img
src="${pageContext.request.contextPath}/<s:property value="#p.image"/>"
width="170" height="170" style="display: inline-block;"> <span
style='color:green'> <s:property value="#p.pname" />
</span> <span class="price"> 商城价: ¥<s:property
value="#p.shop_price" />
</span></li>
</s:iterator>
</ul>
</div>

<div class="pagination">
<span>第 <s:property value="pageBean.page" />/<s:property
value="pageBean.totalPage" /> 页
</span>
<s:if test="pageBean.page != 1">
<a
href="${ pageContext.request.contextPath }/product_findProducts.action?page=1"
class="firstPage"> </a>
<a
href="${ pageContext.request.contextPath }/product_findProducts.action?page=
<s:property value="pageBean.page-1"/>" class="previousPage"> </a>
</s:if>

<s:iterator var="i" begin="1" end="pageBean.totalPage">
<s:if test="pageBean.page != #i">
<a
href="${ pageContext.request.contextPath }/product_findProducts.action?page=
<s:property value="#i"/>"><s:property value="#i" /></a>
</s:if>
<s:else>
<span class="currentPage"><s:property value="#i" /></span>
</s:else>
</s:iterator>

<s:if test="pageBean.page != pageBean.totalPage">
<a class="nextPage"
href="${ pageContext.request.contextPath }/product_findProducts.action?page=
<s:property value="pageBean.page+1"/>"> </a>
<a class="lastPage"
href="${ pageContext.request.contextPath }/product_findProducts.action?page=
<s:property value="pageBean.totalPage"/>"> </a>
</s:if>
</div>
</div>
</div>
</body>
</html>
以下代码为call.jsp文件内容,此文件位于WebRoot根目录,可通过url直接访问。
<%@ page language="java" import="java.util.*" pageEncoding="UTF-8"%>
<jsp:forward page="product_findProducts.action" />
③添加资源文件。
包括:创建product表和插入表数据的sql语句;index.jsp引用的两个css文件;实例所需图片。
位置:两个图片文件夹和css文件夹都添加到WebRoot根目录。(单击下载资源文件)
④至此,本实例完成。启动tomcat,访问路径:
http://localhost:8080/page/call.jsp,可查看效果。
3、实现效果展示

结语
SSH网上商城数据流向分析:url-->web.xml-->struts.xml-->action-->service-->dao,dao-->service-->action-->struts.xml-->jsp
分页实例数据流向分析:
url-->ProductAction-->ProductService-->ProductDao,ProductDao-->ProductService-->ProductAction-->index.jsp
通过index.jsp代码,我们可以了解到,分页实例仅涉及到Action的一个方法:findProducts(),该方法只需要一个参数:页码。每次请求都会在Service层new一个PageBean用来保存响应的信息:当前页数、总记录数、总页数、每页显示的记录数、每页显示数据的集合。所以,PageBean在这里就是一个实体类的角色。每次请求都会响应一个PageBean实例。
index.jsp有五个功能:跳转到前一页、后一页、第一页、最后一页、指定页码。它们都是通过findProducts()方法实现,因为这五个请求只是页码不同而已。本实例的后端分析至此完成。
前端样式,完全是借鉴已有的代码,而且并没有很好的理解,所以css中有很多冗余代码没有去除。
本实例算是照葫芦画瓢,而且画了三个小时,还好给兑出来了,2333。(源码)

相关文章推荐
- SSH网上商城—图片显示功能
- 【SSH网上商城项目实战29】使用JsChart技术在后台显示商品销售报表
- [SSH网上商城]css/图片样式失效——低版本tomcat不支持EL表达式
- 【SSH网上商城项目实战29】使用JsChart技术在后台显示商品销售报表
- 【SSH网上商城】图片上传技术
- 【SSH网上商城项目实战05】完成数据库的级联查询和分页
- 【SSH网上商城项目实战22】获取银行图标以及支付页面的显示
- 09(maven+SSH)网上商城项目实战之使用jersey实现应用服务器和图片服务器分离
- 【SSH网上商城项目实战06】基于DataGrid的数据显示
- SSH 技术—— 分页 、图片集合显示出来代码
- 【SSH网上商城项目实战16】Hibernate的二级缓存处理首页的热门显示
- 【SSH网上商城项目实战16】Hibernate的二级缓存处理首页的热门显示
- 【SSH网上商城项目实战29】使用JsChart技术在后台显示商品销售报表
- 【SSH网上商城项目实战16】Hibernate的二级缓存处理首页的热门显示
- 【SSH网上商城项目实战06】基于DataGrid的数据显示
- 【SSH网上商城项目实战05】完成数据库的级联查询和分页
- 【SSH网上商城项目实战22】获取银行图标以及支付页面的显示
- 09(maven+SSH)网上商城项目实战之使用jersey实现应用服务器和图片服务器分离
- 【SSH网上商城项目实战06】基于DataGrid的数据显示
- 【SSH网上商城项目实战22】获取银行图标以及支付页面的显示