Redis集群与SSM整合使用方法
首先是创建redis-cluster文件夹:

因为redis最少需要6个节点(三主三从),为了更好的理解,我这里创建了两台虚拟机(192.168.0.109 192.168.0.110),分别在两台虚拟机的/opt/redis-4.0.1/redis-cluster下创建三个节点文件夹
192.168.0.109:

192.168.0.110:

以上6个节点全部创建完成,分别再在这六个文件夹下创建redis.conf配置文件,其中配置如图:
port 7000
bind 192.168.0.109
daemonize yes
pidfile /var/run/redis_7000.pid
cluster-enabled yes
cluster-config-file nodes_7000.conf
cluster-node-timeout 10000
appendonly yes
其中需要将port pidfile cluster-config-file修改成节点端口号一致,bind改成本机ip,以便远程访问,全部修改完后,即可启动redis服务:
启动命令:
192.168.0.109下的命令:“for((i=0;i<=2;i++)); do /opt/redis-4.0.1/src/redis-server /opt/redis-4.0.1/redis-cluster/700$i/redis.conf; done”
192.168.0.110下的命令:“for((i=3;i<=5;i++)); do /opt/redis-4.0.1/src/redis-server /opt/redis-4.0.1/redis-cluster/700$i/redis.conf; done”

可以看到后台模式启动成功的日志打印,两天机器都需要依次启动所有节点。节点启动完成后,即可创建集群服务:
在其中一台虚拟机上执行如下命令“/opt/redis-4.0.1/src/redis-trib.rb create --replicas 1 192.168.0.109:7000 192.168.0.109:7001 192.168.0.109:7002 192.168.0.110:7003 192.168.0.110:7004 192.168.0.110:7005”

千万记住只需要在一台上执行即可,如果卡在join处不能往下执行,一般情况是出在防火墙端口被禁导致,有两种方式可以解决:
1、不但需要开启7000对外端口,还需要开启17000(因为redis总线端口需要加1000)。
2、直接关闭所有防火墙(因我这里是自己的环境,所以直接关闭了防火墙服务)。
出现上图运行日志,基本就成功搭建好了集群服务,可以清晰的看到各个节点的主从关系,环境搭建好后,这里我们就和我上篇写到的SSM架构进行联合使用。
上次整合的mybaits二级缓存是个单机版本,由于这种方式不支持集群,所以这里从新使用jedis-cluster进行另外一种redis集群与java整合使用的方式。
首先在redis.properties文件中新增集群机器的配置,将6个节点依次加入配置:
#cluster
cluster1.host.port=192.168.0.109:7000
cluster2.host.port=192.168.0.109:7001
cluster3.host.port=192.168.0.109:7002
cluster4.host.port=192.168.0.110:7003
cluster5.host.port=192.168.0.110:7004
cluster6.host.port=192.168.0.110:7005
redis配置文件中也与之前改动比较多,我直接列出来,可以直接拷去用了。
spring-redis.xml
<beans xmlns="http://www.springframework.org/schema/beans"
xmlns:xsi="http://www.w3.org/2001/XMLSchema-instance"
xmlns:p="http://www.springframework.org/schema/p"
xmlns:mvc="http://www.springframework.org/schema/mvc"
xmlns:util="http://www.springframework.org/schema/util"
xmlns:aop="http://www.springframework.org/schema/aop"
xmlns:context="http://www.springframework.org/schema/context"
xmlns:task="http://www.springframework.org/schema/task"
xsi:schemaLocation="http://www.springframework.org/schema/beans
http://www.springframework.org/schema/beans/spring-beans-4.3.xsd
http://www.springframework.org/schema/util
http://www.springframework.org/schema/util/spring-util-4.3.xsd
http://www.springframework.org/schema/mvc
http://www.springframework.org/schema/mvc/spring-mvc-4.3.xsd
http://www.springframework.org/schema/aop
http://www.springframework.org/schema/aop/spring-aop-4.3.xsd
http://www.springframework.org/schema/context
http://www.springframework.org/schema/context/spring-context-4.3.xsd">
<!-- 连接池基本参数配置,类似数据库连接池 -->
<context:property-placeholder location="classpath*:redis.properties" />
<bean name="genericObjectPoolConfig" class="org.apache.commons.pool2.impl.GenericObjectPoolConfig" >
<property name="maxWaitMillis" value="-1" />
<property name="maxTotal" value="1000" />
<property name="minIdle" value="8" />
<property name="maxIdle" value="100" />
</bean>
<!-- 连接池配置,类似数据库连接池 -->
<!-- <bean id="jedisConnectionFactory" class="org.springframework.data.redis.connection.jedis.JedisConnectionFactory" >
<property name="hostName" value="${redis.host}"></property>
<property name="port" value="${redis.port}"></property>
<property name="password" value="${redis.pass}"></property>
<property name="poolConfig" ref="poolConfig"></property>
</bean> -->
<!-- 调用连接池工厂配置 -->
<!-- <bean id="redisTemplate" class=" org.springframework.data.redis.core.RedisTemplate">
<property name="jedisConnectionFactory" ref="jedisConnectionFactory"></property>
如果不配置Serializer,那么存储的时候智能使用String,如果用User类型存储,那么会提示错误User can't cast to String!!!
<property name="keySerializer">
<bean
class="org.springframework.data.redis.serializer.StringRedisSerializer" />
</property>
<property name="valueSerializer">
<bean
class="org.springframework.data.redis.serializer.JdkSerializationRedisSerializer" />
</property>
</bean> -->
<bean id="jedisCluster" class="com.cjl.util.JedisClusterFactory">
<property name="addressConfig">
<value>classpath:redis.properties</value>
</property>
<property name="addressKeyPrefix" value="cluster" />
<property name="timeout" value="300000" />
<property name="maxRedirections" value="6" />
<property name="genericObjectPoolConfig" ref="genericObjectPoolConfig" />
</bean>
</beans>
将上篇SSM+redis整合中mybatis的开启缓存配置全部禁用,即可启动服务测试了
首先直接注入jedisCluster获取一个集群对象。

这里为了方便,我数据同步直接用了java写了个简单思想,其他方法也可实现,例如Spring AOP方式实现,使用第三方插件,或者数据库层面实现都可行。
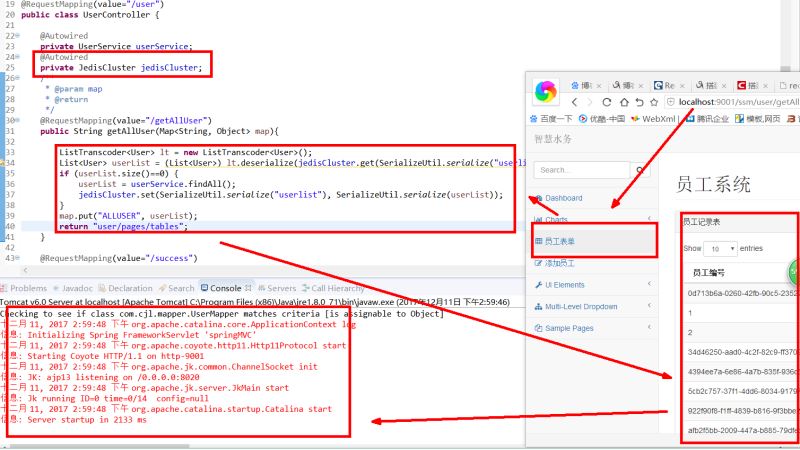
启动成功后,反复调用方法。可以看到控制台并未打印sql语句,而是直接在redis集群中直接获取得到数据。以上简单的redis集群实例已经完成,因为时间关系,其中linux中有些坑我没有细细写出。
总结
以上所述是小编给大家介绍的Redis集群与SSM整合使用方法,希望对大家有所帮助,如果大家有任何疑问请给我留言,小编会及时回复大家的。在此也非常感谢大家对脚本之家网站的支持!
您可能感兴趣的文章:

- spring整合redis以及使用RedisTemplate的方法
- redis与ssm整合方法(mybatis二级缓存)
- redis集群搭建之一~使用utils/create-cluster方法
- Redis与spring整合缓存的业务场景使用方法二(使用注解@Cacheable@CacheEvict)
- redis集群搭建之二~使用redis-trib.rb方法
- Redis与spring整合缓存的业务场景使用方法一
- springboot使用protostuff进行序列化和反序列化整合redis的redisTemplate的各种方法的写法
- php使用redis在windows下配置方法
- Java版的Redis各种类型的使用方法
- spring整合hibernate使用getHibernateTemplate().save()方法不能输入数据库
- 使用spring整合mybatis时映射文件的导入方法
- OpenStack Swift集群与Keystone的整合使用说明
- Spring整合hibernate,使用HibernateTemplate的save()方法不起作用问题
- OpenStack Swift集群与Keystone的整合使用说明
- JAVA EE项目常用知识 之 整合了spring 项目中使用log4j的一种方法
- Redis系列-JAVA与redis整合-jdbc-redis的使用(存在BUG)
- Redis系列-JAVA与redis整合-JedisPool的使用
- PHP安装redis扩展模块及常使用方法
- php-redis客户端使用方法
- phpredis使用方法