Spring项目集成apidoc生成api接口文档
2018-01-29 14:05
232 查看
一、背景需求
JavaWeb/spring项目写成的api接口,需要自动生成api文档,甚至需要在线测试接口。考虑实现的方案有swagger,apidoc,spring rest docs。在之后的项目都有一一尝试,最终还是觉得apidoc的方式比较合适,虽然有一些问题(针对在线测试方面),但可以进行定制修复并解决。
二、方案对比
1.现在大家普遍使用的是swagger结合springmvc来生成api接口文档,对比apidoc,swagger有一个明显的劣势,便是返回的响应,无法生成文档描述,即无法描述响应体的数据结构,这对前后端对接,或者是与移动端/其他端对接来说,需要耗费更多的交流成本,沟通成本,即不可能每个接口都通过实际调用后,看返回实体获悉响应参数。针对后端改动响应体这种情况,又会导致新的问题存在。
2.spring rest docs,这是spring体系里提供的一种接口生成框架,基于mockmvc编写单元测试,单元测试通过即可生成可供阅读的接口文档。这种生成方式需要编写详细的测试单元,并且稍微一点出错便导致编译不通过,对于程序的严谨有一定帮助,但又牺牲一些时间,并且最终生成的文档是基于测试用例数据,没有类似swagger和apidoc的在线测试功能。
3.apidoc,通过注释,生成接口文档,不像swagger和spring rest docs嵌入在代码中,仅仅是通过注释而已。缺点是在线测试功能有些问题,不支持文件表单,但这些缺陷都是可以弥补的,可通过再编程,重新定制源码实现,基于handlebars.js。
三、环境准备
1.安装node.js,官网:https://nodejs.org/en/点击打开链接;windows64位下载地址https://nodejs.org/dist/v8.9.4/node-v8.9.4-x64.msi下载;
2.安装apidoc,命令行下,输入npm install apidoc -g,参考官网:http://apidocjs.com/#install 点击打开链接
四、整合项目使用
1.项目根路径下建立apidoc.json文件,配置好基本的文档信息。
如图
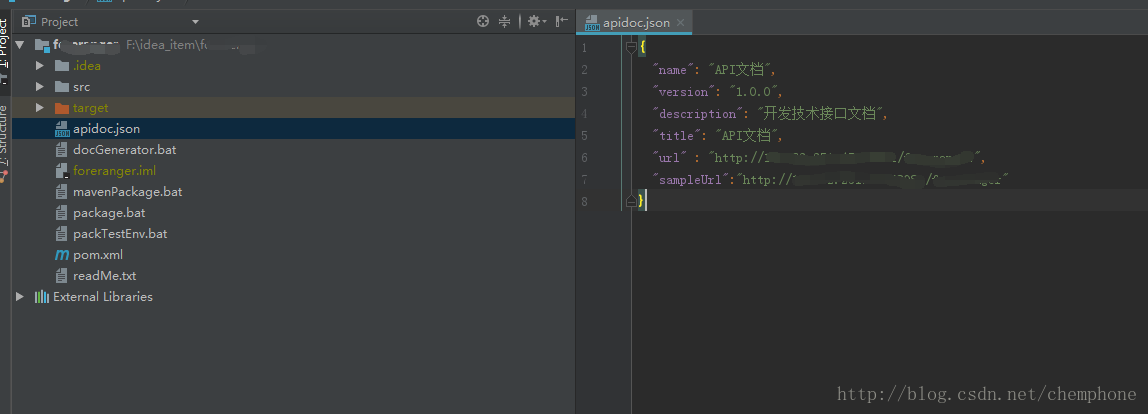
最终可配置apidoc的标题,版本号,描述,全局url根路径,测试请求的url根路径
2.抽象一些通用的返回信息,自定义一些tag,如我的代码:
抽象一些返回的错误代码
以上定义了一个常用的并且对于我的项目来说是通用的返回信息,如token_msg,success_msg,error_msg,下面例子中,一些apiUse用到的是其他的错误代码,并未一一列举出来,但可以根据名字想象就是。
3.在接口中使用。
A:get请求例子1
get请求例子2:
get请求例子3:
B:POST请求例子1
POST请求例子2
POST请求5(表单上传2)
4.如上已经列举增删改查,以及文件上传的注释例子,注意:formData是我自己定制代码使用的,原生并没有提供表单上传的功能。
下面把我的定制过程分享给大家。
在resource里面新增一个目录,放置修改的文件。

(1)如图所示,我们先在main.js中引入jqury.form.min.js依赖

(2)在index.html模板文件中,添加支持formData的模板
其实所有的资源都是使用apidoc -i ./ -o ./src/main/webapp/WEB-INF/doc生成后的文件,再把源代码进行修改而已,我们修改的只是在线测试部分的代码,所需的只是找准渲染模板所在的位置。
(3)模板修改完成后,让请求带上即可,所以修改发送请求的js文件代码

(4)定制已经完成。我们只需要将doc-extends的文件,直接覆盖回去即可。如我的批处理文件。docGenerator.bat.
即把index.html,main.js,放回生成后的根目录,jquery.form.min.js放到vendor目录下,send_sample_request.js放回utils目录下,favicon.ico放回img目录下,覆盖原来的文件即可,等于是修改了源代码。
5.在spring项目中开放一个路由,或者将其映射为静态路径,xml配置如下
<mvc:resources mapping="/rest/doc/**" location="/WEB-INF/doc/" cache-period="31536000"/>这时,只需要将apidoc生成的文档放置在/WEB-INF/doc下,访问http://localhost:port/contextPath/rest/doc/index.html便可进入接口文档,生成指令为apidoc -i ./ -o ./src/main/webapp/WEB-INF/doc。
springBoot的项目也是同理,把其放置到某个目录下,然后将该目录映射为静态资源,映射一个路径,访问该路径即可。
五、打包项目。
至此,apidoc的代码已经写进注释里,要融合进我们的开发里面,就需要使用脚本来一步完成,不然的话,就按照基本流程过来。
总共步骤如下
1.打开cmd,调用apidoc的执行程序,生成apidoc文档,apidoc -i ./ -o ./src/main/webapp/WEB-INF/doc
2.将我们修改过的源文件逐个复制回原本的目录,覆盖。
3.项目打包,mvn clean install package
4.部署,访问http://localhost:port/contextPath/rest/doc/index.html,访问接口文档。
我写了一个在window下的批处理文件。package.bat。代码如下。
与步骤有些不同:svn回滚,然后svn更新,apidoc生成文档,覆盖修改文件到apidoc目录下,打包项目,将打包的war包拷贝到桌面。具体根据自己项目修改批处理文件,linux系统脚本自己定制。
六、效果图。


七、结束。
这里没有讲apidoc具体的注释的使用,但是已经举了一些例子,并且对源码进行了一定的定制,虽然仍然有其不足,但是思路已经为大家打开了,你也可以像我一样对源码进行自己的定制,不过是基于handlebars.js的渲染而已。具体的注释请参照官网http://apidocjs.com即可。
可能本篇文章讲的并不是很细致,不足之处请大家指教,有问题可以评论留言,如果看到,会逐个回复。
JavaWeb/spring项目写成的api接口,需要自动生成api文档,甚至需要在线测试接口。考虑实现的方案有swagger,apidoc,spring rest docs。在之后的项目都有一一尝试,最终还是觉得apidoc的方式比较合适,虽然有一些问题(针对在线测试方面),但可以进行定制修复并解决。
二、方案对比
1.现在大家普遍使用的是swagger结合springmvc来生成api接口文档,对比apidoc,swagger有一个明显的劣势,便是返回的响应,无法生成文档描述,即无法描述响应体的数据结构,这对前后端对接,或者是与移动端/其他端对接来说,需要耗费更多的交流成本,沟通成本,即不可能每个接口都通过实际调用后,看返回实体获悉响应参数。针对后端改动响应体这种情况,又会导致新的问题存在。
2.spring rest docs,这是spring体系里提供的一种接口生成框架,基于mockmvc编写单元测试,单元测试通过即可生成可供阅读的接口文档。这种生成方式需要编写详细的测试单元,并且稍微一点出错便导致编译不通过,对于程序的严谨有一定帮助,但又牺牲一些时间,并且最终生成的文档是基于测试用例数据,没有类似swagger和apidoc的在线测试功能。
3.apidoc,通过注释,生成接口文档,不像swagger和spring rest docs嵌入在代码中,仅仅是通过注释而已。缺点是在线测试功能有些问题,不支持文件表单,但这些缺陷都是可以弥补的,可通过再编程,重新定制源码实现,基于handlebars.js。
三、环境准备
1.安装node.js,官网:https://nodejs.org/en/点击打开链接;windows64位下载地址https://nodejs.org/dist/v8.9.4/node-v8.9.4-x64.msi下载;
2.安装apidoc,命令行下,输入npm install apidoc -g,参考官网:http://apidocjs.com/#install 点击打开链接
npm install apidoc -g安装完毕,可在命令下使用apidoc -h测试是否安装成功
apidoc -h3.apidoc指令能成功识别,apidoc环境便已经安装好了,这时可在项目中使用,所有的代码基于注释即可。
四、整合项目使用
1.项目根路径下建立apidoc.json文件,配置好基本的文档信息。
{
"name": "API文档",
"version": "1.0.0",
"description": "开发技术接口文档",
"title": "API文档",
"url" : "http://localhost:8080/test",
"sampleUrl":"http://localhost:8080/test"
}
如图
最终可配置apidoc的标题,版本号,描述,全局url根路径,测试请求的url根路径
2.抽象一些通用的返回信息,自定义一些tag,如我的代码:
/**
* Created by Administrator on 2017/2/16.
*/
public class BaseApi {
/**
* @apiDefine error_msg 全局配置失败响应信息
* @apiError 1001 保存失败
* @apiError 1002 修改失败
* @apiError 1003 删除失败
* @apiError 1004 上传失败
* @apiError 1005 注册失败
* @apiError 1101 输入参数格式不正确
* @apiError 1102 用户名或者密码错误
* @apiError 1103 用户名不存在
* @apiError 1201 发送手机注册验证码失败
* @apiError 1202 用户注册失败
* @apiError 1203 机构不存在
* @apiError 1204 注册验证码输入错误
* @apiError 1205 手机号码已存在
* @apiError 1206 用户名已存在
* @apiError 1207 机构不存在
* @apiError 1208 手机或者用户名已存在
* @apiError 4101 token过期
* @apiError 4102 token签名错误
* @apiError 4103 无效token
* @apiError 4104 token格式错误
* @apiError 5000 接口内部错误
* @apiErrorExample 错误响应例子:
*     {
*       "code": 1101,
*       "msg": "输入参数格式不正确",
*       "res": "",
*       "timestamp": 1489110927975
*     }
*
*/

/**
* @apiDefine success_msg 全局配置成功响应信息
* @apiSuccess (success 2000) {Date}  timestamp     时间戳
* @apiSuccess (success 2000) {Integer} code        响应码
* @apiSuccess (success 2000) {String}  msg       响应信息
* @apiSuccess (success 2000) {Object}  res   响应实体
*/

/**
* @apiDefine token_msg 全局配置token鉴权请求头
* @apiError 4101 token过期
* @apiError 4102 token签名错误
* @apiError 4103 无效token
* @apiError 4104 token格式错误
* @apiHeader {String}  Authorization 鉴权信息:为Bearer + "空格" +  {token}
* @apiHeaderExample {json} 请求头例子:
*     {
*       "Authorization": "Bearer eyJhbGciOiJIUzI1NiJ9.eyJzdWIiOiIxNDg5NjAiLCJpYXQiOjE0OTUxNjYyMzgsImV4cCI6MTQ5Nzc1ODIzOH0.Mv8BfTIGxGZ6AGkYqHFTRhp40x5xHV6k7Hpwo6OdgiA"
*     }
*/
}
抽象一些返回的错误代码
public enum AttendRestEnum implements RestEnum{
/**
* @apiDefine ATTEND_EMPTY_ID
* @apiError 5001 规则不能为空
*/
ATTEND_EMPTY_ID(5001,"规则不能为空"),
/**
* @apiDefine ATTEND_EMPTY_VALUE
* @apiError 5002 值不能为空
*/
ATTEND_EMPTY_VALUE(5002,"值不能为空"),
/**
* @apiDefine ATTEND_ERROR_EQUAL_VALUE
* @apiError 5003 设置参数的个数不一致
*/
ATTEND_ERROR_EQUAL_VALUE(5003,"设置参数的个数不一致"),
/**
* @apiDefine ATTEND_EMPTY_LONGITUDE
* @apiError 5004 经度不能为空
*/
ATTEND_EMPTY_LONGITUDE(5004, "经度不能为空"),
/**
* @apiDefine ATTEND_EMPTY_LATITUDE
* @apiError 5005 纬度不能为空
*/
ATTEND_EMPTY_LATITUDE(5005,"纬度不能为空" ),
/**
* @apiDefine ATTEND_EMPTY_DEVICE_SN
* @apiError 5006 设备不能为空
*/
ATTEND_EMPTY_DEVICE_SN(5006,"设备不能为空" ),

/**
* @apiDefine ATTEND_EMPTY_ORG
* @apiError 5007 机构不能为空
*/
ATTEND_EMPTY_ORG(5007,"机构不能为空"),

/**
* @apiDefine ATTEND_NOT_FIND_ORG
* @apiError 5008 机构没有找到
*/
ATTEND_NOT_FIND_ORG(5008,"机构没有找到"),

/**
* @apiDefine ATTEND_EMPTY_MINUTES
* @apiError 5009 使用时长不能为空
*/
ATTEND_EMPTY_MINUTES(5009,"使用时长不能为空"),

/**
* @apiDefine ATTEND_ERROR_MINUTES
* @apiError 5010 使用时长不能为负数
*/
ATTEND_ERROR_MINUTES(5010,"使用时长不能为负数"),

/**
* @apiDefine ATTEND_ERROR2_MINUTES
* @apiError 5011 当天使用时长不能大于24小时
*/
ATTEND_ERROR2_MINUTES(5011,"当天使用时长不能大于24小时")

;

private  final int code;
private final String msg;

private AttendRestEnum(int code,String msg){
this.code = code;
this.msg = msg;
}
@Override
public int getCode() {
return this.code;
}

@Override
public String getMsg() {
return this.msg;
}
}
以上定义了一个常用的并且对于我的项目来说是通用的返回信息,如token_msg,success_msg,error_msg,下面例子中,一些apiUse用到的是其他的错误代码,并未一一列举出来,但可以根据名字想象就是。
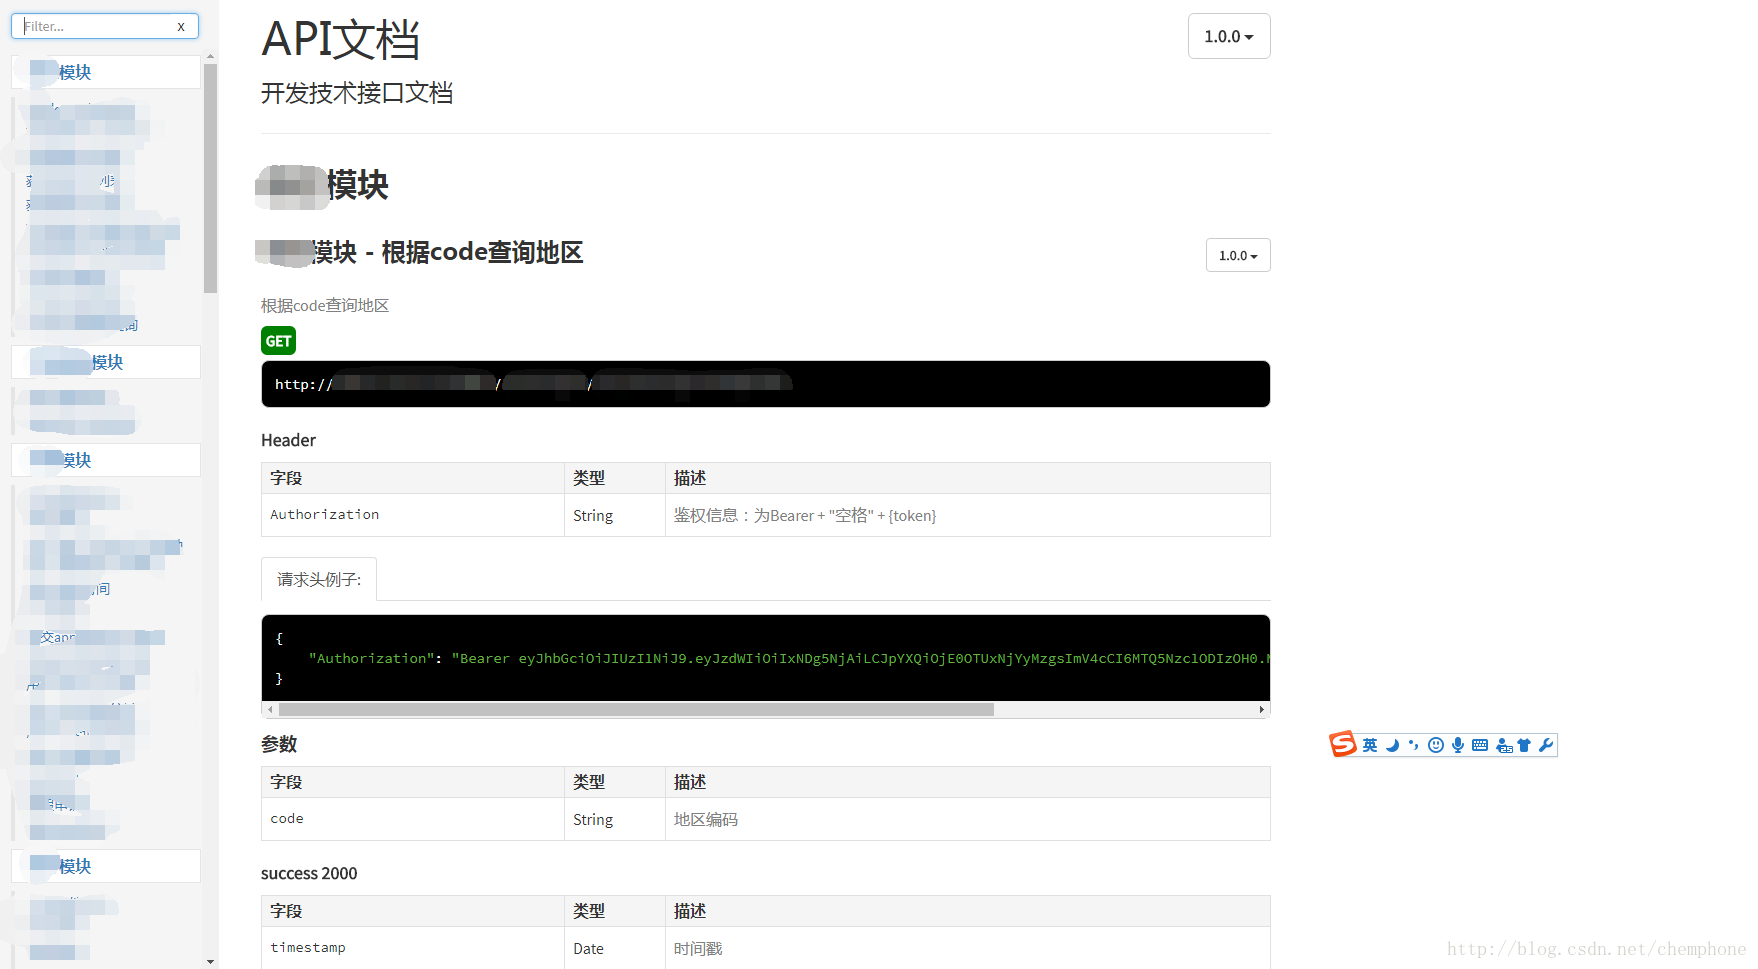
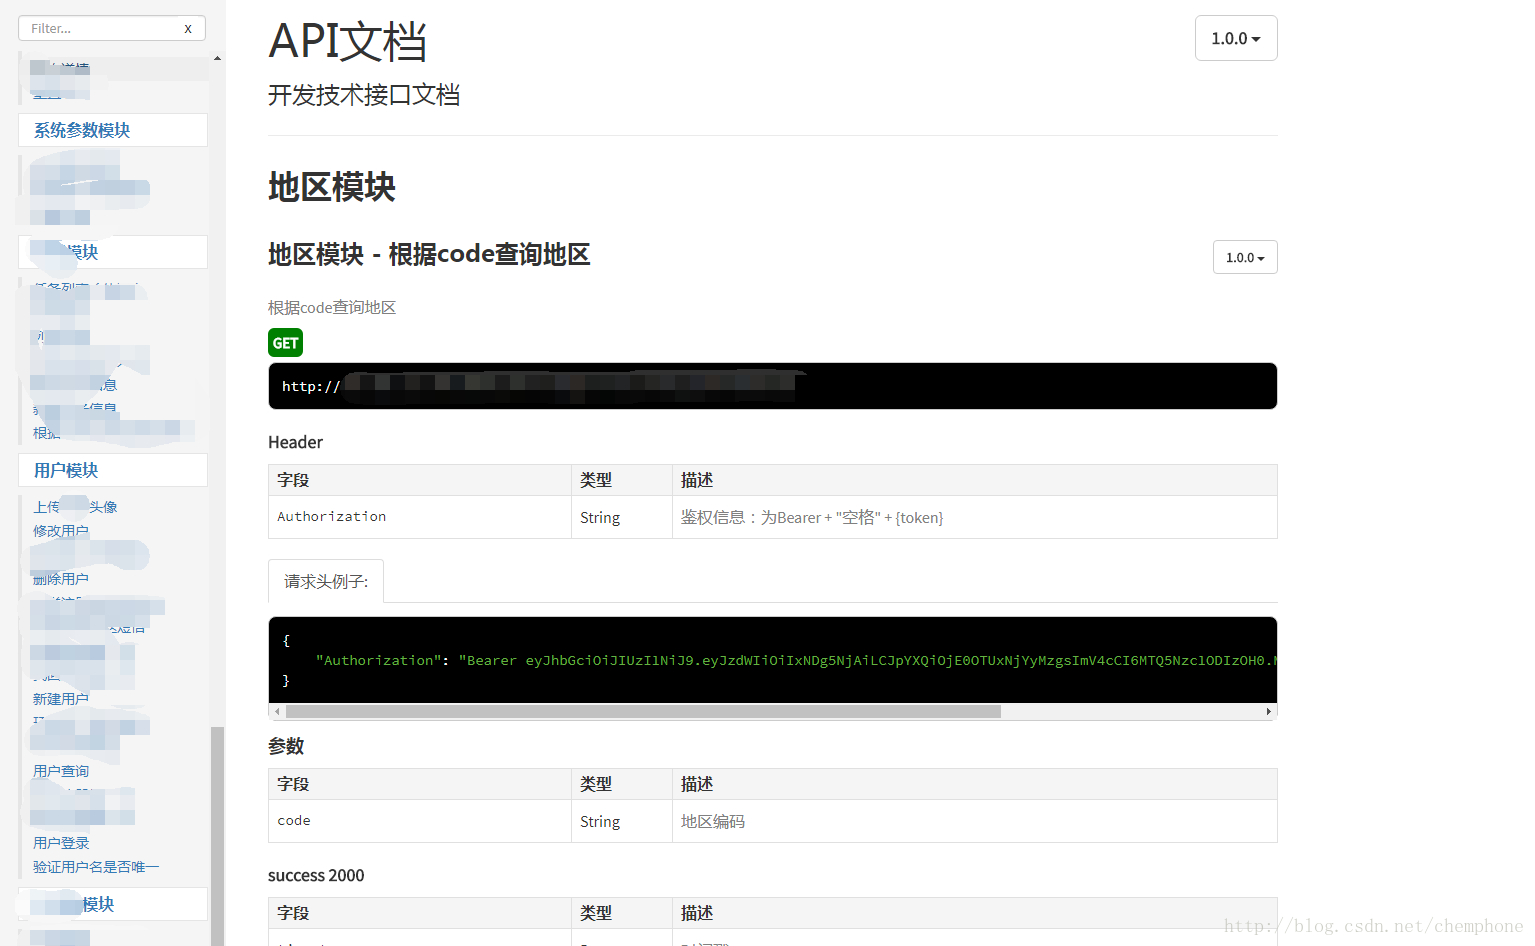
3.在接口中使用。
A:get请求例子1
/**
* @api {get} /rest/area/getAreasByCode 行政区域查询
* @apiDescription 根据行政编码获取行政区域,0获取省级行政区域
* @apiName getAreasByCode
* @apiGroup area
* @apiVersion 1.0.0
*
* @apiParam {String} code 行政编码
*
* @apiSampleRequest /rest/area/getAreasByCode
* @apiUse token_msg
* @apiUse success_msg
* @apiSuccess (success 2000) {String} res.id 标识码
* @apiSuccess (success 2000) {String} res.name 行政地区名称
* @apiSuccess (success 2000) {String} res.code 行政编码
* @apiSuccess (success 2000) {String} res.prevCode 上级行政编码
* @apiSuccess (success 2000) {String} res.allName 全称
*
*/
@RequestMapping("/getAreasByCode")
@ResponseBody
public RestResponse getAreasByCode(String code){
return new RestResponse(areaService.findAreaByPrevCode(code));
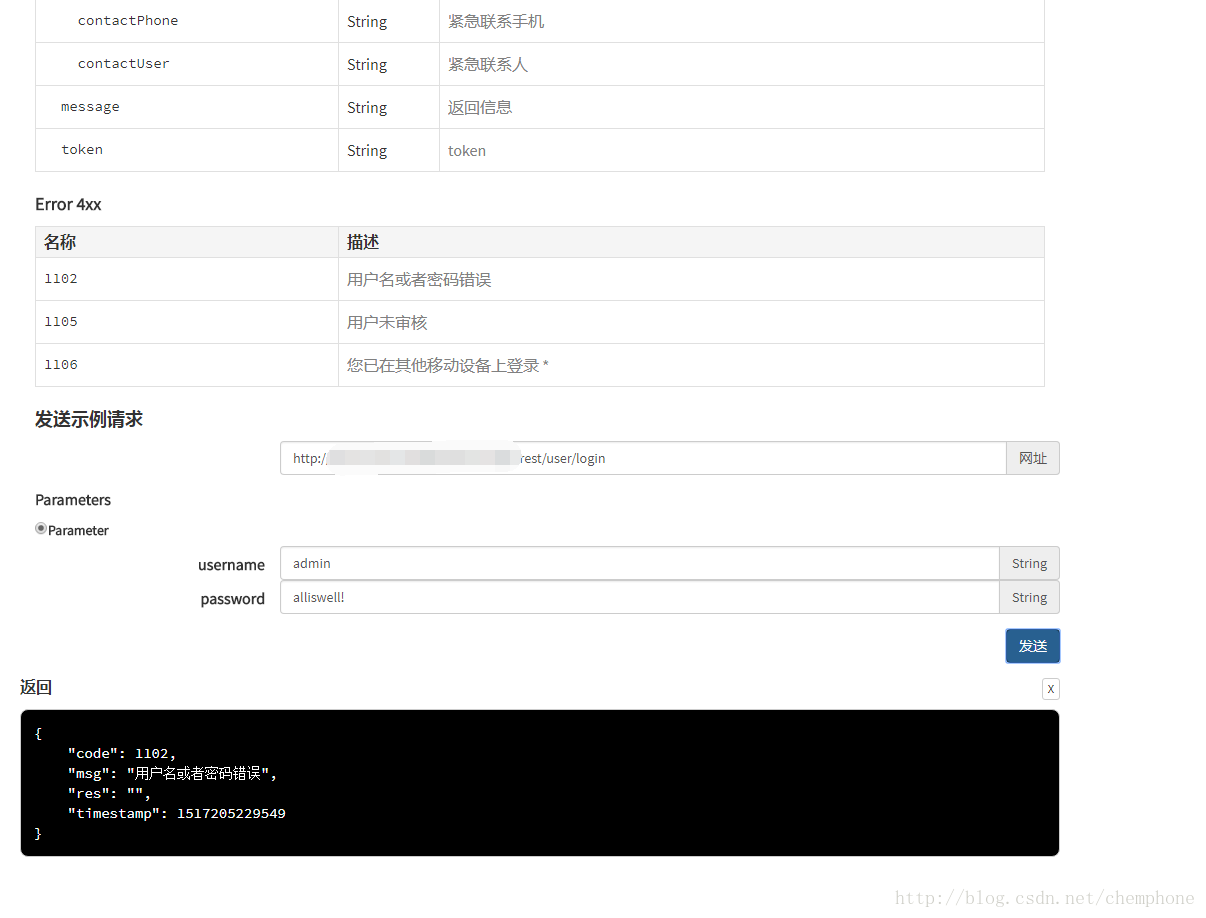
}get请求例子2:
/**
* @api {get} /rest/role/find 角色列表查询
* @apiDescription  综合角色查询
* @apiName find
* @apiGroup role
* @apiVersion 1.0.0
*
* @apiUse token_msg
* @apiParam {String}  [page]     当前第几页
* @apiParam {String}  [pageSize]    每页显示多少条数据,当该参数为0时表示不分页,查询全部
* @apiParam {String}  [name]    角色名称
* @apiParam {String}  [code]       角色代码
*
* @apiSampleRequest /rest/role/find
* @apiUse success_msg
* @apiSuccess (success 2000) {Long}      res.total    总条数
* @apiSuccess (success 2000) {Array}    res.results    结果集
* @apiSuccess (success 2000) {String}    res.results.id    角色id
* @apiSuccess (success 2000) {String}    res.results.name    角色名称
* @apiSuccess (success 2000) {String}    res.results.code        角色代码
* @apiSuccess (success 2000) {String}    res.results.remark        角色描述
* @apiSuccess (success 2000) {String}    res.results.createTime        创建时间
* @apiSuccess (success 2000) {String}    res.results.updateTime        更新时间
* @apiSuccess (success 2000) {String}    res.results.sort        排序编号
* @apiSuccess (success 2000) {String}    res.results.isSuper        是否超级管理员
*/
@RequestMapping("/find")
@ResponseBody
public RestResponse find(String name,String code,String page,String pageSize){
return new RestResponse(rsp);
}
get请求例子3:
/**
* @api {get} /rest/role/get 角色详情
* @apiDescription  根据id或者根据code查询角色
* @apiName get
* @apiGroup role
* @apiVersion 1.0.0
*
* @apiUse token_msg
* @apiParam {String}  [id]     角色id
* @apiParam {String}  [code]       角色代码
*
* @apiSampleRequest /rest/role/get
* @apiUse success_msg
* @apiSuccess (success 2000) {String}    res.id    角色id
* @apiSuccess (success 2000) {String}    res.name    角色名称
* @apiSuccess (success 2000) {String}    res.code        角色代码
* @apiSuccess (success 2000) {String}    res.remark        角色描述
* @apiSuccess (success 2000) {String}    res.createTime        创建时间
* @apiSuccess (success 2000) {String}    res.updateTime        更新时间
* @apiSuccess (success 2000) {String}    res.sort        排序编号
* @apiSuccess (success 2000) {String}    res.isSuper        是否超级管理员
*
* @apiUse ROLE_UN_EXIST
*/
@RequestMapping("/get")
@ResponseBody
public RestResponse get(String id,String code){
return rest;
}
B:POST请求例子1
/**
* @api {post} /rest/role/create 创建角色
* @apiDescription  新建角色
* @apiName create
* @apiGroup role
* @apiVersion 1.0.0
*
* @apiUse token_msg
* @apiParam {String}  code 角色代码
* @apiParam {String}  name 角色名称
* @apiParam {String}  [remark] 角色描述
*
* @apiSampleRequest /rest/role/create
* @apiUse success_msg
*
* @apiUse ROLE_INPUT_NAME_ERROR
* @apiUse ROLE_INPUT_CODE_ERROR
* @apiUse ROLE_REPEAT_CODE
*/
@RequestMapping("/create")
@ResponseBody

bf40
public RestResponse create(String name,String code,String remark){
return new RestResponse();
}
POST请求例子2
/**
* @api {post} /rest/role/update 修改角色
* @apiDescription  修改角色
* @apiName update
* @apiGroup role
* @apiVersion 1.0.0
*
* @apiUse token_msg
* @apiParam {String}  id 角色代码
* @apiParam {String}  [name] 角色名称
* @apiParam {String}  [code] 角色代码
* @apiParam {String}  [remark] 角色描述
*
* @apiSampleRequest /rest/role/update
* @apiUse success_msg
*
* @apiUse ROLE_CANNOTBE_NONE
* @apiUse ROLE_REPEAT_CODE
* @apiUse ROLE_UN_EXIST
* @apiUse ROLE_CANNOT_EDIT
*/
@RequestMapping("/update")
@ResponseBody
public RestResponse update(String id,String name,String code,String remark){
return new RestResponse();
}POST请求例子3/**
* @api {post} /rest/role/delete 删除角色
* @apiDescription 根据id删除角色
* @apiName delete
* @apiGroup role
* @apiVersion 1.0.0
*
* @apiUse token_msg
* @apiParam {String} id 角色id
*
* @apiSampleRequest /rest/role/delete
* @apiUse success_msg
*
* @apiUse USER_ROLE_UNEXIST
* @apiUse ROLE_DELETE_CANNOT_DELETE_DEFAULT
*/
@RequestMapping("/delete")
@ResponseBody
public RestResponse delete(String id){
return new RestResponse(rest);
}POST请求4(表单上传1)/**
* @api {post} /rest/user/updateHxIcon/{userName} 上传头像
* @apiDescription 上传头像,{userName}是需要上传的用户名称,为地址参数
* @apiName updateHxIcon
* @apiGroup user
* @apiVersion 1.0.0
*
* @apiParam {formData} imageFile 头像文件
*
* @apiSampleRequest /rest/user/updateHxIcon/{userName}
* @apiUse token_msg
* @apiUse success_msg
* @apiSuccess (success 2000) {boolean} res.result 请求结果
* @apiSuccess (success 2000) {String} res.message 请求结果信息
* @apiSuccess (success 2000) {String} res.url 头像链接
*
* @apiUse INPUT_ERROR
* @apiUse BASE_UPLOAD_FAIL
* @apiUse USER_UNEXIST
*/
@RequestMapping(value = "/updateHxIcon/{userName}",method = RequestMethod.POST)
@ResponseBody
public RestResponse updateHxIcon(HttpServletRequest request,@PathVariable("userName") String userName,@RequestParam(value = "imageFile", required = true) MultipartFile file){
return res;
}POST请求5(表单上传2)
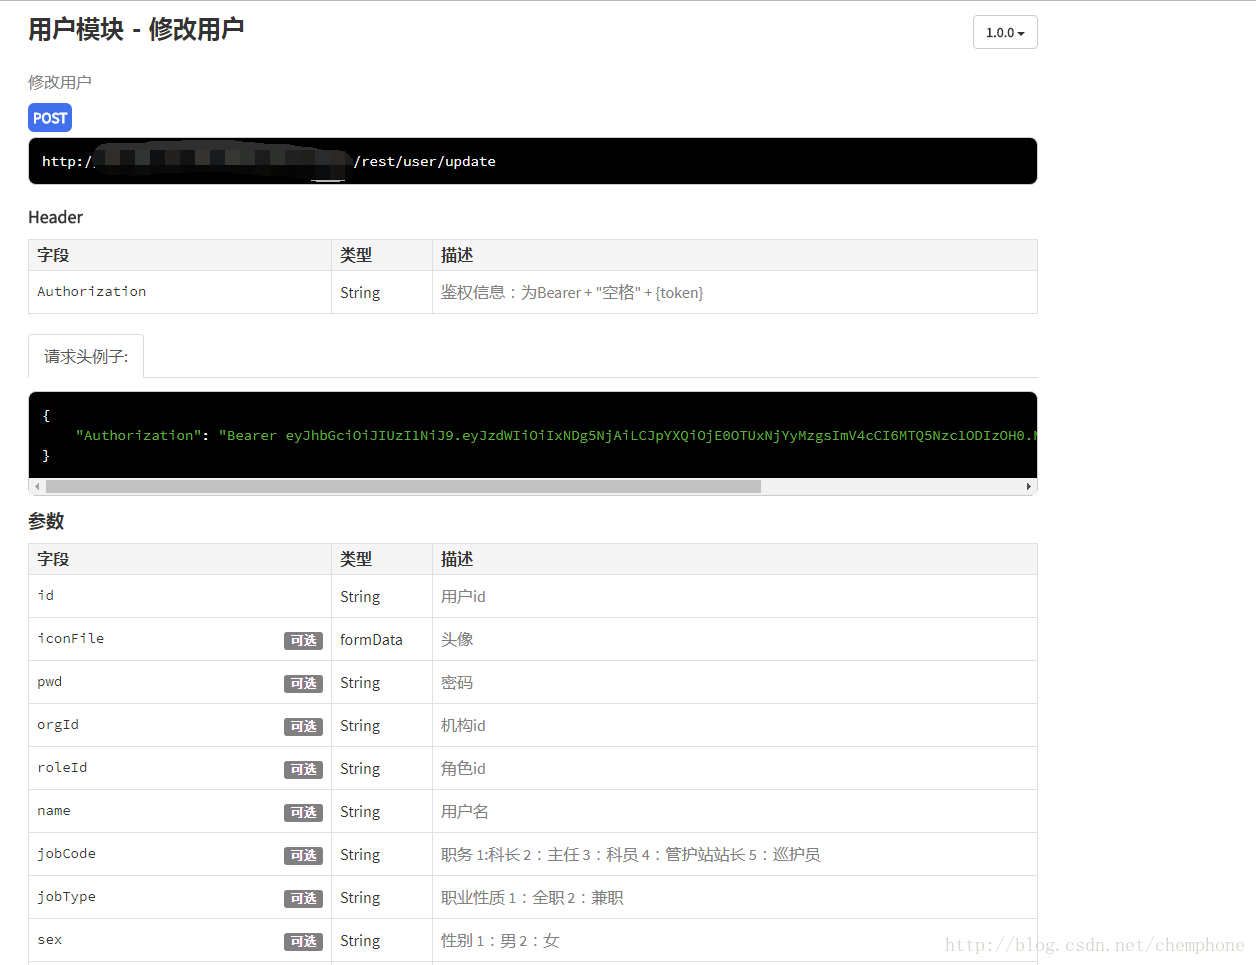
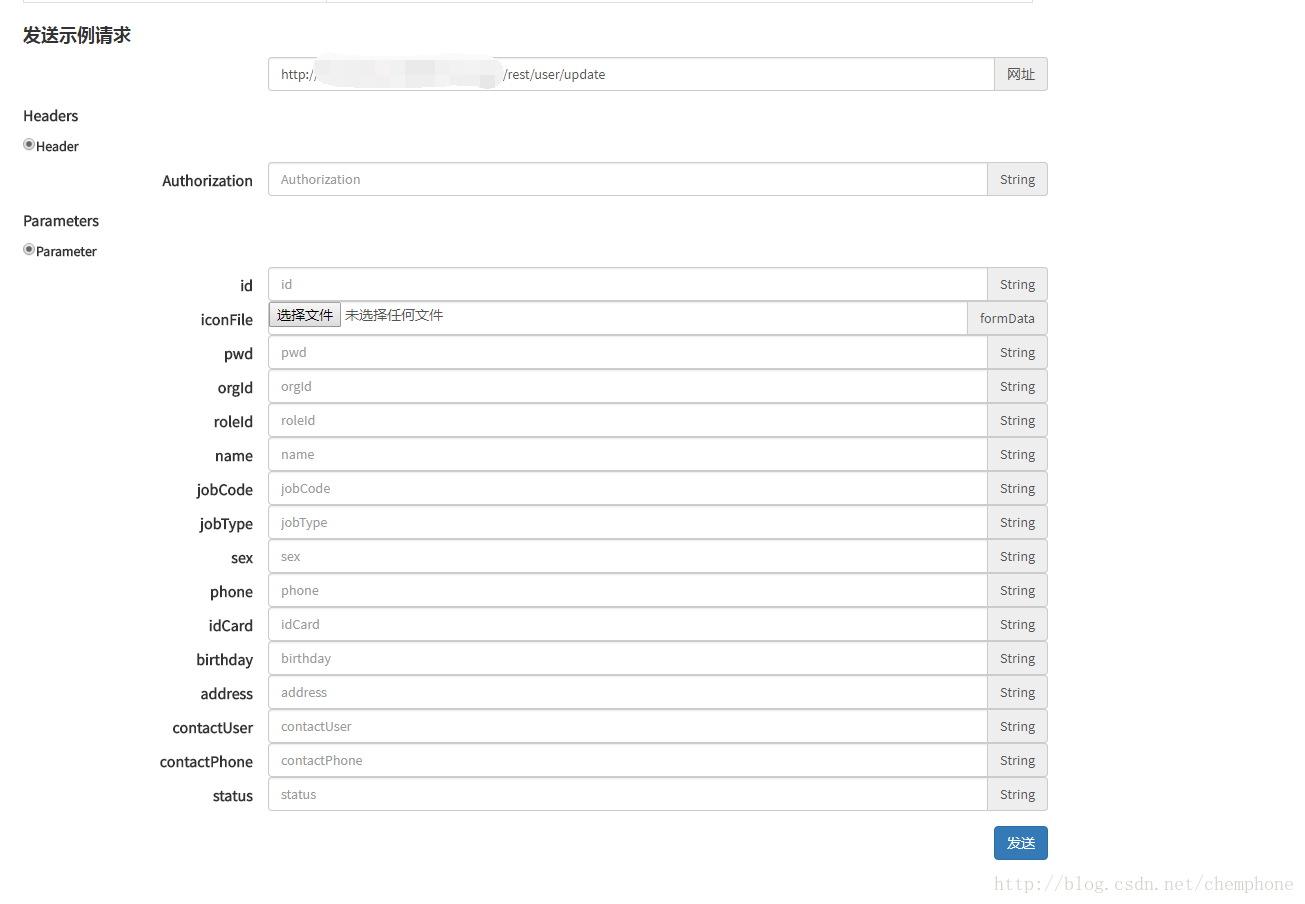
/**
* @api {post} /rest/user/create 新建用户
* @apiDescription  新建用户
* @apiName create
* @apiGroup user
* @apiVersion 1.0.0
*
* @apiUse token_msg
* @apiParam {formData}  [iconFile]     头像
* @apiParam {String}  loginName     登录名
* @apiParam {String}  pwd     密码
* @apiParam {String}  orgId     机构id
* @apiParam {String}  [roleId]     角色id
* @apiParam {String}  name    用户名
* @apiParam {String}  [jobCode]    职务 1:科长 2:主任 3:科员 4:。。。
* @apiParam {String}  [jobType]    职业性质 1:全职 2:兼职
* @apiParam {String}  [sex]    性别 1:男 2:女
* @apiParam {String}  phone    手机号
* @apiParam {String}   idCard   身份证号
* @apiParam {String}  birthday  出生日期
* @apiParam {String}  [address]    住址
* @apiParam  {String} [contactUser] 紧急联系人
* @apiParam {String}  [contactPhone] 紧急联系电话
* @apiParam  {String} [sex]    性别  1:男  2:女
*
* @apiSampleRequest /rest/user/create
* @apiUse success_msg
*
* @apiUse USER_EMPTY_NAME
* @apiUse USER_EMPTY_LOGIN_NAME
* @apiUse USER_EMPTY_PWD
* @apiUse USER_EMPTY_ORG
* @apiUse USER_EMPTY_ROLE
* @apiUse REGISTER_PHONE_EXIST
* @apiUse REGISTER_USERNAME_EXIST
* @apiUse USER_IDCARD_EXIST
* @apiUse REGISTER_ORG_UNEXIST
* @apiUse BASE_UPLOAD_FAIL
* @apiUse BASE_SAVE_FAIL
* */
@RequestMapping("/create")
@ResponseBody
public RestResponse create(@RequestParam("iconFile") CommonsMultipartFile[] files
,String loginName,String pwd,String orgId,String roleId,String name,
String jobCode,String jobType,String sex,String phone,String idCard,String birthday,String address,String contactUser,String contactPhone){
return new RestResponse(rest);
}4.如上已经列举增删改查,以及文件上传的注释例子,注意:formData是我自己定制代码使用的,原生并没有提供表单上传的功能。
下面把我的定制过程分享给大家。
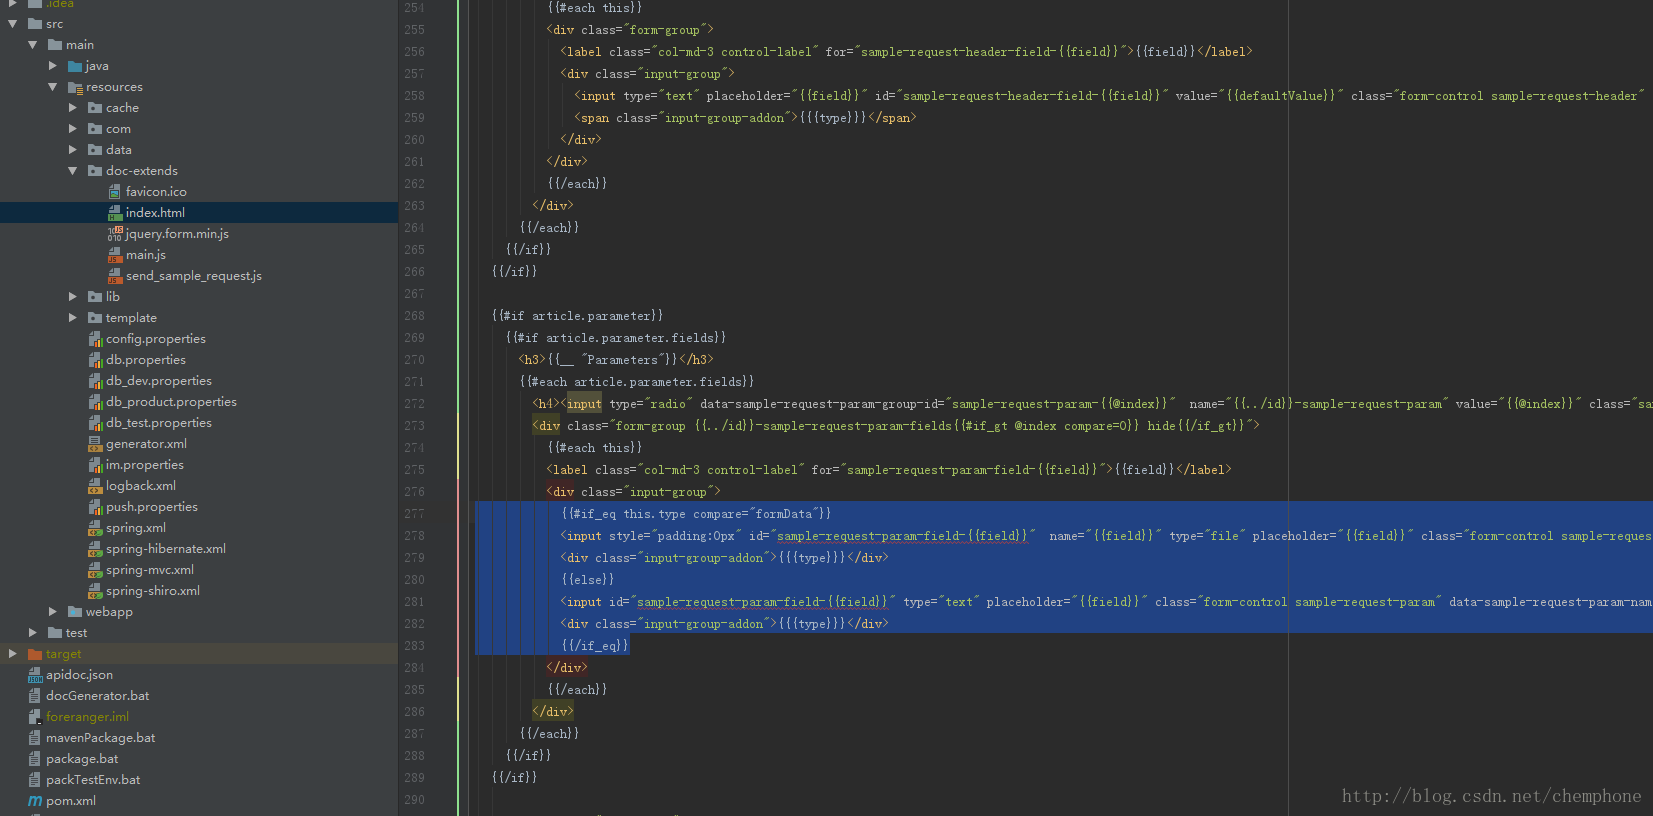
在resource里面新增一个目录,放置修改的文件。
(1)如图所示,我们先在main.js中引入jqury.form.min.js依赖
(2)在index.html模板文件中,添加支持formData的模板
{{#if_eq this.type compare="formData"}}
<input style="padding:0px" id="sample-request-param-field-{{field}}"  name="{{field}}" type="file" placeholder="{{field}}" class="form-control sample-request-param" data-sample-request-param-name="{{field}}" data-sample-request-param-group="sample-request-param-{{@../index}}">
<div class="input-group-addon">{{{type}}}</div>
{{else}}
<input id="sample-request-param-field-{{field}}" type="text" placeholder="{{field}}" class="form-control sample-request-param" data-sample-request-param-name="{{field}}" data-sample-request-param-group="sample-request-param-{{@../index}}">
<div class="input-group-addon">{{{type}}}</div>
{{/if_eq}}
其实所有的资源都是使用apidoc -i ./ -o ./src/main/webapp/WEB-INF/doc生成后的文件,再把源代码进行修改而已,我们修改的只是在线测试部分的代码,所需的只是找准渲染模板所在的位置。
(3)模板修改完成后,让请求带上即可,所以修改发送请求的js文件代码
// send AJAX request, catch success or error callback
var ajaxRequest = {
url        : url,
headers    : header,
data       : param,
type       : type.toUpperCase(),
success    : displaySuccess,
error      : displayError
};
if($root.find("input[type='file']").length == 0) {
$.ajax(ajaxRequest);
}else{
var $ycfm = $($root.find("form")[0]);
$ycfm.attr("enctype","multipart/form-data");
$ycfm.ajaxSubmit(ajaxRequest);
}
(4)定制已经完成。我们只需要将doc-extends的文件,直接覆盖回去即可。如我的批处理文件。docGenerator.bat.
@echo off
call apidoc -i ./ -o ./src/main/webapp/WEB-INF/doc
copy "%~dp0src\main\resources\doc-extends\index.html" "%~dp0src\main\webapp\WEB-INF\doc" /y
copy "%~dp0src\main\resources\doc-extends\main.js" "%~dp0src\main\webapp\WEB-INF\doc" /y
copy "%~dp0src\main\resources\doc-extends\jquery.form.min.js" "%~dp0src\main\webapp\WEB-INF\doc\vendor" /y
copy "%~dp0src\main\resources\doc-extends\send_sample_request.js" "%~dp0src\main\webapp\WEB-INF\doc\utils" /y
copy "%~dp0src\main\resources\doc-extends\favicon.ico" "%~dp0src\main\webapp\WEB-INF\doc\img" /y
pause
即把index.html,main.js,放回生成后的根目录,jquery.form.min.js放到vendor目录下,send_sample_request.js放回utils目录下,favicon.ico放回img目录下,覆盖原来的文件即可,等于是修改了源代码。
5.在spring项目中开放一个路由,或者将其映射为静态路径,xml配置如下
<mvc:resources mapping="/rest/doc/**" location="/WEB-INF/doc/" cache-period="31536000"/>这时,只需要将apidoc生成的文档放置在/WEB-INF/doc下,访问http://localhost:port/contextPath/rest/doc/index.html便可进入接口文档,生成指令为apidoc -i ./ -o ./src/main/webapp/WEB-INF/doc。
springBoot的项目也是同理,把其放置到某个目录下,然后将该目录映射为静态资源,映射一个路径,访问该路径即可。
五、打包项目。
至此,apidoc的代码已经写进注释里,要融合进我们的开发里面,就需要使用脚本来一步完成,不然的话,就按照基本流程过来。
总共步骤如下
1.打开cmd,调用apidoc的执行程序,生成apidoc文档,apidoc -i ./ -o ./src/main/webapp/WEB-INF/doc
2.将我们修改过的源文件逐个复制回原本的目录,覆盖。
3.项目打包,mvn clean install package
4.部署,访问http://localhost:port/contextPath/rest/doc/index.html,访问接口文档。
我写了一个在window下的批处理文件。package.bat。代码如下。
@echo off
svn revert -R src/main/webapp/WEB-INF/doc
svn update

call apidoc -i ./ -o ./src/main/webapp/WEB-INF/doc
copy "%~dp0src\main\resources\doc-extends\index.html" "%~dp0src\main\webapp\WEB-INF\doc" /y
copy "%~dp0src\main\resources\doc-extends\main.js" "%~dp0src\main\webapp\WEB-INF\doc" /y
copy "%~dp0src\main\resources\doc-extends\jquery.form.min.js" "%~dp0src\main\webapp\WEB-INF\doc\vendor" /y
copy "%~dp0src\main\resources\doc-extends\send_sample_request.js" "%~dp0src\main\webapp\WEB-INF\doc\utils" /y
copy "%~dp0src\main\resources\doc-extends\favicon.ico" "%~dp0src\main\webapp\WEB-INF\doc\img" /y

call mvn clean install package -Dmaven.test.skip=true

for /f "tokens=2,*" %%i in ('reg query "HKCU\Software\Microsoft\Windows\CurrentVersion\Explorer\Shell Folders" /v "Desktop"') do (
set desk=%%j
)
copy "%~dp0target\foreranger.war" "%desk%" /y
pause
与步骤有些不同:svn回滚,然后svn更新,apidoc生成文档,覆盖修改文件到apidoc目录下,打包项目,将打包的war包拷贝到桌面。具体根据自己项目修改批处理文件,linux系统脚本自己定制。
六、效果图。
七、结束。
这里没有讲apidoc具体的注释的使用,但是已经举了一些例子,并且对源码进行了一定的定制,虽然仍然有其不足,但是思路已经为大家打开了,你也可以像我一样对源码进行自己的定制,不过是基于handlebars.js的渲染而已。具体的注释请参照官网http://apidocjs.com即可。
可能本篇文章讲的并不是很细致,不足之处请大家指教,有问题可以评论留言,如果看到,会逐个回复。

相关文章推荐
- Spring项目集成apidoc生成api接口文档
- Spring-Boot + Swagger2 自动生成API接口文档
- 详解 集成Maven Spring Mybatis项目打包生成Bat文件
- spring集成swagger生成api文档的丢弃接口添加删除线效果
- springboot+springfox+Swagger 实现项目的restful文档的自动生成
- 使用apidoc自动生成rest风格api接口文档
- eclipse根据C++项目组提供的WEBSERVICE的WSDL文档生成客户端,打成jar包,供spring项目使用
- springboot 集成 swagger生成在线文档
- 【SpringBoot探索四】SpringBoot项目集成Swagger2管理接口文档
- springmvc集成Swagger自动生成api文档
- 使用SpringBoot搭建小型项目,集成mybatis,redis,swagger2,并部署在外部容器中。
- 整合Spring Cloud分布式微服务云架构集成项目
- [置顶] spring boot项目实战:swagger2在线文档
- 利用Xcode自动生成项目文档
- 利用网站生成一个 springboot+freemarker项目
- SpringBoot实践之---集成Swagger2生成Restful风格的在线API
- 根据开源项目的源代码生成相应的帮助文档
- springmvc+mybatis+maven项目集成的时候遇到一个问题,项目搭起来以后,http请求怎么都进不到controller中,页面直接返回404错误,控制台没有报任何错误,请大神帮我看看
- [翻译]Drools6.2帮助文档-11.与Spring集成
- 杨品的文档之--spring-boot集成jsp配置