杨品的文档之--spring-boot集成jsp配置
2017-02-08 11:35
561 查看
之前一直有听说spring-boot,但没怎么用过,spring-boot减少了很多的配置,这点的还是很给力的,有点类似博主接触过的grails(groovy+gralde)项目,spring-boot的“约定优于配置 ”理念也是极大的简化基于Spring MVC的Web应用和REST服务开发,
感兴趣的可以去spring官网查阅下相关的介绍https://spring.io
1,FreeMarker
2,Groovy
3,Thymeleaf (spring 官网使用这个)
4,Velocity
5,JSP (Spring Boot官方不推荐,STS创建的项目会在src/main/resources 下有个templates 目录,这里就是让我们放模版文(spring-boot默认支持html文件的直接跳转),然后并没有生成诸如 SpringMVC 中的webapp目录)。同时spring也提供了在线生成spring-boot工程的链接地址https://start.spring.io/
先贴上工程的目录结构图:

大体步骤如下:
1,创建Maven Web Project项目;
2,在pom.xml文件中添加相关依赖;
3,配置application.properties支持jsp参数;
4,编写Controller控制器
5,编写jsp页面
6,创建spring-boot的启动类Application.java
------------------------------------------------------------------------------------
1,第一步创建maven web工程就略去了,网上教程很多,不太会的,大家自己可以去看下
2,创建Maven Web工程后配置下pom.xml文件:
3,我们先要创建src/main/resources这个目录,然后在此目录下创建一个application.properties配置文件(注意,还需要创建src/main/resources/templates 这个目录,用来存放模板文件),先贴上application.properties代码
4,IndexControl.java 控制器
package com.cnepay;
import java.util.Map;
import org.springframework.beans.factory.annotation.Value;
import org.springframework.stereotype.Controller;
import org.springframework.ui.Model;
import org.springframework.web.bind.annotation.RequestMapping;
import org.springframework.web.servlet.ModelAndView;
@Controller
public class IndexControl {
//从 application.properties 中读取配置,如取不到默认值为congratulations
@Value("${ap
9abd
plication.msg:congratulations}")
private String msg;
/**
* 默认页<br/>
* @RequestMapping("/") 和 @RequestMapping 是有区别的
* 如果不写参数,则为全局默认页,加入输入404页面,也会自动访问到这个页面。
* 如果加了参数“/”,则只认为是根页面。
*/
@RequestMapping("/")
public String index(Map<String, Object> map) {
System.out.println("application.msg is ====>>" + msg);
map.put("msg", msg);
return "hello";
}
@RequestMapping("/test")
public ModelAndView page1(){
// 页面位置 /WEB-INF/jsp/test/welcome.jsp
ModelAndView mav = new ModelAndView("test/welcome");
mav.addObject("content", msg + ",test");
return mav;
}
/**
* 响应到JSP页面welcome(可以直接使用Model封装内容,直接返回页面字符串)
*/
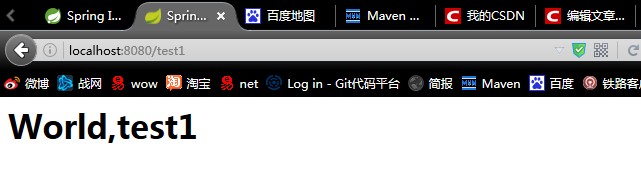
@RequestMapping("/test1")
public String page2(Model model){
// 页面位置 /WEB-INF/jsp/page/page.jsp
model.addAttribute("content", msg + ",test1");
return "test/welcome";
}
}
5,hello.jsp 页面
<!DOCTYPE html>
<html lang="en">
<head>
<meta charset="UTF-8"></meta>
<title>Hello</title>
</head>
<body>
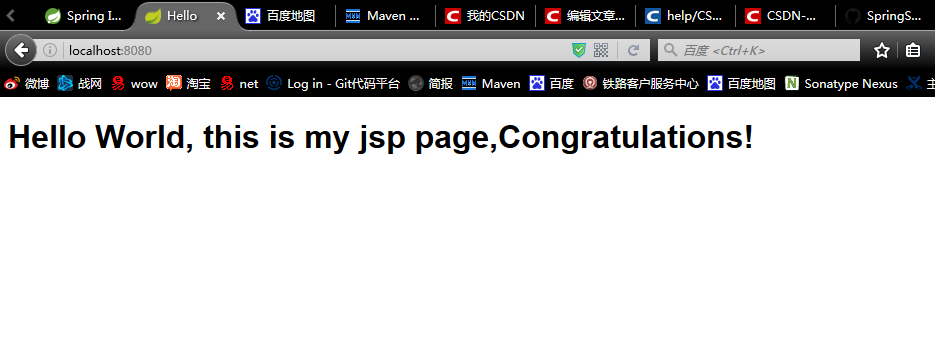
<h1> Hello ${msg}, this is my jsp page,Congratulations!</h1>
</body>
</html>
6,创建spring-boot的启动类application.java
要想让spring-boot支持JSP,需要将项目打成war包。
我们做最后一点修改,修改pom.xml文件,将 jar 中的 jar 修改为 war
然后启动spring-boot服务。
访问页面查看结果:
http://localhost:8080
http://localhost:8080/test

http://localhost:8080/test1
感兴趣的可以去spring官网查阅下相关的介绍https://spring.io
1,FreeMarker
2,Groovy
3,Thymeleaf (spring 官网使用这个)
4,Velocity
5,JSP (Spring Boot官方不推荐,STS创建的项目会在src/main/resources 下有个templates 目录,这里就是让我们放模版文(spring-boot默认支持html文件的直接跳转),然后并没有生成诸如 SpringMVC 中的webapp目录)。同时spring也提供了在线生成spring-boot工程的链接地址https://start.spring.io/
先贴上工程的目录结构图:
大体步骤如下:
1,创建Maven Web Project项目;
2,在pom.xml文件中添加相关依赖;
3,配置application.properties支持jsp参数;
4,编写Controller控制器
5,编写jsp页面
6,创建spring-boot的启动类Application.java
------------------------------------------------------------------------------------
1,第一步创建maven web工程就略去了,网上教程很多,不太会的,大家自己可以去看下
2,创建Maven Web工程后配置下pom.xml文件:
<project xmlns="http://maven.apache.org/POM/4.0.0" xmlns:xsi="http://www.w3.org/2001/XMLSchema-instance"
xsi:schemaLocation="http://maven.apache.org/POM/4.0.0 http://maven.apache.org/xsd/maven-4.0.0.xsd"> <modelVersion>4.0.0</modelVersion>

<groupId>com.cnepay</groupId>
<artifactId>spring-boot</artifactId>
<version>0.0.1-SNAPSHOT</version>
<packaging>war</packaging>

<name>spring-boot</name>
<url>http://maven.apache.org</url>

<parent>
<groupId>org.springframework.boot</groupId>
<artifactId>spring-boot-starter-parent</artifactId>
<version>1.3.5.RELEASE</version>
</parent>
<properties>
<project.build.sourceEncoding>UTF-8</project.build.sourceEncoding>
<project.reporting.outputEncoding>UTF-8</project.reporting.outputEncoding>
<java.version>1.7</java.version>
</properties>

<dependencies>
<dependency>
<groupId>org.springframework.boot</groupId>
<artifactId>spring-boot-starter-web</artifactId>
</dependency>
<dependency>
<groupId>org.springframework.boot</groupId>
<artifactId>spring-boot-starter-tomcat</artifactId>
<!-- <scope>provided</scope> -->
</dependency>
<dependency>
<groupId>org.apache.tomcat.embed</groupId>
<artifactId>tomcat-embed-jasper</artifactId>
<!--  <scope>provided</scope> -->
</dependency>
<dependency>
<groupId>org.springframework.boot</groupId>
<artifactId>spring-boot-starter-test</artifactId>
<scope>test</scope>
</dependency>
<dependency>
<groupId>javax.servlet</groupId>
<artifactId>jstl</artifactId>
</dependency>
</dependencies>

<build>
<plugins>
<plugin>
<groupId>org.springframework.boot</groupId>
<artifactId>spring-boot-maven-plugin</artifactId>
</plugin>
</plugins>
</build>

</project>
3,我们先要创建src/main/resources这个目录,然后在此目录下创建一个application.properties配置文件(注意,还需要创建src/main/resources/templates 这个目录,用来存放模板文件),先贴上application.properties代码
#页面默认的前缀目录
spring.mvc.view.prefix= /WEB-INF/jsp/
#响应页面默认后缀
spring.mvc.view.suffix= .jsp
#自定义属性,可在controller中提取
application.msg= World
4,IndexControl.java 控制器
package com.cnepay;
import java.util.Map;
import org.springframework.beans.factory.annotation.Value;
import org.springframework.stereotype.Controller;
import org.springframework.ui.Model;
import org.springframework.web.bind.annotation.RequestMapping;
import org.springframework.web.servlet.ModelAndView;
@Controller
public class IndexControl {
//从 application.properties 中读取配置,如取不到默认值为congratulations
@Value("${ap
9abd
plication.msg:congratulations}")
private String msg;
/**
* 默认页<br/>
* @RequestMapping("/") 和 @RequestMapping 是有区别的
* 如果不写参数,则为全局默认页,加入输入404页面,也会自动访问到这个页面。
* 如果加了参数“/”,则只认为是根页面。
*/
@RequestMapping("/")
public String index(Map<String, Object> map) {
System.out.println("application.msg is ====>>" + msg);
map.put("msg", msg);
return "hello";
}
@RequestMapping("/test")
public ModelAndView page1(){
// 页面位置 /WEB-INF/jsp/test/welcome.jsp
ModelAndView mav = new ModelAndView("test/welcome");
mav.addObject("content", msg + ",test");
return mav;
}
/**
* 响应到JSP页面welcome(可以直接使用Model封装内容,直接返回页面字符串)
*/
@RequestMapping("/test1")
public String page2(Model model){
// 页面位置 /WEB-INF/jsp/page/page.jsp
model.addAttribute("content", msg + ",test1");
return "test/welcome";
}
}
5,hello.jsp 页面
<!DOCTYPE html>
<html lang="en">
<head>
<meta charset="UTF-8"></meta>
<title>Hello</title>
</head>
<body>
<h1> Hello ${msg}, this is my jsp page,Congratulations!</h1>
</body>
</html>
6,创建spring-boot的启动类application.java
package com.cnepay;

import org.apache.log4j.Logger;
import org.springframework.boot.SpringApplication;
import org.springframework.boot.autoconfigure.SpringBootApplication;
import org.springframework.boot.builder.SpringApplicationBuilder;
import org.springframework.boot.context.web.SpringBootServletInitializer;

@SpringBootApplication
public class Application extends SpringBootServletInitializer {

private static Logger logger = Logger.getLogger(Application.class);

@Override
protected SpringApplicationBuilder configure(SpringApplicationBuilder application) {
return application.sources(Application.class);
}

/**
* Main Start
*/
public static void main(String[] args) throws Exception {
SpringApplication.run(Application.class, args);
logger.info("============= SpringBoot Start Success =============");
}
}
要想让spring-boot支持JSP,需要将项目打成war包。
我们做最后一点修改,修改pom.xml文件,将 jar 中的 jar 修改为 war
然后启动spring-boot服务。
访问页面查看结果:
http://localhost:8080
http://localhost:8080/test
http://localhost:8080/test1

相关文章推荐
- Spring Boot与FreeMarker集成后配置全局模板转义html/xml
- 初步学习shiro+redis+springMVC的集成配置,做一下记录文档吧
- 使用IDEA在Spring Boot中集成JSP
- 使用IDEA在Spring Boot上集成JSP
- springboot 配置jsp支持
- SpringBoot学习笔记(5) Spring Boot集成Redis实现自动配置
- springboot 集成elasticsearh的简单配置
- spring boot 集成druid,监控配置
- Spring Boot参考文档(8)配置
- springboot 使用配置返回jsp
- 摘抄官方文档: spring boot配置 iframe同源可访问
- spring-boot 集成mybatis配置使用
- springboot集成quartz配置多个job任务
- Springboot集成ecache缓存配置
- SpringBoot+Shiro+SpringSession的简单集成配置简要步骤
- SpringBoot配置使用jsp页面技术
- springboot集成swagger2构建RESTful API文档
- Spring boot 添加jsp支持配置
- springboot集成swagger2构建RESTful API文档
- springBoot+jsp配置