iptables规则备份和恢复 | firewalld
2018-01-26 22:07
447 查看
10.19 iptables规则备份和恢复
备份(另存为)命令:iptables-save
[root@centos-01 ~]# iptables-save > /tmp/ipt.txt
恢复
[root@centos-01 ~]# iptables-restore < /tmp/ipt.txt
10.20 firewalld的9个zone
先执行以下操作切换至firewalld防火墙:关闭iptables:
[root@centos-01 ~]# systemctl disable iptables
Removed symlink /etc/systemd/system/basic.target.wants/iptables.service.
[root@centos-01 ~]# systemctl stop iptables
开启firewalld:
[root@centos-01 ~]# systemctl enable firewalld
Created symlink from /etc/systemd/system/dbus-  org.fedoraproject.FirewallD1.service to    /usr/lib/systemd/system/firewalld.service.
Created symlink from /etc/systemd/system/basic.target.wants/firewalld.service to /usr/lib/systemd/system/firewalld.service.
[root@centos-01 ~]# systemctl start firewalld
注: 此时防火墙的规则已发生改变,可以使用命令iptables -nvL查看。
9种zone:
查看zone类型:
[root@centos-01 ~]# firewall-cmd --get-zones
work drop internal external trusted home dmz public block
关于9种zone的解析:
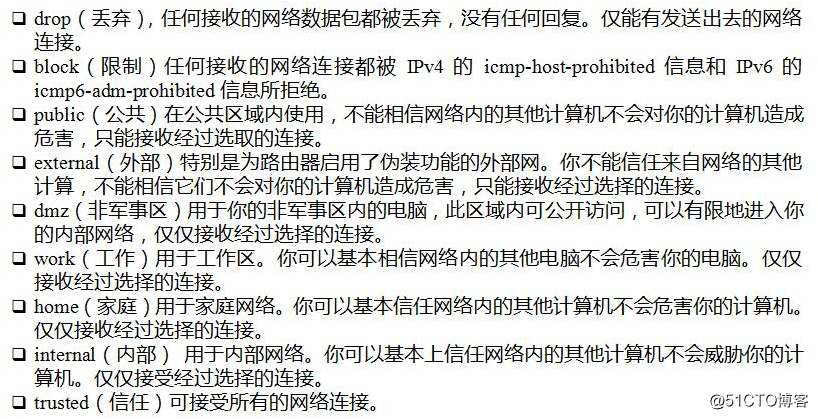
注: 9个zone中内容分别保存着不同的规则!
查看系统默认的zone:
[root@centos-01 ~]# firewall-cmd --get-default-zone
public
10.21 firewalld关于zone的操作
设置默认的zone设置默认的zone:
[root@centos-01 ~]# firewall-cmd --set-default-zone=work
success
查看:
[root@centos-01 ~]# firewall-cmd --get-default-zone
work
查看指定网卡的zone:
[root@centos-01 ~]# firewall-cmd --get-zone-of-interface=ens33
public
[root@centos-01 ~]# firewall-cmd --get-zone-of-interface=lo
no zone
给指定网卡增加zone
可以通过以下两种方法为网卡添加zone:
方法1:
编辑网卡配置文件(复制系统网卡配置文件进行更名)的方法为其添加zone(配置完成后重启网络服务,并重新加载firewalld服务:“systemctl restart firewalld”)。
方法2:
[root@centos-01 ~]# firewall-cmd --zone=work --add-    interface=ens37
success
[root@centos-01 ~]# firewall-cmd --get-zone-of-interface=ens37
work
给指定网卡更改zone
[root@centos-01 ~]# firewall-cmd --zone=block --change-interface=ens37
success
[root@centos-01 ~]# firewall-cmd --get-zone-of-interface=ens37
block
给指定网卡删除zone
[root@centos-01 ~]# firewall-cmd --zone=bmz --remove-interface=ens37
The interface is under control of NetworkManager, setting zone to default.
success

[root@centos-01 ~]# firewall-cmd --get-zone-of-interface=ens37
work
查看系统中所有网卡所在的zone
[root@centos-01 ~]# firewall-cmd --get-active-zones
work
interfaces: ens37
public
interfaces: ens33
10.22 firewalld关于service的操作
查看系统所有service[root@centos-01 ~]# firewall-cmd --get-services
查看当前zone下的service
[root@centos-01 ~]# firewall-cmd --list-services
dhcpv6-client ssh
查看指定zone下的service
[root@centos-01 ~]# firewall-cmd --zone=public --list-services
dhcpv6-client ssh 添加一个服务到某个zone下
临时添加(配置文件中不存在,重启会恢复原配置)
[root@centos-01 ~]# firewall-cmd --zone=public --add-service=http
success
[root@centos-01 ~]# firewall-cmd --zone=public --list-services
dhcpv6-client ssh http
永久添加(即,更改配置文件)
[root@centos-01 ~]# firewall-cmd --zone=public --add- service=http --permanent
删除zone下某服务
临时删除
删除前:
[root@centos-01 ~]# firewall-cmd --zone=public --list-service
ftp dhcpv6-client ssh

[root@centos-01 ~]# firewall-cmd --zone=public --remove-   service=ftp
success
删除后:
[root@centos-01 ~]# firewall-cmd --zone=public --list-service
dhcpv6-client ssh
永久删除
[root@centos-01 ~]# firewall-cmd --zone=public --list-service
ftp dhcpv6-client http ssh
[root@centos-01 ~]# firewall-cmd --zone=public    --remove-    service=ftp --permanent
success
[root@centos-01 ~]# firewall-cmd --reload
success
[root@centos-01 ~]# firewall-cmd --zone=public --list-service
dhcpv6-client http ssh
配置文件
zone的系统配置文件位置:/etc/firewalld/zones/
[root@centos-01 ~]# ls /etc/firewalld/zones/
public.xml public.xml.old
[root@centos-01 ~]# cat /etc/firewalld/zones/public.xml
<?xml version="1.0" encoding="utf-8"?>
<zone>
<short>Public</short>
<description>For use in public areas. You do not trust the other        computers on networks to not harm your computer. Only       selected incoming connections are accepted.</description>
<service name="dhcpv6-client"/>
<service name="http"/>
<service name="ssh"/>
</zone>
说明: public.xml.old相当于一个备份文件,每次编辑public.xml时,系统会自动将原public.xml内容备份到public.xml.old。
zone配置文件模板
[root@centos-01 ~]# ls /usr/lib/firewalld/zones/
block.xml  drop.xml      home.xml      public.xml   work.xml
dmz.xml    external.xml  internal.xml  trusted.xml
firewalld内各项服务的配置文件模板
[root@centos-01 ~]# ls /usr/lib/firewalld/
icmptypes  ipsets  services  xmlschema  zones
注: 每次编辑配置文件后需要重新加载(reload)firewall-cmd才生效。
应用
需求: ftp服务自定义端口1121,需要在work zone下面放行ftp。
方法:
步骤一:复制ftp的配置文件到/etc/firewalld/services/
[root@centos-01 ~]# cp /usr/lib/firewalld/services/ftp.xml /etc/firewalld/services/
步骤二:编辑该文件,将port="21"改为port="1121"
[root@centos-01 ~]# vim /etc/firewalld/services/ftp.xml
<?xml version="1.0" encoding="utf-8"?>
<service>
<short>FTP</short>
<description>FTP is a protocol used for remote file transfer. If          you plan to make your FTP server publicly available, enable     this option. You need the vsftpd package installed for this option to    be useful.</description>
<port protocol="tcp" port="1121"/>
<module name="nf_conntrack_ftp"/>
</service>
步骤三:复制workzone的配置文件到/etc/firewalld/zones/
[root@centos-01 ~]# cp /usr/lib/firewalld/zones/work.xml /etc/firewalld/zones/
步骤四:编辑该文件,增加“<service name="ftp"/>”
[root@centos-01 ~]# vim /etc/firewalld/zones/work.xml
<?xml version="1.0" encoding="utf-8"?>
<zone>
<short>Work</short>
<description>For use in work areas. You mostly trust the other    computers on networks to not harm your computer. Only selected incoming connections are accepted.</description>
<service name="ssh"/>
<service name="dhcpv6-client"/>
<service name="ftp"/>
</zone>
步骤五:重新加载
[root@centos-01 ~]# firewall-cmd --reload
success
Finished!

相关文章推荐
- linux学习第三十一篇:iptables规则备份和恢复,firewalld的9个zone,firewalld关于zone的操作,firewalld关于service的操作
- iptables规则备份和恢复,firewalld关于zone和service的操作
- iptables规则备份和恢复、firewalld相关
- 10.19 iptables规则备份和恢复 10.20 firewalld的9个zone 10.21 firewalld关于zone的操作 10.22 firewalld关于service的操作
- 10.19 iptables规则备份和恢复 10.20 firewalld的9个zone10.21
- 七周五次课(12月1日) 10.19 iptables规则备份和恢复 10.20 firewalld的9个zone 10.21 firewalld关于zone的操作 10.22 firewalld关于
- iptables规则备份和恢复 及firewalld用法
- 10.19 iptables规则备份和恢复 10.20 firewalld的9个zone 10.21
- iptables规则备份和恢复 firewalld的9个zone firewalld关于zone的操作 firewalld关于service的操作
- iptables规则备份和恢复 firewalld的9个zone firewalld关于zone的操作 firewalld关于service的操作
- iptables规则备份和恢复,firewalld的9个zone,firewalld关于zone的操作,firewalld关于service的操作
- 10.19 iptables规则备份和恢复 10.20 firewalld的9个zone 10.21
- 12.1 iptables规则备份和恢复, firewalld的9个zone, firewalld关于zone的操作,firewalld关于service的操作
- iptables规则备份和恢复 firewalld的9个zone firewalld关于zone的操作 firewalld关于service的操作