caffe2:使用训练好的模型进行训练(使用mnist模型)
2018-01-26 21:59
585 查看
在使用模型的时候,不能直接调用该模型,还需要改写之前的训练网络,最后将更改之后的网络(deploy)和模型结合在一起使用
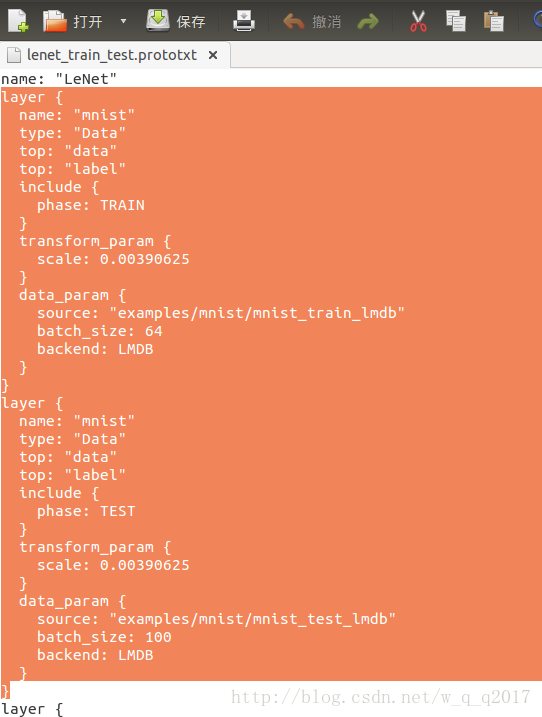
1.把数据层(Data Layer)和连接数据层的Layers去掉(即top:data的层),图左彩色部分删除
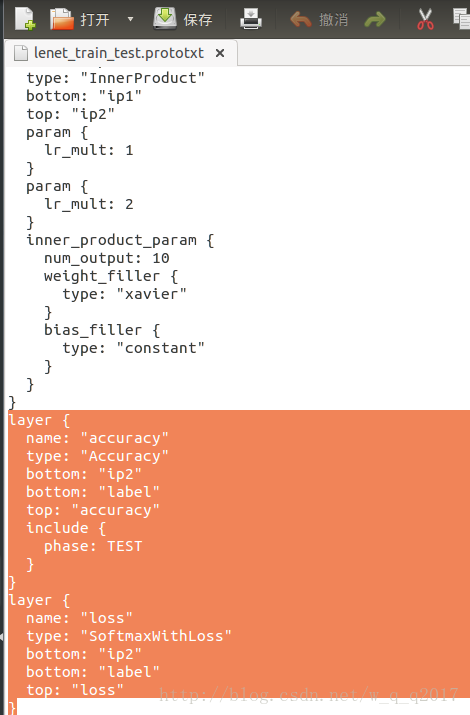
2. 去掉输出层和连接输出层的Layers(即bottom:label)图右彩色部分删除
3. 重新建立输入,将第一步删除的部分粘贴下面的代码
input: "data"
input_shape {
dim: 1 # batchsize,每次forward的时候输入的图片个数
dim: 3 # number of colour channels - rgb.如果是1,测试灰度值
dim: 28 # width
dim: 28 # height
}
4.重新建立输出,将第二部删除的部分粘贴下面的代码
layer {
name: "prob"
type: "Softmax"
bottom: "ip2"
top: "prob"
}
* 修改后的mnist的deploy文件可以参考caffe/example/mnist/lenet_train.prototxt
修改后的deploy的文件如下:
建立一个test_mnist.cpp文件输入以下代码
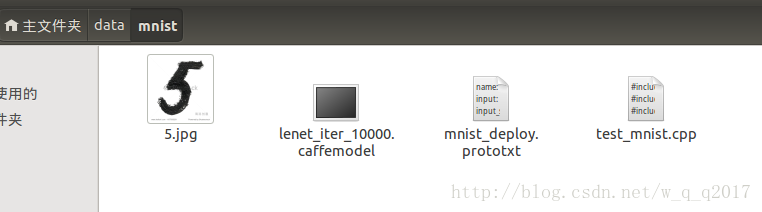
4.使用修改后的mnist的deploy文件,输入一张图片,输出分类结果。将mnist训练好的模型放在一个文件夹下,该文件夹下有以下几个文件
执行
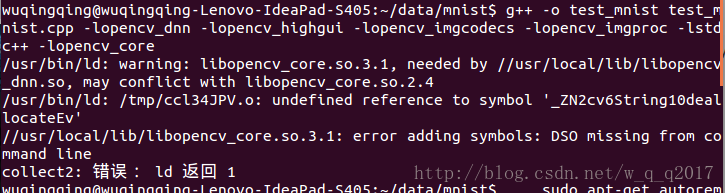
g++-o test_mnist test_mnist.cpp
-lopencv_dnn -lopencv_highgui-lopencv_imgcodecs -lopencv_imgproc -lstdc++ -lopencv_core
出现了如下错误:
输入以下命令:
sudo apt-get autoremove libopencv-dev,选择y。再次执行g++-o test_mnist test_mnist.cpp
-lopencv_dnn -lopencv_highgui-lopencv_imgcodecs -lopencv_imgproc -lstdc++ -lopencv_core。会在文件中生成test_mnist文件。
然后执行:./test_mnist
出现结果:

1.把数据层(Data Layer)和连接数据层的Layers去掉(即top:data的层),图左彩色部分删除
2. 去掉输出层和连接输出层的Layers(即bottom:label)图右彩色部分删除
3. 重新建立输入,将第一步删除的部分粘贴下面的代码
input: "data"
input_shape {
dim: 1 # batchsize,每次forward的时候输入的图片个数
dim: 3 # number of colour channels - rgb.如果是1,测试灰度值
dim: 28 # width
dim: 28 # height
}
4.重新建立输出,将第二部删除的部分粘贴下面的代码
layer {
name: "prob"
type: "Softmax"
bottom: "ip2"
top: "prob"
}
* 修改后的mnist的deploy文件可以参考caffe/example/mnist/lenet_train.prototxt
修改后的deploy的文件如下:
name: "LeNet"
input: "data"
input_shape {
dim: 1 # batchsize
dim: 1 # number of colour channels - rgb
dim: 28 # width
dim: 28 # height
}
layer {
name: "conv1"
type: "Convolution"
bottom: "data"
top: "conv1"
param {
lr_mult: 1
}
param {
lr_mult: 2
}
convolution_param {
num_output: 20
kernel_size: 5
stride: 1
weight_filler {
type: "xavier"
}
bias_filler {
type: "constant"
}
}
}
layer {
name: "pool1"
type: "Pooling"
bottom: "conv1"
top: "pool1"
pooling_param {
pool: MAX
kernel_size: 2
stride: 2
}
}
layer {
name: "conv2"
type: "Convolution"
bottom: "pool1"
top: "conv2"
param {
lr_mult: 1
}
param {
lr_mult: 2
}
convolution_param {
num_output: 50
kernel_size: 5
stride: 1
weight_filler {
type: "xavier"
}
bias_filler {
type: "constant"
}
}
}
layer {
name: "pool2"
type: "Pooling"
bottom: "conv2"
top: "pool2"
pooling_param {
pool: MAX
kernel_size: 2
stride: 2
}
}
layer {
name: "ip1"
type: "InnerProduct"
bottom: "pool2"
top: "ip1"
param {
lr_mult: 1
}
param {
lr_mult: 2
}
inner_product_param {
num_output: 500
weight_filler {
type: "xavier"
}
bias_filler {
type: "constant"
}
}
}
layer {
name: "relu1"
type: "ReLU"
bottom: "ip1"
top: "ip1"
}
layer {
name: "ip2"
type: "InnerProduct"
bottom: "ip1"
top: "ip2"
param {
lr_mult: 1
}
param {
lr_mult: 2
}
inner_product_param {
num_output: 10
weight_fi
4000
ller {
type: "xavier"
}
bias_filler {
type: "constant"
}
}
}
layer {
name: "prob"
type: "Softmax"
bottom: "ip2"
top: "prob"
}
建立一个test_mnist.cpp文件输入以下代码
#include "opencv2/dnn.hpp"
#include "opencv2/imgproc.hpp"
#include "opencv2/highgui.hpp"

using namespace cv;
using namespace cv::dnn;

#include <fstream>
#include <iostream>
#include <cstdlib>
using namespace std;

/* Find best class for the blob (i. e. class with maximal probability) */
void getMaxClass(dnn::Blob &probBlob, int *classId, double *classProb)
{
Mat probMat = probBlob.matRefConst().reshape(1, 1); //reshape the blob to 1x1000 matrix
Point classNumber;
minMaxLoc(probMat, NULL, classProb, NULL, &classNumber);
*classId = classNumber.x;
}

int main(int argc,char* argv[]){

String modelTxt = "mnist_deploy.prototxt";
String modelBin = "lenet_iter_10000.caffemodel";
String imageFile = (argc > 1) ? argv[1] : "5.jpg";

//! [Create the importer of Caffe model] 导入一个caffe模型接口
Ptr<dnn::Importer> importer;
importer = dnn::createCaffeImporter(modelTxt, modelBin);

if (!importer){
std::cerr << "Can't load network by using the following files: " << std::endl;
std::cerr << "prototxt:   " << modelTxt << std::endl;
std::cerr << "caffemodel: " << modelBin << std::endl;
exit(-1);
}

//! [Initialize network] 通过接口创建和初始化网络
Net net;
importer->populateNet(net);
importer.release();

//! [Prepare blob] 读取一张图片并转换到blob数据存储
Mat img = imread(imageFile,0); //[<Important>] "0" for 1 channel, Mnist accepts 1 channel
if (img.empty())
{
std::cerr << "Can't read image from the file: " << imageFile << std::endl;
exit(-1);
}
resize(img, img, Size(28, 28));                   //[<Important>]Mnist accepts only 28x28 RGB-images

dnn::Blob inputBlob = cv::dnn::Blob(img);   //Convert Mat to dnn::Blob batch of images

//! [Set input blob] 将blob输入到网络
net.setBlob(".data", inputBlob);        //set the network input

//! [Make forward pass] 进行前向传播
net.forward();                          //compute output

//! [Gather output] 获取概率值
dnn::Blob prob = net.getBlob("prob");   //[<Important>] gather output of "prob" layer
int classId;
double classProb;
getMaxClass(prob, &classId, &classProb);//find the best class

//! [Print results] 输出结果
std::cout << "Best class: #" << classId << "'" << std::endl;
std::cout << "Probability: " << classProb * 100 << "%" << std::endl;

return 0;
}
4.使用修改后的mnist的deploy文件,输入一张图片,输出分类结果。将mnist训练好的模型放在一个文件夹下,该文件夹下有以下几个文件
执行
g++-o test_mnist test_mnist.cpp
-lopencv_dnn -lopencv_highgui-lopencv_imgcodecs -lopencv_imgproc -lstdc++ -lopencv_core
出现了如下错误:
输入以下命令:
sudo apt-get autoremove libopencv-dev,选择y。再次执行g++-o test_mnist test_mnist.cpp
-lopencv_dnn -lopencv_highgui-lopencv_imgcodecs -lopencv_imgproc -lstdc++ -lopencv_core。会在文件中生成test_mnist文件。
然后执行:./test_mnist
出现结果:

相关文章推荐
- 使用caffe对mnist进行训练遇到的点点滴滴
- 【Caffe的C++接口使用说明(三)】Ubuntu14.04下Caffe利用训练好的模型进行分类的C++接口使用说明(三)
- 使用caffe训练好的模型进行分类
- matlab + mnist 调用训练好的caffe模型进行手写体识别
- 【神经网络与深度学习】Caffe使用step by step:使用自己数据对已经训练好的模型进行finetuning
- caffe+python 使用训练好的VGG16模型 对 单张图片进行分类,输出置信度
- caffe+python 使用训练好的VGG16模型 对 单张图片进行分类,输出置信度
- 深度学习Caffe平台实例——CIFAR-10数据集在caffe平台上模型训练及实例使用模型进行预测
- 使用MATLAB加载训练好的caffe模型进行识别分类
- caffe使用预训练的模型进行finetune--caffe学习(1)
- Caffe使用step by step:使用自己数据对已经训练好的模型进行finetuning
- 使用Caffe训练适合自己样本集的AlexNet网络模型,并对其进行分类
- Caffe使用step by step:使用自己数据对已经训练好的模型进行finetuning
- caffe简易上手指南(三)—— 使用模型进行fine tune
- 基于caffe特征可视化 以及 用训练好的模型进行分类
- 奔跑吧Caffe(在MNIST手写体数字集上用Caffe框架训练LeNet模型)
- DL开源框架Caffe | 用训练好的模型对数据进行预测
- caffe 09 win10 使用训练好模型为给定图片分类
- 使用训练好的googlenet caffemodel进行图片分类
- 使用caffe训练并且测试一个自己的模型