ssm整合配置实例
2018-01-25 18:01
417 查看
本文主要是介绍SSM整合基本配置实例,利用一个简单的例子来说明如何整合SSM
首先下载SSM整合的相关jar包,下载链接如下:
http://download.csdn.net/download/qi_ming88/10223988
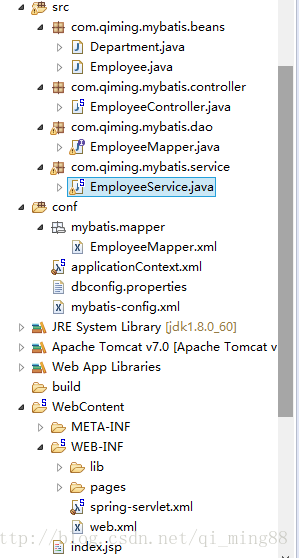
1.建立web工程,工程结构图如下:
配置web.xml,在web.xml中主要配置spring,以及springMVC配置:
<?xml version="1.0" encoding="UTF-8"?>
<web-app xmlns:xsi="http://www.w3.org/2001/XMLSchema-instance" xmlns="http://java.sun.com/xml/ns/javaee" xsi:schemaLocation="http://java.sun.com/xml/ns/javaee http://java.sun.com/xml/ns/javaee/web-app_3_0.xsd" id="WebApp_ID" version="3.0">
<!--Spring配置 -->
<context-param>
<param-name>contextConfigLocation</param-name>
<param-value>classpath:applicationContext.xml</param-value>
</context-param>
<!-- Bootstraps the root web application context before servlet initialization -->
<listener>
<listener-class>org.springframework.web.context.ContextLoaderListener</listener-class>
</listener>
<!--SpringMVC配置,启动约定在web.xml同级目录创建spring-servlet.xml -->
<!-- The front controller of this Spring Web application, responsible for handling all application requests -->
<servlet>
<servlet-name>spring</servlet-name>
<servlet-class>org.springframework.web.servlet.DispatcherServlet</servlet-class>
<load-on-startup>1</load-on-startup>
</servlet>
<!-- Map all requests to the DispatcherServlet for handling -->
<servlet-mapping>
<servlet-name>spring</servlet-name>
<url-pattern>/</url-pattern>
</servlet-mapping>
</web-app>在web.xml统计目录建立 springMVC配置spring-servlet.xml:
<?xml version="1.0" encoding="UTF-8"?>
<beans xmlns="http://www.springframework.org/schema/beans"
xmlns:xsi="http://www.w3.org/2001/XMLSchema-instance"
xmlns:context="http://www.springframework.org/schema/context"
xmlns:mvc="http://www.springframework.org/schema/mvc"
xsi:schemaLocation="http://www.springframework.org/schema/mvc http://www.springframework.org/schema/mvc/spring-mvc-4.3.xsd http://www.springframework.org/schema/beans http://www.springframework.org/schema/beans/spring-beans.xsd http://www.springframework.org/schema/context http://www.springframework.org/schema/context/spring-context-4.3.xsd">
<!--SpringMVC只是控制网站跳转逻辑 -->
<context:component-scan base-package="com.qiming.mybatis">
<!--只扫描springMVC部分的控制器 -->
<context:include-filter type="annotation" expression="org.springframework.stereotype.Controller"/>
</context:component-scan>
<!-- 视图解析器 -->
<bean class="org.springframework.web.servlet.view.InternalResourceViewResolver">
<property name="prefix" value="/WEB-INF/pages/"></property>
<property name="suffix" value=".jsp"></property>
</bean>
<mvc:annotation-driven></mvc:annotation-driven>
<mvc:default-servlet-handler/>
</beans>
在源文件夹conf下建立spring配置文件applicationContext.xml
再源文件conf配置mybatis配置文件,在mybatis中主要输配置settings组件的属性,其他的基本都是在spring配置中完成,只是利用mybatis对数据库操作:
<?xml version="1.0" encoding="UTF-8" ?>
<!DOCTYPE configuration
PUBLIC "-//mybatis.org//DTD Config 3.0//EN"
"http://mybatis.org/dtd/mybatis-3-config.dtd">
<configuration>
<settings>
<!-- <setting name="mapUnderscoreToCamelCase" value="true" />
-->
<!--显示的指定每一个我们需要更改的配置的值,即使他是默认的,防止版本更新带来的错误 -->
<setting name="cacheEnabled" value="true"/>
<setting name="lazyLoadingEnabled" value="true"/>
<setting name="aggressiveLazyLoading" value="false"/>
</settings>
<databaseIdProvider type="DB_VENDOR">
</databaseIdProvider>
</configuration>以上就是对三种框架的基本配置,spring主要处理业务逻辑,事务等,springMVC主要是对网站页面逻辑的控制,mybatis是对数据操作持久化层的操作。
通过controller类对页面响应,并且通过调用service(service调用持久化成dao的mybatis配置mapper接口,操作数据库)
Controller注解类:
import java.util.List;
import java.util.Map;
import org.springframework.beans.factory.annotation.Autowired;
import org.springframework.stereotype.Controller;
import org.springframework.web.bind.annotation.RequestMapping;
import com.qiming.mybatis.beans.Employee;
import com.qiming.mybatis.service.EmployeeService;
@Controller
public class EmployeeController {
@Autowired
EmployeeService employeeService;
@RequestMapping("emps")
public String emps(Map<String, Object> map) {
List<Employee> emps = employeeService.getEmps();
System.out.println(emps);
map.put("allEmps", emps);
return "list";
}
}
Service注解类
mybatis映射接口Mapper:
import java.util.List;
import java.util.Map;
import org.apache.ibatis.annotations.MapKey;
import org.apache.ibatis.annotations.Param;
import com.qiming.mybatis.beans.Employee;
public interface EmployeeMapper {
public Employee getEmpById(Integer id);
public List<Employee> getEmps();
}
javabean类:
<?xml version="1.0" encoding="UTF-8" ?>
<!DOCTYPE mapper
PUBLIC "-//mybatis.org//DTD Mapper 3.0//EN"
"http://mybatis.org/dtd/mybatis-3-mapper.dtd">
<mapper namespace="com.qiming.mybatis.dao.EmployeeMapper">
<!-- public Employee getEmpById(Integer id);
-->
<select id="getEmpById" resultType="com.qiming.mybatis.beans.Employee">
select * from tbl_employee where id=#{id}
</select>
<!--public List<Employee> getEmps();
-->
<select id="getEmps" resultType="com.qiming.mybatis.beans.Employee">
select id,last_name lastName,email,gender from tbl_employee
</select>
</mapper>
首先下载SSM整合的相关jar包,下载链接如下:
http://download.csdn.net/download/qi_ming88/10223988
1.建立web工程,工程结构图如下:
配置web.xml,在web.xml中主要配置spring,以及springMVC配置:
<?xml version="1.0" encoding="UTF-8"?>
<web-app xmlns:xsi="http://www.w3.org/2001/XMLSchema-instance" xmlns="http://java.sun.com/xml/ns/javaee" xsi:schemaLocation="http://java.sun.com/xml/ns/javaee http://java.sun.com/xml/ns/javaee/web-app_3_0.xsd" id="WebApp_ID" version="3.0">
<!--Spring配置 -->
<context-param>
<param-name>contextConfigLocation</param-name>
<param-value>classpath:applicationContext.xml</param-value>
</context-param>
<!-- Bootstraps the root web application context before servlet initialization -->
<listener>
<listener-class>org.springframework.web.context.ContextLoaderListener</listener-class>
</listener>
<!--SpringMVC配置,启动约定在web.xml同级目录创建spring-servlet.xml -->
<!-- The front controller of this Spring Web application, responsible for handling all application requests -->
<servlet>
<servlet-name>spring</servlet-name>
<servlet-class>org.springframework.web.servlet.DispatcherServlet</servlet-class>
<load-on-startup>1</load-on-startup>
</servlet>
<!-- Map all requests to the DispatcherServlet for handling -->
<servlet-mapping>
<servlet-name>spring</servlet-name>
<url-pattern>/</url-pattern>
</servlet-mapping>
</web-app>在web.xml统计目录建立 springMVC配置spring-servlet.xml:
<?xml version="1.0" encoding="UTF-8"?>
<beans xmlns="http://www.springframework.org/schema/beans"
xmlns:xsi="http://www.w3.org/2001/XMLSchema-instance"
xmlns:context="http://www.springframework.org/schema/context"
xmlns:mvc="http://www.springframework.org/schema/mvc"
xsi:schemaLocation="http://www.springframework.org/schema/mvc http://www.springframework.org/schema/mvc/spring-mvc-4.3.xsd http://www.springframework.org/schema/beans http://www.springframework.org/schema/beans/spring-beans.xsd http://www.springframework.org/schema/context http://www.springframework.org/schema/context/spring-context-4.3.xsd">
<!--SpringMVC只是控制网站跳转逻辑 -->
<context:component-scan base-package="com.qiming.mybatis">
<!--只扫描springMVC部分的控制器 -->
<context:include-filter type="annotation" expression="org.springframework.stereotype.Controller"/>
</context:component-scan>
<!-- 视图解析器 -->
<bean class="org.springframework.web.servlet.view.InternalResourceViewResolver">
<property name="prefix" value="/WEB-INF/pages/"></property>
<property name="suffix" value=".jsp"></property>
</bean>
<mvc:annotation-driven></mvc:annotation-driven>
<mvc:default-servlet-handler/>
</beans>
在源文件夹conf下建立spring配置文件applicationContext.xml
<?xml version="1.0" encoding="UTF-8"?>
<beans xmlns="http://www.springframework.org/schema/beans"
xmlns:xsi="http://www.w3.org/2001/XMLSchema-instance"
xmlns:context="http://www.springframework.org/schema/context"
xmlns:tx="http://www.springframework.org/schema/tx"
xmlns:mybatis-spring="http://mybatis.org/schema/mybatis-spring"
xsi:schemaLocation="http://mybatis.org/schema/mybatis-spring http://mybatis.org/schema/mybatis-spring-1.2.xsd http://www.springframework.org/schema/beans http://www.springframework.org/schema/beans/spring-beans.xsd http://www.springframework.org/schema/context http://www.springframework.org/schema/context/spring-context-4.3.xsd http://www.springframework.org/schema/tx http://www.springframework.org/schema/tx/spring-tx-4.3.xsd">
<!--Spring希望管理所有的业务逻辑组件等  -->
<context:component-scan base-package="com.qiming.mybatis">
<context:exclude-filter type="annotation" expression="org.springframework.stereotype.Controller"/>
</context:component-scan>

<!--引入数据库的配置文件  -->
<context:property-placeholder location="classpath:dbconfig.properties"/>
<!-- Spring用来控制业务
b8b7
逻辑。数据源。aop -->
<!--配置数据源  -->
<bean id="dataSource" class="com.mchange.v2.c3p0.ComboPooledDataSource">
<property name="driverClass" value="${jdbc.driver}"></property>
<property name="jdbcUrl" value="${jdbc.url}"></property>
<property name="user" value="${jdbc.username}"></property>
<property name="password" value="${jdbc.password}"></property>
</bean>

<!--spring事务管理  -->
<bean id="dataSourceTransactionManager" class="org.springframework.jdbc.datasource.DataSourceTransactionManager" >
<property name="dataSource" ref="dataSource"></property>
</bean>

<!--开启基于注解的事务管理器  -->
<tx:annotation-driven transaction-manager="dataSourceTransactionManager"/>

<!--整合mybatis
目的:1.spring管理所有组件,mapper的实现类
service==》Dao @Autowired:自动注入mapper
2.spring用来管理事务,spring声明式事务
-->
<!--创建SqlSessionFactory对象  -->
<bean id="sqlSessionFactoryBean" class="org.mybatis.spring.SqlSessionFactoryBean">
<property name="dataSource" ref="dataSource">
</property>
<!--configLocation指定全局文件配置  -->
<property name="configLocation" value="classpath:mybatis-config.xml"></property>
<!--mapperLocations:指定mapper文件的位置  -->
<property name="mapperLocations" value="classpath:mybatis/mapper/*.xml"></property>
</bean>

<!-- 扫描所有的mapper接口的实现,让这些mapper能够自动注入
base-package:指定mapper接口的包名
-->
<mybatis-spring:scan base-package="com.qiming.mybatis.dao"/>

<!-- <bean class="org.mybatis.spring.mapper.MapperScannerConfigurer">
<property name="basePackage" value="com.qiming.mybatis.dao"></property>
</bean> -->

</beans>
再源文件conf配置mybatis配置文件,在mybatis中主要输配置settings组件的属性,其他的基本都是在spring配置中完成,只是利用mybatis对数据库操作:
<?xml version="1.0" encoding="UTF-8" ?>
<!DOCTYPE configuration
PUBLIC "-//mybatis.org//DTD Config 3.0//EN"
"http://mybatis.org/dtd/mybatis-3-config.dtd">
<configuration>
<settings>
<!-- <setting name="mapUnderscoreToCamelCase" value="true" />
-->
<!--显示的指定每一个我们需要更改的配置的值,即使他是默认的,防止版本更新带来的错误 -->
<setting name="cacheEnabled" value="true"/>
<setting name="lazyLoadingEnabled" value="true"/>
<setting name="aggressiveLazyLoading" value="false"/>
</settings>
<databaseIdProvider type="DB_VENDOR">
</databaseIdProvider>
</configuration>以上就是对三种框架的基本配置,spring主要处理业务逻辑,事务等,springMVC主要是对网站页面逻辑的控制,mybatis是对数据操作持久化层的操作。
通过controller类对页面响应,并且通过调用service(service调用持久化成dao的mybatis配置mapper接口,操作数据库)
Controller注解类:
import java.util.List;
import java.util.Map;
import org.springframework.beans.factory.annotation.Autowired;
import org.springframework.stereotype.Controller;
import org.springframework.web.bind.annotation.RequestMapping;
import com.qiming.mybatis.beans.Employee;
import com.qiming.mybatis.service.EmployeeService;
@Controller
public class EmployeeController {
@Autowired
EmployeeService employeeService;
@RequestMapping("emps")
public String emps(Map<String, Object> map) {
List<Employee> emps = employeeService.getEmps();
System.out.println(emps);
map.put("allEmps", emps);
return "list";
}
}
Service注解类
import java.util.List;

import org.apache.ibatis.session.SqlSession;
import org.springframework.beans.factory.annotation.Autowired;
import org.springframework.stereotype.Service;

import com.qiming.mybatis.beans.Employee;
import com.qiming.mybatis.dao.EmployeeMapper;

@Service
public class EmployeeService {

@Autowired
private EmployeeMapper employeeMapper;

/*	@Autowired
private SqlSession sqlSession;*/

public List<Employee> getEmps(){
//
//EmployeeMapper mapper = sqlSession.getMapper(EmployeeMapper.class);
return employeeMapper.getEmps();
}

}
mybatis映射接口Mapper:
import java.util.List;
import java.util.Map;
import org.apache.ibatis.annotations.MapKey;
import org.apache.ibatis.annotations.Param;
import com.qiming.mybatis.beans.Employee;
public interface EmployeeMapper {
public Employee getEmpById(Integer id);
public List<Employee> getEmps();
}
javabean类:
package com.qiming.mybatis.beans;

import java.io.Serializable;

import org.apache.ibatis.type.Alias;

@Alias("emp")
public class Employee implements Serializable{

/**
*
*/
private static final long serialVersionUID = 1L;
private Integer id;
private String lastName;
private String gender;
private String email;
private Department dept;

public Employee(Integer id, String lastName, String gender, String email, Department dept) {
super();
this.id = id;
this.lastName = lastName;
this.gender = gender;
this.email = email;
this.dept = dept;
}
public Department getDept() {
return dept;
}
public void setDept(Department dept) {
this.dept = dept;
}
public Integer getId() {
return id;
}
public void setId(Integer id) {
this.id = id;
}
public String getLastName() {
return lastName;
}

@Override
public String toString() {
return "Employee [id=" + id + ", lastName=" + lastName + ", gender=" + gender + ", email=" + email + "]";
}
public Employee(Integer id, String lastName, String gender, String email) {
super();
this.id = id;
this.lastName = lastName;
this.gender = gender;
this.email = email;
}
public void setLastName(String lastName) {
this.lastName = lastName;
}
public String getGender() {
return gender;
}
public void setGender(String gender) {
this.gender = gender;
}
public String getEmail() {
return email;
}
public void setEmail(String email) {
this.email = email;
}

public Employee() {
super();
// TODO Auto-generated constructor stub
}

}
mybatis SQL配置文件:<?xml version="1.0" encoding="UTF-8" ?>
<!DOCTYPE mapper
PUBLIC "-//mybatis.org//DTD Mapper 3.0//EN"
"http://mybatis.org/dtd/mybatis-3-mapper.dtd">
<mapper namespace="com.qiming.mybatis.dao.EmployeeMapper">
<!-- public Employee getEmpById(Integer id);
-->
<select id="getEmpById" resultType="com.qiming.mybatis.beans.Employee">
select * from tbl_employee where id=#{id}
</select>
<!--public List<Employee> getEmps();
-->
<select id="getEmps" resultType="com.qiming.mybatis.beans.Employee">
select id,last_name lastName,email,gender from tbl_employee
</select>
</mapper>

相关文章推荐
- SSM整合SpringSecurity实现权限管理实例 javaconfig配置方式
- SSM整合SpringSecurity实现权限管理实例 javaconfig配置方式
- ssm整合的配置文件
- SSM项目的配置文件整合
- 使用maven实现ssm整合配置文件
- SSM整合的基本配置
- SSM整合配置文件(Springmvc+Spring+Mybatis)
- Spring boot+Spring Security 4配置整合实例
- Maven下SSM项目整合笔记02:mybatis配置文件以及逆向工程
- SSM配置、整合、注意事项
- SSM整合的配置
- JAVA Maven SSM框架以及SpringBoot,mybatise框架整合实例开发的脚手架
- SSM整合中拦截器的配置
- SSM框架整合方式(二):XML配置文件代码
- SSM框架整合 配置文件
- SSM 框架 Maven项目整合实例
- maven下的ssm整合配置步骤
- 最基础的-----基于maven进行的SSM框架的整合的全部配置文件.
- ssm整合一个user表(配合上一篇的配置文件使用)
- SSM(spring+springMVC+mybatis)整合配置