ansible自动化管理windows系统实战
2018-01-24 18:40
513 查看
一、简述
1、说明日常系统自动化运维过程中难免会有windows系列服务器,就开源软件来说目前大多的对windows批量管理兼容性不太好;不像Linux系统便捷,但现实中确实有些业务需要跑在windows上;搜索查找折腾一番后,发现python开发的ansible(已经被redhat收购)有比较好的解决方案,通过一番折腾,整理出来,以备忘交流;
2、实验环境
服务器端:
CentOS7.4_x64 自带python 2.7.5 ip:172.16.3.167
源码安装ansible
被管理windows端:
win7sp1_x32 需要powershell 3.0+ ip:172.16.3.188 并开启winrm服务 开启防火墙规则
3、实验目标
能通过ansible 的各模块对windows进行传输文件,管理账号,执行脚本等批量自动化管理工作;
二、ansible配置
1、简介Ansible 从1.7+版本开始支持Windows,但管理机必须为Linux系统,远程主机的通信方式也由Linux下的SSH变为PowerShell,管理机需要安装Python的pywinrm模块,但PowerShell需3.0+版本且Management Framework 3.0+版本,实测Windows 7 SP1和Windows Server 2008 R2及以上版本系统经简单配置可正常与Ansible通信。
2、环境准备
以下配置在CentOS7.4_x64下
安装pip及相关依赖
下载pip
#wget https://bootstrap.pypa.io/get-pip.py #python get-pip.py
安装依赖
#pip install pywinrm paramiko PyYAML Jinja2 httplib2 six
3、源码安装ansible
# git clone git://github.com/ansible/ansible.git --recursive
#cd ./ansible
#source ./hacking/env-setup
运行了env-setup脚本,就意味着Ansible基于源码运行起来了.默认的inventory文件是 /etc/ansible/hosts
cat /etc/ansible/hosts
注:可以把这步添加到开机自启中;
[win7]
172.16.3.188 ansible_ssh_user="virtual" ansible_ssh_pass="myself." ansible_ssh_port=5985 ansible_connection="winrm" ansible_winrm_server_cert_validation=ignore
注意上信息在一行;以空格隔开,[win7] 是这台主机的标题;下面的是ip和连接信息等;
以上ansible管理端已经配置好,被管理端win7还没有配置,相对来说稍稍麻烦点
三、被管理端win7配置
1、环境简介和Linux稍有区别,被管理端系统如果是Windows系列时;需预先有以下配置:
安装Framework 3.0+ (有可能需要下载)
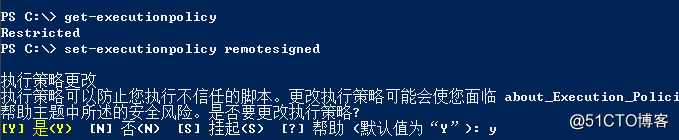
配置powershell策略为remotesigned (需要修改)
升级PowerShell至3.0+(win7默认是2.0)
设置Windows远端管理,英文全称WS-Management(WinRM)
2、环境配置
a、升级或安装Framework 4.5
如果Framework版不满足请至微软官方下载
b、修改powershell策略为remotesigned
如图:
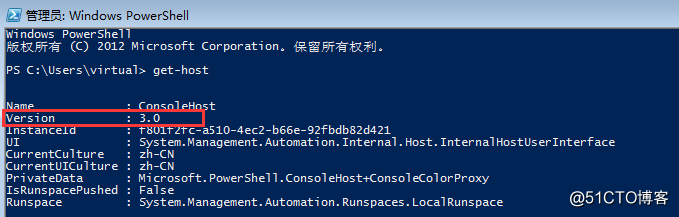
c、升级PowerShell至3.0
保存以下脚本为upgrade_to_ps3.ps1
# Powershell script to upgrade a PowerShell 2.0 system to PowerShell 3.0
# based on http://occasionalutility.blogspot.com/2013/11/everyday-powershell-part-7-powershell.html # some Ansible modules that may use Powershell 3 features, so systems may need
# to be upgraded.  This may be used by a sample playbook.  Refer to the windows
# documentation on docs.ansible.com for details.
# - hosts: windows
#   tasks:
#     - script: upgrade_to_ps3.ps1

# Get version of OS

# 6.0 is 2008
# 6.1 is 2008 R2
# 6.2 is 2012
# 6.3 is 2012 R2

if ($PSVersionTable.psversion.Major -ge 3)
{
write-host "Powershell 3 Installed already; You don't need this"
Exit
}

$powershellpath = "C:\powershell"

function download-file
{
param ([string]$path, [string]$local)
$client = new-object system.net.WebClient
$client.Headers.Add("user-agent", "PowerShell")
$client.downloadfile($path, $local)
}

if (!(test-path $powershellpath))
{
New-Item -ItemType directory -Path $powershellpath
}

# .NET Framework 4.0 is necessary.

#if (($PSVersionTable.CLRVersion.Major) -lt 2)
#{
#    $DownloadUrl = "http://download.microsoft.com/download/B/A/4/BA4A7E71-2906-4B2D-A0E1-80CF16844F5F/dotNetFx45_Full_x86_x64.exe"
#    $FileName = $DownLoadUrl.Split('/')[-1]
#    download-file $downloadurl "$powershellpath\$filename"
#    ."$powershellpath\$filename" /quiet /norestart
#}

#You may need to reboot after the .NET install if so just run the script again.

# If the Operating System is above 6.2, then you already have PowerShell Version > 3
if ([Environment]::OSVersion.Version.Major -gt 6)
{
write-host "OS is new; upgrade not needed."
Exit
}

$osminor = [environment]::OSVersion.Version.Minor

$architecture = $ENV:PROCESSOR_ARCHITECTURE

if ($architecture -eq "AMD64")
{
$architecture = "x64"
}
else
{
$architecture = "x86"
}

if ($osminor -eq 1)
{
$DownloadUrl = "http://download.microsoft.com/download/E/7/6/E76850B8-DA6E-4FF5-8CCE-A24FC513FD16/Windows6.1-KB2506143-" + $architecture + ".msu"
}
elseif ($osminor -eq 0)
{
$DownloadUrl = "http://download.microsoft.com/download/E/7/6/E76850B8-DA6E-4FF5-8CCE-A24FC513FD16/Windows6.0-KB2506146-" + $architecture + ".msu"
}
else
{
# Nothing to do; In theory this point will never be reached.
Exit
}

$FileName = $DownLoadUrl.Split('/')[-1]
download-file $downloadurl "$powershellpath\$filename"

Start-Process -FilePath "$powershellpath\$filename" -ArgumentList /quiet
脚本来源于github upgrade_to_ps3.ps1
右击-->以管理员运行 稍等几分钟(具体时间看下载的速度,只要任务管理器中有powershell就说明还在下载安装),系统会自动重启升级安装powershell到3.0
如图:
重启后查看powershell信息
d、设置Windows远端管理(WS-Management,WinRM)服务
winrm 服务默认都是未启用的状态;注意以下操作在cmd中执行,而非powershell中
对winrm服务进行基础配置:
winrm quickconfig
C:\Users\san02>winrm quickconfig
已在此计算机上运行 WinRM 服务。
WinRM 没有设置成为了管理此计算机而允许对其进行远程访问。
必须进行以下更改:
在 HTTP://* 上创建 WinRM 侦听程序接受 WS-Man 对此机器上任意 IP 的请求。
启用 WinRM 防火墙异常。
执行这些更改吗[y/n]? y
WinRM 已经进行了更新,以用于远程管理。
在 HTTP://* 上创建 WinRM 侦听程序接受 WS-Man 对此机器上任意 IP 的请求。
WinRM 防火墙异常已启用。

查看winrm service listener
winrm e winrm/config/listener
C:\Users\san02>winrm e winrm/config/listener
Listener
Address = *
Transport = HTTP
Port = 5985
Hostname
Enabled = true
URLPrefix = wsman
CertificateThumbprint
ListeningOn = 127.0.0.1, 172.16.3.137, ::1, fe80::100:7f:fffe%13, fe80::5efe
:172.16.3.137%12, fe80::4865:97de:bb1f:877%11

配置auth 为true(默认为false)
winrm set winrm/config/service/auth @{Basic="true"}C:\Users\san02>winrm set winrm/config/service/auth @{Basic="true"}
Auth
Basic = true
Kerberos = true
Negotiate = true
Certificate = false
CredSSP = false
CbtHardeningLevel = Relaxed

配置允许非加密方式
winrm set winrm/config/service @{AllowUnencrypted="true"}
C:\Users\san02>winrm set winrm/config/service @{AllowUnencrypted="true"}
Service
RootSDDL = O:NSG:BAD:P(A;;GA;;;BA)(A;;GR;;;IU)S:P(AU;FA;GA;;;WD)(AU;SA;GXGW;
;;WD)
MaxConcurrentOperations = 4294967295
MaxConcurrentOperationsPerUser = 1500
EnumerationTimeoutms = 240000
MaxConnections = 300
MaxPacketRetrievalTimeSeconds = 120
AllowUnencrypted = true
Auth
Basic = true
......以下省略.......
至此被管理端win7的环境配置完成!
四、测试Ansible管理windows
1、查看连接状态[root@localhost ~]# ansible win7 -m win_ping
172.16.3.188 | SUCCESS => {
"attempts": 1,
"changed": false,
"failed": false,
"ping": "pong"
}2、获取Windows Facts
[root@localhost ~]# ansible win7 -m   setup
172.16.3.188 | SUCCESS => {
"ansible_facts": {
"ansible_architecture": "32-bit",
"ansible_bios_date": "12/01/2006",
"ansible_bios_version": "VirtualBox",
"ansible_date_time": {
"date": "2018-01-24",
"day": "24",
"epoch": "1516816620.86637",
"hour": "17",
"iso8601": "2018-01-24T09:57:00Z",
"iso8601_basic": "20180124T175700861308",
"iso8601_basic_short": "20180124T175700",
"iso8601_micro": "2018-01-24T09:57:00.861308Z",
"minute": "57",
"month": "01",
"second": "00",
......以下省略.......
3、远程执行命令
远程执行命令分为远程执行windows 原生自有命令通过raw 模块,如:"ipconfig "
远程执行ansible的win_command模块也可以执行命令,即ansible的扩展命令如"whoami"
默认是乱码,需要修改winrm模块文件
sed -i "s#tdout_buffer.append(stdout)#tdout_buffer.append(stdout.decode('gbk').encode('utf-8'))#g" /usr/lib/python2.7/site-packages/winrm/protocol.py
sed -i "s#stderr_buffer.append(stderr)#stderr_buffer.append(stderr.decode('gbk').encode('utf-8'))#g" /usr/lib/python2.7/site-packages/winrm/protocol.py
a、获取ip地址
[root@localhost ~]# ansible win7 -m raw -a "ipconfig"
172.16.3.188 | SUCCESS | rc=0 >>
Windows IP Configuration
Ethernet adapter 本地连接:
Connection-specific DNS Suffix . :
Link-local IPv6 Address . . . . . : fe80::c55d:90f1:8d60:5d97%11
IPv4 Address. . . . . . . . . . . : 172.16.3.188
Subnet Mask . . . . . . . . . . . : 255.255.255.0
Default Gateway . . . . . . . . . : fe80::daae:90ff:fe02:9d81%11
172.16.3.1
.....省略.....
b、win_command模块远程获取身份
[root@localhost ansible]# ansible win7 -m win_command -a "whoami"
172.16.3.188 | SUCCESS | rc=0 >>
virtual_san\virtual
c、移动文件
[root@localhost ansible]# ansible win7 -m raw -a "cmd /c 'move /y d:\issue c:\issue'"
172.16.3.188 | SUCCESS | rc=0 >>
1 file(s) moved
d、创建文件夹
[root@localhost ansible]# ansible win7 -m raw -a "mkdir d:\\tst"
172.16.3.188 | SUCCESS | rc=0 >>
Directory: D:\
Mode LastWriteTime Length Name
---- ------------- ------ ----
d---- 2018/1/25 16:44 tst
e、删除文件或目录
[root@localhost ansible]# ansible win7 -m win_file -a "path=D:\1.txt state=absent"
172.16.3.188 | SUCCESS => {
"attempts": 1,
"changed": true,
"failed": false
}
f、结束某程序
先通过 tasklist获取运行程序信息
[root@localhost ansible]# ansible win7 -m raw -a "taskkill /F /IM QQ.exe /T"
172.16.3.188 | SUCCESS | rc=0 >>
SUCCESS: The process with PID 3504 (child process of PID 2328) has been terminated4、文件传输到win7被管理端
把/etc/issue文件复制到当前目录(也可以直接/etc/issue)再传送到目标主机D盘下(可以修改文件名)
[root@localhost ~]# ansible win7 -m  win_copy -a "src=issue dest=D:\issue"
172.16.3.188 | SUCCESS => {
"attempts": 1,
"changed": true,
"checksum": "5c76e3b565c91e21bee303f15c728c71e6b39540",
"dest": "D:\\issue",
"failed": false,
"operation": "file_copy",
"original_basename": "issue",
"size": 23,
"src": "issue"
}
5、添加用户
[root@localhost ansible]# ansible win7 -m win_user -a "name=san2 passwd=123.c0m groups=Administrators"
172.16.3.188 | SUCCESS => {
"account_disabled": false,
"account_locked": false,
"attempts": 1,
"changed": true,
"description": "",
"failed": false,
"fullname": "san2",
"groups": [
{
"name": "Administrators",
"path": "WinNT://WORKGROUP/VIRTUAL_SAN/Administrators"
}
],
"name": "san2",
"password_expired": true,
"password_never_expires": false,
"path": "WinNT://WORKGROUP/VIRTUAL_SAN/san2",
"sid": "S-1-5-21-2708087092-4192450616-382865091-1004",
"state": "present",
"user_cannot_change_password": false
}通过以上的实践我得知,要想通过ansible批量管理windows,前提是windows上要基于powershell配置好winrm服务;然后ansible通过模块和winrm服务远程指管理;这里只是简单的列举了向个常用管理模块;更多好用的模块请参考官方windows可用模块,包括自动配置等;

相关文章推荐
- 使用 Ansible 让你的系统管理自动化
- ansible实战应用之——自动化系统上线
- 自动化运维工具Ansible实战(二)主机清单的管理
- 使用 Ansible 让你的系统管理自动化 | Linux 中国
- Ansible管理windows系统
- OSSIM下自动化配置管理工具Ansible实战
- 使用 Ansible 让你的系统管理自动化
- Rails 实战——图书管理系统——基础建设
- Jenkins实战演练之Windows系统节点管理
- JAVA项目实战<迷你DVD管理系统>
- JavaEE项目实战(OA系统)之十一_部门管理之五
- 项目管理实战之团队管理 对团队的管理需要重视以下几个方面 一个系统不仅需要优秀的分析和设计,更需要一个良好的过程将其从蓝图转化为实现。这个过程中最重要的是对团队的管理,也就是人的管理
- 使用Chef管理windows集群 | 运维自动化工具
- Windows 10企业批量部署实战之系统分区设置
- Windows系统管理笔记(4)
- 《Windows 系统管理》
- Tasklist与Tskill管理Windows系统进程
- Node.js 切近实战(三) 之图书管理系统(图书信息录入)
- 20161128L04-08老男孩linux运维实战培训-Linux系统的用户和用户组管理-06
- 家庭财务管理系统实战4- mybatis分页查询功能改进实现