如何使SCCM同时支持BIOS PXE Boot 和 UEFI PXE Boot
2018-01-15 21:10
225 查看
Learn how to PXE Boot both BIOS & UEFImachines with DHCP Policies and Custom Vendor Classes One of the challenges that an IT deployment administrator mayface in the field is the ability to boot both BIOS and UEFImachines from the same WDS environment. This is exactly the issue Ifaced when our organization decided to purchase a number of newSurface devices. These were the first set of devices that wereconfigured to natively boot to UEFI. This leaves you to decide froman organization standpoint whether you wish to boot all yourdevices using UEFI or the legacy BIOS…or does it.
I am a strong believer that finding a workaround to a problem isnot a fix to the problem. To that end modern devices such as thesurface are meant to be booted using the native UEFI boot. However,many organizations may also still have legacy BIOS devices that donot support UEFI boot or just work better booting from BIOS.Whatever the reasoning behind this it is actually quite easy tosetup DHCP to provide the BIOS or UEFI boot file depending on whatis used.
The solution!
By using DHCP policies and custom vendor classes for the followingDHCP Options:
Option 60
Option 66
Option 67
The below assumes that you have SCCM configured with a PXE enableddistribution point and a valid and configured DHCP server. Youshould therefore be at a configured state where you are able to PXEboot BIOS based devices.
Create Custom Vendor Classes for Use with your DHCPPolicy
Think Custom Vendor Classes as Detection Method’s used to determinehow devices are requesting a boot image from the DHCP server.
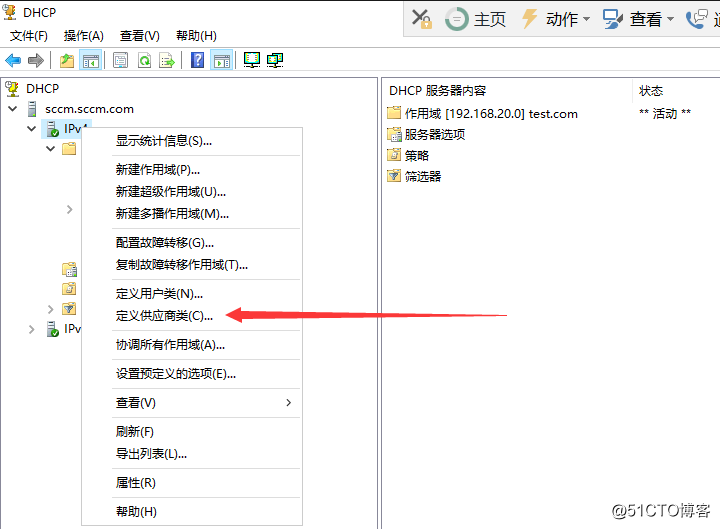
Open the DHCP Console and expand the IPv4 Node
Right-Click on ‘IPv4 Node’ and select ‘Define VendorClasses’
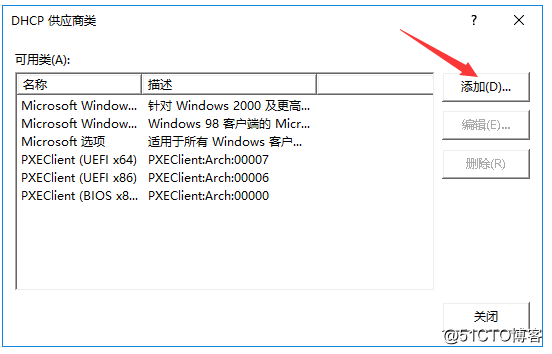
Click ‘Add’
Create the UEFI 64-Bit Vendor class first by entering thefollowing information
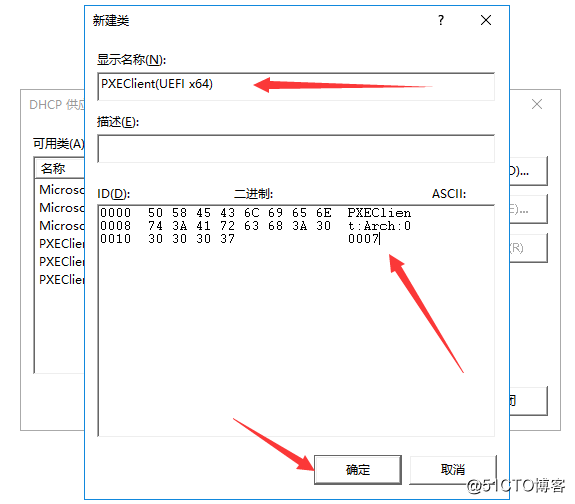
Enter the following information for the respectivefields:
DisplayName: PXEClient (UEFI x64)
Description: PXEClient:Arch:00007
ASCII: PXEClient:Arch:00007
Click ‘OK’
Click ‘Add’
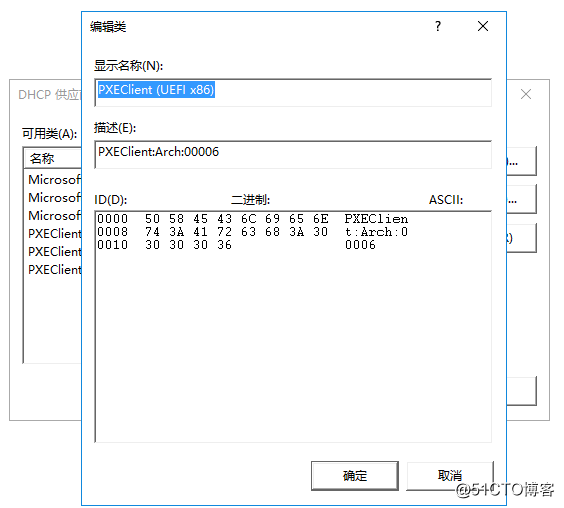
DisplayName: PXEClient (UEFI x86)
Description: PXEClient:Arch:00006
ASCII: PXEClient:Arch:00006
Click ‘OK’
Click ‘Add’
DisplayName: PXEClient (BIOS x86& x64)
Description: PXEClient:Arch:00000
ASCII: PXEClient:Arch:00000
Click ‘OK’

Creating Custom DHCP Policies
UEFI 64-Bit DHCP Policy
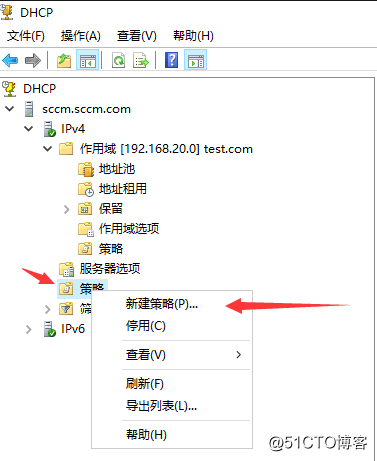
Right-Click ‘Policies’ and click ‘New Policy’
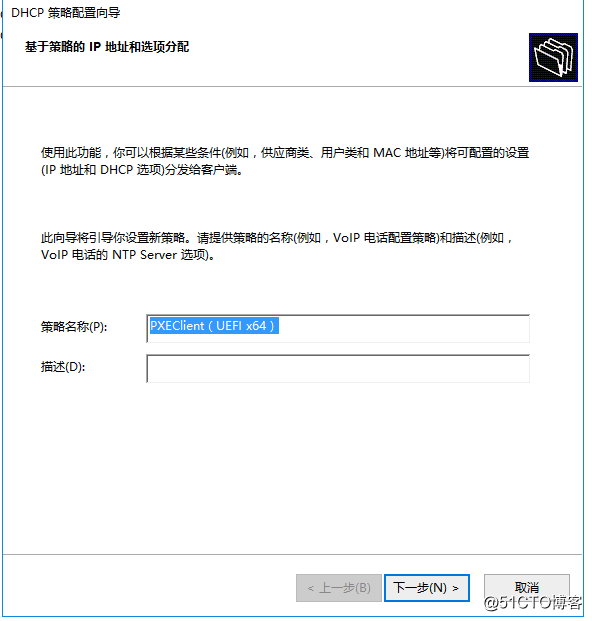
Give the policy a friendly name that coincides with the yourvendor class naming scheme:
PolicyName: PXEClient (UEFI x64)
Description: Delivers the correct bootfile for (UEFIx64)
Click ‘Next’
On the ‘Configure Conditions for the policy’ page click‘add’
Select the ‘Value’ drop-down box and selectthe PXEClient (UEFIx64) vendor class that you created in previoussteps
Ensure that you check the box ‘Appendwildcard(*)’
Select ‘Add’
Select ‘Ok’
Click ‘Next’
If you want the policy to affect only a specific range withinyour scope configure it, otherwise select no and click ‘next’
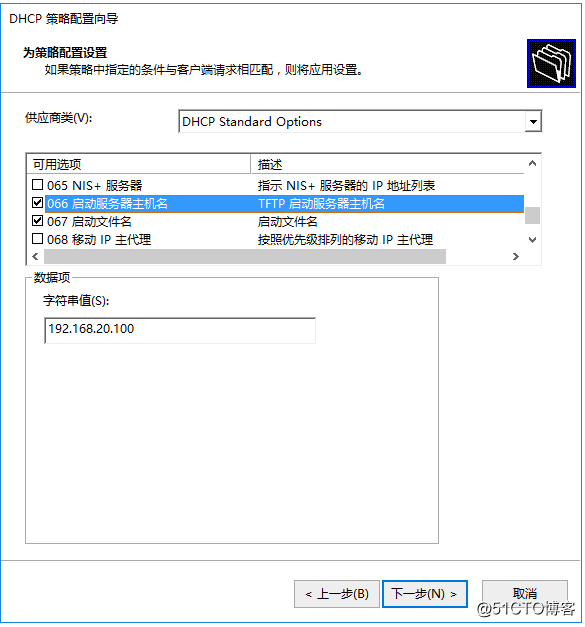
On the Configure settings for the policy page ensure that ‘DHCPStandard Options’ is selected from the drop down box
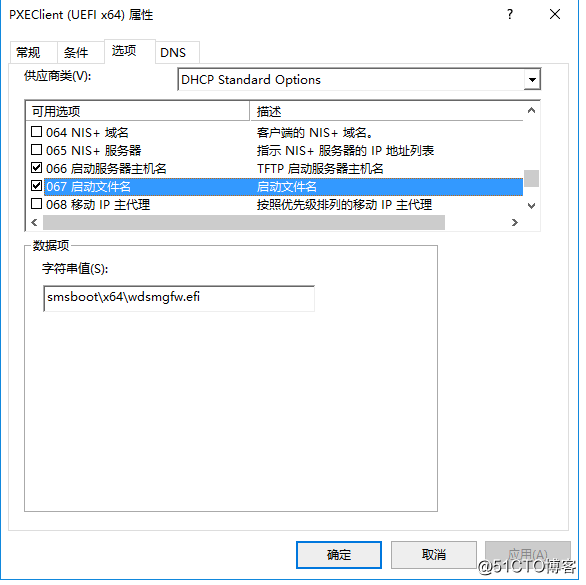
Configure the following scope options:
060: PXEClient
066: IP Address of the SCCM or WDSService
067: smsboot\x64\wdsmgfw.efi
Cick ‘Next’
On the Summary pageclick ‘Finish’


BIOS 32-Bit & 64-Bit DHCPPolicy
Right-Click ‘Policies’ and click ‘New Policy’
Give the policy a friendly name that coincides with the yourvendor class naming scheme:
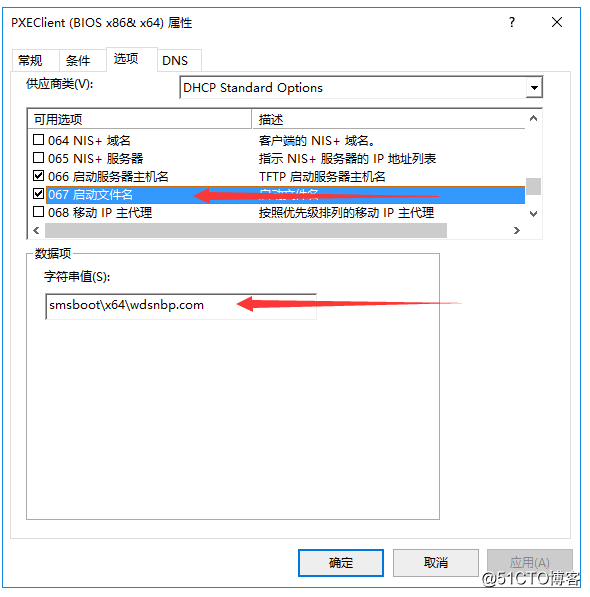
PolicyName: PXEClient (BIOS x86& x64)
Description: Delivers the correct bootfile for BIOSmachines
Click ‘Next’
On the ‘Configure Conditions for the policy’ page click‘add’
Select the ‘Value’ drop-down box and selectthe PXEClient (BIOS x86& x64) vendor class thatyou created in previous steps
Ensure that you check the box ‘Appendwildcard(*)’
Select ‘Add’
Select ‘Ok’
Click ‘Next’
If you want the policy to affect only a specific range withinyour scope configure it, otherwise select no and click ‘next’
On the Configure settings for the policy page ensure that ‘DHCPStandard Options’ is selected from the drop down box
Configure the following scope options:
060: PXEClient
066: IP Address of the SCCM or WDSService
067: smsboot\x64\wdsnbp.com
Cick ‘Next’
On the Summary pageclick ‘Finish’
UEFI 32-Bit DHCP Policy
Right-Click ‘Policies’ and click ‘New Policy’
Give the policy a friendly name that coincides with the yourvendor class naming scheme:
PolicyName: PXEClient (UEFI x86)
Description: Delivers the correct bootfile for (UEFIx86) machines
Click ‘Next’
On the ‘Configure Conditions for the policy’ page click‘add’
Select the ‘Value’ drop-down box and selectthe PXEClient (UEFIx86) vendor class that you created in previoussteps
Ensure that you check the box ‘Appendwildcard(*)’
Select ‘Add’
Select ‘Ok’
Click ‘Next’
If you want the policy to affect only a specific range withinyour scope configure it, otherwise select no and click ‘next’
On the Configure settings for the policy page ensure that ‘DHCPStandard Options’ is selected from the drop down box
Configure the following scope options:
060: PXEClient
066: IP Address of the SCCM or WDSService
067: smsboot\x86\wdsmgfw.efi
Cick ‘Next’
On the Summary pageclick ‘Finish’

Remove Default PXE Options
Ensure that you have removed the 067, 066, 060 options from thedefault scope options to ensure that the Policies take precedenceotherwise you will end up with conflict
As long as you have configured everything correctly you should nowhave the ability to boot machines from BIOS orUEFI. Hopefully this helps alleviate some of the stress surroundingyour PXE deployments. This has worked great on all of ourdistribution points since implementation and has allowed ourdeployments to be much more flexible.
I am a strong believer that finding a workaround to a problem isnot a fix to the problem. To that end modern devices such as thesurface are meant to be booted using the native UEFI boot. However,many organizations may also still have legacy BIOS devices that donot support UEFI boot or just work better booting from BIOS.Whatever the reasoning behind this it is actually quite easy tosetup DHCP to provide the BIOS or UEFI boot file depending on whatis used.
The solution!
By using DHCP policies and custom vendor classes for the followingDHCP Options:
Option 60
Option 66
Option 67
The below assumes that you have SCCM configured with a PXE enableddistribution point and a valid and configured DHCP server. Youshould therefore be at a configured state where you are able to PXEboot BIOS based devices.
Create Custom Vendor Classes for Use with your DHCPPolicy
Think Custom Vendor Classes as Detection Method’s used to determinehow devices are requesting a boot image from the DHCP server.
Open the DHCP Console and expand the IPv4 Node
Right-Click on ‘IPv4 Node’ and select ‘Define VendorClasses’
Click ‘Add’
Create the UEFI 64-Bit Vendor class first by entering thefollowing information
Enter the following information for the respectivefields:
DisplayName: PXEClient (UEFI x64)
Description: PXEClient:Arch:00007
ASCII: PXEClient:Arch:00007
Click ‘OK’
Click ‘Add’
DisplayName: PXEClient (UEFI x86)
Description: PXEClient:Arch:00006
ASCII: PXEClient:Arch:00006
Click ‘OK’
Click ‘Add’
DisplayName: PXEClient (BIOS x86& x64)
Description: PXEClient:Arch:00000
ASCII: PXEClient:Arch:00000
Click ‘OK’
Creating Custom DHCP Policies
UEFI 64-Bit DHCP Policy
Right-Click ‘Policies’ and click ‘New Policy’
Give the policy a friendly name that coincides with the yourvendor class naming scheme:
PolicyName: PXEClient (UEFI x64)
Description: Delivers the correct bootfile for (UEFIx64)
Click ‘Next’
On the ‘Configure Conditions for the policy’ page click‘add’
Select the ‘Value’ drop-down box and selectthe PXEClient (UEFIx64) vendor class that you created in previoussteps
Ensure that you check the box ‘Appendwildcard(*)’
Select ‘Add’
Select ‘Ok’
Click ‘Next’
If you want the policy to affect only a specific range withinyour scope configure it, otherwise select no and click ‘next’
On the Configure settings for the policy page ensure that ‘DHCPStandard Options’ is selected from the drop down box
Configure the following scope options:
060: PXEClient
066: IP Address of the SCCM or WDSService
067: smsboot\x64\wdsmgfw.efi
Cick ‘Next’
On the Summary pageclick ‘Finish’
BIOS 32-Bit & 64-Bit DHCPPolicy
Right-Click ‘Policies’ and click ‘New Policy’
Give the policy a friendly name that coincides with the yourvendor class naming scheme:
PolicyName: PXEClient (BIOS x86& x64)
Description: Delivers the correct bootfile for BIOSmachines
Click ‘Next’
On the ‘Configure Conditions for the policy’ page click‘add’
Select the ‘Value’ drop-down box and selectthe PXEClient (BIOS x86& x64) vendor class thatyou created in previous steps
Ensure that you check the box ‘Appendwildcard(*)’
Select ‘Add’
Select ‘Ok’
Click ‘Next’
If you want the policy to affect only a specific range withinyour scope configure it, otherwise select no and click ‘next’
On the Configure settings for the policy page ensure that ‘DHCPStandard Options’ is selected from the drop down box
Configure the following scope options:
060: PXEClient
066: IP Address of the SCCM or WDSService
067: smsboot\x64\wdsnbp.com
Cick ‘Next’
On the Summary pageclick ‘Finish’
UEFI 32-Bit DHCP Policy
Right-Click ‘Policies’ and click ‘New Policy’
Give the policy a friendly name that coincides with the yourvendor class naming scheme:
PolicyName: PXEClient (UEFI x86)
Description: Delivers the correct bootfile for (UEFIx86) machines
Click ‘Next’
On the ‘Configure Conditions for the policy’ page click‘add’
Select the ‘Value’ drop-down box and selectthe PXEClient (UEFIx86) vendor class that you created in previoussteps
Ensure that you check the box ‘Appendwildcard(*)’
Select ‘Add’
Select ‘Ok’
Click ‘Next’
If you want the policy to affect only a specific range withinyour scope configure it, otherwise select no and click ‘next’
On the Configure settings for the policy page ensure that ‘DHCPStandard Options’ is selected from the drop down box
Configure the following scope options:
060: PXEClient
066: IP Address of the SCCM or WDSService
067: smsboot\x86\wdsmgfw.efi
Cick ‘Next’
On the Summary pageclick ‘Finish’
Remove Default PXE Options
Ensure that you have removed the 067, 066, 060 options from thedefault scope options to ensure that the Policies take precedenceotherwise you will end up with conflict
As long as you have configured everything correctly you should nowhave the ability to boot machines from BIOS orUEFI. Hopefully this helps alleviate some of the stress surroundingyour PXE deployments. This has worked great on all of ourdistribution points since implementation and has allowed ourdeployments to be much more flexible.

相关文章推荐
- [grub实现]U盘引导多个linux镜像安装,同时支持BIOS和UEFI模式
- 如何制作支持Legacy BIOS和UEFI BIOS两种模式启动的Windows PE
- PXE批量部署Linux之四:一台服务器同时支持BIOS和UEFI
- springboot项目 同时支持http、https
- 关于u-boot同时支持nand启动和Nor启动环境变量的保存位置
- [s3c2416x移植u-boot-2015.10]如何在u-boot工程中取消对NorFlash的支持
- 抽空更新了下自己的杂交PE,支持bios和uefi双启动。
- node如何让一个端口同时支持https与http
- 转一份在 51testing 上的讨论——如何测试一个门户网站是否可以支持10万用户同时在线?
- 转一讨论帖:如何测试一个门户网站是否可以支持10万用户同时在线?
- 转一份在 51testing 上的讨论——如何测试一个门户网站是否可以支持10万用户同时在线?
- windows 10如何从BIOS+MBR更改成UEFI+GPT启动
- uefi bios代码中如何找到函数的实现?
- 如何在Legacy BIOS与UEFI 两种模式安装Windows 8操作系统?
- oracle sql developer 如何支持多个窗体,打开多张表,多个tab,同时查看多个数据表
- Hyper如何同时支持OLAP和OLTP业务
- 转一份在 51testing 上的讨论——如何测试一个门户网站是否可以支持10万用户同时在线?
- oracle sql developer 如何支持多个窗体,打开多张表,多个tab,同时查看多个数据表
- 怎么让U盘是ExFAT或NTFS格式又支持UEFI和BIOS启动