实战maven私有仓库三部曲之一:搭建和使用
2018-01-14 20:42
671 查看
在局域网内搭建maven私有仓库,可避免每次都从中央仓库下载公共jar包,另外将A模块作为二方库发布到私有仓库后,B模块可以很方便的引用,今天我们就来实战maven私有仓库的搭建和使用;
原文地址:http://blog.csdn.net/boling_cavalry/article/details/79059021
maven私有仓库的软件是nexus-2.14.5,请在官网下载;
在window10环境上做验证的使用,用到的maven版本是3.3.3,jdk版本1.8.0_111;
执行命令source /etc/profile,使刚才的配置生效;
从官网下载的是nexus-2.14.5-02-bundle.tar.gz,执行tar -zxvf nexus-2.14.5-02-bundle.tar.gz解压后,里面有两个目录:nexus-2.14.5-02和sonatype-work;
进入nexus-2.14.5-02/bin,执行./nexus start启动nexus;
进入nexus-2.14.5-02/logs,执行tail -f wrapper.log观察日志滚动信息,看到如下信息时nexus启动成功:
进入nexus首页后,点击右上角的”Log In”按钮,输入用户名”admin”,默认密码”admin123”;
点击左侧的”Repositories”按钮,看到已有的仓库,如下图:
目前nexus已经开始正常工作了,接下来我们开始使用私有仓库;
在mirrors节点下新增一个mirror节点,内容如下:
192.168.119.155是nexus机器的IP;
3. 在profiles节点下新增一个profile节点,内容如下:
以上新增了中央仓库的相关信息;
4. 新增一个activeProfiles节点,该节点和profiles节点一个层次,内容如下:
可以看到如下信息,当前的maven已经在通过私有仓库下载:
至此,nexus的安装和缓存jar包功能的使用实战已经完成,接下来的章节,我们会将本机的工程打包并发布到私有仓库;
原文地址:http://blog.csdn.net/boling_cavalry/article/details/79059021
环境信息
安装私有仓库的机器是ubuntu16,IP是192.168.119.155;maven私有仓库的软件是nexus-2.14.5,请在官网下载;
在window10环境上做验证的使用,用到的maven版本是3.3.3,jdk版本1.8.0_111;
安装和启动nexus
打开/etc/profile,新增一行export RUN_AS_USER=root;执行命令source /etc/profile,使刚才的配置生效;
从官网下载的是nexus-2.14.5-02-bundle.tar.gz,执行tar -zxvf nexus-2.14.5-02-bundle.tar.gz解压后,里面有两个目录:nexus-2.14.5-02和sonatype-work;
进入nexus-2.14.5-02/bin,执行./nexus start启动nexus;
进入nexus-2.14.5-02/logs,执行tail -f wrapper.log观察日志滚动信息,看到如下信息时nexus启动成功:
jvm 1    | 2018-01-13 21:38:44,671-0800 INFO  [jetty-main-1]  org.sonatype.nexus.webresources.internal.WebResourceServlet - Max-age: 30 days (2592000 seconds)
jvm 1    | 2018-01-13 21:38:44,698-0800 INFO  [jetty-main-1]  org.sonatype.nexus.bootstrap.jetty.InstrumentedSelectChannelConnector - Metrics enabled
jvm 1    | 2018-01-13 21:38:44,713-0800 INFO  [jetty-main-1]  org.eclipse.jetty.server.AbstractConnector - Started InstrumentedSelectChannelConnector@0.0.0.0:8081
jvm 1    | 2018-01-13 21:38:44,713-0800 INFO  [jetty-main-1]  org.sonatype.nexus.bootstrap.jetty.JettyServer - Running
jvm 1    | 2018-01-13 21:38:44,713-0800 INFO  [WrapperListener_start_runner]  org.sonatype.nexus.bootstrap.jetty.JettyServer - Started
jvm 1    | 2018-01-13 21:39:26,926-0800 INFO  [qtp984089572-47]  org.apache.shiro.nexus5727.FixedDefaultWebSessionManager - Global session timeout: 1800000 ms
jvm 1    | 2018-01-13 21:39:26,931-0800 INFO  [qtp984089572-47]  org.apache.shiro.session.mgt.AbstractValidatingSessionManager - Enabling session validation scheduler...
jvm 1    | 2018-01-13 21:39:26,944-0800 INFO  [qtp984089572-47]  org.apache.shiro.cache.ehcache.EhCacheManager - Using existing EHCache named [shiro-activeSessionCache]
jvm 1    | 2018-01-13 21:39:26,945-0800 INFO  [qtp984089572-45]  org.apache.shiro.nexus5727.FixedDefaultWebSessionManager - Global session timeout: 1800000 ms
登录
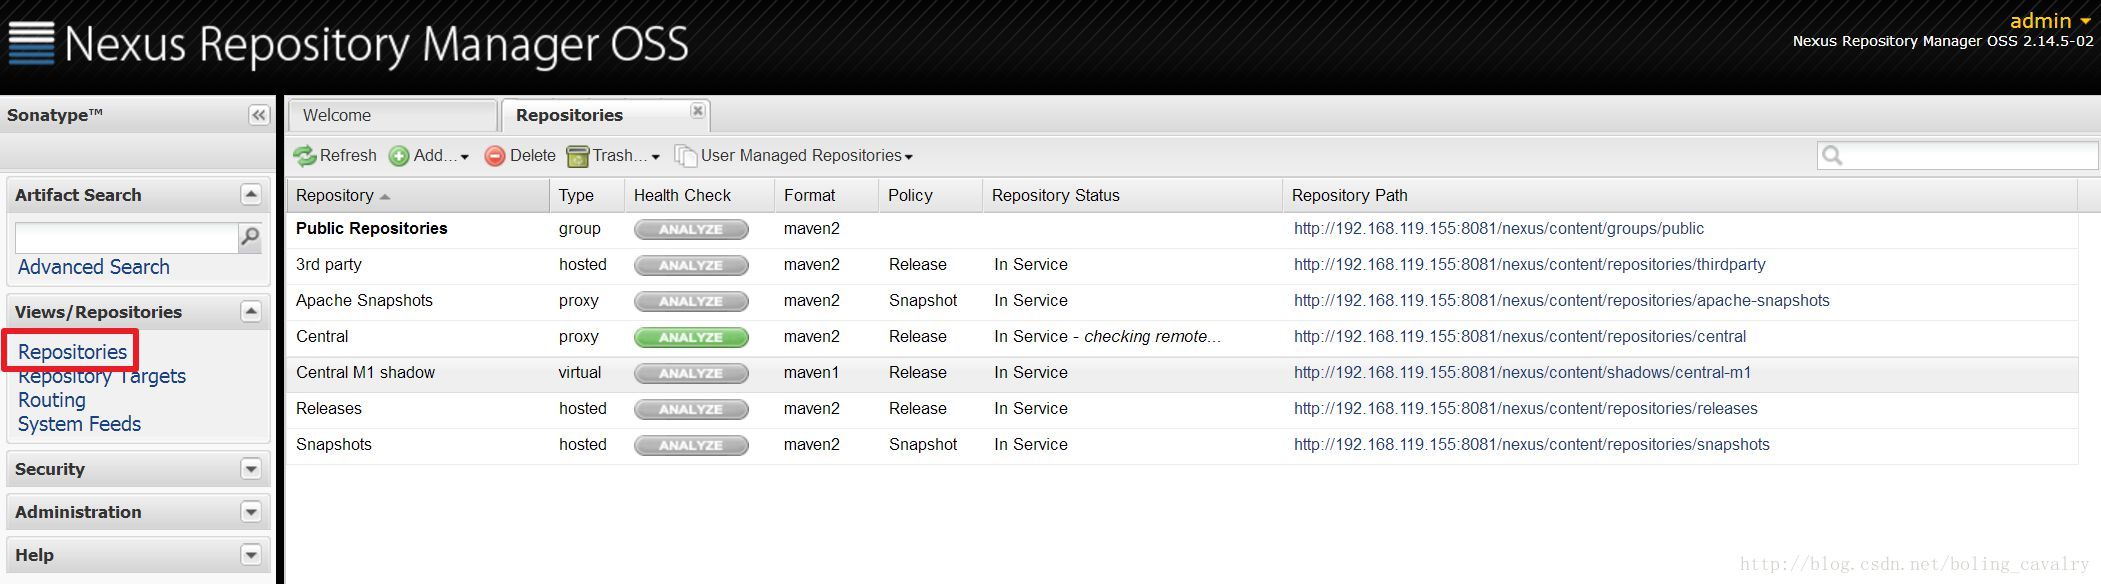
在浏览器输入地址:http://192.168.119.155:8081/nexus/进入nexus首页后,点击右上角的”Log In”按钮,输入用户名”admin”,默认密码”admin123”;
点击左侧的”Repositories”按钮,看到已有的仓库,如下图:
目前nexus已经开始正常工作了,接下来我们开始使用私有仓库;
使用私有仓库,配置
我的windows10开发环境要使用私有仓库,需要配置maven的信息,打开maven安装目录下的conf/settings.xml文件;在mirrors节点下新增一个mirror节点,内容如下:
<mirror>
<id>nexus</id>
<mirrorOf>*</mirrorOf>
<url>http://192.168.119.155:8081/nexus/content/groups/public/</url>
</mirror>
192.168.119.155是nexus机器的IP;
3. 在profiles节点下新增一个profile节点,内容如下:
<profile>
<id>nexus</id>
<repositories>
<repository>
<id>central</id>
<url>http://central</url>
<releases><enabled>true</enabled></releases>
<snapshots><enabled>true</enabled></snapshots>
</repository>
</repositories>
<pluginRepositories>
<pluginRepository>
<id>central</id>
<url>http://central</url>
<releases><enabled>true</enabled></releases>
<snapshots><enabled>true</enabled></snapshots>
</pluginRepository>
</pluginRepositories>
</profile>
以上新增了中央仓库的相关信息;
4. 新增一个activeProfiles节点,该节点和profiles节点一个层次,内容如下:
<activeProfiles>
<activeProfile>nexus</activeProfile>
</activeProfiles>
新建一个springboot工程
新建一个基于maven构建的springboot的web工程,里面只有一个最简单的controller,在pom.xml所在目录下执行以下命令:mvn clean package -Dmaven.test.skip=true
可以看到如下信息,当前的maven已经在通过私有仓库下载:
[INFO] Building jar: D:\temp\201801\06\helloworld\target\helloworld-0.0.1-SNAPSHOT.jar
[INFO]
[INFO] --- spring-boot-maven-plugin:1.5.9.RELEASE:repackage (default) @ helloworld ---
Downloading: http://192.168.119.155:8081/nexus/content/groups/public/org/springframework/boot/spring-boot-loader-tools/1.5.9.RELEASE/spring-boot-loader-tools-1.5.9.RELEASE.pom Downloaded: http://192.168.119.155:8081/nexus/content/groups/public/org/springframework/boot/spring-boot-loader-tools/1.5.9.RELEASE/spring-boot-loader-tools-1.5.9.RELEASE.pom (0 B at 0.0 KB/sec)
Downloading: http://192.168.119.155:8081/nexus/content/groups/public/org/springframework/boot/spring-boot-loader-tools/1.5.9.RELEASE/spring-boot-loader-tools-1.5.9.RELEASE.jar Downloaded: http://192.168.119.155:8081/nexus/content/groups/public/org/springframework/boot/spring-boot-loader-tools/1.5.9.RELEASE/spring-boot-loader-tools-1.5.9.RELEASE.jar (0 B at 0.0 KB/sec)
[INFO] ------------------------------------------------------------------------
[INFO] BUILD SUCCESS
[INFO] ------------------------------------------------------------------------
[INFO] Total time: 01:21 min
[INFO] Finished at: 2018-01-14T17:57:45+08:00
[INFO] Final Memory: 29M/164M
[INFO] ------------------------------------------------------------------------
已缓存信息
此时再从浏览器查看“Central”仓库的信息,发现里面已经缓存了前面的springboot工程所依赖的jar包,今后其他机器再需要这些jar包时,就可以直接从私有仓库上下载了,而私有仓库没有的jar包,也会由私有仓库下载并保存,然后提供给使用私有仓库的机器;至此,nexus的安装和缓存jar包功能的使用实战已经完成,接下来的章节,我们会将本机的工程打包并发布到私有仓库;

相关文章推荐
- 实战maven私有仓库三部曲之三:Docker下搭建maven私有仓库
- 拥抱 Android Studio 之四:Maven 仓库使用与私有仓库搭建
- 使用Gradle和Sonatype Nexus 搭建私有maven仓库
- 网上商城项目实战之使用nexus搭建maven私有服务器
- Jenkins 持续集成平台构建之使用nexus搭建maven私有仓库
- 使用Artifactory搭建私有Maven仓库
- Maven私有仓库搭建和使用
- 08(maven+SSH)网上商城项目实战之使用nexus搭建maven私有服务器
- 使用nexus搭建maven私有仓库服务器
- docker私有仓库搭建与使用实战
- 使用Archiva搭建Maven私有仓库
- 拥抱 Android Studio 之四:Maven 仓库使用与私有仓库搭建
- 实战maven私有仓库三部曲之二:上传到私有仓库
- Android Studio:Maven仓库的使用和本地,私有仓库的搭建
- 使用Gradle和Sonatype Nexus 搭建私有maven仓库
- 使用Nexus搭建Maven私有仓库
- 08(maven+SSH)网上商城项目实战之使用nexus搭建maven私有服务器
- 拥抱 Android Studio 之四:Maven 仓库使用与私有仓库搭建
- centos使用nexus搭建私有maven仓库
- 【Maven】Nexus3搭建Maven私有仓库及使用