unity3d和php后台简单交互
2018-01-11 11:23
232 查看
环境:
Unity2017.3.0f3
Mysql5.7.20
Wampserver64
在Wampserver64 的www目录下新建名为unity的文件夹。
1. unity3d通过get方式请求php
结果:

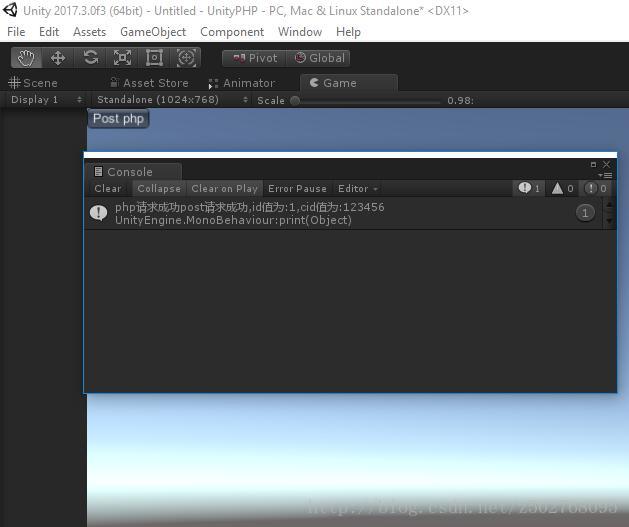
2. unity3d通过post方式请求php.
结果为:
3、unity3d和php后台通讯实例
这里有两个,
一个是php对数据库的操作代码 dbconfig.php,
二是登录的代码 login.php
dbconfig.php
login.php
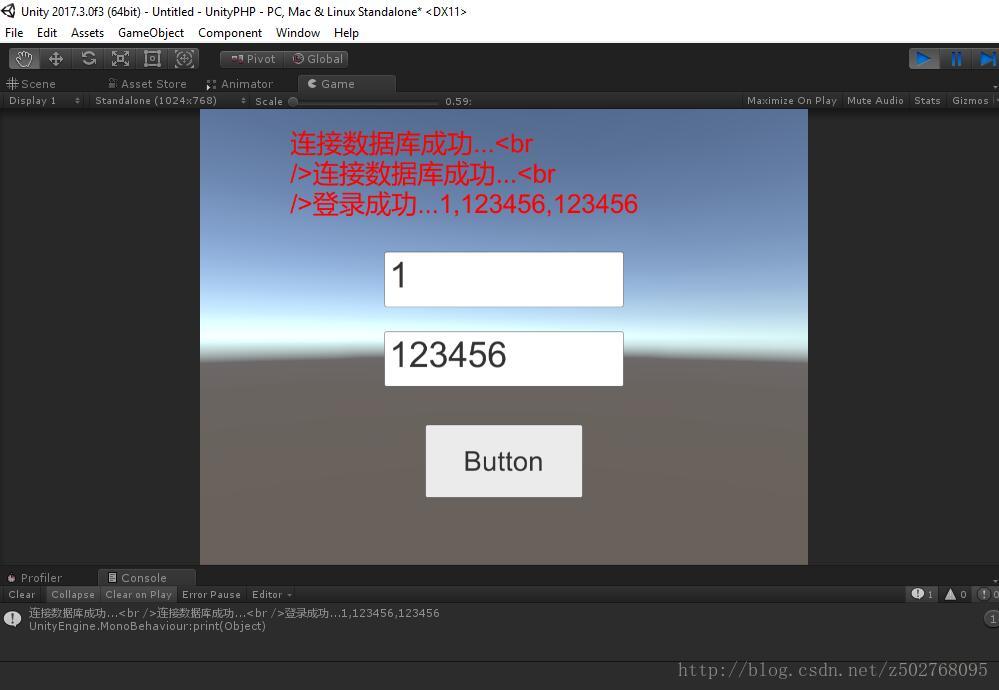
3、5运行结果
4、结束
对于unity3d和php的简单交互就到这里,在实际的开发中我们可能通过xml,json等数据格式来在unity 和php之间互传数据。掌握以上知识之后这些就会变得更加简单,犹如有了地基之后,只需要往上添砖加瓦,房子就会越来越大越来越漂亮。
Unity2017.3.0f3
Mysql5.7.20
Wampserver64
在Wampserver64 的www目录下新建名为unity的文件夹。
1. unity3d通过get方式请求php
1、1Unity端的代码
using UnityEngine;
using System.Collections;

public class phpUnity1 : MonoBehaviour
{
private string url = "http://localhost/unity/phpunity1.php?id=1&cid=123456";  //带get参数id和cid的url

void OnGUI()
{
if (GUILayout.Button("get php"))
{
StartCoroutine(OnGet());
}
}

IEnumerator OnGet()
{
WWW www = new WWW(url);

yield return www;

if (www.error != null)
{
print("php请求错误: 代码为" + www.error);
}
else
{
print("php请求成功" + www.text);
}
}

}
1、2 php端代码(php名字为phpunity1.php)
<?php
if(isset($_GET["id"])
&& isset($_GET["cid"]))
{
echo "get请求成功,id值为:".$_GET["id"].",cid值为:".$_GET["cid"];
}
?>
结果:
2. unity3d通过post方式请求php.
2、1 Unity端的代码
using UnityEngine;
using System.Collections;

public class phpUnity2: MonoBehaviour
{

private string url = "http://localhost/unity/phpunity2.php";  //

void OnGUI()
{
if (GUILayout.Button("Post php"))
{
StartCoroutine(OnGet());
}
}

IEnumerator OnGet()
{
//表单
WWWForm form = new WWWForm()
4000
;
form.AddField("id", 1);
form.AddField("cid", 123456);

WWW www = new WWW(url, form);

yield return www;

if (www.error != null)
{
print("php请求错误: 代码为" + www.error);
}
else
{
print("php请求成功" + www.text);
}
}
}
2、2 php端代码(php名字为 phpunity2.php)
<?php
if(isset($_POST["id"])
&& isset($_POST["cid"]))
{
echo "post请求成功,id值为:".$_POST["id"].",cid值为:".$_POST["cid"];
}
?>
结果为:
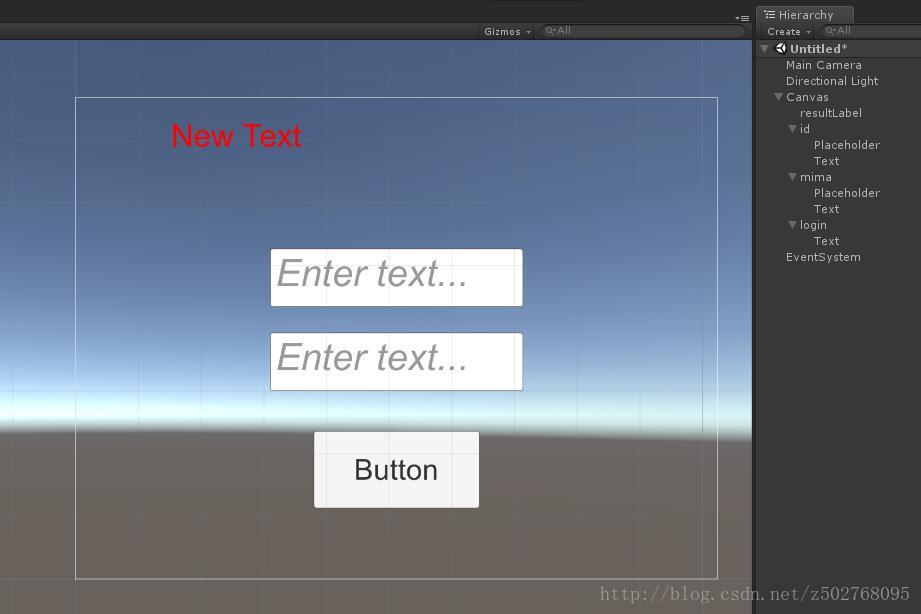
3、unity3d和php后台通讯实例
3、1 简单来个UI界面
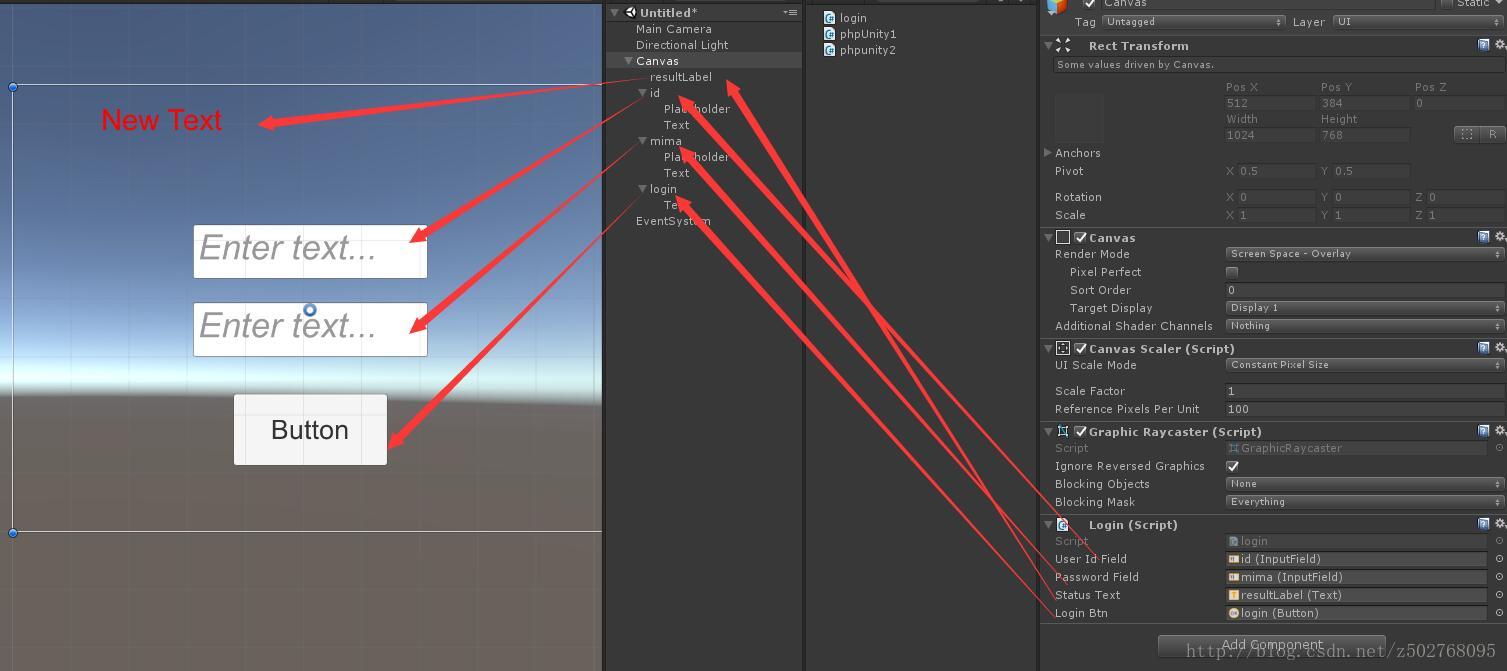
3、2 Unity端的代码
using UnityEngine;
using UnityEngine.UI;
using System.Collections;

public class login : MonoBehaviour
{
public InputField userIdField;
public InputField passwordField;
public Text statusText;

public Button loginBtn;
private string userId = "";
private string password = "";
private string url = "http://localhost/unity/login.php";

private void Awake()
{
loginBtn.onClick.AddListener(OnLogin);
}
public   void OnLogin()
{
userId = userIdField.text;
password = passwordField.text;

if (string.IsNullOrEmpty(userId)|| string.IsNullOrEmpty(password))
{
print("账户和密码不能为空");

return;
}

StartCoroutine(logining());
}

private IEnumerator logining()
{
WWWForm form = new WWWForm();

form.AddField("userId", userId);
form.AddField("password", password);

WWW www = new WWW(url, form);

yield return www;

if (www.error != null)
{
print("error is login:" + www.error);
statusText.text = www.error + "...";
}
else
{
print(www.text);
statusText.text = www.text;
}

}

}
3、3 php端代码
这里有两个,
一个是php对数据库的操作代码 dbconfig.php,
二是登录的代码 login.php
dbconfig.php
<?php
/****************************************************************************
*    说明: 对数据库的封装
****************************************************************************/

class dbconfig{

//构造函数
function __construct()
{
if(!$this->mysqli = mysqli_connect($this->host, $this->user, $this->pwd))
{
die("Cant connect into database");
}
else
{

echo  "连接数据库成功...<br />";
}

$this->select_db($this->db_name);
}

//析构函数
function __destruct()
{
mysqli_close($this->mysqli);
}

/*
*    说明:
*/
public function get_mysql_handle()
{
return $this->mysqli;
}

/*
*    说明:
*/
public function select_db($_db)
{
if($this->mysqli != null)
{
if(mysqli_select_db($this->mysqli, $_db))
{
echo  "连接数据库成功...<br />";
}
else
{
die("Cant connect into database");
}
}
}

/*
*    说明:    执行一个sql无返回值
*/
public function execute($_sql)
{
if(empty($_sql))
{
echo "参数不能为空";
return;
}

if(!mysqli_query($this->mysqli, $_sql))
{

echo  "执行失败...<br />";
}
}

/*
*    说明: 执行一个查询语句,并执行回调函数
*/
public function do_query($_sql, $query_callback = "")
{
if(empty($_sql))
{
echo  "参数不能为空";

return;
}

if($result = mysqli_query($this->mysqli, $_sql))
{
$num_rows = $result->num_rows;
if($num_rows > 0)
{
while($row = $result->fetch_assoc())
{
if(!empty($query_callback))
{
call_user_func( $query_callback , $row );
}
}

return $num_rows;
}
else
{
return 0;
}

mysqli_free_result($result);
}
else
{
echo  "执行失败...<br />";
}
}

//成员变量
private $host = "localhost";    //数据库地址
private $user = "root";            //用户名
private $pwd = "123456";                //用户密码
private $db_name = "test";        //数据库
private $mysqli = null;
}
?>
login.php
<?php
/****************************************************************************
*    说明: 登录
****************************************************************************/
include_once "dbconfig.php";

$dbcfg = new dbconfig();
$password_db = "";

if(isset($_POST["userId"]) && isset($_POST["password"]))
{
$password = $_POST["password"];

$sql = "select * from tb1 where userid='".$_POST['userId']."'";
if($dbcfg->do_query($sql, "login_callback") > 0)
{
if($password_db == $password)
{

echo "登录成功...".$_POST["userId"].",".$_POST["password"].",".$password_db;
}
else
{

echo "登录失败1...".$_POST["userId"].",".$_POST["password"].",".$password_db;
}
}
else
{

echo "登录失败2...".$_POST["userId"].",".$_POST["password"].",".$password_db;
}
}

function login_callback($row)
{
global $password_db;
$password_db = $row["password"];
}
?>
3、4 在MySQL建一个测试的数据表:(数据库名字为test)
DROP TABLE IF EXISTS `tb1`;
CREATE TABLE `tb1` (
`userid` varchar(30) NOT NULL,
`password` varchar(50) NOT NULL,
PRIMARY KEY (`userid`)
) ENGINE=InnoDB DEFAULT CHARSET=latin1;

INSERT INTO `tb1` VALUES ('1', '123456');
INSERT INTO `tb1` VALUES ('2', '123456');
INSERT INTO `tb1` VALUES ('3', '123456');
INSERT INTO `tb1` VALUES ('4', '123456');
3、5运行结果
4、结束
对于unity3d和php的简单交互就到这里,在实际的开发中我们可能通过xml,json等数据格式来在unity 和php之间互传数据。掌握以上知识之后这些就会变得更加简单,犹如有了地基之后,只需要往上添砖加瓦,房子就会越来越大越来越漂亮。

相关文章推荐
- Unity3D后台数据库交互 php接口设计
- 自从有了Phantomjs和Casperjs,后台网页抓取和交互变得异常的简单
- ios前台与php后台的交互
- atitit.js javascript 调用c# java php后台语言api html5交互的原理与总结p97
- iOS客户端与PHP服务端的简单交互
- jQuery的$.ajax()与php后台交互,进行图片上传并删除
- 简单的php登陆类及后台权限的控制
- as3 和PHP 后台交互
- php的jquery与后台交互调试小技巧
- as3与php后台交互教程
- php网站制作(4)-thinkphp jQuery ajax实现后台数据交互
- android客户端与php服务器的json数据简单交互(一)
- PHP与jquery前后台交互的小程序
- HTTP协议实践篇--使用Fiddler与后台php交互
- TP5(thinkPHP5)框架基于ajax与后台数据交互操作简单示例
- atitit.js javascript 调用c# java php后台语言api html5交互的原理与总结p97
- ajax简单后台交互-我们到底能走多远系列(28)
- 前后台交互:跨域以及PHP与Ajax的配合使用
- 前端 后台php MySQL数据库之间通过Ajax技术的完整连接与交互 Ajax的应用
- PHP和Mysql简单的交互