深入理解MyBatis——数据源和事务管理
2018-01-05 20:24
519 查看
在使用MyBatis是,我们需要配置数据源,常用的数据源有c3p0,dbcp,druid等。打开源码会发现,他们都实现了javax.sql.DataSource接口。
实质上,MyBatis中数据源可以分为三类,UNPOOLED、POOLED和JNDI类。使用UnpooledDataSource,PooledDataSource来分别表示前两种数据源,两者都实现了javax.sql.DataSource接口;而JNDI类的数据源则是则是通过JNDI上下文中取值。
UNPOOLED和POOLED分别表示不使用连接池与使用连接池。
在配置文件中:
我们可以修改type属性的值,mybatis根据你设置的属性产生不同类型的datasource。
获得datasource是通过datasourceFactory来获得的,不同的datasourceFactory都实现了DataSourceFactory接口。
值的注意的是PooledDataSourceFactory继承了UnpooledDataSourceFactory。
DataSource创建Connection对象是在需要执行一个SQL的时候,通过dataSource.getConnection()获得一个Connection。
UnpooledDataSource获得Connection对象
UnpooledDataSource获得Connection做了如下的事情:
1.初始化Driver:通过调用initializeDriver()
2.创建Connection:由Driver来创建
3.配置Connection:调用configureConnection()方法实现,设置是否自动提交和隔离级别。
PoolState中有两个List:idleConnections和activeConnections,分为表示连接的两种状态: 空闲状态(idle)和活动状态(active)。
知道这些我们回过头来看PooledDataSource是如何获得Connection的。
代码跟进入popConnection()方法。
整个流程可以看我的注释。
此时返回的时Connection对象,但是getConnection方法获得却是最终的代理。
注意:
我们知道,当我们使用完一个connection对象以后,需要调用close()方法将连接关闭,但是当我们使用数据库连接池的时候需要将关闭连接的操作替换为将connection对象加入连接池中,以复用,因此我们使用了connection对象的代理,在不修改原有代码的情况下将原本应该关闭连接的操作替换为将connection对象加入连接池中。
我们看PooledConnection对象的结构:可以知道PooledConenction**实现了InvocationHandler接口**,并且,proxyConnection对象也是根据这个它来生成的代理对象。
PooledDataSource获得的Connection就是这个proxyConnection对象。
当我们调用此proxyConnection对象上的任何方法时,都会调用此对象的invoke()方法。
invoke()源码:
关于JNDI类型的数据源DataSource比较简单,大家可以看源码。

MyBatis的事务管理分为两种:
1.JDBC的事务管理机制:利用JDBC实现事务管理
2.MANAGED的事务管理机制:程序的容器来实现对事务的管理。
MyBatis时,一般会在MyBatisXML配置文件配置事务。
改变type来改变事务管理机制。
从包结构中我们看到,除了两种事务管理机制还有一个类—TransactionFactory。TransactionFactory是创建MyBatis事务的。
在MyBatis初始化时,会根据不同的类型配置生成相应的TransactionFactory。
JdbcTransaction
我们来看一下JdbcTransaction具体如何实现事务管理的。
JdbcTransaction.java
我们可以知道,JdbcTransaction只是相当于对java.sql.Connection事务处理进行了一次包装,其事务管理都是通过java.sql.Connection实现的。
ManagedTransaction
我们可以知道,ManagedTransaction的commit和rollback方法什么都不会做,而是将事务管理的权利移交给了容器来实现。
实质上,MyBatis中数据源可以分为三类,UNPOOLED、POOLED和JNDI类。使用UnpooledDataSource,PooledDataSource来分别表示前两种数据源,两者都实现了javax.sql.DataSource接口;而JNDI类的数据源则是则是通过JNDI上下文中取值。
UNPOOLED和POOLED分别表示不使用连接池与使用连接池。
在配置文件中:
<datasource type="POOLED">
我们可以修改type属性的值,mybatis根据你设置的属性产生不同类型的datasource。
获得datasource是通过datasourceFactory来获得的,不同的datasourceFactory都实现了DataSourceFactory接口。
/**
* @author Clinton Begin
*/
public interface DataSourceFactory {

void setProperties(Properties props);

DataSource getDataSource();

}
值的注意的是PooledDataSourceFactory继承了UnpooledDataSourceFactory。
/**
* @author Clinton Begin
*/
public class PooledDataSourceFactory extends UnpooledDataSourceFactory {

public PooledDataSourceFactory() {
this.dataSource = new PooledDataSource();
}

}
创建时机
MyBatis数据源DataSource对象的创建发生在MyBatis初始化的过程中,关于初始化可以看一看前一篇文章。DataSource创建Connection对象是在需要执行一个SQL的时候,通过dataSource.getConnection()获得一个Connection。
//此时创建Connection对象
sqlSession.selectList("SELECT * FROM table_name");
UnpooledDataSource获得Connection对象
public Connection getConnection() throws SQLException {
//调用doGetConnection方法
return doGetConnection(username, password);
}

private Connection doGetConnection(String username, String password) throws SQLException {
Properties props = new Properties();
//封装username和password成Properties对象
if (driverProperties != null) {
props.putAll(driverProperties);
}
if (username != null) {
props.setProperty("user", username);
}
if (password != null) {
props.setProperty("password", password);
}
return doGetConnection(props);
}

private Connection doGetConnection(Properties properties) throws SQLException {
//初始化Driver
initializeDriver();
//根据properties创建Connection
Connection connection = DriverManager.getConnection(url, properties);
//对Connection进行配置
configureConnection(connection);
return connection;
}
UnpooledDataSource获得Connection做了如下的事情:
1.初始化Driver:通过调用initializeDriver()
2.创建Connection:由Driver来创建
3.配置Connection:调用configureConnection()方法实现,设置是否自动提交和隔离级别。
PooledDataSource获得Connection
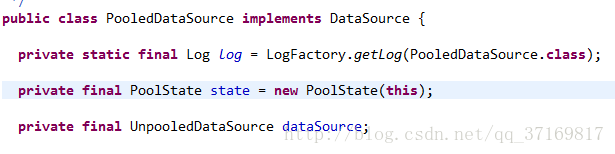
PooledDataSource类中有一个PoolState对象, 它是装载连接池的容器。PoolState中有两个List:idleConnections和activeConnections,分为表示连接的两种状态: 空闲状态(idle)和活动状态(active)。
//空闲的
protected final List<PooledConnection> idleConnections = new ArrayList<PooledConnection>();
//活动的
protected final List<PooledConnection> activeConnections = new ArrayList<PooledConnection>();
知道这些我们回过头来看PooledDataSource是如何获得Connection的。
public Connection getConnection() throws SQLException {
return popConnection(dataSource.getUsername(), dataSource.getPassword()).getProxyConnection();
}

public Connection getConnection(String username, String password) throws SQLException {
//获得Connection代理
return popConnection(username, password).getProxyConnection();
}
代码跟进入popConnection()方法。
private PooledConnection popConnection(String username, String password) throws SQLException {
boolean countedWait = false;
PooledConnection conn = null;
long t = System.currentTimeMillis();
int localBadConnectionCount = 0;

while (conn == null) {
synchronized (state) {
//1.先去idleConnections查找是否有空闲的连接
if (state.idleConnections.size() > 0) {
// Pool has available connection
conn = state.idleConnections.remove(0);
if (log.isDebugEnabled()) {
log.debug("Checked out connection " + conn.getRealHashCode() + " from pool.");
}
} else {
//如果idleConnections没有空闲的连接
// Pool does not have available connection
//查询activeConnections中的连接是否满了
if (state.activeConnections.size() < poolMaximumActiveConnections) {
// Can create new connection
//如果没满就创建新的
conn = new PooledConnection(dataSource.getConnection(), this);
@SuppressWarnings("unused")
//used in logging, if enabled
Connection realConn = conn.getRealConnection();
if (log.isDebugEnabled()) {
log.debug("Created connection " + conn.getRealHashCode() + ".");
}
} else {
// Cannot create new connection
//如果activeConnections中连接满了就取出活动连接池的第一个,也就是最早创建的

PooledConnection oldestActiveConnection = state.activeConnections.get(0);
long longestCheckoutTime = oldestActiveConnection.getCheckoutTime();
//查询最早创建的是否过期,如果过期了就移除他并创建新的
if (longestCheckoutTime > poolMaximumCheckoutTime) {
// Can claim overdue connection
state.claimedOverdueConnectionCount++;
state.accumulatedCheckoutTimeOfOverdueConnections += longestCheckoutTime;
state.accumulatedCheckoutTime += longestCheckoutTime;
state.activeConnections.remove(oldestActiveConnection);
if (!oldestActiveConnection.getRealConnection().getAutoCommit()) {
oldestActiveConnection.getRealConnection().rollback();
}
conn = new PooledConnection(oldestActiveConnection.getRealConnection(), this);
oldestActiveConnection.invalidate();
if (log.isDebugEnabled()) {
log.debug("Claimed overdue connection " + conn.getRealHashCode() + ".");
}
} else {
//还未过期,就必须等待,再次重复上述步骤
// Must wait
try {
if (!countedWait) {
state.hadToWaitCount++;
countedWait = true;
}
if (log.isDebugEnabled()) {
log.debug("Waiting as long as " + poolTimeToWait + " milliseconds for connection.");
}
long wt = System.currentTimeMillis();
state.wait(poolTimeToWait);
state.accumulatedWaitTime += System.currentTimeMillis() - wt;
} catch (InterruptedException e) {
break;
}
}
}
}
if (conn != null) {
if (conn.isValid()) {
if (!conn.getRealConnection().getAutoCommit()) {
conn.getRealConnection().rollback();
}
conn.setConnectionTypeCode(assembleConnectionTypeCode(dataSource.getUrl(), username, password));
conn.setCheckoutTimestamp(System.currentTimeMillis());
conn.setLastUsedTimestamp(System.currentTimeMillis());
state.activeConnections.add(conn);
state.requestCount++;
state.accumulatedRequestTime += System.currentTimeMillis() - t;
} else {
if (log.isDebugEnabled()) {
log.debug("A bad connection (" + conn.getRealHashCode() + ") was returned from the pool, getting another connection.");
}
state.badConnectionCount++;
localBadConnectionCount++;
conn = null;
if (localBadConnectionCount > (poolMaximumIdleConnections + 3)) {
if (log.isDebugEnabled()) {
log.debug("PooledDataSource: Could not get a good connection to the database.");
}
throw new SQLException("PooledDataSource: Could not get a good connection to the database.");
}
}
}
}

}

if (conn == null) {
if (log.isDebugEnabled()) {
log.debug("PooledDataSource: Unknown severe error condition.  The connection pool returned a null connection.");
}
throw new SQLException("PooledDataSource: Unknown severe error condition.  The connection pool returned a null connection.");
}

return conn;
}
整个流程可以看我的注释。
此时返回的时Connection对象,但是getConnection方法获得却是最终的代理。
注意:
我们知道,当我们使用完一个connection对象以后,需要调用close()方法将连接关闭,但是当我们使用数据库连接池的时候需要将关闭连接的操作替换为将connection对象加入连接池中,以复用,因此我们使用了connection对象的代理,在不修改原有代码的情况下将原本应该关闭连接的操作替换为将connection对象加入连接池中。
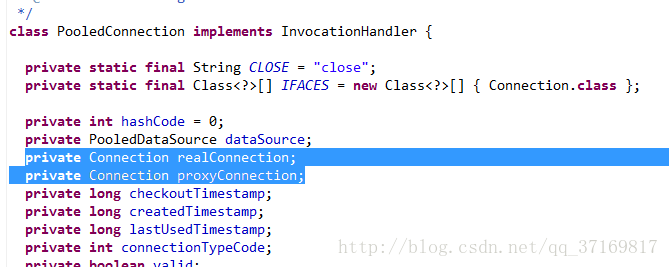
我们看PooledConnection对象的结构:可以知道PooledConenction**实现了InvocationHandler接口**,并且,proxyConnection对象也是根据这个它来生成的代理对象。
PooledDataSource获得的Connection就是这个proxyConnection对象。
当我们调用此proxyConnection对象上的任何方法时,都会调用此对象的invoke()方法。
invoke()源码:
/*
* Required for InvocationHandler implementation.
*
* @param proxy  - not used
* @param method - the method to be executed
* @param args   - the parameters to be passed to the method
* @see java.lang.reflect.InvocationHandler#invoke(Object, java.lang.reflect.Method, Object[])
*/
public Object invoke(Object proxy, Method method, Object[] args) throws Throwable {
String methodName = method.getName();
if (CLOSE.hashCode() == methodName.hashCode() && CLOSE.equals(methodName)) {
//当调用关闭的时候,其实只是将连接放回连接池而已
dataSource.pushConnection(this);
return null;
} else {
try {
if (!Object.class.equals(method.getDeclaringClass())) {
// issue #579 toString() should never fail
// throw an SQLException instead of a Runtime
checkConnection();
}
return method.invoke(realConnection, args);
} catch (Throwable t) {
throw ExceptionUtil.unwrapThrowable(t);
}
}
}
关于JNDI类型的数据源DataSource比较简单,大家可以看源码。
事务管理
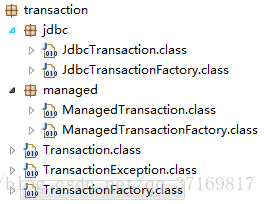
MyBatis中关于事务的包结构如下:MyBatis的事务管理分为两种:
1.JDBC的事务管理机制:利用JDBC实现事务管理
2.MANAGED的事务管理机制:程序的容器来实现对事务的管理。
MyBatis时,一般会在MyBatisXML配置文件配置事务。
<transactionManager type="JDBC">
改变type来改变事务管理机制。
从包结构中我们看到,除了两种事务管理机制还有一个类—TransactionFactory。TransactionFactory是创建MyBatis事务的。
public interface TransactionFactory {

void setProperties(Properties props);

Transaction newTransaction(Connection conn);

Transaction newTransaction(DataSource dataSource, TransactionIsolationLevel level, boolean autoCommit);

}
在MyBatis初始化时,会根据不同的类型配置生成相应的TransactionFactory。
public class JdbcTransactionFactory implements TransactionFactory {

public void setProperties(Properties props) {
}

//JdbcTransactionFactory创建JdbcTransaction
public Transaction newTransaction(Connection conn) {
return new JdbcTransaction(conn);
}

public Transaction newTransaction(DataSource ds, TransactionIsolationLevel level, boolean autoCommit) {
return new JdbcTransaction(ds, level, autoCommit);
}
}
JdbcTransaction
我们来看一下JdbcTransaction具体如何实现事务管理的。
JdbcTransaction.java
public class JdbcTransaction implements Transaction {

private static final Log log = LogFactory.getLog(JdbcTransaction.class);

protected Connection connection;
protected DataSource dataSource;
protected TransactionIsolationLevel level;
protected boolean autoCommmit;

public JdbcTransaction(DataSource ds, TransactionIsolationLevel desiredLevel, boolean desiredAutoCommit) {
dataSource = ds;
level = desiredLevel;
autoCommmit = desiredAutoCommit;
}

public JdbcTransaction(Connection connection) {
this.connection = connection;
}

public Connection getConnection() throws SQLException {
if (connection == null) {
openConnection();
}
return connection;
}

//调用java.sql.Connection.commit()实现
public void commit() throws SQLException {
if (connection != null && !connection.getAutoCommit()) {
if (log.isDebugEnabled()) {
log.debug("Committing JDBC Connection [" + connection + "]");
}
connection.commit();
}
}

//调用java.sql.Connection.rollback()实现
public void rollback() throws SQLException {
if (connection != null && !connection.getAutoCommit()) {
if (log.isDebugEnabled()) {
log.debug("Rolling back JDBC Connection [" + connection + "]");
}
connection.rollback();
}
}

//调用java.sql.Connection.close()实现
public void close() throws SQLException {
if (connection != null) {
resetAutoCommit();
if (log.isDebugEnabled()) {
log.debug("Closing JDBC Connection [" + connection + "]");
}
connection.close();
}
}

//调用java.sql.Connection.setAutoCommit()实现
protected void setDesiredAutoCommit(boolean desiredAutoCommit) {
try {
if (connection.getAutoCommit() != desiredAutoCommit) {
if (log.isDebugEnabled()) {
log.debug("Setting autocommit to " + desiredAutoCommit + " on JDBC Connection [" + connection + "]");
}
connection.setAutoCommit(desiredAutoCommit);
}
} catch (SQLException e) {
// Only a very poorly implemented driver would fail here,
// and there's not much we can do about that.
throw new TransactionException("Error configuring AutoCommit.  "
+ "Your driver may not support getAutoCommit() or setAutoCommit(). "
+ "Requested setting: " + desiredAutoCommit + ".  Cause: " + e, e);
}
}

protected void resetAutoCommit() {
try {
if (!connection.getAutoCommit()) {
// MyBatis does not call commit/rollback on a connection if just selects were performed.
// Some databases start transactions with select statements
// and they mandate a commit/rollback before closing the connection.
// A workaround is setting the autocommit to true before closing the connection.
// Sybase throws an exception here.
if (log.isDebugEnabled()) {
log.debug("Resetting autocommit to true on JDBC Connection [" + connection + "]");
}
connection.setAutoCommit(true);
}
} catch (SQLException e) {
log.debug("Error resetting autocommit to true "
+ "before closing the connection.  Cause: " + e);
}
}

protected void openConnection() throws SQLException {
if (log.isDebugEnabled()) {
log.debug("Opening JDBC Connection");
}
connection = dataSource.getConnection();
if (level != null) {
connection.setTransactionIsolation(level.getLevel());
}
setDesiredAutoCommit(autoCommmit);
}

}
我们可以知道,JdbcTransaction只是相当于对java.sql.Connection事务处理进行了一次包装,其事务管理都是通过java.sql.Connection实现的。
ManagedTransaction
public class ManagedTransaction implements Transaction {

private static final Log log = LogFactory.getLog(ManagedTransaction.class);

private DataSource dataSource;
private TransactionIsolationLevel level;
private Connection connection;
private boolean closeConnection;

public ManagedTransaction(Connection connection, boolean closeConnection) {
this.connection = connection;
this.closeConnection = closeConnection;
}

public ManagedTransaction(DataSource ds, TransactionIsolationLevel level, boolean closeConnection) {
this.dataSource = ds;
this.level = level;
this.closeConnection = closeConnection;
}

public Connection getConnection() throws SQLException {
if (this.connection == null) {
openConnection();
}
return this.connection;
}

public void commit() throws SQLException {
// 什么都没有做
}

public void rollback() throws SQLException {
// 什么都没有做
}

public void close() throws SQLException {
if (this.closeConnection && this.connection != null) {
if (log.isDebugEnabled()) {
log.debug("Closing JDBC Connection [" + this.connection + "]");
}
this.connection.close();
}
}

protected void openConnection() throws SQLException {
if (log.isDebugEnabled()) {
log.debug("Opening JDBC Connection");
}
this.connection = this.dataSource.getConnection();
if (this.level != null) {
this.connection.setTransactionIsolation(this.level.getLevel());
}
}

}我们可以知道,ManagedTransaction的commit和rollback方法什么都不会做,而是将事务管理的权利移交给了容器来实现。

相关文章推荐
- 深入理解mybatis原理(八) MyBatis事务管理机制
- 《深入理解mybatis原理》 MyBatis事务管理机制
- 《深入理解mybatis原理》 MyBatis事务管理机制 http://blog.csdn.net/luanlouis/article/details/37992171
- 《深入理解mybatis原理》 MyBatis事务管理机制
- 《深入理解mybatis原理》 Mybatis数据源与连接池
- 【Java】mybatis用AbstractRoutingDataSource实现动态数据源时的事务管理
- spring+mybatis管理多个数据源(非分布式事务)
- Springboot+Mybatis+Druid 实现多数据源,与事务管理
- 《深入理解mybatis原理》 Mybatis数据源与连接池
- 深入理解mybatis原理--Mybatis数据源与连接池
- Spring多数据源分布式事务管理/springmvc+spring+atomikos[jta]+druid+mybatis
- Spring多数据源分布式事务管理/springmvc+spring+atomikos[jta]+druid+mybatis
- 《深入理解mybatis原理》 Mybatis数据源与连接池
- 《深入理解mybatis原理》 Mybatis数据源与连接池
- 《深入理解mybatis原理》 Mybatis数据源与连接池
- spring管理mybatis事务源码理解随记
- 深入理解mybatis原理(九) Mybatis数据源与连接池
- 《深入理解mybatis原理》 Mybatis数据源与连接池
- Mybatis深入之事务管理
- 深入理解MyBatis(七)—MyBatis事务