Android组件管理--应用程序启动流程
2018-01-02 16:12
423 查看
Activity的启动流程相对复杂一些,涉及到了Activity中的生命周期方法,涉及到了Android体系的CS模式,涉及到了Android中进程通讯Binder机制等等。
前言
我们先看一下源码中对Activity的描述,如下:
在介绍Activity的启动流程之前,我们先介绍几个概念:
Activity的生命周期
Android采用Task来管理Activity,当启用一个应用时,Android会为之创建一个Task,Task以栈的形式管理Activity,先启动的Activity保存到Task栈底,后启动的Activity放在Task栈顶。
standard标准模式:创建一个新的目标Activity实例,并添加到当前Task栈中。
singleTop(Task栈顶单例模式):与standard模式类似,但是当要启动的目标Activity已经位于Task栈顶时,系统不会创建目标Activity的实例,而是直接复用已有的Activity实例。
singleTask(Task内单例模式):Task内只有一个实例。
(1)、如果将要启动的目标Activity不存在,创建目标Activity的实例,并将它加入Task栈顶;
(2)、如果将要启动的目标Activity已经位于栈顶,与singleTop类似,不再创建新的Activity实例,直接复用已有的Activity;
(3)、如果将要启动的目标Activity已经存在,但没有位于栈顶,系统将把位于该Activity上面的所有Activity移出Task栈,从而使目标Activity位于栈顶。
singleInstance(全局单例模式):系统无论从哪个Task中启动Activity,只会创建一个目标Activity实例,并会使用一个新的Task栈来加载该Activity实例。
(1)、如果要启动的目标Activity实例不存在,系统会先创建一个全新的Task,再创建目标Activity实例,并将它加入Task栈顶;
(2)、如果要启动的目标Activity已经存在,无论它位于哪个应用程序中、位于哪个Task中,系统都会把它所在的Task转到前台,从而使Activity显示出来。
Intent启动Activity分为两种方式,即显式启动和隐式启动。
显式启动就是在初始化Intent对象的时候,直接引用需要启动的Activity的字节码。显式启动的好处就是直接告诉Intent对象要启动的Activity对象,不需要执行IntentFilter索引需要启动哪一个Activity,但是显式启动不能启动其他进程的Activity对象,因为无法获取其他进程的Activity对象的字节码。隐式启动则可以通过配置IntentFilter启动其他进程的Activity对象。
在应用内,一般都是使用显式启动的方式启动Activity;而如果需要启动其他应用的Activity时,一般使用隐式启动的方式。
在Actvity启动过程中,其实是应用进程与SystemServer进程相互配合启动Activity的过程,其中应用进程主要用于执行具体的Activity的启动过程,回调生命周期方法等操作,而SystemServer进程则主要是调用其中的各种服务,将Activity保存在栈中,协调各种系统资源等操作。
流程简要分析
这里先看下大致的流程图,如下:
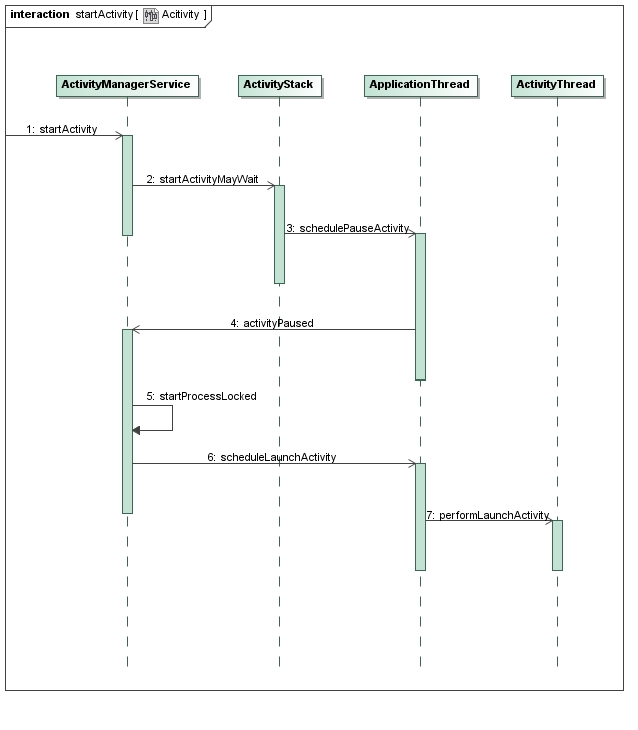
在这个图中,ActivityManagerService和ActivityStack位于同一个进程中,而ApplicationThread和ActivityThread位于另一个进程中。其中,ActivityManagerService是负责管理Activity的生命周期的,AMS还借助ActivityStack是来把所有的Activity按照后进先出的顺序放在一个堆栈中;对于每一个应用程序来说,都有一个ActivityThread来表示应用程序的主进程,而每一个ActivityThread都包含一个ApplicationThread实例,它是一个Binder对象,负责和其他进程进行通信。
下面简要介绍一下启动的流程:
1. 无论是通过Launcher来启动Activity,还是通过Activity内部调用startActivity接口来启动新的Activity,都通过Binder进程间通信进入到ActivityManagerService进程中,并且调用AMS.startActivity()方法;
2. AMS调用ActivityStack.startActivityMayWait()方法来做准备要启动的Activity的相关信息;
3. ActivityStack通知ApplicationThread要进行Activity启动调度了;这里的ApplicationThread代表的是调用ActivityManagerService.startActivity()方法的进程,对于通过点击应用程序图标的情景来说,这个进程就是Launcher了,而对于通过在Activity内部调用startActivity的情景来说,这个进程就是这个Activity所在的进程了;
4. ApplicationThread不执行真正的启动操作,它通过调用AMS.activityPaused()方法进入到AMS进程中,看看是否需要创建新的进程来启动Activity;
5. 对于通过点击应用程序图标来启动Activity的情景来说,AMS在这一步中,会调用startProcessLocked()方法来创建一个新的进程;而对于通过在Activity内部调用startActivity()方法来启动新的Activity来说,这一步是不需要执行的,因为新的Activity就在原来的Activity所在的进程中进行启动;
6. AMS调用ApplicationThread.scheduleLaunchActivity()方法,通知相应的进程执行启动Activity的操作;
7. ApplicationThread把这个启动Activity的操作转发给ActivityThread,ActivityThread通过ClassLoader导入相应的Activity类,然后把它启动起来。
负责启动其它应用程序的源代码实现在src/com/android/launcher3/Launcher.java文件中:
由于上一步中传递的Bundle对象为空,所以这里我们执行的是else分支的逻辑,所以这里调用了startActivityForResult方法,并且传递的参数为intent和-1。
注意:通过这里的代码可以发现,我们调用startActivity方法时,在其内部也是调用startActivityForResult()方法的。那么为什么调用startActivityForResult方法可以在Activity中回调onActivityResult(),而调用startActivity()则不可以呢?可以发现其主要区别是,在startActivity()方法内部调用startActivityForResult()方法时,传递给startActivityForResult()的requestCode参数的值是-1。也就是说,我们在Activity中调用startActivityForResult()方法时,传递的requestCode值为-1的话,那么onActivityResult()方法是不起作用的。实际上,经测试requestCode的值小于0的时候都是不起作用的,所以当我们调用startActivityForResult的时候需要注意这一点。
第一次启动Activity时,if分支成立;mInstrumentation是Activity类的成员变量,类型是Instrumentation,用来监控应用程序和系统的交互,Activity、Service等都是通过它来与系统交互。mMainThread类型是ActivityThread,代表应用程序的主线程,这里通过mMainThread.getApplicationThread获得它里面的ApplicationThread成员变量,他是一个Binder对象,AMS会使用它来和ActivityThread进行进程间通信。
mToken是一个Binder对象的远程接口。在AMS中,每个Activity组件都对应一个ActivityRecord对象,AMS以ActivityRecord类型来管理Activity组件。AMS为了将自己内部管理的ActivityRecord实例与某个Activity组件对应起来,就使用一个IBinder实例来作为桥梁,对Activity和ActivityRecord进行关联。所以,AMS通过传入的Activity::mToken对象就可以在它内部找到这个Activity对应的ActivityRecord实例了。
ActivityStarter是AMS启动Activity的一个管理类,我们这里先看一下AMS在启动Activity过程中,引入的一些辅助类,如下:
第一部分
从上面代码来看,startActivityMayWait()在第一阶段最主要的工作其实就是:
1、解析出与intent相匹配的ActivityInfo;
2、得到启动该Activity的Task,即父Activity的Task或前台Task。
在这一部分主要是调用了startActivityLocked()方法来继续处理Activity的启动流程,当该函数成功执行完毕后,Activity将会被启动,并形成对应的ActivityRecord被AMS统一管理。
1. 处理sourceRecord和resultRecord
sourceRecord表示发起本次请求的Activity,即父Activity对应的信息;resultRecord表示接收处理结果的Activity。一般情况下,两者应指向同一个Activity。
2. 处理app switch
如果AMS当前禁止app switch,那么AMS会将本次请求保存起来,以便允许app switch时再进行处理。从代码可以看出,在AMS可以进行app switch时,在处理本次的请求前,会先调用doPendingActivityLaunchesLocked()方法,该方法将启动之前因系统禁止app switch而保存的请求。
3. 调用startActivityUnchecked()方法继续处理本次Activity的启动请求。
computeLaunchingTaskFlags()方法主要用于决策是否在mLaunchFlags中添加FLAG_ACTIVITY_NEW_TASK标记。函数的主要思想可以简化为:
(1).如果参数中指定了希望Activity加入的Task,同时这个Task确实可用(不与当前的LaunchFlags矛盾),不需要添加FLAG_ACTIVITY_NEW_TASK。
(2).如果没有指定希望Activity加入的Task,或者指定的Task无法使用,在满足条件的情况下,会为mLaunchFlags添加FLAG_ACTIVITY_NEW_TASK。
简单一句话就是:在正常情况下,若现存Task中,没有待启动Activity可以使用的,就重新为其创建一个。
computeSourceStack()方法主要用于记录父Activity对应的TaskRecord信息。当父Activity finishing时,此父Activity对应的Task不再作为新Activity的SourceStack,因为该Task有可能会被Android系统清理掉。在这种情况下,Android系统将创建新的Task作为SourceStack,同时使这个新Task的信息与父Activity原有sourceTask信息相同。
至此,startActivityUnchecked方法第一部分结束。在这一部分中,代码主要判断Activity是否需要插入到现有Task中,同时当存在父Activity时,判断sourceTask是否有效。所有的这些判断,最后都用于决策新启动的Activity是否需要携带FLAG_ACTIVITY_NEW_TASK标志,即是否需要新建一个Task对象。
下面看下几个主要的函数。
1. getReusableIntentActivity()
getReusableIntentActivity方法将决定新启动的Activity是否可以复用现有的Activity。
如果启动参数中指定了目标Task,那么显然需要利用ActivityStackSupervisor找到指定的Task,如果指定的Task存在,那么新启动的Activity将插入到该Task的Top位置。如果启动的参数中没有指定启动的Task,那么就需要根据Activity信息,利用ActivityStackSupervisor在当前的Task中进行匹配。
最后,调用ActivityStackSupervisor的resumeFocusedStackTopActivityLocked函数
1、如果mResumedActivity不为空,则需要先暂停这个Activity。
mResumedActivity代表当前已经存在于界面的Activity。当需要启动一个新的Activity时,需要先停止当前的Activity。这部分工作由startPausingLocked方法来完成。
也就是说,首先要让现在正在运行的Activity调用startPausingLocked方法进入pause状态。
2、当mResumedActivity为空时,若待启动的Activity对应的应用存在,那么仅需要调用scheduleResumeActivity重新启动该Activity;否则,需要调用ActivityStackSupervisor的startSpecificActivityLocked方法,启动整个进程。
需要说明的是:
1. 当系统启动第一个Activity,即Launcher时,mResumedActivity的值才会是null。因此,即使我们以脚步的方式启动一个Activity,也必须先中断当前的界面,才能进行后续的操作。
2. 分析startPausingLocked函数时,将涉及到当前界面对应的进程、新启动Activity所在的进程,与AMS之间的交互,整体比较复杂。
因此还是先从简单的情况入手,看看直接启动新Activity所在进程的startSpecificActivityLocked函数,后面我们在分析其他情况。
在startProcessLocked方法中,我们主要做了:
1、处理FLAG_FROM_BACKGROUND和BadProcess;
2、创建一个新的ProcessRecord,调用Process的start方法,通过socket向Zygote发送命令,fork出进程;
3、AMS按照键值对的形式保存ProcessRecord(pid为键值),同时发送延迟消息PROC_START_TIMEOUT_MSG,监控进程是否创建成功。
这里主要是调用Process.start接口来创建一个新的进程,新的进程会导入android.app.ActivityThread类,并且执行它的main函数,因此,每一个应用程序都有一个ActivityThread实例来对应。Android系统开始通过创建zygote创建应用进程。
16.Process.zygoteSendArgsAndGetResult
为啥子我们平时都将ActivityThread称之为UI线程或主线程呢?这里可以看出,应用进程被创建之后首先执行的是ActivityThread的main方法,所以我们将ActivityThread称为主线程。
1. 创建出一个Looper,并将主线程加入到消息循环中。
2. 创建出ActivityThread,并调用其attach方法。
attach方法最终调用了ActivityManagerService的远程接口ActivityManagerProxy的attachApplication方法,传入的参数是mAppThread,这是一个ApplicationThread类型的Binder对象,它的作用是用来进行进程间通信的。
18. ActivityThread.attach
这里我们跳过ActivityManagerNative类,到ActivityManagerService的attachApplication方法。
1. 判断进程的有效性,同时注册讣告:监听进程的死亡信号;
2. 设置pid对应的ProcessRecord对象的一些成员变量,例如和应用进程交互的IApplicationThread对象、进程调度的优先级等;
3. 进程注册成功,AMS从消息队列中移除PROC_START_TIMEOUT_MSG。
第二部分
ApplicationThread.bindApplication
ApplicationThread类是ActivityThread类的内部类,从前面的代码,我们知道应用进程有Zygote fork得到,然后调用ActivityThread的main函数,进入到Java世界。但是截止到目前,该进程并没有融入到Android体系中,因此仅能被成为一个Java进程,是指连进程名也只是“敷衍”地定义为“pre-initialized”。这里介绍的bindApplication方法,就是在新进程中创建并初始化对应的Android运行环境的。下面看下主要流程:
由上面代码可知,ApplicationThread的接口被AMS调用后,会将参数保存到APPBindData对象中,然后发送消息让ActivityThread的主线程处理。由此可见,对应用进程而言,ApplicationThread只是与AMS通信的接口,实际的工作一般还是会交给ActivityThread来完成。ActivityThread中处理该消息的实际方法是handleBindApplication。
ActivityThread.handleBindApplication
1、按照Android的要求,完成对进程基本参数的设置,包括设置进程名、时区、资源及兼容性配置;同时也添加了一些限制,例如主线程不能访问网络等。
2、创建进程对应的ContextImpl、LoadedApk、Application等对象,同时加载Application中的Contentprovider,并初始化Application。
当完成上述工作后,新建的进程终于加入到了Android体系。
这里我们主要分析下Activity的启动过程。根据上面的代码,调用的就是ActivityStackSupervisor的attachApplicationLocked方法。
1、 进一步配置ActivityRecord和ProcessRecord;
2、调用scheduleLaunchActivity方法,通知应用进程启动Activity;
3、在Activity启动后,AMS调用minimalResumeActivityLocked方法更新相应的状态。
这里我们只需要进一步看看scheduleLaunchActivity和minimalResumeActivityLocked这两个函数的流程。
下面继续read the fucking source code。
1、调用performLaunchActivity()方法创建出Activity;
2、调用handleResumeActivity()方法,完成调用目标Activity的onResume()方法等工作;
3、对于可见但非前台的Activity,还需要调用performPauseActivityIfNeeded()方法,调用Activity的onPause()接口。
我们主要看一下performLaunchActivity和handleResumeActivity函数。
25. ActivityThread.performLaunchActivity
从上面的代码可以看出,handleResumeActivity函数将会调用Activity的onResume接口,并进行绘制相关的操作,然后向Activity的MessageQueue中增加一个IdleHandler,最终通知AMS更新Activity的状态。
当MessagQueue的next函数被调用时,如果队列中没有message需要处理,那么将调用添加到MessageQueue的IdleHandler的queueIdle接口。handleResumeActivity函数向ActivityThread增加了一个IdleHandler,我们看看它的作用:
private class Idler implements MessageQueue.IdleHandler {
public final boolean queueIdle() {
ActivityClientRecord a = mNewActivities;
..................
if (a != null) {
mNewActivities = null;
IActivityManager am = ActivityManagerNative.getDefault();
ActivityClientRecord prev;
do {
............
if (a.activity != null && !a.activity.mFinished) {
try {
//调用AMS的activityIdle函数
am.activityIdle(a.token, a.createdConfig, stopProfiling);
a.createdConfig = null;
} catch (RemoteException ex) {
..............
}
//do-while循环将处理所有的已经完成onResume的Activity
prev = a;
a = a.nextIdle;
prev.nextIdle = null;
}
}while (a != null);
..........
}
.........
//返回值为false,于是执行一次后,会被移除
return false;
}
} 从上面的代码可以看出,当ActivityThread空闲下来后,将为所有完成onResume的Activity调用AMS的activityIdle函数。该函数是Activity成功创建并启动流程中的最后一步,我们稍后再分析。
至此,scheduleLaunchActivity函数分析完毕,我们看看realStartActivityLocked函数的下一个关键点minimalResumeActivityLocked。
void minimalResumeActivityLocked(ActivityRecord r) {
r.state = ActivityState.RESUMED;
.............
mResumedActivity = r;
r.task.touchActiveTime();
//mRecentTasks保存近期被调用的Task
mRecentTasks.addLocked(r.task);
//更新一些状态
completeResumeLocked(r);
//判断AMS当前维护的Activity对应的进程是否可以sleep
//若可以sleep,将调用对应ApplicationThread的scheduleSleeping函数
mStackSupervisor.checkReadyForSleepLocked();
setLaunchTime(r);
............
} 上述代码中主要的工作由completeResumeLocked来完成:
/**
* Once we know that we have asked an application to put an activity in
* the resumed state (either by launching it or explicitly telling it),
* this function updates the rest of our state to match that fact.
*/
private void completeResumeLocked(ActivityRecord next) {
//更新ActivityRecord的变量
next.visible = true;
next.idle = false;
............
if (next.isHomeActivity()) {
//对Home Activity的特殊处理
..........
}
if (next.nowVisible) {
// We won't get a call to reportActivityVisibleLocked() so dismiss lockscreen now.
//如果已经visible将进行通知
mStackSupervisor.reportActivityVisibleLocked(next);
mStackSupervisor.notifyActivityDrawnForKeyguard();
}
// schedule an idle timeout in case the app doesn't do it for us.
//发送一个延迟消息IDLE_TIMEOUT_MSG,延迟时间为10s
//这里就是要求Activity启动后,10s内要调用AMS的activityIdle函数
//不过从代码来看,即使Activity 10s内没有调用activityIdle函数,
//ActivityStackSupervisor也会自己调用activityIdleInternalLocked函数
mStackSupervisor.scheduleIdleTimeoutLocked(next);
mStackSupervisor.reportResumedActivityLocked(next);
......................
} 从这部分代码,可以看出minimalResumeActivityLocked函数整体上就是负责更新一些状态。
下面,我们看一下Activity启动的最后一步,即调用AMS的activityIdle函数。
................
synchronized (this) {
ActivityStack stack = ActivityRecord.getStackLocked(token);
if (stack != null) {
//主要调用ActivityStackSupervisor的activityIdleInternalLocked函数
ActivityRecord r =
mStackSupervisor.activityIdleInternalLocked(token, false, config);
.................
}
}
..............
} 跟进activityIdleInternalLocked函数:
//如果超时后,由ActivityStackSupervisor主动调用该函数,fromTimeout的值为true
final ActivityRecord activityIdleInternalLocked(final IBinder token, boolean fromTimeout,
Configuration config) {
................
ActivityRecord r = ActivityRecord.forTokenLocked(token);
if (r != null) {
....................
mHandler.removeMessages(IDLE_TIMEOUT_MSG, r);
....................
if (fromTimeout) {
//超时时,将通知Activity完成启动
reportActivityLaunchedLocked(fromTimeout, r, -1, -1);
}
if (config != null) {
r.configuration = config;
}
r.idle = true;
................
}
//当所有Resumed Activity都处于空闲状态时
if (allResumedActivitiesIdle()) {
if (r != null) {
mService.scheduleAppGcsLocked();
}
//mLaunchingActivity是一个WakeLock,用于防止在操作Activity的过程中休眠
//由于该WakeLock不能长时间使用,因此系统设置了一个超时消息LAUNCH_TIMEOUT_MSG
//处理该消息时,将释放该WakeLock
//此处,当所有Activity均空闲时,说明事件处理完毕,此时需要释放该WakeLock
if (mLaunchingActivity.isHeld()) {
mHandler.removeMessages(LAUNCH_TIMEOUT_MSG);
...............
mLaunchingActivity.release();
}
ensureActivitiesVisibleLocked(null, 0, !PRESERVE_WINDOWS);
}
// Atomically retrieve all of the other things to do.
//processStoppingActivitiesLocked返回那些因本次Activity启动而被暂停(paused)的Activity
final ArrayList<ActivityRecord> stops = processStoppingActivitiesLocked(true);
NS = stops != null ? stops.size() : 0;
if ((NF = mFinishingActivities.size()) > 0) {
//finishes保存等待结束的Activity
finishes = new ArrayList<>(mFinishingActivities);
mFinishingActivities.clear();
}
.................
// Stop any activities that are scheduled to do so but have been
// waiting for the next one to start.
for (int i = 0; i < NS; i++) {
r = stops.get(i);
final ActivityStack stack = r.task.stack;
if (stack != null) {
if (r.finishing) {
//如果被暂停的Activity已经处于了finishing状态,则通知它们执行Destroy操作,即Activity的onDestroy函数将被调用
stack.finishCurrentActivityLocked(r, ActivityStack.FINISH_IMMEDIATELY, false);
} else {
//否则通知它们执行stop操作,即Activity的onStop将被调用
stack.stopActivityLocked(r);
}
}
}
// Finish any activities that are scheduled to do so but have been
// waiting for the next one to start.
// 处理等待结束的Activity,从代码来看最终也是调用其onDestroy接口
for (int i = 0; i < NF; i++) {
r = finishes.get(i);
final ActivityStack stack = r.task.stack;
if (stack != null) {
activityRemoved |= stack.destroyActivityLocked(r, true, "finish-idle");
}
}
................
//AMS清理没有任何组建的无用进程
mService.trimApplications();
if (activityRemoved) {
//如果等待结束的Activity被处理,保证前台栈顶Activity处于Resumed状态
resumeFocusedStackTopActivityLocked();
}
return r;
} 至此,启动Activity最后一部分的主要工作介绍完毕。从代码来看,这一部分最主要的工作是:进行一些扫尾工作,即根据后台Activity是否处于finishing状态,分别调用其onStop和onDestroy接口。同时,AMS也会清理一些无实际工作的进程。我们看下Activity在ActivityThread后的处理流程图:

至此,AMS启动Activity的后一部分基本介绍完毕。这一部分的代码整体流程如上图所示,我们省略一些细节,例如绘制等。
从整个逻辑来看,这部分流程比较清晰,主要思想如下:
1、启动进程,创建自己的ActivityThread和ApplicationThread。
2、进程与AMS通信,其实就是完成一个注册过程(将ApplicationThread作为Binder通信接口交给AMS保存),AMS毕竟要统一管理系统中所有的应用进程。
3、AMS通知进程创建自己的Android运行环境,加入到Android体系。
4、AMS通知进程可以启动进程中的组件了,注意四大组件的顺序以此是ContentProvider、Activity、Service、BroadcastReceiver(本文我们仅分析了Activity的启动过程)。
5、Activity启动完成后,通知AMS更新相关的状态,并进行一些扫尾工作。
整体而言,所有的实际工作都是由进程自己完成的,AMS仅起到一个管理的作用。
前言
我们先看一下源码中对Activity的描述,如下:An activity is a single, focused thing that the user can do. Almost all activities interact with the user, so the Activity class takes
care of creating a window for you in which you can place your UI with {@link #setContentView}. While activities are often presented to
the user as full-screen windows, they can also be used in other ways: as floating windows (via a theme with {@link
android.R.attr#windowIsFloating} set) or embedded inside of another activity (using {@link ActivityGroup}).
Sometimes an Activity may need to do a long-running operation that exists independently of the activity lifecycle itself. An example
may be a camera application that allows you to upload a picture to a web site. The upload may take a long time, and the application
should allow the user to leave the application while it is executing. To accomplish this, your Activity should start a {@link Service}
in which the upload takes place. This allows the system to properly prioritize your process (considering it to be more important than
other non-visible applications) for the duration of the upload, independent of whether the original activity is paused, stopped, or
finished.在介绍Activity的启动流程之前,我们先介绍几个概念:
Activity的生命周期
protected void onCreate(Bundle savedInstanceState);
protected void onRestart();
protected void onStart();
protected void onResume();
protected void onPause();
protected void onStop();
protected void onDestory();
以上为Activity生命周期中的各个时期的回调方法,在不同的方法中我们可以执行不同的逻辑。
Activity的启动模式
使用android:launchMode属性可以配置Activity的启动模式;主要有四种模式:standard标准模式,singleTop(Task栈顶单例模式),singleTask(Task内单例模式),singleInstance(全局单例模式)。Android采用Task来管理Activity,当启用一个应用时,Android会为之创建一个Task,Task以栈的形式管理Activity,先启动的Activity保存到Task栈底,后启动的Activity放在Task栈顶。
standard标准模式:创建一个新的目标Activity实例,并添加到当前Task栈中。
singleTop(Task栈顶单例模式):与standard模式类似,但是当要启动的目标Activity已经位于Task栈顶时,系统不会创建目标Activity的实例,而是直接复用已有的Activity实例。
singleTask(Task内单例模式):Task内只有一个实例。
(1)、如果将要启动的目标Activity不存在,创建目标Activity的实例,并将它加入Task栈顶;
(2)、如果将要启动的目标Activity已经位于栈顶,与singleTop类似,不再创建新的Activity实例,直接复用已有的Activity;
(3)、如果将要启动的目标Activity已经存在,但没有位于栈顶,系统将把位于该Activity上面的所有Activity移出Task栈,从而使目标Activity位于栈顶。
singleInstance(全局单例模式):系统无论从哪个Task中启动Activity,只会创建一个目标Activity实例,并会使用一个新的Task栈来加载该Activity实例。
(1)、如果要启动的目标Activity实例不存在,系统会先创建一个全新的Task,再创建目标Activity实例,并将它加入Task栈顶;
(2)、如果要启动的目标Activity已经存在,无论它位于哪个应用程序中、位于哪个Task中,系统都会把它所在的Task转到前台,从而使Activity显示出来。
Activity的启动进程
在AndroidManifest.xml中定义Activity的时候,Activity默认是属于进程名称为包名的进程的,当然这时候是可以指定Activity的启动进程(android:process),所以在Activity启动时首先会检测当前Activity所属的进程是否已经启动,若进程没有启动,则首先会启动该进程,并在该进程启动之后才会执行Activity的启动过程。Intent启动Activity的方式
有两种方式启动一个Activity,一是在Launcher中点击应用的图标;二是在应用内部,通过函数调用启动Activity。Intent启动Activity分为两种方式,即显式启动和隐式启动。
显式启动就是在初始化Intent对象的时候,直接引用需要启动的Activity的字节码。显式启动的好处就是直接告诉Intent对象要启动的Activity对象,不需要执行IntentFilter索引需要启动哪一个Activity,但是显式启动不能启动其他进程的Activity对象,因为无法获取其他进程的Activity对象的字节码。隐式启动则可以通过配置IntentFilter启动其他进程的Activity对象。
在应用内,一般都是使用显式启动的方式启动Activity;而如果需要启动其他应用的Activity时,一般使用隐式启动的方式。
Android framework层的CS模式
我们知道Android系统在启动过程中会执行这样的逻辑:Zygote进程 –> SystemServer进程 –> 各种系统服务 –> 应用进程。在Actvity启动过程中,其实是应用进程与SystemServer进程相互配合启动Activity的过程,其中应用进程主要用于执行具体的Activity的启动过程,回调生命周期方法等操作,而SystemServer进程则主要是调用其中的各种服务,将Activity保存在栈中,协调各种系统资源等操作。
流程简要分析
这里先看下大致的流程图,如下:在这个图中,ActivityManagerService和ActivityStack位于同一个进程中,而ApplicationThread和ActivityThread位于另一个进程中。其中,ActivityManagerService是负责管理Activity的生命周期的,AMS还借助ActivityStack是来把所有的Activity按照后进先出的顺序放在一个堆栈中;对于每一个应用程序来说,都有一个ActivityThread来表示应用程序的主进程,而每一个ActivityThread都包含一个ApplicationThread实例,它是一个Binder对象,负责和其他进程进行通信。
下面简要介绍一下启动的流程:
1. 无论是通过Launcher来启动Activity,还是通过Activity内部调用startActivity接口来启动新的Activity,都通过Binder进程间通信进入到ActivityManagerService进程中,并且调用AMS.startActivity()方法;
2. AMS调用ActivityStack.startActivityMayWait()方法来做准备要启动的Activity的相关信息;
3. ActivityStack通知ApplicationThread要进行Activity启动调度了;这里的ApplicationThread代表的是调用ActivityManagerService.startActivity()方法的进程,对于通过点击应用程序图标的情景来说,这个进程就是Launcher了,而对于通过在Activity内部调用startActivity的情景来说,这个进程就是这个Activity所在的进程了;
4. ApplicationThread不执行真正的启动操作,它通过调用AMS.activityPaused()方法进入到AMS进程中,看看是否需要创建新的进程来启动Activity;
5. 对于通过点击应用程序图标来启动Activity的情景来说,AMS在这一步中,会调用startProcessLocked()方法来创建一个新的进程;而对于通过在Activity内部调用startActivity()方法来启动新的Activity来说,这一步是不需要执行的,因为新的Activity就在原来的Activity所在的进程中进行启动;
6. AMS调用ApplicationThread.scheduleLaunchActivity()方法,通知相应的进程执行启动Activity的操作;
7. ApplicationThread把这个启动Activity的操作转发给ActivityThread,ActivityThread通过ClassLoader导入相应的Activity类,然后把它启动起来。
开始请求执行启动Activity
上面简要介绍了Android应用程序的Activity的启动过程。在Android系统中,应用程序是由Activity组成的,因此,应用程序的启动过程实际上就是应用程序中的默认Activity的启动过程,我们下面将详细分析应用程序框架层的源代码,了解Android应用程序的启动过程。这一节主要分析在Launcher界面通过点击应用程序图标的情景,在应用程序内部通过startActivity()方法的情景后面再学习,下面进入主题。1. Launcher.startActivitySafely
在Android系统中,应用程序是由Launcher启动起来的,其实,Launcher本身也是一个应用程序,其它的应用程序安装后,就会Launcher的界面上出现一个相应的图标,点击这个图标时,Launcher就会把对应的应用程序启动起来。负责启动其它应用程序的源代码实现在src/com/android/launcher3/Launcher.java文件中:
/**
* Default launcher application.
*/
public final class Launcher extends Activity
implements View.OnClickListener, OnLongClickListener, LauncherModel.Callbacks, AllAppsView.Watcher {

......

/**
* Launches the intent referred by the clicked shortcut.
*
* @param v The view representing the clicked shortcut.
*/
public void onClick(View v) {
Object tag = v.getTag();
if (tag instanceof ShortcutInfo) {
// Open shortcut
final Intent intent = ((ShortcutInfo) tag).intent;
int[] pos = new int[2];
v.getLocationOnScreen(pos);
intent.setSourceBounds(new Rect(pos[0], pos[1],
pos[0] + v.getWidth(), pos[1] + v.getHeight()));
startActivitySafely(intent, tag);
} else if (tag instanceof FolderInfo) {
......
} else if (v == mHandleView) {
......
}
}

void startActivitySafely(Intent intent, Object tag) {
intent.addFlags(Intent.FLAG_ACTIVITY_NEW_TASK);//默认添加Intent.FLAG_ACTIVITY_NEW_TASK标记
try {
startActivity(intent);
} catch (ActivityNotFoundException e) {
......
} catch (SecurityException e) {
......
}
}

......

} Intent.FLAG_ACTIVITY_NEW_TASK表示要在一个新的Task中启动这个Activity,Task是管理Activity的堆栈,遵循后进先出的原则。2. Activity.startActivity
在Step 1中,我们看到,Launcher继承于Activity类,而Activity类实现了startActivity函数,因此,这里就调用了Activity.startActivity函数,它实现在frameworks/base/core/java/android/app/Activity.java文件中:@Override
public void startActivity(Intent intent) {
this.startActivity(intent, null);
}@Override
public void startActivity(Intent intent, @Nullable Bundle options) {//options为null
if (options != null) {
startActivityForResult(intent, -1, options);
} else {
// Note we want to go through this call for compatibility with
// applications that may have overridden the method.重写这个方法来兼容应用程序
startActivityForResult(intent, -1);
}
}由于上一步中传递的Bundle对象为空,所以这里我们执行的是else分支的逻辑,所以这里调用了startActivityForResult方法,并且传递的参数为intent和-1。
注意:通过这里的代码可以发现,我们调用startActivity方法时,在其内部也是调用startActivityForResult()方法的。那么为什么调用startActivityForResult方法可以在Activity中回调onActivityResult(),而调用startActivity()则不可以呢?可以发现其主要区别是,在startActivity()方法内部调用startActivityForResult()方法时,传递给startActivityForResult()的requestCode参数的值是-1。也就是说,我们在Activity中调用startActivityForResult()方法时,传递的requestCode值为-1的话,那么onActivityResult()方法是不起作用的。实际上,经测试requestCode的值小于0的时候都是不起作用的,所以当我们调用startActivityForResult的时候需要注意这一点。
3. Activity.startActivityForResult
这个函数也是实现在frameworks/base/core/java/android/app/Activity.java文件中:public void startActivityForResult(@RequiresPermission Intent intent, int requestCode) {
startActivityForResult(intent, requestCode, null);//requestCode=-1
}public void startActivityForResult(@RequiresPermission Intent intent, int requestCode,
@Nullable Bundle options) {//requestCode=-1,options为null
if (mParent == null) {//第一次启动Activity,mParent为null;表面该Activity是否由父Activity启动
options = transferSpringboardActivityOptions(options);
Instrumentation.ActivityResult ar =
mInstrumentation.execStartActivity(
this, mMainThread.getApplicationThread(), mToken, this,
intent, requestCode, options);//Instrumentation类用来监控应用程序和系统的交互
if (ar != null) {
mMainThread.sendActivityResult(
mToken, mEmbeddedID, requestCode, ar.getResultCode(),
ar.getResultData());//mMainThread代表主线程(Launcher应用程序允许的进程)
}
if (requestCode >= 0) {//这就是判断requestCode的逻辑,只有当requestCode>=0时,onActivityResult才会被回调。
// If this start is requesting a result, we can avoid making如果请求一个返回结果,可以在结果返回之前使Activity不可见。
// the activity visible until the result is received. Setting
// this code during onCreate(Bundle savedInstanceState) or onResume() will keep the
// activity hidden during this time, to avoid flickering.在onCreate或onResume方法内设置这个值,保持Activity隐藏,避免闪烁
// This can only be done when a result is requested because
// that guarantees we will get information back when the
// activity is finished, no matter what happens to it.只有在请求结果时才允许这样做
mStartedActivity = true;
}
cancelInputsAndStartExitTransition(options);
// TODO Consider clearing/flushing other event sources and events for child windows.
} else {
if (options != null) {
mParent.startActivityFromChild(this, intent, requestCode, options);
} else {
// Note we want to go through this method for compatibility with
// existing applications that may have overridden it.
mParent.startActivityFromChild(this, intent, requestCode);
}
}
}第一次启动Activity时,if分支成立;mInstrumentation是Activity类的成员变量,类型是Instrumentation,用来监控应用程序和系统的交互,Activity、Service等都是通过它来与系统交互。mMainThread类型是ActivityThread,代表应用程序的主线程,这里通过mMainThread.getApplicationThread获得它里面的ApplicationThread成员变量,他是一个Binder对象,AMS会使用它来和ActivityThread进行进程间通信。
mToken是一个Binder对象的远程接口。在AMS中,每个Activity组件都对应一个ActivityRecord对象,AMS以ActivityRecord类型来管理Activity组件。AMS为了将自己内部管理的ActivityRecord实例与某个Activity组件对应起来,就使用一个IBinder实例来作为桥梁,对Activity和ActivityRecord进行关联。所以,AMS通过传入的Activity::mToken对象就可以在它内部找到这个Activity对应的ActivityRecord实例了。
4. Instrumentation.execStartActivity
这个函数定义在frameworks/base/core/java/android/app/Instrumentation.java文件中:public ActivityResult execStartActivity(
Context who, IBinder contextThread, IBinder token, Activity target,
Intent intent, int requestCode, Bundle options) {
android.util.SeempLog.record_str(377, intent.toString());
IApplicationThread whoThread = (IApplicationThread) contextThread;//Launcher组件的主线程
Uri referrer = target != null ? target.onProvideReferrer() : null;
if (referrer != null) {
intent.putExtra(Intent.EXTRA_REFERRER, referrer);
}
if (mActivityMonitors != null) {
......
}
try {
intent.migrateExtraStreamToClipData();
intent.prepareToLeaveProcess(who);//即将离开的进程是Launcher进程
int result = ActivityManagerNative.getDefault()
.startActivity(whoThread, who.getBasePackageName(), intent,
intent.resolveTypeIfNeeded(who.getContentResolver()),
token, target != null ? target.mEmbeddedID : null,
requestCode, 0, null, options);//调用到AMS的startActivity方法
checkStartActivityResult(result, intent);
} catch (RemoteException e) {
throw new RuntimeException("Failure from system", e);
}
return null;
} 这里的ActivityManagerNative.getDefault返回ActivityManagerService的远程接口,即ActivityManagerProxy接口。这里的intent.resolveTypeIfNeeded返回这个intent的MIME类型,在这个例子中,没有AndroidManifest.xml设置MainActivity的MIME类型,因此,这里返回null。这里的target不为null,但是target.mEmbddedID为null,我们不用关注。5. ActivityManagerProxy.startActivity
这个函数定义在frameworks/base/core/java/android/app/ActivityManagerNative.java文件中:class ActivityManagerProxy implements IActivityManager
{
......
public int startActivity(IApplicationThread caller, Intent intent,
String resolvedType, Uri[] grantedUriPermissions, int grantedMode,
IBinder resultTo, String resultWho,
int requestCode, boolean onlyIfNeeded,
boolean debug) throws RemoteException {
Parcel data = Parcel.obtain();
Parcel reply = Parcel.obtain();
data.writeInterfaceToken(IActivityManager.descriptor);
......
mRemote.transact(START_ACTIVITY_TRANSACTION, data, reply, 0);
reply.readException();
int result = reply.readInt();
reply.recycle();
data.recycle();
return result;
}
......
} 这里就涉及到具体的Binder进程间通信机制了,不做过多分析,通过数据传输之后就会调用ActivityManagerService的startActivity()方法了。6. ActivityManagerService.startActivity
它定义在frameworks/base/services/java/com/android/server/am/ActivityManagerService.java文件中:@Override
public final int startActivity(IApplicationThread caller, String callingPackage,
Intent intent, String resolvedType, IBinder resultTo, String resultWho, int requestCode,
int startFlags, ProfilerInfo profilerInfo, Bundle bOptions) {
return startActivityAsUser(caller, callingPackage, intent, resolvedType, resultTo,
resultWho, requestCode, startFlags, profilerInfo, bOptions,
UserHandle.getCallingUserId());
}@Override
public final int startActivityAsUser(IApplicationThread caller, String callingPackage,
Intent intent, String resolvedType, IBinder resultTo, String resultWho, int requestCode,
int startFlags, ProfilerInfo profilerInfo, Bundle bOptions, int userId) {
enforceNotIsolatedCaller("startActivity");
userId = mUserController.handleIncomingUser(Binder.getCallingPid(), Binder.getCallingUid(),
userId, false, ALLOW_FULL_ONLY, "startActivity", null);
// TODO: Switch to user app stacks here.
return mActivityStarter.startActivityMayWait(caller, -1, callingPackage, intent,
resolvedType, null, null, resultTo, resultWho, requestCode, startFlags,
profilerInfo, null, null, bOptions, false, userId, null, null);
} caller是指向Launcher的ApplicationThread对象,AMS可以通过该对象与Launcher的主线程进行交互;intent包含了所要启动的Activity的信息;resultTo是一个ActivityRecord的IBinder对象,它在AMS中会对应Launcher中的一个Activity组件。ActivityStarter是AMS启动Activity的一个管理类,我们这里先看一下AMS在启动Activity过程中,引入的一些辅助类,如下:
7. ActivityStarter.startActivityMayWait
它定义在frameworks/base/services/java/com/android/server/am/ActivityStarter.java文件中,该函数较长,我们分为三个部分进行分析:第一部分
final int startActivityMayWait(IApplicationThread caller, int callingUid,
String callingPackage, Intent intent, String resolvedType,
IVoiceInteractionSession voiceSession, IVoiceInteractor voiceInteractor,
IBinder resultTo, String resultWho, int requestCode, int startFlags,
ProfilerInfo profilerInfo, IActivityManager.WaitResult outResult, Configuration config,
Bundle bOptions, boolean ignoreTargetSecurity, int userId,
IActivityContainer iContainer, TaskRecord inTask) {
// Refuse possible leaked file descriptors
if (intent != null && intent.hasFileDescriptors()) {
throw new IllegalArgumentException("File descriptors passed in Intent");
}
mSupervisor.mActivityMetricsLogger.notifyActivityLaunching();
boolean componentSpecified = intent.getComponent() != null;//判断是否指定了组件名

// Save a copy in case ephemeral needs it保存副本,以备临时所需
final Intent ephemeralIntent = new Intent(intent);
// Don't modify the client's object!创建一个新的intent对象,方便改动
intent = new Intent(intent);

ResolveInfo rInfo = mSupervisor.resolveIntent(intent, resolvedType, userId);//通过PMS根据intent获取需要启动的组件的更多信息
if (rInfo == null) {//从Launcher启动时,ResolveInfo不会为null
......
}
// Collect information about the target of the Intent.
ActivityInfo aInfo = mSupervisor.resolveActivity(intent, rInfo, startFlags, profilerInfo);//获取Activity组件信息保存到aInfo

ActivityOptions options = ActivityOptions.fromBundle(bOptions);//得到options,其中可能指定了Activity要加入的Task
ActivityStackSupervisor.ActivityContainer container =
(ActivityStackSupervisor.ActivityContainer)iContainer;
synchronized (mService) {
if (container != null && container.mParentActivity != null &&
container.mParentActivity.state != RESUMED) {//如果通过am命令启动Activity,父Activity为null
// Cannot start a child activity if the parent is not resumed.父Activity没有恢复,子Activity不能启动
return ActivityManager.START_CANCELED;//从一个Activity启动另一个Activity,要求父Activity已经执行过onResume方法
}
final int realCallingPid = Binder.getCallingPid();
final int realCallingUid = Binder.getCallingUid();
int callingPid;
if (callingUid >= 0) {
callingPid = -1;
} else if (caller == null) {//caller不为null
callingPid = realCallingPid;
callingUid = realCallingUid;
} else {
callingPid = callingUid = -1;
}

final ActivityStack stack;//Activity启动时的Task栈
if (container == null || container.mStack.isOnHomeDisplay()) {//am指令启动,或home来启动Activity
stack = mSupervisor.mFocusedStack;//stack为前台栈
} else {
stack = container.mStack;//从一个Activity启动另一个Activity时,Stack为父Activity的task栈
}
stack.mConfigWillChange = config != null && mService.mConfiguration.diff(config) != 0;//am指令启动时config为null
if (DEBUG_CONFIGURATION) Slog.v(TAG_CONFIGURATION,
"Starting activity when config will change = " + stack.mConfigWillChange);

final long origId = Binder.clearCallingIdentity();

if (aInfo != null &&
(aInfo.applicationInfo.privateFlags
& ApplicationInfo.PRIVATE_FLAG_CANT_SAVE_STATE) != 0) {//heavy-weight进程处理逻辑
// This may be a heavy-weight process!  Check to see if we already
// have another, different heavy-weight process running.
......
} 上面代码中有对heavy-weight进程的处理逻辑。正常情况下,当一个Application推到后台时,系统会为它保存状态;当调度其到前台时,恢复它之前的状态,以保证用户体验的连续性;如果在AndroidManifest.xml中的Application标签中声明了CANT_SAVE_STATE属性,设置了该属性的Application将不享受系统提供的状态保存/恢复功能,被称为heavy-weight进程。从上面代码来看,startActivityMayWait()在第一阶段最主要的工作其实就是:
1、解析出与intent相匹配的ActivityInfo;
2、得到启动该Activity的Task,即父Activity的Task或前台Task。
第二部分
final ActivityRecord[] outRecord = new ActivityRecord[1];
int res = startActivityLocked(caller, intent, ephemeralIntent, resolvedType,
aInfo, rInfo, voiceSession, voiceInteractor,
resultTo, resultWho, requestCode, callingPid,
callingUid, callingPackage, realCallingPid, realCallingUid, startFlags,
options, ignoreTargetSecurity, componentSpecified, outRecord, container,
inTask);//调用startActivityLocked方法继续处理Activity启动流程

Binder.restoreCallingIdentity(origId);

if (stack.mConfigWillChange) {
// If the caller also wants to switch to a new configuration,
// do so now.  This allows a clean switch, as we are waiting
// for the current activity to pause (so we will not destroy
// it), and have not yet started the next activity.
mService.enforceCallingPermission(android.Manifest.permission.CHANGE_CONFIGURATION,
"updateConfiguration()");
stack.mConfigWillChange = false;
if (DEBUG_CONFIGURATION) Slog.v(TAG_CONFIGURATION,
"Updating to new configuration after starting activity.");
mService.updateConfigurationLocked(config, null, false);
} 如果task栈的mConfigWillChange为true,调用AMS的updateConfigurationLocked()方法更新Configuration,该方法主要做了两件事情:(1)改变现在的Configuration;(2)确保所有正在运行的Activity都运行改变后的Configuration。在这一部分主要是调用了startActivityLocked()方法来继续处理Activity的启动流程,当该函数成功执行完毕后,Activity将会被启动,并形成对应的ActivityRecord被AMS统一管理。
第三部分
if (outResult != null) {//outResult不为null,表示等待启动结果;
outResult.result = res;//目标Activity要运行在一个新的应用进程中,因此需要等到应用进程正常启动并处理相关请求
if (res == ActivityManager.START_SUCCESS) {
mSupervisor.mWaitingActivityLaunched.add(outResult);
do {
try {
mService.wait();//一直等待,直到outResult显示Activity对应的task为前台栈
} catch (InterruptedException e) {
}
} while (outResult.result != START_TASK_TO_FRONT
&& !outResult.timeout && outResult.who == null);
if (outResult.result == START_TASK_TO_FRONT) {
res = START_TASK_TO_FRONT;
}
}
if (res == START_TASK_TO_FRONT) {//Activity对应的task栈拉到前台后,一直要等待该界面被加载
ActivityRecord r = stack.topRunningActivityLocked();
if (r.nowVisible && r.state == RESUMED) {
outResult.timeout = false;
outResult.who = new ComponentName(r.info.packageName, r.info.name);
outResult.totalTime = 0;
outResult.thisTime = 0;
} else {
outResult.thisTime = SystemClock.uptimeMillis();
mSupervisor.mWaitingActivityVisible.add(outResult);
do {
try {
mService.wait();
} catch (InterruptedException e) {
}
} while (!outResult.timeout && outResult.who == null);
}
}
}

final ActivityRecord launchedActivity = mReusedActivity != null
? mReusedActivity : outRecord[0];
mSupervisor.mActivityMetricsLogger.notifyActivityLaunched(res, launchedActivity);
return res;
} 从上面的代码可以看出,第三阶段的工作就是根据返回值做一些处理。8.ActivityStarter.startActivityLocked
它定义在frameworks/base/services/java/com/android/server/am/ActivityStarter.java文件中:final int startActivityLocked(IApplicationThread caller, Intent intent, Intent ephemeralIntent,
String resolvedType, ActivityInfo aInfo, ResolveInfo rInfo,
IVoiceInteractionSession voiceSession, IVoiceInteractor voiceInteractor,
IBinder resultTo, String resultWho, int requestCode, int callingPid, int callingUid,
String callingPackage, int realCallingPid, int realCallingUid, int startFlags,
ActivityOptions options, boolean ignoreTargetSecurity, boolean componentSpecified,
ActivityRecord[] outActivity, ActivityStackSupervisor.ActivityContainer container,
TaskRecord inTask) {
int err = ActivityManager.START_SUCCESS;//err用于保存错误信息
ProcessRecord callerApp = null;//用于保存启动Activity的进程信息
if (caller != null) {//如果参数中调用者不为空,则从AMS中找到对应的ProcessRecord,目的是得到调用者的pid和uid;am拉起Activity,caller为null
callerApp = mService.getRecordForAppLocked(caller);
if (callerApp != null) {
callingPid = callerApp.pid;
callingUid = callerApp.info.uid;
} else {
Slog.w(TAG, "Unable to find app for caller " + caller
+ " (pid=" + callingPid + ") when starting: "
+ intent.toString());
err = ActivityManager.START_PERMISSION_DENIED;
}
}
final int userId = aInfo != null ? UserHandle.getUserId(aInfo.applicationInfo.uid) : 0;
if (err == ActivityManager.START_SUCCESS) {
Slog.i(TAG, "START u" + userId + " {" + intent.toShortString(true, true, true, false)
+ "} from uid " + callingUid
+ " on display " + (container == null ? (mSupervisor.mFocusedStack == null ?
Display.DEFAULT_DISPLAY : mSupervisor.mFocusedStack.mDisplayId) :
(container.mActivityDisplay == null ? Display.DEFAULT_DISPLAY :
container.mActivityDisplay.mDisplayId)));
}
ActivityRecord sourceRecord = null;//用于保存父Activity的信息
ActivityRecord resultRecord = null;//用于保存接收启动结果的Activity的信息
if (resultTo != null) {//对startActivityForResult()才有意义
sourceRecord = mSupervisor.isInAnyStackLocked(resultTo);//判断是否有resultTo对应的ActivityRecord
if (DEBUG_RESULTS) Slog.v(TAG_RESULTS,//隐含条件是resultTo的对象就是父Activity
"Will send result to " + resultTo + " " + sourceRecord);
if (sourceRecord != null) {
if (requestCode >= 0 && !sourceRecord.finishing) {
resultRecord = sourceRecord;
}
}
}
final int launchFlags = intent.getFlags();//得到启动Activity设置的标记
if ((launchFlags & Intent.FLAG_ACTIVITY_FORWARD_RESULT) != 0 && sourceRecord != null) {
// Transfer the result target from the source activity to the new
// one being started, including any failures.以这个标签启动的Activity,将接收发往父Activity的result
......
}
......//err一些状态的判断,修改
final ActivityStack resultStack = resultRecord == null ? null : resultRecord.task.stack;//得到接收启动结果的task
if (err != START_SUCCESS) {
if (resultRecord != null) {
resultStack.sendActivityResultLocked(//返回错误信息
-1, resultRecord, resultWho, requestCode, RESULT_CANCELED, null);
}
ActivityOptions.abort(options);
return err;
}
boolean abort = !mSupervisor.checkStartAnyActivityPermission(intent, aInfo, resultWho,
requestCode, callingPid, callingUid, callingPackage, ignoreTargetSecurity, callerApp,
resultRecord, resultStack, options);//检查权限
abort |= !mService.mIntentFirewall.checkStartActivity(intent, callingUid,
callingPid, resolvedType, aInfo.applicationInfo);//根据intentFirewall判断intent是否满足要求
if (mService.mController != null) {//通过接口可以为AMS设置一个IActivityController监听器;AMS操作时会回调该监听器
try {
// The Intent we give to the watcher has the extra data
// stripped off, since it can contain private information.
Intent watchIntent = intent.cloneFilter();
abort |= !mService.mController.activityStarting(watchIntent,
aInfo.applicationInfo.packageName);
} catch (RemoteException e) {
mService.mController = null;
}
}
......
if (abort) {//以上任一条件不满足时,进行通知
if (resultRecord != null) {
resultStack.sendActivityResultLocked(-1, resultRecord, resultWho, requestCode,
RESULT_CANCELED, null);
}
// We pretend to the caller that it was really started, but
// they will just get a cancel result.
ActivityOptions.abort(options);
return START_SUCCESS;
}
// If permissions need a review before any of the app components can run, we
// launch the review activity and pass a pending intent to start the activity
// we are to launching now after the review is completed.
if (Build.PERMISSIONS_REVIEW_REQUIRED && aInfo != null) {//在必要时,再检查一下权限
......
}
......
ActivityRecord r = new ActivityRecord(mService, callerApp, callingUid, callingPackage,
intent, resolvedType, aInfo, mService.mConfiguration, resultRecord, resultWho,
requestCode, componentSpecified, voiceSession != null, mSupervisor, container,
options, sourceRecord);//创建ActivityRecord对象
if (outActivity != null) {
outActivity[0] = r;
}
......
final ActivityStack stack = mSupervisor.mFocusedStack;
if (voiceSession == null && (stack.mResumedActivity == null
|| stack.mResumedActivity.info.applicationInfo.uid != callingUid)) {
if (!mService.checkAppSwitchAllowedLocked(callingPid, callingUid,
realCallingPid, realCallingUid, "Activity start")) {//检查调用进程是否有权限切换Activity
PendingActivityLaunch pal = new PendingActivityLaunch(r,
sourceRecord, startFlags, stack, callerApp);
mPendingActivityLaunches.add(pal);//如果调用进程没有权限进行切换,则将本次Activity的启动请求保存起来
ActivityOptions.abort(options);
return ActivityManager.START_SWITCHES_CANCELED;
}
}
if (mService.mDidAppSwitch) {//用于控制app switch
// This is the second allowed switch since we stopped switches,
// so now just generally allow switches. Use case: user presses
// home (switches disabled, switch to home, mDidAppSwitch now true);
// user taps a home icon (coming from home so allowed, we hit here
// and now allow anyone to switch again).
mService.mAppSwitchesAllowedTime = 0;
} else {
mService.mDidAppSwitch = true;
}
doPendingActivityLaunchesLocked(false);//启动处于pending状态的Activity
try {
mService.mWindowManager.deferSurfaceLayout();//WindowManager延迟绘制
err = startActivityUnchecked(r, sourceRecord, voiceSession, voiceInteractor, startFlags,
true, options, inTask);//调用startActivityUnchecked
} finally {
mService.mWindowManager.continueSurfaceLayout();//WindowManager重新开始绘制(绘制当前的前台界面)
}
//此处将通知ActivityStarter, Activity对应的Task被移动到前台
postStartActivityUncheckedProcessing(r, err, stack.mStackId, mSourceRecord, mTargetStack);
return err;
} startActivityLocked方法比较长,但主干比较清晰,只是添加许多条件判断。从代码看主要工作包括:1. 处理sourceRecord和resultRecord
sourceRecord表示发起本次请求的Activity,即父Activity对应的信息;resultRecord表示接收处理结果的Activity。一般情况下,两者应指向同一个Activity。
2. 处理app switch
如果AMS当前禁止app switch,那么AMS会将本次请求保存起来,以便允许app switch时再进行处理。从代码可以看出,在AMS可以进行app switch时,在处理本次的请求前,会先调用doPendingActivityLaunchesLocked()方法,该方法将启动之前因系统禁止app switch而保存的请求。
3. 调用startActivityUnchecked()方法继续处理本次Activity的启动请求。
9. ActivityStarter.startActivityUnchecked
这个函数较长,分段来看下:第一部分
第一部分代码主要用于判断是否需要为新的Activity创建一个Task。private int startActivityUnchecked(final ActivityRecord r, ActivityRecord sourceRecord,
IVoiceInteractionSession voiceSession, IVoiceInteractor voiceInteractor,
int startFlags, boolean doResume, ActivityOptions options, TaskRecord inTask) {
setInitialState(r, options, inTask, doResume, startFlags, sourceRecord, voiceSession,
voiceInteractor);//根据参数重新设置类的变量;存储当前Activity对应的启动模式等信息。
computeLaunchingTaskFlags();//初始化启动标记位mLaunchFlags
computeSourceStack();
mIntent.setFlags(mLaunchFlags);
...... 这是前期准备工作,主要是获取Activity的启动模式和启动标记信息。computeLaunchingTaskFlags()方法主要用于决策是否在mLaunchFlags中添加FLAG_ACTIVITY_NEW_TASK标记。函数的主要思想可以简化为:
(1).如果参数中指定了希望Activity加入的Task,同时这个Task确实可用(不与当前的LaunchFlags矛盾),不需要添加FLAG_ACTIVITY_NEW_TASK。
(2).如果没有指定希望Activity加入的Task,或者指定的Task无法使用,在满足条件的情况下,会为mLaunchFlags添加FLAG_ACTIVITY_NEW_TASK。
简单一句话就是:在正常情况下,若现存Task中,没有待启动Activity可以使用的,就重新为其创建一个。
computeSourceStack()方法主要用于记录父Activity对应的TaskRecord信息。当父Activity finishing时,此父Activity对应的Task不再作为新Activity的SourceStack,因为该Task有可能会被Android系统清理掉。在这种情况下,Android系统将创建新的Task作为SourceStack,同时使这个新Task的信息与父Activity原有sourceTask信息相同。
至此,startActivityUnchecked方法第一部分结束。在这一部分中,代码主要判断Activity是否需要插入到现有Task中,同时当存在父Activity时,判断sourceTask是否有效。所有的这些判断,最后都用于决策新启动的Activity是否需要携带FLAG_ACTIVITY_NEW_TASK标志,即是否需要新建一个Task对象。
第二部分
mReusedActivity = getReusableIntentActivity();//决定是否将新的Activity插入到现有的Task中,返回null表示否

final int preferredLaunchStackId =//从参数中得到希望Activity加入的Task对应的stackId
(mOptions != null) ? mOptions.getLaunchStackId() : INVALID_STACK_ID;

if (mReusedActivity != null) {//将新的Activity插入到现有的Task中
// When the flags NEW_TASK and CLEAR_TASK are set, then the task gets reused but
// still needs to be a lock task mode violation since the task gets cleared out and
// the device would otherwise leave the locked task.//LockTaskMode
if (mSupervisor.isLockTaskModeViolation(mReusedActivity.task,
(mLaunchFlags & (FLAG_ACTIVITY_NEW_TASK | FLAG_ACTIVITY_CLEAR_TASK))
== (FLAG_ACTIVITY_NEW_TASK | FLAG_ACTIVITY_CLEAR_TASK))) {
mSupervisor.showLockTaskToast();
Slog.e(TAG, "startActivityUnchecked: Attempt to violate Lock Task Mode");
return START_RETURN_LOCK_TASK_MODE_VIOLATION;
}

if (mStartActivity.task == null) {//设置待启动的Activity的task
mStartActivity.task = mReusedActivity.task;
}
if (mReusedActivity.task.intent == null) {//如果复用Activity之前的Task没有intent,重新设置
// This task was started because of movement of the activity based on affinity...
// Now that we are actually launching it, we can assign the base intent.
mReusedActivity.task.setIntent(mStartActivity);
}

// This code path leads to delivering a new intent, we want to make sure we schedule it
// as the first operation, in case the activity will be resumed as a result of later
// operations.
if ((mLaunchFlags & FLAG_ACTIVITY_CLEAR_TOP) != 0//以singleTask等启动模式启动现有Task中的Activity时,要清空其上的Activity
|| mLaunchSingleInstance || mLaunchSingleTask) {
// In this situation we want to remove all activities from the task up to the one
// being started. In most cases this means we are resetting the task to its initial
// state.
final ActivityRecord top = mReusedActivity.task.performClearTaskForReuseLocked(
mStartActivity, mLaunchFlags);//清空操作
if (top != null) {
if (top.frontOfTask) {
// Activity aliases may mean we use different intents for the top activity,
// so make sure the task now has the identity of the new intent.
top.task.setIntent(mStartActivity);//top Activity将是要启动的Activity
}
......
top.deliverNewIntentLocked(mCallingUid, mStartActivity.intent,
mStartActivity.launchedFromPackage);//这里最后会触发待启动Activity的onNewIntent方法
}
}

sendPowerHintForLaunchStartIfNeeded(false /* forceSend */);

mReusedActivity = setTargetStackAndMoveToFrontIfNeeded(mReusedActivity);//将复用Activity对应的Task移到前台

if ((mStartFlags & START_FLAG_ONLY_IF_NEEDED) != 0) {
// We don't need to start a new activity, and the client said not to do anything
// if that is the case, so this is it!  And for paranoia, make sure we have
// correctly resumed the top activity.
resumeTargetStackIfNeeded();
return START_RETURN_INTENT_TO_CALLER;
}
setTaskFromIntentActivity(mReusedActivity);

......
}

...... 这一段代码主要是针对复用Activity的场景,代码逻辑比较繁杂,但主要目的是:当判断新启动的Activity可以复用现有Task中的Activity时,则按照Activity的请模式,对该Activity所在的Task执行相应的操作。下面看下几个主要的函数。
1. getReusableIntentActivity()
getReusableIntentActivity方法将决定新启动的Activity是否可以复用现有的Activity。
/**
* Decide whether the new activity should be inserted into an existing task. Returns null决定是否将新Activity插入到一个已存在的Task中
* if not or an ActivityRecord with the task into which the new activity should be added.不需要插入返回null;插入返回ActivityRecord
*/
private ActivityRecord getReusableIntentActivity() {
// We may want to try to place the new activity in to an existing task.  We always
// do this if the target activity is singleTask or singleInstance; we will also do
// this if NEW_TASK has been requested, and there is not an additional qualifier telling
// us to still place it in a new task: multi task, always doc mode, or being asked to
// launch this as a new task behind the current one.
boolean putIntoExistingTask = ((mLaunchFlags & FLAG_ACTIVITY_NEW_TASK) != 0 &&
(mLaunchFlags & FLAG_ACTIVITY_MULTIPLE_TASK) == 0)
|| mLaunchSingleInstance || mLaunchSingleTask;//根据标记位和启动模式,决定新启动的Activity是否加入到已有的Task中
// If bring to front is requested, and no result is requested and we have not been given
// an explicit task to launch in to, and we can find a task that was started with this
// same component, then instead of launching bring that one to the front.
putIntoExistingTask &= mInTask == null && mStartActivity.resultTo == null;
ActivityRecord intentActivity = null;//保存返回结果
if (mOptions != null && mOptions.getLaunchTaskId() != -1) {//如果启动参数中指定了Taskid,那么优先使用对应的Task
final TaskRecord task = mSupervisor.anyTaskForIdLocked(mOptions.getLaunchTaskId());
intentActivity = task != null ? task.getTopActivity() : null;//获得指定Task的topActivity
} else if (putIntoExistingTask) {//加入已存在的Task中
if (mLaunchSingleInstance) {
// There can be one and only one instance of single instance activity in the//singleInstance模式,只有一个Activity实例
// history, and it is always in its own unique task, so we do a special search.
intentActivity = mSupervisor.findActivityLocked(mIntent, mStartActivity.info, false);
} else if ((mLaunchFlags & FLAG_ACTIVITY_LAUNCH_ADJACENT) != 0) {
// For the launch adjacent case we only want to put the activity in an existing
// task if the activity already exists in the history.
intentActivity = mSupervisor.findActivityLocked(mIntent, mStartActivity.info,
!mLaunchSingleTask);
} else {
// Otherwise find the best task to put the activity in.
intentActivity = mSupervisor.findTaskLocked(mStartActivity);
}
}
return intentActivity;
} 当我们启动一个Activity时,优先是想进行复用。因此,需要寻找匹配该Activity的Task。如果启动参数中指定了目标Task,那么显然需要利用ActivityStackSupervisor找到指定的Task,如果指定的Task存在,那么新启动的Activity将插入到该Task的Top位置。如果启动的参数中没有指定启动的Task,那么就需要根据Activity信息,利用ActivityStackSupervisor在当前的Task中进行匹配。
第三部分
// 当启动的Activity已经位于栈顶时,是否需要启动一个实例
final ActivityStack topStack = mSupervisor.mFocusedStack;
final ActivityRecord top = topStack.topRunningNonDelayedActivityLocked(mNotTop);
final boolean dontStart = top != null && mStartActivity.resultTo == null
&& top.realActivity.equals(mStartActivity.realActivity)
&& top.userId == mStartActivity.userId
&& top.app != null && top.app.thread != null//待启动的Activity是否与前台的Activity一直
&& ((mLaunchFlags & FLAG_ACTIVITY_SINGLE_TOP) != 0//是否需要重新创建一个实例
|| mLaunchSingleTop || mLaunchSingleTask);
if (dontStart) {
......
if (mDoResume) {
mSupervisor.resumeFocusedStackTopActivityLocked();
}
......
top.deliverNewIntentLocked(//调用onNewIntent()
mCallingUid, mStartActivity.intent, mStartActivity.launchedFromPackage);

......
}

boolean newTask = false;//表示是否创建新的task
final TaskRecord taskToAffiliate = (mLaunchTaskBehind && mSourceRecord != null)
? mSourceRecord.task : null;

// Should this be considered a new task?
if (mStartActivity.resultTo == null && mInTask == null && !mAddingToTask
&& (mLaunchFlags & FLAG_ACTIVITY_NEW_TASK) != 0) {
newTask = true;
if (mPerf != null) {
mStartActivity.perfActivityBoostHandler = mPerf.perfLockAcquire(mLBoostTimeOut, mLBoostCpuParamVal);
}

setTaskFromReuseOrCreateNewTask(taskToAffiliate);

......
} else if (mSourceRecord != null) {
......

final int result = setTaskFromSourceRecord();//待启动的Activity使用父Activity的task,有必要时将父Activity的task移到前台
if (result != START_SUCCESS) {
return result;
}
} else if (mInTask != null) {
......

final int result = setTaskFromInTask();//对应于指定task启动的Activity
if (result != START_SUCCESS) {
return result;
}
} else {
setTaskToCurrentTopOrCreateNewTask();//待启动的Activity使用前台task,或者重新创建一个task
}

......

mTargetStack.startActivityLocked(mStartActivity, newTask, mKeepCurTransition, mOptions);
if (mDoResume) {
......//将待启动的Activity加入到mTargetStack记录中
final ActivityRecord topTaskActivity = mStartActivity.task.topRunningActivityLocked();
if (!mTargetStack.isFocusable()
|| (topTaskActivity != null && topTaskActivity.mTaskOverlay
&& mStartActivity != topTaskActivity)) {//待启动的Activity不可见的情况
......
mTargetStack.ensureActivitiesVisibleLocked(null, 0, !PRESERVE_WINDOWS);
mWindowManager.executeAppTransition();//同时调用WindowManager准备app切换相关的工作
} else {
mSupervisor.resumeFocusedStackTopActivityLocked(mTargetStack, mStartActivity,
mOptions);//最终调用resumeFocusedStackTopActivityLocked方法,重新启动前台栈顶的Activity
}
} else {
mTargetStack.addRecentActivityLocked(mStartActivity);
}
mSupervisor.updateUserStackLocked(mStartActivity.userId, mTargetStack);

mSupervisor.handleNonResizableTaskIfNeeded(
mStartActivity.task, preferredLaunchStackId, mTargetStack.mStackId);

return START_SUCCESS;
} startActivityUnchecked第三部分代码最核心的内容是:决定是否为待启动的Activity创建对应的Task,同时将Activity和Task关联起来。最后,调用ActivityStackSupervisor的resumeFocusedStackTopActivityLocked函数
10.ActivityStackSupervisor.resumeFocusedStackTopActivity
boolean resumeFocusedStackTopActivityLocked(
ActivityStack targetStack, ActivityRecord target, ActivityOptions targetOptions) {
if (targetStack != null && isFocusedStack(targetStack)) {//待启动Activity对应的task为前台task时,调用该task对应的ActivityStack的
return targetStack.resumeTopActivityUncheckedLocked(target, targetOptions);//resumeTopActivityUncheckedLocked方法
}
final ActivityRecord r = mFocusedStack.topRunningActivityLocked();//获取当前栈顶部Activity对应的ActivityRecord
if (r == null || r.state != RESUMED) {
mFocusedStack.resumeTopActivityUncheckedLocked(null, null);//否则调用当前前台栈的resumeTopActivityUncheckedLocked方法
}
return false;
} 这里调用了ActivityStack的resumeTopActivityUncheckedLocked()方法。11.ActivityStack.resumeTopActivityUncheckedLocked
/**
* Ensure that the top activity in the stack is resumed.确保栈中顶部Activity恢复
*
* @param prev The previously resumed activity, for when in the process
* of pausing; can be null to call from elsewhere.
* @param options Activity options.
*
* @return Returns true if something is being resumed, or false if
* nothing happened.
*
* NOTE: It is not safe to call this method directly as it can cause an activity in a
*       non-focused stack to be resumed.直接调用这个方法是不安全的,因为有可能会使非当前栈的Activity恢复。
*       Use {@link ActivityStackSupervisor#resumeFocusedStackTopActivityLocked} to resume the
*       right activity for the current system state.
*/
boolean resumeTopActivityUncheckedLocked(ActivityRecord prev, ActivityOptions options) {
if (mStackSupervisor.inResumeTopActivity) {
// Don't even start recursing.
return false;
}

boolean result = false;
try {
// Protect against recursion.
mStackSupervisor.inResumeTopActivity = true;
if (mService.mLockScreenShown == ActivityManagerService.LOCK_SCREEN_LEAVING) {
mService.mLockScreenShown = ActivityManagerService.LOCK_SCREEN_HIDDEN;
mService.updateSleepIfNeededLocked();
}
result = resumeTopActivityInnerLocked(prev, options);
} finally {
mStackSupervisor.inResumeTopActivity = false;
}
return result;
} 接着调用resumeTopActivityInnerLocked()方法。12.ActivityStack.resumeTopActivityInnerLocked
resumeTopActivityInnerLocked()方法判断要启动的Activity所在的栈是否对当前用户不可见,如果不可见就不需要继续执行下去,因为即使把这个Activity启动起来,用户也不可见,还不如先把它保存起来,等到下次可见的时候再启动。若可见,则继续执行,把要启动的Activity添加到栈顶。private boolean resumeTopActivityInnerLocked(ActivityRecord prev, ActivityOptions options) {
if (DEBUG_LOCKSCREEN) mService.logLockScreen("");
if (!mService.mBooting && !mService.mBooted) {//判断AMS是否已经启动完毕
// Not ready yet!AMS未启动完毕
return false;
}
ActivityRecord parent = mActivityContainer.mParentActivity;//获取parentActivity
if ((parent != null && parent.state != ActivityState.RESUMED) ||
!mActivityContainer.isAttachedLocked()) {
// Do not resume this stack if its parent is not resumed.先确保父栈已经恢复,否则直接返回
// TODO: If in a loop, make sure that parent stack resumeTopActivity is called 1st.
return false;
}
//如果有正在初始化的Activity没有位于ActivityStack的栈顶,且正在执行Window的启动和显示;则要将Window相关的操作取消。
mStackSupervisor.cancelInitializingActivities();//因为这里Activity的窗口有可能被孤立,那么他们有可能永远也不会进入resume状态。
// Find the first activity that is not finishing.取出当前ActivityStack栈顶的Activity的ActivityRecord
final ActivityRecord next = topRunningActivityLocked();
// Remember how we'll process this pause/resume situation, and ensure记住我们怎样处理pause/resume状态切换
// that the state is reset however we wind up proceeding.并确保无论何时结束处理都会重置状态
final boolean userLeaving = mStackSupervisor.mUserLeaving;
mStackSupervisor.mUserLeaving = false;
final TaskRecord prevTask = prev != null ? prev.task : null;
if (next == null) {//next为null,表示当前ActivityStack栈中没有要显示的Activity,则启动Launcher界面
// There are no more activities!
final String reason = "noMoreActivities";
final int returnTaskType = prevTask == null || !prevTask.isOverHomeStack()
? HOME_ACTIVITY_TYPE : prevTask.getTaskToReturnTo();
if (!mFullscreen && adjustFocusToNextFocusableStackLocked(returnTaskType, reason)) {//如果当前Activity不是全屏的
// Try to move focus to the next visible stack with a running activity if this//将焦点移动到下一个拥有Activity的可见栈中
// stack is not covering the entire screen.
return mStackSupervisor.resumeFocusedStackTopActivityLocked(
mStackSupervisor.getFocusedStack(), prev, null);
}
// Let's just start up the Launcher...//如果ActivityStack是全屏的,但是没有显示的Activity,那么就显示桌面(Launcher)
ActivityOptions.abort(options);
if (DEBUG_STATES) Slog.d(TAG_STATES,
"resumeTopActivityLocked: No more activities go home");
if (DEBUG_STACK) mStackSupervisor.validateTopActivitiesLocked();
// Only resume home if on home display
return isOnHomeDisplay() &&
mStackSupervisor.resumeHomeStackTask(returnTaskType, prev, reason);
}
next.delayedResume = false;
// If the top activity is the resumed one, nothing to do.如果栈顶的Activity已经resumed,并且是我们要启动的Activity,上面也不做直接返回
if (mResumedActivity == next && next.state == ActivityState.RESUMED &&
mStackSupervisor.allResumedActivitiesComplete()) {
......
return false;
}
final TaskRecord nextTask = next.task;//判断下一个任务,由上一个任务决定是否回到桌面
if (prevTask != null && prevTask.stack == this &&//对prevActivity(Launcher)所在的Task的一些判断
prevTask.isOverHomeStack() && prev.finishing && prev.frontOfTask) {
if (DEBUG_STACK) mStackSupervisor.validateTopActivitiesLocked();
if (prevTask == nextTask) {//如果prevTask和nextTask相同,则将prevTask直接设为前台task
prevTask.setFrontOfTask();
} else if (prevTask != topTask()) {//如果prevTask不是当前ActivityStack栈顶的task,那么它后面的task都应该放到Launcher的task后面
// This task is going away but it was supposed to return to the home stack.
// Now the task above it has to return to the home task instead.
final int taskNdx = mTaskHistory.indexOf(prevTask) + 1;
mTaskHistory.get(taskNdx).setTaskToReturnTo(HOME_ACTIVITY_TYPE);
} else if (!isOnHomeDisplay()) {
return false;
} else if (!isHomeStack()){
if (DEBUG_STATES) Slog.d(TAG_STATES,
"resumeTopActivityLocked: Launching home next");
final int returnTaskType = prevTask == null || !prevTask.isOverHomeStack() ?
HOME_ACTIVITY_TYPE : prevTask.getTaskToReturnTo();
return isOnHomeDisplay() &&
mStackSupervisor.resumeHomeStackTask(returnTaskType, prev, "prevFinished");
}
}
// If we are sleeping, and there is no resumed activity, and the top
// activity is paused, well that is the state we want.
if (mService.isSleepingOrShuttingDownLocked()//如果AMS处于休眠状态;此时没有Activity处于resumed状态;
&& mLastPausedActivity == next
&& mStackSupervisor.allPausedActivitiesComplete()) {//并且栈顶Activity处于pause状态,则中断调度
// Make sure we have executed any pending transitions, since there
// should be nothing left to do at this point.
mWindowManager.executeAppTransition();
mNoAnimActivities.clear();
ActivityOptions.abort(options);
if (DEBUG_STATES) Slog.d(TAG_STATES,
"resumeTopActivityLocked: Going to sleep and all paused");
if (DEBUG_STACK) mStackSupervisor.validateTopActivitiesLocked();
return false;
}
// Make sure that the user who owns this activity is started. If not,
// we will just leave it as is because someone should be bringing
// another user's activities to the top of the stack.
if (!mService.mUserController.hasStartedUserState(next.userId)) {//如果不确定是哪个用户打开的Activity,直接返回
Slog.w(TAG, "Skipping resume of top activity " + next
+ ": user " + next.userId + " is stopped");
if (DEBUG_STACK) mStackSupervisor.validateTopActivitiesLocked();
return false;
}
// The activity may be waiting for stop, but that is no longer
// appropriate for it.确保我们要启动的Activity没有在stop队列、休眠队列、等待变为可见队列中
mStackSupervisor.mStoppingActivities.remove(next);
mStackSupervisor.mGoingToSleepActivities.remove(next);
next.sleeping = false;
mStackSupervisor.mWaitingVisibleActivities.remove(next);
if (DEBUG_SWITCH) Slog.v(TAG_SWITCH, "Resuming " + next);
mActivityTrigger.activityResumeTrigger(next.intent, next.info, next.appInfo,
next.task.mFullscreen);
// If we are currently pausing an activity, then don't do anything
// until that is done.如果有正在pause的Activity,直接返回
if (!mStackSupervisor.allPausedActivitiesComplete()) {
if (DEBUG_SWITCH || DEBUG_PAUSE || DEBUG_STATES) Slog.v(TAG_PAUSE,
"resumeTopActivityLocked: Skip resume: some activity pausing.");
if (DEBUG_STACK) mStackSupervisor.validateTopActivitiesLocked();
return false;
}
mStackSupervisor.setLaunchSource(next.info.applicationInfo.uid);
// We need to start pausing the current activity so the top one can be resumed...暂停当前Activity,以便恢复栈顶的Activity
final boolean dontWaitForPause = (next.info.flags & FLAG_RESUME_WHILE_PAUSING) != 0;
boolean pausing = mStackSupervisor.pauseBackStacks(userLeaving, next, dontWaitForPause);
if (mResumedActivity != null) {//当前界面显示的Activity,表示当前的Activity正在运行
if (DEBUG_STATES) Slog.d(TAG_STATES,
"resumeTopActivityLocked: Pausing " + mResumedActivity);//如果当前界面显示了一个Activity,那么在启动新的Activity之前
pausing |= startPausingLocked(userLeaving, false, next, dontWaitForPause);//必须先中断当前的Activity
}
if (pausing) {
if (DEBUG_SWITCH || DEBUG_STATES) Slog.v(TAG_STATES,
"resumeTopActivityLocked: Skip resume: need to start pausing");
// At this point we want to put the upcoming activity's process
// at the top of the LRU list, since we know we will be needing it
// very soon and it would be a waste to let it get killed if it
// happens to be sitting towards the end.
if (next.app != null && next.app.thread != null) {
mService.updateLruProcessLocked(next.app, true, null);//将即将启动的Activity放入Lru list,如果直接杀死的话会造成资源浪费
}
if (DEBUG_STACK) mStackSupervisor.validateTopActivitiesLocked();
return true;
} else if (mResumedActivity == next && next.state == ActivityState.RESUMED &&
mStackSupervisor.allResumedActivitiesComplete()) {//特殊情况
......
}
// If the most recent activity was noHistory but was only stopped rather
// than stopped+finished because the device went to sleep, we need to make
// sure to finish it as we're making a new activity topmost.如果之前存在未正常结束的Activity,我们要优先结束这些Activity
if (mService.isSleepingLocked() && mLastNoHistoryActivity != null &&
!mLastNoHistoryActivity.finishing) {
if (DEBUG_STATES) Slog.d(TAG_STATES,
"no-history finish of " + mLastNoHistoryActivity + " on new resume");
requestFinishActivityLocked(mLastNoHistoryActivity.appToken, Activity.RESULT_CANCELED,
null, "resume-no-history", false);
mLastNoHistoryActivity = null;
}
......
// Launching this app's activity, make sure the app is no longer
// considered stopped.通过PKMS设置待启动的Activity对应的package的stop状态
try {
AppGlobals.getPackageManager().setPackageStoppedState(
next.packageName, false, next.userId); /* TODO: Verify if correct userid */
} catch (RemoteException e1) {
} catch (IllegalArgumentException e) {
Slog.w(TAG, "Failed trying to unstop package "
+ next.packageName + ": " + e);
}
// We are starting up the next activity, so tell the window manager
// that the previous one will be hidden soon. This way it can know
// to ignore it when computing the desired screen orientation.
boolean anim = true;//打开动画,
if (mIsAnimationBoostEnabled == true && mPerf == null) {
mPerf = new BoostFramework();
}
if (prev != null) {
if (prev.finishing) {//并通知Window manager关闭上一个Activity
......
} else {
......
}
} else {
......
}
Bundle resumeAnimOptions = null;
if (anim) {
ActivityOptions opts = next.getOptionsForTargetActivityLocked();
if (opts != null) {
resumeAnimOptions = opts.toBundle();
}
next.applyOptionsLocked();
} else {
next.clearOptionsLocked();
}
ActivityStack lastStack = mStackSupervisor.getLastStack();
if (next.app != null && next.app.thread != null) {//如果待启动的Activity对应的进程已启动,则只需重启Activity
if (DEBUG_SWITCH) Slog.v(TAG_SWITCH, "Resume running: " + next
+ " stopped=" + next.stopped + " visible=" + next.visible);
final boolean lastActivityTranslucent = lastStack != null
&& (!lastStack.mFullscreen
|| (lastStack.mLastPausedActivity != null
&& !lastStack.mLastPausedActivity.fullscreen));
// This activity is now becoming visible.显示Activity
if (!next.visible || next.stopped || lastActivityTranslucent) {
mWindowManager.setAppVisibility(next.appToken, true);
}
// schedule launch ticks to collect information about slow apps.
next.startLaunchTickingLocked();//开始计时
ActivityRecord lastResumedActivity =
lastStack == null ? null :lastStack.mResumedActivity;
ActivityState lastState = next.state;
mService.updateCpuStats();//更新CPU使用信息
if (DEBUG_STATES) Slog.v(TAG_STATES, "Moving to RESUMED: " + next + " (in existing)");
next.state = ActivityState.RESUMED;//设置Activity状态
mResumedActivity = next;
next.task.touchActiveTime();
mRecentTasks.addLocked(next.task);
mService.updateLruProcessLocked(next.app, true, null);//来调整进程在mLruProcesses列表中的位置
updateLRUListLocked(next);
mService.updateOomAdjLocked();//计算oom_adj的值
// Have the window manager re-evaluate the orientation of
// the screen based on the new activity order.根据Activity设置屏幕方向
boolean notUpdated = true;
if (mStackSupervisor.isFocusedStack(this)) {
Configuration config = mWindowManager.updateOrientationFromAppTokens(
mService.mConfiguration,
next.mayFreezeScreenLocked(next.app) ? next.appToken : null);
if (config != null) {
next.frozenBeforeDestroy = true;
}
notUpdated = !mService.updateConfigurationLocked(config, next, false);
}
if (notUpdated) {//确保Activity保持在栈顶
// The configuration update wasn't able to keep the existing
// instance of the activity, and instead started a new one.
// We should be all done, but let's just make sure our activity
// is still at the top and schedule another run if something
// weird happened.
ActivityRecord nextNext = topRunningActivityLocked();//取得当前ActivityStack栈顶Activity的ActivityRecord
if (DEBUG_SWITCH || DEBUG_STATES) Slog.i(TAG_STATES,
"Activity config changed during resume: " + next
+ ", new next: " + nextNext);
if (nextNext != next) {
// Do over!
mStackSupervisor.scheduleResumeTopActivities();
}
if (mStackSupervisor.reportResumedActivityLocked(next)) {
mNoAnimActivities.clear();
if (DEBUG_STACK) mStackSupervisor.validateTopActivitiesLocked();
return true;
}
if (DEBUG_STACK) mStackSupervisor.validateTopActivitiesLocked();
return false;
}
try {
// Deliver all pending results.
ArrayList<ResultInfo> a = next.results;
if (a != null) {
final int N = a.size();
if (!next.finishing && N > 0) {
if (DEBUG_RESULTS) Slog.v(TAG_RESULTS,
"Delivering results to " + next + ": " + a);
next.app.thread.scheduleSendResult(next.appToken, a);
}
}
boolean allowSavedSurface = true;
if (next.newIntents != null) {
// Restrict saved surface to launcher start, or there is no intent at all
// (eg. task being brought to front). If the intent is something else,
// likely the app is going to show some specific page or view, instead of
// what's left last time.
for (int i = next.newIntents.size() - 1; i >= 0; i--) {
final Intent intent = next.newIntents.get(i);
if (intent != null && !ActivityRecord.isMainIntent(intent)) {
allowSavedSurface = false;
break;
}
}
next.app.thread.scheduleNewIntent(
next.newIntents, next.appToken, false /* andPause */);
}
// Well the app will no longer be stopped.
// Clear app token stopped state in window manager if needed.
mWindowManager.notifyAppResumed(next.appToken, next.stopped, allowSavedSurface);
EventLog.writeEvent(EventLogTags.AM_RESUME_ACTIVITY, next.userId,
System.identityHashCode(next), next.task.taskId, next.shortComponentName);
next.sleeping = false;//是否睡眠
mService.showUnsupportedZoomDialogIfNeededLocked(next);
mService.showAskCompatModeDialogLocked(next);//兼容模式提示框
next.app.pendingUiClean = true;//清理UI资源
next.app.forceProcessStateUpTo(mService.mTopProcessState);//设置处理状态
next.clearOptionsLocked();//清理最近的选择
next.app.thread.scheduleResumeActivity(next.appToken, next.app.repProcState,
mService.isNextTransitionForward(), resumeAnimOptions);//resume目标Activity
mStackSupervisor.checkReadyForSleepLocked();
if (DEBUG_STATES) Slog.d(TAG_STATES, "resumeTopActivityLocked: Resumed " + next);
} catch (Exception e) {
......
}
// From this point on, if something goes wrong there is no way
// to recover the activity.如果出了差错,就无法恢复活动
try {
completeResumeLocked(next);
} catch (Exception e) {
// If any exception gets thrown, toss away this
// activity and try the next one.如果出了意外,放弃操作,尝试下一个Activity
Slog.w(TAG, "Exception thrown during resume of " + next, e);
requestFinishActivityLocked(next.appToken, Activity.RESULT_CANCELED, null,
"resume-exception", true);
if (DEBUG_STACK) mStackSupervisor.validateTopActivitiesLocked();
return true;
}
} else {
// Whoops, need to restart this activity!Activity所在的进程不存在的情况下,重启Activity
if (!next.hasBeenLaunched) {
next.hasBeenLaunched = true;
} else {
if (SHOW_APP_STARTING_PREVIEW) {
next.showStartingWindow(null, true);
}
if (DEBUG_SWITCH) Slog.v(TAG_SWITCH, "Restarting: " + next);
}
if (DEBUG_STATES) Slog.d(TAG_STATES, "resumeTopActivityLocked: Restarting " + next);
mStackSupervisor.startSpecificActivityLocked(next, true, true);//启动Activity
}
if (DEBUG_STACK) mStackSupervisor.validateTopActivitiesLocked();
return true;
} resumeTopActivityInnerLocked()方法非常繁琐,但整体来讲应该只有两个比较关键的地方:1、如果mResumedActivity不为空,则需要先暂停这个Activity。
mResumedActivity代表当前已经存在于界面的Activity。当需要启动一个新的Activity时,需要先停止当前的Activity。这部分工作由startPausingLocked方法来完成。
也就是说,首先要让现在正在运行的Activity调用startPausingLocked方法进入pause状态。
2、当mResumedActivity为空时,若待启动的Activity对应的应用存在,那么仅需要调用scheduleResumeActivity重新启动该Activity;否则,需要调用ActivityStackSupervisor的startSpecificActivityLocked方法,启动整个进程。
需要说明的是:
1. 当系统启动第一个Activity,即Launcher时,mResumedActivity的值才会是null。因此,即使我们以脚步的方式启动一个Activity,也必须先中断当前的界面,才能进行后续的操作。
2. 分析startPausingLocked函数时,将涉及到当前界面对应的进程、新启动Activity所在的进程,与AMS之间的交互,整体比较复杂。
因此还是先从简单的情况入手,看看直接启动新Activity所在进程的startSpecificActivityLocked函数,后面我们在分析其他情况。
13.ActivityStackSupervisor.startSpecificActivityLocked
void startSpecificActivityLocked(ActivityRecord r,
boolean andResume, boolean checkConfig) {
// Is this activity's application already running?应用进程是否运行,第一次启动Activity,这里为null
ProcessRecord app = mService.getProcessRecordLocked(r.processName,
r.info.applicationInfo.uid, true);

r.task.stack.setLaunchTime(r);//设置启动时间

if (app != null && app.thread != null) {//如果进程已经启动,并向AMS注册过
try {
if ((r.info.flags&ActivityInfo.FLAG_MULTIPROCESS) == 0
|| !"android".equals(r.info.packageName)) {//单进程非系统应用,向ProcessRecord中增加对应的package信息
//ProcessRecord可能已经有对应的信息了
app.addPackage(r.info.packageName, r.info.applicationInfo.versionCode,
mService.mProcessStats);
}
realStartActivityLocked(r, app, andResume, checkConfig);//通知进程启动目标Activity
return;
} catch (RemoteException e) {
Slog.w(TAG, "Exception when starting activity "
+ r.intent.getComponent().flattenToShortString(), e);
}

// If a dead object exception was thrown -- fall through to
// restart the application.
}

mService.startProcessLocked(r.processName, r.info.applicationInfo, true, 0,
"activity", r.intent.getComponent(), false, false, true);//如果进程不存在,调用AMS的startProcessLocked方法创建新进程
} 这里是第一次启动应用程序的Activity,因此创建的ProcessRecord为null,就会调用AMS的startProcessLocked()方法创建新的进程。如果在AndroidManifest.xml配置文件中,没有指定process属性,系统就会默认使用package的名称。14.ActivityManagerService.startProcessLocked
final ProcessRecord startProcessLocked(String processName,
ApplicationInfo info, boolean knownToBeDead, int intentFlags,
String hostingType, ComponentName hostingName, boolean allowWhileBooting,
boolean isolated, boolean keepIfLarge) {
return startProcessLocked(processName, info, knownToBeDead, intentFlags, hostingType,
hostingName, allowWhileBooting, isolated, 0 /* isolatedUid */, keepIfLarge,
null /* ABI override */, null /* entryPoint */, null /* entryPointArgs */,
null /* crashHandler */);
}
final ProcessRecord startProcessLocked(String processName, ApplicationInfo info,
boolean knownToBeDead, int intentFlags, String hostingType, ComponentName hostingName,
boolean allowWhileBooting, boolean isolated, int isolatedUid, boolean keepIfLarge,
String abiOverride, String entryPoint, String[] entryPointArgs, Runnable crashHandler) {
long startTime = SystemClock.elapsedRealtime();
ProcessRecord app;
if (!isolated) {//isolated为false
app = getProcessRecordLocked(processName, info.uid, keepIfLarge);//根据processName,uid寻找是否已经存在ProcessRecord
checkTime(startTime, "startProcess: after getProcessRecord");
if ((intentFlags & Intent.FLAG_FROM_BACKGROUND) != 0) {//FLAG_FROM_BACKGROUND表示发起这次启动的task属于后台任务
// If we are in the background, then check to see if this process//如果没有这个标志,那么本次启动请求是由前台任务触发的
// is bad. If so, we will just silently fail.//如果一个应用在1分钟内连续崩溃超过2次,AMS就会将其ProcessRecord加入到
if (mAppErrors.isBadProcessLocked(info)) {//BadProcesses中,正常情况下,一个应用崩溃后,会弹出一个提示框提示用户
if (DEBUG_PROCESSES) Slog.v(TAG, "Bad process: " + info.uid
+ "/" + info.processName);//但是如果一个后台task启动BadProcesses,然后该Process崩溃,由于用户看不到该Process界面,
return null;//若弹出一个提示框,用户会感动很奇怪;因此,此处禁止后台task启动BadProcesses。
}
} else {
// When the user is explicitly starting a process, then clear its如果用户从界面明确启动一个process,
// crash count so that we won't make it bad until they see at即使该进程是BadProcess,也不能禁止该操作;而且还要清空对应process
// least one crash dialog again, and make the process good again的不良记录。
// if it had been bad.
if (DEBUG_PROCESSES) Slog.v(TAG, "Clearing bad process: " + info.uid
+ "/" + info.processName);//对比上面的代码,可以看出这其实是一种安全机制,防止不健全的程序不断启动潜在的崩溃组件
mAppErrors.resetProcessCrashTimeLocked(info);
if (mAppErrors.isBadProcessLocked(info)) {
EventLog.writeEvent(EventLogTags.AM_PROC_GOOD,
UserHandle.getUserId(info.uid), info.uid,
info.processName);
mAppErrors.clearBadProcessLocked(info);
if (app != null) {
app.bad = false;
}
}
}
} else {//如果这是一个孤立的进程,它不能重用现有的进程
// If this is an isolated process, it can't re-use an existing process.
app = null;
}
// app launch boost for big.little configurations
// use cpusets to migrate freshly launched tasks to big cores
nativeMigrateToBoost();
mIsBoosted = true;
mBoostStartTime = SystemClock.uptimeMillis();
Message msg = mHandler.obtainMessage(APP_BOOST_DEACTIVATE_MSG);
mHandler.sendMessageDelayed(msg, APP_BOOST_MESSAGE_DELAY);//该消息仍然是调用nativeMigrateToBoost
// We don't have to do anything more if:
// (1) There is an existing application record; and
// (2) The caller doesn't think it is dead, OR there is no thread
// object attached to it so we know it couldn't have crashed; and
// (3) There is a pid assigned to it, so it is either starting or
// already running.
if (DEBUG_PROCESSES) Slog.v(TAG_PROCESSES, "startProcess: name=" + processName
+ " app=" + app + " knownToBeDead=" + knownToBeDead
+ " thread=" + (app != null ? app.thread : null)
+ " pid=" + (app != null ? app.pid : -1));
if (app != null && app.pid > 0) {
if ((!knownToBeDead && !app.killed) || app.thread == null) {
// We already have the app running, or are waiting for it to
// come up (we have a pid but not yet its thread), so keep it.
if (DEBUG_PROCESSES) Slog.v(TAG_PROCESSES, "App already running: " + app);
// If this is a new package in the process, add the package to the list
app.addPackage(info.packageName, info.versionCode, mProcessStats);
checkTime(startTime, "startProcess: done, added package to proc");
return app;
}
// An application record is attached to a previous process,
// clean it up now.
if (DEBUG_PROCESSES || DEBUG_CLEANUP) Slog.v(TAG_PROCESSES, "App died: " + app);
checkTime(startTime, "startProcess: bad proc running, killing");
killProcessGroup(app.uid, app.pid);
handleAppDiedLocked(app, true, true);
checkTime(startTime, "startProcess: done killing old proc");
}
String hostingNameStr = hostingName != null
? hostingName.flattenToShortString() : null;
if (app == null) {
checkTime(startTime, "startProcess: creating new process record");
app = newProcessRecordLocked(info, processName, isolated, isolatedUid);//创建一个新的process
if (app == null) {
Slog.w(TAG, "Failed making new process record for "
+ processName + "/" + info.uid + " isolated=" + isolated);
return null;
}
app.crashHandler = crashHandler;
checkTime(startTime, "startProcess: done creating new process record");
} else {
// If this is a new package in the process, add the package to the list
app.addPackage(info.packageName, info.versionCode, mProcessStats);
checkTime(startTime, "startProcess: added package to existing proc");
}
// If the system is not ready yet, then hold off on starting this
// process until it is.
if (!mProcessesReady
&& !isAllowedWhileBooting(info)
&& !allowWhileBooting) {
if (!mProcessesOnHold.contains(app)) {
mProcessesOnHold.add(app);//如果系统没有准备好,先加入mProcessesOnHold数组,稍后启动
}
if (DEBUG_PROCESSES) Slog.v(TAG_PROCESSES,
"System not ready, putting on hold: " + app);
checkTime(startTime, "startProcess: returning with proc on hold");
return app;
}
checkTime(startTime, "startProcess: stepping in to startProcess");
startProcessLocked(
app, hostingType, hostingNameStr, abiOverride, entryPoint, entryPointArgs);//继续向下处理
checkTime(startTime, "startProcess: done starting proc!");
return (app.pid != 0) ? app : null;
} 这里主要判断是否应该创建新进程,若需要创建新进程,将进一步调用重载后的startProcessLocked方法。private final void startProcessLocked(ProcessRecord app, String hostingType,
String hostingNameStr, String abiOverride, String entryPoint, String[] entryPointArgs) {
long startTime = SystemClock.elapsedRealtime();
if (app.pid > 0 && app.pid != MY_PID) {//启动一个进程,若AMS之前维持着这个进程的信息,那么现在需要移除
checkTime(startTime, "startProcess: removing from pids map");
synchronized (mPidsSelfLocked) {
mPidsSelfLocked.remove(app.pid);
mHandler.removeMessages(PROC_START_TIMEOUT_MSG, app);
}
checkTime(startTime, "startProcess: done removing from pids map");
app.setPid(0);
}
if (DEBUG_PROCESSES && mProcessesOnHold.contains(app)) Slog.v(TAG_PROCESSES,
"startProcessLocked removing on hold: " + app);
mProcessesOnHold.remove(app);//mProcessesOnHold用于保存那些在系统还没准备好就提前请求启动的ProcessRecord
checkTime(startTime, "startProcess: starting to update cpu stats");
updateCpuStats();
checkTime(startTime, "startProcess: done updating cpu stats");
try {
try {//通过PKMS检查待启动进程对应的package是否满足启动条件
final int userId = UserHandle.getUserId(app.uid);
AppGlobals.getPackageManager().checkPackageStartable(app.info.packageName, userId);
} catch (RemoteException e) {
throw e.rethrowAsRuntimeException();
}
int uid = app.uid;
int[] gids = null;
int mountExternal = Zygote.MOUNT_EXTERNAL_NONE;
if (!app.isolated) {
int[] permGids = null;
try {
checkTime(startTime, "startProcess: getting gids from package manager");
final IPackageManager pm = AppGlobals.getPackageManager();
permGids = pm.getPackageGids(app.info.packageName,
MATCH_DEBUG_TRIAGED_MISSING, app.userId);//得到进程对应的gid
MountServiceInternal mountServiceInternal = LocalServices.getService(
MountServiceInternal.class);
mountExternal = mountServiceInternal.getExternalStorageMountMode(uid,
app.info.packageName);//判断进程对外部设备的存储模式
} catch (RemoteException e) {
throw e.rethrowAsRuntimeException();
}
/*
* Add shared application and profile GIDs so applications can share some
* resources like shared libraries and access user-wide resources
*/
if (ArrayUtils.isEmpty(permGids)) {
gids = new int[2];
} else {
gids = new int[permGids.length + 2];
System.arraycopy(permGids, 0, gids, 2, permGids.length);
}
gids[0] = UserHandle.getSharedAppGid(UserHandle.getAppId(uid));//得到共享应用的gid信息
gids[1] = UserHandle.getUserGid(UserHandle.getUserId(uid));
}
......//debugFlags的设置
String requiredAbi = (abiOverride != null) ? abiOverride : app.info.primaryCpuAbi;
if (requiredAbi == null) {//ABI表示应用程序的二进制接口,ABI精确地定义了应用程序及其代码在运行时如何和系统交互
requiredAbi = Build.SUPPORTED_ABIS[0];
}
String instructionSet = null;
if (app.info.primaryCpuAbi != null) {
instructionSet = VMRuntime.getInstructionSet(app.info.primaryCpuAbi);//得到对应的指令集
}
app.gids = gids;
app.requiredAbi = requiredAbi;
app.instructionSet = instructionSet;
// Start the process. It will either succeed and return a result containing
// the PID of the new process, or else throw a RuntimeException.开启进程,前面都是为创建新进程做的初始化操作
boolean isActivityProcess = (entryPoint == null);
if (entryPoint == null) entryPoint = "android.app.ActivityThread";//指定反射的classname
Trace.traceBegin(Trace.TRACE_TAG_ACTIVITY_MANAGER, "Start proc: " +
app.processName);
checkTime(startTime, "startProcess: asking zygote to start proc");
Process.ProcessStartResult startResult = Process.start(entryPoint,//Process类的start方法将通过socket发送消息给zygote
app.processName, uid, uid, gids, debugFlags, mountExternal,//Zygote将派生一个子进程,子进程将通过反射调用ActivityThread
app.info.targetSdkVersion, app.info.seinfo, requiredAbi, instructionSet,//的main函数,注意此时传递给Zygote的参数并没有
app.info.dataDir, entryPointArgs);//包含任何和Activity相关的信息
checkTime(startTime, "startProcess: returned from zygote!");
Trace.traceEnd(Trace.TRACE_TAG_ACTIVITY_MANAGER);
mBatteryStatsService.noteProcessStart(app.processName, app.info.uid);//增加电量统计项
......
if (app.persistent) {//实际仅判断启动的进程是否是processName;
Watchdog.getInstance().processStarted(app.processName, startResult.pid);
}
......//打印一些日志
app.setPid(startResult.pid);//利用启动结果,更新ProcessRecord
app.usingWrapper = startResult.usingWrapper;
app.removed = false;
app.killed = false;
app.killedByAm = false;
checkTime(startTime, "startProcess: starting to update pids map");
ProcessRecord oldApp;
synchronized (mPidsSelfLocked) {
oldApp = mPidsSelfLocked.get(startResult.pid);
}
// If there is already an app occupying that pid that hasn't been cleaned up
if (oldApp != null && !app.isolated) {
// Clean up anything relating to this pid first首先要清空pid相关的任何组件
Slog.w(TAG, "Reusing pid " + startResult.pid
+ " while app is still mapped to it");
cleanUpApplicationRecordLocked(oldApp, false, false, -1,
true /*replacingPid*/);//主要负责清理一些providers、receivers、services等,并且在清理过程中根据配置信息决定是否重启并启动
}
synchronized (mPidsSelfLocked) {
this.mPidsSelfLocked.put(startResult.pid, app);//AMS以键值对的形式保存pid和对应的ProcessRecord
if (isActivityProcess) {
Message msg = mHandler.obtainMessage(PROC_START_TIMEOUT_MSG);
msg.obj = app;//发送一个延迟消息;在该消息没有处理前,如果新创建的进程没有和AMS交互,那么该进程启动失败;正常延迟时间为10秒;
mHandler.sendMessageDelayed(msg, startResult.usingWrapper//若通过wrapper加载,应用程序将在wrapper的运行环境中工作,
? PROC_START_TIMEOUT_WITH_WRAPPER : PROC_START_TIMEOUT);//耗时较长,AMS中定义的延迟时间是1200秒;
}
}
......
} catch (RuntimeException e) {
Slog.e(TAG, "Failure starting process " + app.processName, e);
......//出现异常时,冻结应用
forceStopPackageLocked(app.info.packageName, UserHandle.getAppId(app.uid), false,
false, true, false, false, UserHandle.getUserId(app.userId), "start failure");
}
} 至此,startSpecificActivityLocked函数分析完毕。在startProcessLocked方法中,我们主要做了:
1、处理FLAG_FROM_BACKGROUND和BadProcess;
2、创建一个新的ProcessRecord,调用Process的start方法,通过socket向Zygote发送命令,fork出进程;
3、AMS按照键值对的形式保存ProcessRecord(pid为键值),同时发送延迟消息PROC_START_TIMEOUT_MSG,监控进程是否创建成功。
这里主要是调用Process.start接口来创建一个新的进程,新的进程会导入android.app.ActivityThread类,并且执行它的main函数,因此,每一个应用程序都有一个ActivityThread实例来对应。Android系统开始通过创建zygote创建应用进程。
15.Process.start
public static final ProcessStartResult start(final String processClass,
final String niceName,
int uid, int gid, int[] gids,
int debugFlags, int mountExternal,
int targetSdkVersion,
String seInfo,
String abi,
String instructionSet,
String appDataDir,
String[] zygoteArgs) {
try {
return startViaZygote(processClass, niceName, uid, gid, gids,
debugFlags, mountExternal, targetSdkVersion, seInfo,
abi, instructionSet, appDataDir, zygoteArgs);
} catch (ZygoteStartFailedEx ex) {
Log.e(LOG_TAG,
"Starting VM process through Zygote failed");
throw new RuntimeException(
"Starting VM process through Zygote failed", ex);
}
} 这里调用startViaZygote方法,继续往下跟踪。private static ProcessStartResult startViaZygote(final String processClass,
final String niceName,
final int uid, final int gid,
final int[] gids,
int debugFlags, int mountExternal,
int targetSdkVersion,
String seInfo,
String abi,
String instructionSet,
String appDataDir,
String[] extraArgs)
throws ZygoteStartFailedEx {
synchronized(Process.class) {
ArrayList<String> argsForZygote = new ArrayList<String>();
// --runtime-args, --setuid=, --setgid=,
// and --setgroups= must go first设置启动应用进程用的各个参数
argsForZygote.add("--runtime-args");
argsForZygote.add("--setuid=" + uid);
argsForZygote.add("--setgid=" + gid);
if ((debugFlags & Zygote.DEBUG_ENABLE_JNI_LOGGING) != 0) {
argsForZygote.add("--enable-jni-logging");
}
if ((debugFlags & Zygote.DEBUG_ENABLE_SAFEMODE) != 0) {
argsForZygote.add("--enable-safemode");
}
if ((debugFlags & Zygote.DEBUG_ENABLE_DEBUGGER) != 0) {
argsForZygote.add("--enable-debugger");
}
if ((debugFlags & Zygote.DEBUG_ENABLE_CHECKJNI) != 0) {
argsForZygote.add("--enable-checkjni");
}
if ((debugFlags & Zygote.DEBUG_GENERATE_DEBUG_INFO) != 0) {
argsForZygote.add("--generate-debug-info");
}
if ((debugFlags & Zygote.DEBUG_ALWAYS_JIT) != 0) {
argsForZygote.add("--always-jit");
}
if ((debugFlags & Zygote.DEBUG_NATIVE_DEBUGGABLE) != 0) {
argsForZygote.add("--native-debuggable");
}
if ((debugFlags & Zygote.DEBUG_ENABLE_ASSERT) != 0) {
argsForZygote.add("--enable-assert");
}
if (mountExternal == Zygote.MOUNT_EXTERNAL_DEFAULT) {
argsForZygote.add("--mount-external-default");
} else if (mountExternal == Zygote.MOUNT_EXTERNAL_READ) {
argsForZygote.add("--mount-external-read");
} else if (mountExternal == Zygote.MOUNT_EXTERNAL_WRITE) {
argsForZygote.add("--mount-external-write");
}
argsForZygote.add("--target-sdk-version=" + targetSdkVersion);
//TODO optionally enable debuger
//argsForZygote.add("--enable-debugger");
// --setgroups is a comma-separated list
if (gids != null && gids.length > 0) {
StringBuilder sb = new StringBuilder();
sb.append("--setgroups=");
int sz = gids.length;
for (int i = 0; i < sz; i++) {
if (i != 0) {
sb.append(',');
}
sb.append(gids[i]);
}
argsForZygote.add(sb.toString());
}
if (niceName != null) {
argsForZygote.add("--nice-name=" + niceName);
}
if (seInfo != null) {
argsForZygote.add("--seinfo=" + seInfo);
}
if (instructionSet != null) {
argsForZygote.add("--instruction-set=" + instructionSet);
}
if (appDataDir != null) {
argsForZygote.add("--app-data-dir=" + appDataDir);
}
argsForZygote.add(processClass);
if (extraArgs != null) {
for (String arg : extraArgs) {
argsForZygote.add(arg);
}
}
return zygoteSendArgsAndGetResult(openZygoteSocketIfNeeded(abi), argsForZygote);
}
} 在startViaZygote方法里面,计算启动应用进程用的各个参数,然后调用zygoteSendArgsAndGetResult方法将这些参数通过socket发送给Zygote进程,Zygote进程会孵化出新的Dalvik应用进程,然后告诉ActivityManagerService新启动的进程的pid。16.Process.zygoteSendArgsAndGetResult
/**
* Sends an argument list to the zygote process, which starts a new child
* and returns the child's pid. Please note: the present implementation
* replaces newlines in the argument list with spaces.用空格替换换行符
*
* @throws ZygoteStartFailedEx if process start failed for any reason
*/
private static ProcessStartResult zygoteSendArgsAndGetResult(
ZygoteState zygoteState, ArrayList<String> args)
throws ZygoteStartFailedEx {
try {
// Throw early if any of the arguments are malformed. This means we can
// avoid writing a partial response to the zygote.如果任何一个参数有异常,尽早抛出ZygoteStartFailedEx
int sz = args.size();
for (int i = 0; i < sz; i++) {
if (args.get(i).indexOf('\n') >= 0) {
throw new ZygoteStartFailedEx("embedded newlines not allowed");
}//不允许出现换行符
}

/**
* See com.android.internal.os.ZygoteInit.readArgumentList()
* Presently the wire format to the zygote process is:
* a) a count of arguments (argc, in essence)
* b) a number of newline-separated argument strings equal to count
*
* After the zygote process reads these it will write the pid of
* the child or -1 on failure, followed by boolean to
* indicate whether a wrapper process was used.
*/
final BufferedWriter writer = zygoteState.writer;
final DataInputStream inputStream = zygoteState.inputStream;

writer.write(Integer.toString(args.size()));
writer.newLine();

for (int i = 0; i < sz; i++) {
String arg = args.get(i);
writer.write(arg);
writer.newLine();
}

writer.flush();//将各个参数用换行符隔开,并写入BufferedWriter中。

// Should there be a timeout on this?
ProcessStartResult result = new ProcessStartResult();//创建ProcessStartResult对象

// Always read the entire result from the input stream to avoid leaving从输入流中读取结果,
// bytes in the stream for future process starts to accidentally stumble
// upon.
result.pid = inputStream.readInt();
result.usingWrapper = inputStream.readBoolean();

if (result.pid < 0) {
throw new ZygoteStartFailedEx("fork() failed");
}
return result;
} catch (IOException ex) {
zygoteState.close();
throw new ZygoteStartFailedEx(ex);
}
} 可以发现其最终调用了Zygote并通过socket通信的方式让Zygote进程fork出了一个新的进程,并根据我们刚刚传递的“android.app.ActivityThread”字符串,反射出该对象并执行ActivityThread的main方法。这样我们所要启动的应用进程这时候其实已经启动了,但是还没有执行相应的初始化操作。为啥子我们平时都将ActivityThread称之为UI线程或主线程呢?这里可以看出,应用进程被创建之后首先执行的是ActivityThread的main方法,所以我们将ActivityThread称为主线程。
17.ActivityThread.main
public static void main(String[] args) {
Trace.traceBegin(Trace.TRACE_TAG_ACTIVITY_MANAGER, "ActivityThreadMain");
SamplingProfilerIntegration.start();//开始信息采样

// CloseGuard defaults to true and can be quite spammy.  We
// disable it here, but selectively enable it later (via
// StrictMode) on debug builds, but using DropBox, not logs.
CloseGuard.setEnabled(false);//调试相关

Environment.initForCurrentUser();//得到当前进程的UserEnvironment

// Set the reporter for event logging in libcore
EventLogger.setReporter(new EventLoggingReporter());

// Make sure TrustedCertificateStore looks in the right place for CA certificates确保进程能够得到CA证书的路径
final File configDir = Environment.getUserConfigDirectory(UserHandle.myUserId());
TrustedCertificateStore.setDefaultUserDirectory(configDir);

Process.setArgV0("<pre-initialized>");

Looper.prepareMainLooper();//准备主线程的looper

ActivityThread thread = new ActivityThread();//创建当前进程的ActivityThread
thread.attach(false);//调用attach函数

if (sMainThreadHandler == null) {
sMainThreadHandler = thread.getHandler();//保存进程对应的主线程的handler
}

if (false) {
Looper.myLooper().setMessageLogging(new
LogPrinter(Log.DEBUG, "ActivityThread"));
}

// End of event ActivityThreadMain.
Trace.traceEnd(Trace.TRACE_TAG_ACTIVITY_MANAGER);
Looper.loop();//进入主线程的消息循环

throw new RuntimeException("Main thread loop unexpectedly exited");
} 从上述代码可以看出,ActivityThread的main函数最主要的工作是:1. 创建出一个Looper,并将主线程加入到消息循环中。
2. 创建出ActivityThread,并调用其attach方法。
attach方法最终调用了ActivityManagerService的远程接口ActivityManagerProxy的attachApplication方法,传入的参数是mAppThread,这是一个ApplicationThread类型的Binder对象,它的作用是用来进行进程间通信的。
18. ActivityThread.attach
private void attach(boolean system) {
sCurrentActivityThread = this;
mSystemThread = system;//system参数:普通进程system为false;系统进程system为true;
if (!system) {//普通进程
ViewRootImpl.addFirstDrawHandler(new Runnable() {//JIT技术主要是对多次运行的代码进行编译,当再次调用时使用编译之后的机器码,而不是每次
@Override//都解释,以节约时间。JIT原理:每启动一个应用程序,都会相应地启动一个Dalvik虚拟机,启动时会建立JIT线程,一直在后台运行。
public void run() {//当某段代码被调用时,虚拟机会判断它是否需要编译成机器码,如果需要,就做一个标记。JIT线程在后台检测该标记,如果发现
ensureJitEnabled();//标记被设定,就把对应的代码编译成机器码,并将其机器码地址及相关信息保存起来,当进程下次执行到这段代码时,直接
}//跳到机器码执行,而不再解释执行,从而提高运行速度。
});//这里开启JIT,应该是为了提高Android绘制的速度。
android.ddm.DdmHandleAppName.setAppName("<pre-initialized>",//设置在DDMS中看到的进程名为“<pre-initialized>”
UserHandle.myUserId());
RuntimeInit.setApplicationObject(mAppThread.asBinder());//将ApplicationThread对象设置为RuntimeInit的mApplicationObject参数
final IActivityManager mgr = ActivityManagerNative.getDefault();//获取与AMS交互的Binder客户端
try {
mgr.attachApplication(mAppThread);//与AMS通信,调用attachApplication接口
} catch (RemoteException ex) {
throw ex.rethrowFromSystemServer();
}
// Watch for getting close to heap limit.监控GC操作;当进程内的一些Activity发生变化,同时内存占用量大时,通知AMS释放一些Activity
BinderInternal.addGcWatcher(new Runnable() {
@Override public void run() {
if (!mSomeActivitiesChanged) {
return;
}
Runtime runtime = Runtime.getRuntime();
long dalvikMax = runtime.maxMemory();
long dalvikUsed = runtime.totalMemory() - runtime.freeMemory();
if (dalvikUsed > ((3*dalvikMax)/4)) {//判断内存占用量是否过大
if (DEBUG_MEMORY_TRIM) Slog.d(TAG, "Dalvik max=" + (dalvikMax/1024)
+ " total=" + (runtime.totalMemory()/1024)
+ " used=" + (dalvikUsed/1024));
mSomeActivitiesChanged = false;
try {
mgr.releaseSomeActivities(mAppThread);//通知AMS是否一些Activity,以缓解内存
} catch (RemoteException e) {
throw e.rethrowFromSystemServer();
}
}
}
});
} else {//系统进程的处理流程,该情况只在systemServer中处理
// Don't set application object here -- if the system crashes,
// we can't display an alert, we just want to die die die.
android.ddm.DdmHandleAppName.setAppName("system_process",
UserHandle.myUserId());//设置在DDMS中看到的systemServier进程名为“system_process”
try {
mInstrumentation = new Instrumentation();
ContextImpl context = ContextImpl.createAppContext(//初始化Context
this, getSystemContext().mPackageInfo);
mInitialApplication = context.mPackageInfo.makeApplication(true, null);
mInitialApplication.onCreate();
} catch (Exception e) {
throw new RuntimeException(
"Unable to instantiate Application():" + e.toString(), e);
}
}

// add dropbox logging to libcore
DropBox.setReporter(new DropBoxReporter());

ViewRootImpl.addConfigCallback(new ComponentCallbacks2() {//注册Configuration变化的回调通知
@Override
public void onConfigurationChanged(Configuration newConfig) {//当系统配置发生变化时,回调该方法
synchronized (mResourcesManager) {
......
}
}
@Override
public void onLowMemory() {
}
@Override
public void onTrimMemory(int level) {
}
});
} 在分析Activity启动过程时,我们提到过AMS创建一个应用进程后,会设置一个超时时间。如果超过这个时间,应用进程还没有和AMS交互,AMS就认为该进程创建失败。因此,应用进程启动后,需要尽快和AMS交互。attachApplication方法就是应用进程与AMS交互的接口。这里我们跳过ActivityManagerNative类,到ActivityManagerService的attachApplication方法。
19. ActivityManagerService.attachApplication
@Override
public final void attachApplication(IApplicationThread thread) {
synchronized (this) {
int callingPid = Binder.getCallingPid();
final long origId = Binder.clearCallingIdentity();
attachApplicationLocked(thread, callingPid);
Binder.restoreCallingIdentity(origId);
}
} 这里直接调用了attachApplicationLocked()方法。20. ActivityManagerService.attachApplicationLocked
attachApplicationLocked方法比较长,我们分段看下。第一部分
private final boolean attachApplicationLocked(IApplicationThread thread,
int pid) {

// Find the application record that is being attached...  either via
// the pid if we are running in multiple processes, or just pull the
// next app record if we are emulating process with anonymous threads.
ProcessRecord app;
if (pid != MY_PID && pid >= 0) {//根据pid查找对应的ProcessRecord
synchronized (mPidsSelfLocked) {
app = mPidsSelfLocked.get(pid);
}
} else {
app = null;
}

if (app == null) {//如果进程有AMS启动,则它在AMS中一定有对应的ProcessRecord;此处app为null,则表示在AMS中没有该进程的记录,故kill掉异常进程
Slog.w(TAG, "No pending application record for pid " + pid
+ " (IApplicationThread " + thread + "); dropping process");
EventLog.writeEvent(EventLogTags.AM_DROP_PROCESS, pid);
if (pid > 0 && pid != MY_PID) {//pid>0且不是系统进程,直接kill掉;
Process.killProcessQuiet(pid);
} else {//pid<0时,表示fork子进程失败,仅上层完成一些清理工作即可
try {
thread.scheduleExit();//应用进程进行一些扫尾工作,如结束消息循环等
} catch (Exception e) {
// Ignore exceptions.
}
}
return false;
}

// If this application record is still attached to a previous//判断pid对应的ProcessRecord的IApplicationThread是否为null
// process, clean it up now.//AMS创建ProcessRecord后,在attach之前,正常情况下IApplicationThread为null;
if (app.thread != null) {//特殊情况下:如果旧应用进程被杀死,pid被释放,在通知到达AMS之前(下面注册了“讣告”),用户又启动了一个新的进程,
handleAppDiedLocked(app, true, true);//正好分配了旧进程的pid,此处得到的app可能就是就进程的,于是app.thread不为空,因此,这里要清理掉。
}

// Tell the process all about itself.

if (DEBUG_ALL) Slog.v(
TAG, "Binding process pid " + pid + " to record " + app);

final String processName = app.processName;
try {
AppDeathRecipient adr = new AppDeathRecipient(
app, pid, thread);//创建一个讣告接收对象,注册到应用进程的ApplicationThread中。
thread.asBinder().linkToDeath(adr, 0);//当应用进程退出时,该对象的binderDeath将会被调用,这样AMS将会做出相应的处理。
app.deathRecipient = adr;//binderDeath方法将在另一个线程中调用,内部也是调用handleAPPDiedLocked方法。
} catch (RemoteException e) {
app.resetPackageList(mProcessStats);
startProcessLocked(app, "link fail", processName);
return false;
}

......//设置app的一些变量

mHandler.removeMessages(PROC_START_TIMEOUT_MSG, app);//启动成功,从消息队列中移除PROC_START_TIMEOUT_MSG 这部分核心代码比较简单:1. 判断进程的有效性,同时注册讣告:监听进程的死亡信号;
2. 设置pid对应的ProcessRecord对象的一些成员变量,例如和应用进程交互的IApplicationThread对象、进程调度的优先级等;
3. 进程注册成功,AMS从消息队列中移除PROC_START_TIMEOUT_MSG。
第二部分
boolean normalMode = mProcessesReady || isAllowedWhileBooting(app.info);//AMS正常启动后,mProcessesReady就变为true了
List<ProviderInfo> providers = normalMode ? generateApplicationProvidersLocked(app) : null;//查询进程中的ContentProvider
//checkAppInLaunchingProvidersLocked方法将当前启动进程的ProcessRecord,与mLaunchingProviders的ProcessRecord比较
if (providers != null && checkAppInLaunchingProvidersLocked(app)) {//当判断出该进程是由于启动Contentprovider而被加载的,
Message msg = mHandler.obtainMessage(CONTENT_PROVIDER_PUBLISH_TIMEOUT_MSG);//就发送一个延迟消息(10s)
msg.obj = app;
mHandler.sendMessageDelayed(msg, CONTENT_PROVIDER_PUBLISH_TIMEOUT);
}//从这里可以看出,当由于加载Contentprovider启动进程时,在进程启动后,Contentprovider要在10s内完成发布

......
try {
......
thread.bindApplication(processName, appInfo, providers, app.instrumentationClass,//回调进程ApplicationThread的bindApplication
profilerInfo, app.instrumentationArguments, app.instrumentationWatcher,
app.instrumentationUiAutomationConnection, testMode,
mBinderTransactionTrackingEnabled, enableTrackAllocation,
isRestrictedBackupMode || !normalMode, app.persistent,
new Configuration(mConfiguration), app.compat,
getCommonServicesLocked(app.isolated),
mCoreSettingsObserver.getCoreSettingsLocked());
updateLruProcessLocked(app, false, null);//更新进程调度策略
......
} catch (Exception e) {
......//bindApplication()异常,重新启动进程
}

...... 这一部分的核心代码就是调用ApplicationThread的bindApplication()方法。ApplicationThread.bindApplication
ApplicationThread类是ActivityThread类的内部类,从前面的代码,我们知道应用进程有Zygote fork得到,然后调用ActivityThread的main函数,进入到Java世界。但是截止到目前,该进程并没有融入到Android体系中,因此仅能被成为一个Java进程,是指连进程名也只是“敷衍”地定义为“pre-initialized”。这里介绍的bindApplication方法,就是在新进程中创建并初始化对应的Android运行环境的。下面看下主要流程:
public final void bindApplication(String processName, ApplicationInfo appInfo,
List<ProviderInfo> providers, ComponentName instrumentationName,
ProfilerInfo profilerInfo, Bundle instrumentationArgs,
IInstrumentationWatcher instrumentationWatcher,
IUiAutomationConnection instrumentationUiConnection, int debugMode,
boolean enableBinderTracking, boolean trackAllocation,
boolean isRestrictedBackupMode, boolean persistent, Configuration config,
CompatibilityInfo compatInfo, Map<String, IBinder> services, Bundle coreSettings) {

if (services != null) {
// Setup the service cache in the ServiceManager
ServiceManager.initServiceCache(services);
}

setCoreSettings(coreSettings);//内部发送H.SET_CORE_SETTINGS消息,调用handleSetCoreSettings方法,主要用于保存新的信息

AppBindData data = new AppBindData();//用AppBindData对象保存参数对应的信息
data.processName = processName;
data.appInfo = appInfo;
data.providers = providers;
data.instrumentationName = instrumentationName;
data.instrumentationArgs = instrumentationArgs;
data.instrumentationWatcher = instrumentationWatcher;
data.instrumentationUiAutomationConnection = instrumentationUiConnection;
data.debugMode = debugMode;
data.enableBinderTracking = enableBinderTracking;
data.trackAllocation = trackAllocation;
data.restrictedBackupMode = isRestrictedBackupMode;
data.persistent = persistent;
data.config = config;
data.compatInfo = compatInfo;
data.initProfilerInfo = profilerInfo;
sendMessage(H.BIND_APPLICATION, data);//发送H.BIND_APPLICATION消息
}
由上面代码可知,ApplicationThread的接口被AMS调用后,会将参数保存到APPBindData对象中,然后发送消息让ActivityThread的主线程处理。由此可见,对应用进程而言,ApplicationThread只是与AMS通信的接口,实际的工作一般还是会交给ActivityThread来完成。ActivityThread中处理该消息的实际方法是handleBindApplication。
ActivityThread.handleBindApplication
private void handleBindApplication(AppBindData data) {
// Register the UI Thread as a sensitive thread to the runtime.
VMRuntime.registerSensitiveThread();//将UI线程注册为运行时线程
if (data.trackAllocation) {
DdmVmInternal.enableRecentAllocations(true);
}

// Note when this process has started.记录线程开始时间
Process.setStartTimes(SystemClock.elapsedRealtime(), SystemClock.uptimeMillis());

mBoundApplication = data;
mConfiguration = new Configuration(data.config);
mCompatConfiguration = new Configuration(data.config);

mProfiler = new Profiler();//初始化性能统计对象
if (data.initProfilerInfo != null) {
mProfiler.profileFile = data.initProfilerInfo.profileFile;
mProfiler.profileFd = data.initProfilerInfo.profileFd;
mProfiler.samplingInterval = data.initProfilerInfo.samplingInterval;
mProfiler.autoStopProfiler = data.initProfilerInfo.autoStopProfiler;
}

// 重新设置进程名,并修改在DDMS中显示的进程名
Process.setArgV0(data.processName);
android.ddm.DdmHandleAppName.setAppName(data.processName,
UserHandle.myUserId());

if (data.persistent) {
// 在低内存设备上,禁止常驻进程使用硬件加速,对进程来说开销很大
if (!ActivityManager.isHighEndGfx()) {
ThreadedRenderer.disable(false);
}
}

if (mProfiler.profileFd != null) {
mProfiler.startProfiling();//启动性能统计
}

......
if (data.appInfo.targetSdkVersion <= android.os.Build.VERSION_CODES.HONEYCOMB_MR1) {
AsyncTask.setDefaultExecutor(AsyncTask.THREAD_POOL_EXECUTOR);//设置默认并发线程池
}

Message.updateCheckRecycle(data.appInfo.targetSdkVersion);

/*
* Before spawning a new process, reset the time zone to be the system time zone.
* This needs to be done because the system time zone could have changed after the
* the spawning of this process. Without doing this this process would have the incorrect
* system time zone.
*/
TimeZone.setDefault(null);

/*
* Set the LocaleList. This may change once we create the App Context.
*/
LocaleList.setDefault(data.config.getLocales());

synchronized (mResourcesManager) {//更新资源和兼容性相关的配置
/*
* Update the system configuration since its preloaded and might not
* reflect configuration changes. The configuration object passed
* in AppBindData can be safely assumed to be up to date
*/
mResourcesManager.applyConfigurationToResourcesLocked(data.config, data.compatInfo);
mCurDefaultDisplayDpi = data.config.densityDpi;

// This calls mResourcesManager so keep it within the synchronized block.
applyCompatConfiguration(mCurDefaultDisplayDpi);
}

data.info = getPackageInfoNoCheck(data.appInfo, data.compatInfo);//根据传递过来的ApplicationInfo创建一个LoadedApk对象

/**
* Switch this process to density compatibility mode if needed.
*/
if ((data.appInfo.flags & ApplicationInfo.FLAG_SUPPORTS_SCREEN_DENSITIES)
== 0) {//如果没有设置屏幕密度,则为Bitmap设置默认的屏幕密度
mDensityCompatMode = true;
Bitmap.setDefaultDensity(DisplayMetrics.DENSITY_DEFAULT);
} else {
int overrideDensity = data.appInfo.getOverrideDensity();
if(overrideDensity != 0) {
Log.d(TAG, "override app density from " + DisplayMetrics.DENSITY_DEVICE + " to " + overrideDensity);
mDensityCompatMode = true;
Bitmap.setDefaultDensity(overrideDensity);
}
}
updateDefaultDensity();

final boolean is24Hr = "24".equals(mCoreSettings.getString(Settings.System.TIME_12_24));
DateFormat.set24HourTimePref(is24Hr);

......
/**
* For apps targetting Honeycomb or later, we don't allow network usage
* on the main event loop / UI thread. This is what ultimately throws
* {@link NetworkOnMainThreadException}.
*/
if (data.appInfo.targetSdkVersion >= Build.VERSION_CODES.HONEYCOMB) {
StrictMode.enableDeathOnNetwork();//禁止在主线程使用网络操作
}

/**
* For apps targetting N or later, we don't allow file:// Uri exposure.
* This is what ultimately throws {@link FileUriExposedException}.
*/
if (data.appInfo.targetSdkVersion >= Build.VERSION_CODES.N) {
StrictMode.enableDeathOnFileUriExposure();//禁止主线程操作文件
}

......
final IBinder b = ServiceManager.getService(Context.CONNECTIVITY_SERVICE);
if (b != null) {
final IConnectivityManager service = IConnectivityManager.Stub.asInterface(b);
try {
final ProxyInfo proxyInfo = service.getProxyForNetwork(null);
Proxy.setHttpProxySystemProperty(proxyInfo);//设置默认的Http proxy
} catch (RemoteException e) {
......
}
}
......

final ContextImpl appContext = ContextImpl.createAppContext(this, data.info);//创建出进程对应的Android运行环境
......

// Install the Network Security Config Provider. This must happen before the application
// code is loaded to prevent issues with instances of TLS objects being created before
// the provider is installed.
......
NetworkSecurityConfigProvider.install(appContext);
......

if ((data.appInfo.flags&ApplicationInfo.FLAG_LARGE_HEAP) != 0) {
dalvik.system.VMRuntime.getRuntime().clearGrowthLimit();//如果package中指定了FLAG_LARGE_HEAP,可跳出虚拟机对内存的限制
} else {
// Small heap, clamp to the current growth limit and let the heap release
// pages after the growth limit to the non growth limit capacity. b/18387825
dalvik.system.VMRuntime.getRuntime().clampGrowthLimit();
}

// Allow disk access during application and provider setup. This could
// block processing ordered broadcasts, but later processing would
// probably end up doing the same disk access.
final StrictMode.ThreadPolicy savedPolicy = StrictMode.allowThreadDiskWrites();
try {
// If the app is being launched for full backup or restore, bring it up in
// a restricted environment with the base application class.利用LoadedApk的makeApplication方法,通过反射创建出Application
Application app = data.info.makeApplication(data.restrictedBackupMode, null);
mInitialApplication = app;

// don't bring up providers in restricted mode; they may depend on the
// app's custom Application class
if (!data.restrictedBackupMode) {
if (!ArrayUtils.isEmpty(data.providers)) {
installContentProviders(app, data.providers);//加载进程对用package中携带的contentprovider
// For process that contains content providers, we want to
// ensure that the JIT is enabled "at some point".
mH.sendEmptyMessageDelayed(H.ENABLE_JIT, 10*1000);//通过JIT技术加速
}
}

......

try {
mInstrumentation.callApplicationOnCreate(app);//调用Application的onCreate方法完成一些初始化操作
} catch (Exception e) {
......
}
} finally {
StrictMode.setThreadPolicy(savedPolicy);
}
} 如上文所述,handleBindApplication方法的目的是让一个Java进程融入到Android体系中。因此该方法主要完成以下工作:1、按照Android的要求,完成对进程基本参数的设置,包括设置进程名、时区、资源及兼容性配置;同时也添加了一些限制,例如主线程不能访问网络等。
2、创建进程对应的ContextImpl、LoadedApk、Application等对象,同时加载Application中的Contentprovider,并初始化Application。
当完成上述工作后,新建的进程终于加入到了Android体系。
第三部分
下面我们接着看attachApplicationLocked方法的剩余部分,如下:// Remove this record from the list of starting applications.
mPersistentStartingProcesses.remove(app);//进程已经启动,从一些列表中移除对应的记录
......
mProcessesOnHold.remove(app);
boolean badApp = false;
boolean didSomething = false;
// See if the top visible activity is waiting to run in this process...
if (normalMode) {
try {
if (mStackSupervisor.attachApplicationLocked(app)) {//启动Activity
didSomething = true;
}
} catch (Exception e) {
Slog.wtf(TAG, "Exception thrown launching activities in " + app, e);
badApp = true;
}
}
// Find any services that should be running in this process...
if (!badApp) {
try {//启动 因目标进程还未启动,而处于等待状态的services
didSomething |= mServices.attachApplicationLocked(app, processName);
} catch (Exception e) {
Slog.wtf(TAG, "Exception thrown starting services in " + app, e);
badApp = true;
}
}
// Check if a next-broadcast receiver is in this process...
if (!badApp && isPendingBroadcastProcessLocked(pid)) {
try {//发送 因目标进程还未启动,而处于等待状态的Broadcast
didSomething |= sendPendingBroadcastsLocked(app);
} catch (Exception e) {
// If the app died trying to launch the receiver we declare it 'bad'
Slog.wtf(TAG, "Exception thrown dispatching broadcasts in " + app, e);
badApp = true;
}
}
// Check whether the next backup agent is in this process...
if (!badApp && mBackupTarget != null && mBackupTarget.appInfo.uid == app.uid) {
......
try {
thread.scheduleCreateBackupAgent(mBackupTarget.appInfo,
compatibilityInfoForPackageLocked(mBackupTarget.appInfo),
mBackupTarget.backupMode);//启动backup agent
} catch (Exception e) {
Slog.wtf(TAG, "Exception thrown creating backup agent in " + app, e);
badApp = true;
}
}
if (badApp) {//如果以上组件启动出错,杀死进程,并清空记录
app.kill("error during init", true);
handleAppDiedLocked(app, false, true);
return false;
}
if (!didSomething) {//如果以上没有启动任何组件,那么didSomething为false
updateOomAdjLocked();//调整进程的oom_adj优先级
}
return true;
} 这段代码的主要功能就是启动新建进程中运行的Activity、Services等。这里我们主要分析下Activity的启动过程。根据上面的代码,调用的就是ActivityStackSupervisor的attachApplicationLocked方法。
21. ActivityStackSupervisor.attachApplicationLocked
boolean attachApplicationLocked(ProcessRecord app) throws RemoteException {
final String processName = app.processName;
boolean didSomething = false;//ActivityStackSupervisor中维护着终端中所有Activity与task之间的关系,
for (int displayNdx = mActivityDisplays.size() - 1; displayNdx >= 0; --displayNdx) {//此轮循环找出前台栈顶端的待启动的Activity
ArrayList<ActivityStack> stacks = mActivityDisplays.valueAt(displayNdx).mStacks;
for (int stackNdx = stacks.size() - 1; stackNdx >= 0; --stackNdx) {
final ActivityStack stack = stacks.get(stackNdx);
if (!isFocusedStack(stack)) {
continue;
}
ActivityRecord hr = stack.topRunningActivityLocked();
if (hr != null) {
if (hr.app == null && app.uid == hr.info.applicationInfo.uid
&& processName.equals(hr.processName)) {//前台待启动的Activity与当前新建的进程一致时,启动Activity
try {
if (realStartActivityLocked(hr, app, true, true)) {//启动Activity
didSomething = true;
}
} catch (RemoteException e) {
......
}
}
}
}
}
......
return didSomething;
} 如果前台栈顶Activity对应的进程信息,与新启动的进程相互吻合时,该进程就需要启动该Activity。这就是为什么前面的分析中要花大力气先将待启动的Activity的Task移到前台,并且要将该Activity移到栈顶;毕竟,在创建新进程时,无法将待启动的Activity的信息一并传递给新进程(进程刚创建时,并没有加入到Android体系),因此新进程创建后,无法知道需要创建的Activity。22. ActivityStackSupervisor.realStartActivityLocked
final boolean realStartActivityLocked(ActivityRecord r, ProcessRecord app,
boolean andResume, boolean checkConfig) throws RemoteException {

if (!allPausedActivitiesComplete()) {//有处于pausing状态的Activity时,直到pauses完成再启动新的Activity
// While there are activities pausing we skipping starting any new activities until
// pauses are complete. NOTE: that we also do this for activities that are starting in
// the paused state because they will first be resumed then paused on the client side.
if (DEBUG_SWITCH || DEBUG_PAUSE || DEBUG_STATES) Slog.v(TAG_PAUSE,
"realStartActivityLocked: Skipping start of r=" + r
+ " some activities pausing...");
return false;
}

if (andResume) {
r.startFreezingScreenLocked(app, 0);//为显示做准备
mWindowManager.setAppVisibility(r.appToken, true);

// schedule launch ticks to collect information about slow apps.
r.startLaunchTickingLocked();//为启动比较慢的应用程序收集信息
}

......
if (checkConfig) {
Configuration config = mWindowManager.updateOrientationFromAppTokens(
mService.mConfiguration,
r.mayFreezeScreenLocked(app) ? r.appToken : null);
......
mService.updateConfigurationLocked(config, r, false, true /* deferResume */);//AMS更新绘制相关的配置信息
}

r.app = app;
app.waitingToKill = null;
r.launchCount++;
r.lastLaunchTime = SystemClock.uptimeMillis();

if (DEBUG_ALL) Slog.v(TAG, "Launching: " + r);

int idx = app.activities.indexOf(r);//将待启动的Activity对应的ActivityRecord加入到进程中
if (idx < 0) {
app.activities.add(r);
}
mService.updateLruProcessLocked(app, true, null);
mService.updateOomAdjLocked();//更新优先级

......

final ActivityStack stack = task.stack;
try {
......
List<ResultInfo> results = null;
List<ReferrerIntent> newIntents = null;
if (andResume) {
results = r.results;
newIntents = r.newIntents;
}
......

if (andResume) {
app.hasShownUi = true;
app.pendingUiClean = true;
}
app.forceProcessStateUpTo(mService.mTopProcessState);
app.thread.scheduleLaunchActivity(new Intent(r.intent), r.appToken,//通知应用进程启动Activity
System.identityHashCode(r), r.info, new Configuration(mService.mConfiguration),
new Configuration(task.mOverrideConfig), r.compat, r.launchedFromPackage,
task.voiceInteractor, app.repProcState, r.icicle, r.persistentState, results,
newIntents, !andResume, mService.isNextTransitionForward(), profilerInfo);

if ((app.info.privateFlags&ApplicationInfo.PRIVATE_FLAG_CANT_SAVE_STATE) != 0) {
......//heavy-weight进程的处理
}

} catch (RemoteException e) {
if (r.launchFailed) {//从代码看,第二次启动失败,才会将launchFailed设为true。
// This is the second time we failed -- finish activity
// and give up.
......
mService.appDiedLocked(app);
stack.requestFinishActivityLocked(r.appToken, Activity.RESULT_CANCELED, null,
"2nd-crash", false);
return false;
}

// This is the first time we failed -- restart process and
// retry.
app.activities.remove(r);
throw e;
}

r.launchFailed = false;
......

if (andResume) {
// As part of the process of launching, ActivityThread also performs
// a resume.Activity进入resume state后,更新相应的状态
stack.minimalResumeActivityLocked(r);
} else {
......
}

......
if (isFocusedStack(stack)) {
mService.startSetupActivityLocked();//启动系统设置向导对应的Activity,当系统更新或初次使用时需要配置
}

......
return true;
} 从上面的代码可以看出,realStartActivityLocked方法主要工作包括:1、 进一步配置ActivityRecord和ProcessRecord;
2、调用scheduleLaunchActivity方法,通知应用进程启动Activity;
3、在Activity启动后,AMS调用minimalResumeActivityLocked方法更新相应的状态。
这里我们只需要进一步看看scheduleLaunchActivity和minimalResumeActivityLocked这两个函数的流程。
23. ActivityThread.ApplicationThread.scheduleLaunchActivity
@Override
public final void scheduleLaunchActivity(Intent intent, IBinder token, int ident,
ActivityInfo info, Configuration curConfig, Configuration overrideConfig,
CompatibilityInfo compatInfo, String referrer, IVoiceInteractor voiceInteractor,
int procState, Bundle state, PersistableBundle persistentState,
List<ResultInfo> pendingResults, List<ReferrerIntent> pendingNewIntents,
boolean notResumed, boolean isForward, ProfilerInfo profilerInfo) {

updateProcessState(procState, false);//更新进程状态

ActivityClientRecord r = new ActivityClientRecord();//创建ActivityClientRecord对象,保存AMS传递过来的信息

r.token = token;
r.ident = ident;
r.intent = intent;
r.referrer = referrer;
r.voiceInteractor = voiceInteractor;
r.activityInfo = info;
r.compatInfo = compatInfo;
r.state = state;
r.persistentState = persistentState;

r.pendingResults = pendingResults;
r.pendingIntents = pendingNewIntents;

r.startsNotResumed = notResumed;
r.isForward = isForward;

r.profilerInfo = profilerInfo;

r.overrideConfig = overrideConfig;
updatePendingConfiguration(curConfig);//更新本地配置

sendMessage(H.LAUNCH_ACTIVITY, r);//发送消息,即ApplicationThread的工作实际就是与AMS通信;实际还是交给进程主线程ActivityThread处理
} 我们接着看下在ActivityThread中handler对该消息的处理,如下:public void handleMessage(Message msg) {
...............
switch (msg.what) {
case LAUNCH_ACTIVITY: {
..............
final ActivityClientRecord r = (ActivityClientRecord) msg.obj;
//利用ApplicationInfo等信息得到对应的LoadedApk,保存到ActivityClientRecord
r.packageInfo = getPackageInfoNoCheck(
r.activityInfo.applicationInfo, r.compatInfo);
//调用handleLaunchActivity
handleLaunchActivity(r, null, "LAUNCH_ACTIVITY");
..............
} break;
...........
}
.............
}下面继续read the fucking source code。
24. ActivityThread.handleLaunchActivity
private void handleLaunchActivity(ActivityClientRecord r, Intent customIntent, String reason) {
// 如果Activity从前台移到后台,则有可能进行gc操作;现在Activity重新启动,要取消gc操作;对于新建Activity而言,此处无实际动作
unscheduleGcIdler();
mSomeActivitiesChanged = true;

if (r.profilerInfo != null) {//Activity进行性能统计
mProfiler.setProfiler(r.profilerInfo);
mProfiler.startProfiling();
}

// 确保Activity以最新的配置启动,即保证Activity符合最新的语音、分辨率等要求
handleConfigurationChanged(null, null);

......

// Initialize before creating the activity
WindowManagerGlobal.initialize();

Activity a = performLaunchActivity(r, customIntent);//1、创建Activity

if (a != null) {
r.createdConfig = new Configuration(mConfiguration);
reportSizeConfigurations(r);
Bundle oldState = r.state;
handleResumeActivity(r.token, false, r.isForward,
!r.activity.mFinished && !r.startsNotResumed, r.lastProcessedSeq, reason);//2、调用Activity的onResume方法

if (!r.activity.mFinished && r.startsNotResumed) {
......
performPauseActivityIfNeeded(r, reason);//处理可见但并非前台的Activity,这种Activity启动后就进入pause状态

......
if (r.isPreHoneycomb()) {//只针对pre-Honeycomb应用
r.state = oldState;
}
}
} else {
// If there was an error, for any reason, tell the activity manager to stop us.
try {//如果启动出错,则通知AMS
ActivityManagerNative.getDefault()
.finishActivity(r.token, Activity.RESULT_CANCELED, null,
Activity.DONT_FINISH_TASK_WITH_ACTIVITY);
} catch (RemoteException ex) {
throw ex.rethrowFromSystemServer();
}
}
} 从上面代码可以看出,handleLaunchActivity()方法的主要工作包括:1、调用performLaunchActivity()方法创建出Activity;
2、调用handleResumeActivity()方法,完成调用目标Activity的onResume()方法等工作;
3、对于可见但非前台的Activity,还需要调用performPauseActivityIfNeeded()方法,调用Activity的onPause()接口。
我们主要看一下performLaunchActivity和handleResumeActivity函数。
25. ActivityThread.performLaunchActivity
private Activity performLaunchActivity(ActivityClientRecord r, Intent customIntent) {

......

Activity activity = null;
try {
java.lang.ClassLoader cl = r.packageInfo.getClassLoader();
activity = mInstrumentation.newActivity(
cl, component.getClassName(), r.intent);//反射创建Activity
......
} catch (Exception e) {
......
}

try {
Application app = r.packageInfo.makeApplication(false, mInstrumentation);

......

if (activity != null) {
......
//设置Activity的主要变量,例如mMainThread、mUiThread;
//mMainThread的类型为ActivityThread,mUiThread类型为Thread;两者实际的工作线程是同一个
activity.attach(appContext, this, getInstrumentation(), r.token,
r.ident, app, r.intent, r.activityInfo, title, r.parent,
r.embeddedID, r.lastNonConfigurationInstances, config,
r.referrer, r.voiceInteractor, window);
......
//进行主题的设置
int theme = r.activityInfo.getThemeResource();
if (theme != 0) {
activity.setTheme(theme);
}

activity.mCalled = false;//调用Activity的onCreate()方法
if (r.isPersistable()) {
mInstrumentation.callActivityOnCreate(activity, r.state, r.persistentState);
} else {
mInstrumentation.callActivityOnCreate(activity, r.state);
}
......
r.activity = activity;
r.stopped = true;
if (!r.activity.mFinished) {//调用Activity的onStart()方法
activity.performStart();
r.stopped = false;
}
if (!r.activity.mFinished) {//调用Activity的onRestoreInstanceState()方法
if (r.isPersistable()) {
if (r.state != null || r.persistentState != null) {
mInstrumentation.callActivityOnRestoreInstanceState(activity, r.state,
r.persistentState);
}
} else if (r.state != null) {
mInstrumentation.callActivityOnRestoreInstanceState(activity, r.state);
}
}
if (!r.activity.mFinished) {//调用Activity的onPostCreate()方法
activity.mCalled = false;
if (r.isPersistable()) {
mInstrumentation.callActivityOnPostCreate(activity, r.state,
r.persistentState);
} else {
mInstrumentation.callActivityOnPostCreate(activity, r.state);
}
......
}
}
r.paused = true;

mActivities.put(r.token, r);//将Activity保存在进程中

} catch (SuperNotCalledException e) {
......
} catch (Exception e) {
......
}

return activity;
} performLaunchActivity的功能比较直观,就是利用反射创建出目标Activity,然后设置Activity的内部变量,最后依次调用Activity生命周期中的接口,主要包括onCreate、onStart等。26. ActivityThread.handleResumeActivity
final void handleResumeActivity(IBinder token,
boolean clearHide, boolean isForward, boolean reallyResume, int seq, String reason) {
ActivityClientRecord r = mActivities.get(token);
......

// 主要是调用目标Activity的onResume()方法
r = performResumeActivity(token, clearHide, reason);

if (r != null) {
final Activity a = r.activity;

......//为绘制界面做准备
if (!r.activity.mFinished && willBeVisible
&& r.activity.mDecor != null && !r.hideForNow) {
......//进行绘制相关的工作
}

if (!r.onlyLocalRequest) {//可以看出ActivityThread以stack的方式保存完成onResume的Activity。r为刚刚完成onResume的Activity
r.nextIdle = mNewActivities;//mNewActivities保存已经完成onResume的Activity;新Activity的nextIdle指向旧的
mNewActivities = r;//然后将新建的Activity保存到mNewActivities中
......
Looper.myQueue().addIdleHandler(new Idler());//向ActivityThread的MessageQueue中增加一个IdleHandler
}
r.onlyLocalRequest = false;

// Tell the activity manager we have resumed.
if (reallyResume) {
try {
ActivityManagerNative.getDefault().activityResumed(token);//通知AMS进入Resumed状态;AMS会修改对应的存储信息;
} catch (RemoteException ex) {
......
}
}

} else {
......
}
}
从上面的代码可以看出,handleResumeActivity函数将会调用Activity的onResume接口,并进行绘制相关的操作,然后向Activity的MessageQueue中增加一个IdleHandler,最终通知AMS更新Activity的状态。
当MessagQueue的next函数被调用时,如果队列中没有message需要处理,那么将调用添加到MessageQueue的IdleHandler的queueIdle接口。handleResumeActivity函数向ActivityThread增加了一个IdleHandler,我们看看它的作用:
private class Idler implements MessageQueue.IdleHandler {
public final boolean queueIdle() {
ActivityClientRecord a = mNewActivities;
..................
if (a != null) {
mNewActivities = null;
IActivityManager am = ActivityManagerNative.getDefault();
ActivityClientRecord prev;
do {
............
if (a.activity != null && !a.activity.mFinished) {
try {
//调用AMS的activityIdle函数
am.activityIdle(a.token, a.createdConfig, stopProfiling);
a.createdConfig = null;
} catch (RemoteException ex) {
..............
}
//do-while循环将处理所有的已经完成onResume的Activity
prev = a;
a = a.nextIdle;
prev.nextIdle = null;
}
}while (a != null);
..........
}
.........
//返回值为false,于是执行一次后,会被移除
return false;
}
} 从上面的代码可以看出,当ActivityThread空闲下来后,将为所有完成onResume的Activity调用AMS的activityIdle函数。该函数是Activity成功创建并启动流程中的最后一步,我们稍后再分析。
至此,scheduleLaunchActivity函数分析完毕,我们看看realStartActivityLocked函数的下一个关键点minimalResumeActivityLocked。
27. ActivityStack.minimalResumeActivityLocked
minimalResumeActivityLocked定义于ActivityStack中。ActivityStack是Activity所在Task中,保存ActivityRecord的数据结构。 我们看看minimalResumeActivityLocked的代码:void minimalResumeActivityLocked(ActivityRecord r) {
r.state = ActivityState.RESUMED;
.............
mResumedActivity = r;
r.task.touchActiveTime();
//mRecentTasks保存近期被调用的Task
mRecentTasks.addLocked(r.task);
//更新一些状态
completeResumeLocked(r);
//判断AMS当前维护的Activity对应的进程是否可以sleep
//若可以sleep,将调用对应ApplicationThread的scheduleSleeping函数
mStackSupervisor.checkReadyForSleepLocked();
setLaunchTime(r);
............
} 上述代码中主要的工作由completeResumeLocked来完成:
/**
* Once we know that we have asked an application to put an activity in
* the resumed state (either by launching it or explicitly telling it),
* this function updates the rest of our state to match that fact.
*/
private void completeResumeLocked(ActivityRecord next) {
//更新ActivityRecord的变量
next.visible = true;
next.idle = false;
............
if (next.isHomeActivity()) {
//对Home Activity的特殊处理
..........
}
if (next.nowVisible) {
// We won't get a call to reportActivityVisibleLocked() so dismiss lockscreen now.
//如果已经visible将进行通知
mStackSupervisor.reportActivityVisibleLocked(next);
mStackSupervisor.notifyActivityDrawnForKeyguard();
}
// schedule an idle timeout in case the app doesn't do it for us.
//发送一个延迟消息IDLE_TIMEOUT_MSG,延迟时间为10s
//这里就是要求Activity启动后,10s内要调用AMS的activityIdle函数
//不过从代码来看,即使Activity 10s内没有调用activityIdle函数,
//ActivityStackSupervisor也会自己调用activityIdleInternalLocked函数
mStackSupervisor.scheduleIdleTimeoutLocked(next);
mStackSupervisor.reportResumedActivityLocked(next);
......................
} 从这部分代码,可以看出minimalResumeActivityLocked函数整体上就是负责更新一些状态。
下面,我们看一下Activity启动的最后一步,即调用AMS的activityIdle函数。
28. ActivityManagerService.activityIdle
public final void activityIdle(IBinder token, Configuration config, boolean stopProfiling) {................
synchronized (this) {
ActivityStack stack = ActivityRecord.getStackLocked(token);
if (stack != null) {
//主要调用ActivityStackSupervisor的activityIdleInternalLocked函数
ActivityRecord r =
mStackSupervisor.activityIdleInternalLocked(token, false, config);
.................
}
}
..............
} 跟进activityIdleInternalLocked函数:
29. ActivityStackSupervisor.activityIdleInternalLocked
//ActivityThread在超时时间内,调用activityIdle时,fromTimeout的值为false//如果超时后,由ActivityStackSupervisor主动调用该函数,fromTimeout的值为true
final ActivityRecord activityIdleInternalLocked(final IBinder token, boolean fromTimeout,
Configuration config) {
................
ActivityRecord r = ActivityRecord.forTokenLocked(token);
if (r != null) {
....................
mHandler.removeMessages(IDLE_TIMEOUT_MSG, r);
....................
if (fromTimeout) {
//超时时,将通知Activity完成启动
reportActivityLaunchedLocked(fromTimeout, r, -1, -1);
}
if (config != null) {
r.configuration = config;
}
r.idle = true;
................
}
//当所有Resumed Activity都处于空闲状态时
if (allResumedActivitiesIdle()) {
if (r != null) {
mService.scheduleAppGcsLocked();
}
//mLaunchingActivity是一个WakeLock,用于防止在操作Activity的过程中休眠
//由于该WakeLock不能长时间使用,因此系统设置了一个超时消息LAUNCH_TIMEOUT_MSG
//处理该消息时,将释放该WakeLock
//此处,当所有Activity均空闲时,说明事件处理完毕,此时需要释放该WakeLock
if (mLaunchingActivity.isHeld()) {
mHandler.removeMessages(LAUNCH_TIMEOUT_MSG);
...............
mLaunchingActivity.release();
}
ensureActivitiesVisibleLocked(null, 0, !PRESERVE_WINDOWS);
}
// Atomically retrieve all of the other things to do.
//processStoppingActivitiesLocked返回那些因本次Activity启动而被暂停(paused)的Activity
final ArrayList<ActivityRecord> stops = processStoppingActivitiesLocked(true);
NS = stops != null ? stops.size() : 0;
if ((NF = mFinishingActivities.size()) > 0) {
//finishes保存等待结束的Activity
finishes = new ArrayList<>(mFinishingActivities);
mFinishingActivities.clear();
}
.................
// Stop any activities that are scheduled to do so but have been
// waiting for the next one to start.
for (int i = 0; i < NS; i++) {
r = stops.get(i);
final ActivityStack stack = r.task.stack;
if (stack != null) {
if (r.finishing) {
//如果被暂停的Activity已经处于了finishing状态,则通知它们执行Destroy操作,即Activity的onDestroy函数将被调用
stack.finishCurrentActivityLocked(r, ActivityStack.FINISH_IMMEDIATELY, false);
} else {
//否则通知它们执行stop操作,即Activity的onStop将被调用
stack.stopActivityLocked(r);
}
}
}
// Finish any activities that are scheduled to do so but have been
// waiting for the next one to start.
// 处理等待结束的Activity,从代码来看最终也是调用其onDestroy接口
for (int i = 0; i < NF; i++) {
r = finishes.get(i);
final ActivityStack stack = r.task.stack;
if (stack != null) {
activityRemoved |= stack.destroyActivityLocked(r, true, "finish-idle");
}
}
................
//AMS清理没有任何组建的无用进程
mService.trimApplications();
if (activityRemoved) {
//如果等待结束的Activity被处理,保证前台栈顶Activity处于Resumed状态
resumeFocusedStackTopActivityLocked();
}
return r;
} 至此,启动Activity最后一部分的主要工作介绍完毕。从代码来看,这一部分最主要的工作是:进行一些扫尾工作,即根据后台Activity是否处于finishing状态,分别调用其onStop和onDestroy接口。同时,AMS也会清理一些无实际工作的进程。我们看下Activity在ActivityThread后的处理流程图:
至此,AMS启动Activity的后一部分基本介绍完毕。这一部分的代码整体流程如上图所示,我们省略一些细节,例如绘制等。
从整个逻辑来看,这部分流程比较清晰,主要思想如下:
1、启动进程,创建自己的ActivityThread和ApplicationThread。
2、进程与AMS通信,其实就是完成一个注册过程(将ApplicationThread作为Binder通信接口交给AMS保存),AMS毕竟要统一管理系统中所有的应用进程。
3、AMS通知进程创建自己的Android运行环境,加入到Android体系。
4、AMS通知进程可以启动进程中的组件了,注意四大组件的顺序以此是ContentProvider、Activity、Service、BroadcastReceiver(本文我们仅分析了Activity的启动过程)。
5、Activity启动完成后,通知AMS更新相关的状态,并进行一些扫尾工作。
整体而言,所有的实际工作都是由进程自己完成的,AMS仅起到一个管理的作用。

相关文章推荐
- Android应用程序组件Content Provider的启动过程源代码分析
- Android应用程序组件Content Provider的启动过程源代码分析(3)
- Android应用程序组件Content Provider的启动过程源代码分析(4)
- Android应用程序组件Content Provider的启动过程源代码分析(5)
- Android程序入口ActivityThread和Android应用程序启动流程详解
- Android应用程序组件Content Provider的启动过程源代码分析(6)
- Android 输入管理服务启动过程的流程
- Android应用程序组件Content Provider的启动过程源代码分析(7)
- Android深入四大组件(一)应用程序启动过程
- Android 儿子Activity在启动过程中的流程组件 && 儿子Activity在一个新的进程组件启动过程
- Android应用程序组件Content Provider的启动过程源代码分析
- Android窗口管理服务WindowManagerService显示Activity组件的启动窗口(Starting Window)的过程分析
- android启动一个应用程序大概流程
- Android窗口管理服务WindowManagerService显示Activity组件的启动窗口(Starting Window)的过程分析
- Android程序包管理机制解析和PMS启动流程分析
- Android应用程序组件Content Provider的启动过程源代码分析
- Android应用程序从Launcher启动流程
- Android Launcher启动应用程序流程源码解析
- android四大组件启动流程-BroadcastReceiver启动流程(基于android 6.0)
- Android窗口管理服务WindowManagerService显示Activity组件的启动窗口(Starting Window)的过程分析