在iOS上实现YOLO目标检测算法
2018-01-01 23:37
621 查看
本文主要介绍YOLOv2在iOS手机端的实现
Paper:https://arxiv.org/abs/1612.08242
Github:https://github.com/pjreddie/darknet
Website:https://pjreddie.com/darknet/yolo
125来自5x(5+20),表示每一个cell中预测5个bounding boxes(表示5个anchor),每一个bounding boxes有x,y,w,h, confidence score(该框是目标的概率),20个类的概率(PASCAL VOC数据集共有20类)。
anchor的值是通过在训练集的框上用k-means聚类算法获得。这里用k-means计算距离时不是用的欧式距离,而是如下的IOU得分。
整个网络只有九层 convolution,注意该inference网络已经去掉了BN层。另外,最后一层maxpooling没有改变feature map的尺寸,所以该maxpooling的stride为1。
采用Metal搭建YOLO网络的代码如下:
通过网络得到13x13x125的feature map后需要把它转换为对应的5个bounding boxes,转换方式如下:
转换的代码实现如下:
转换为bounding boxes之后框共有13x13x5个,这里面很多框都不对,此时需要通过
NMS的实现代码如下
完整的实现代码:https://github.com/Revo-Future/YOLO-iOS
Reference:
http://blog.csdn.net/hrsstudy/article/details/71173305?utm_source=itdadao&utm_medium=referral
Paper:https://arxiv.org/abs/1612.08242
Github:https://github.com/pjreddie/darknet
Website:https://pjreddie.com/darknet/yolo
YOLOv2简介
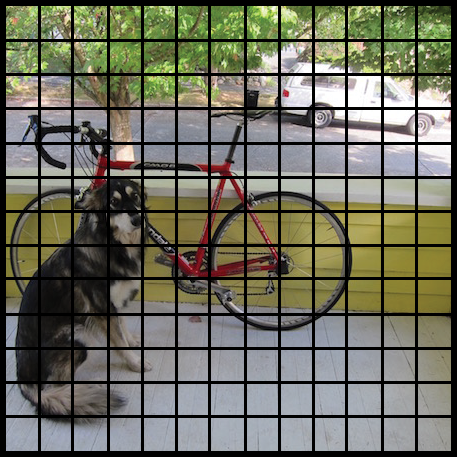
yolov2的输入为416x416,然后通过一些列的卷积、BN、Pooling操作最后到13x13x125的feature map大小。其中13x13对应原图的13x13网格,如下图所示。125来自5x(5+20),表示每一个cell中预测5个bounding boxes(表示5个anchor),每一个bounding boxes有x,y,w,h, confidence score(该框是目标的概率),20个类的概率(PASCAL VOC数据集共有20类)。
anchor的值是通过在训练集的框上用k-means聚类算法获得。这里用k-means计算距离时不是用的欧式距离,而是如下的IOU得分。
d(box, centroid) = 1 - IOU(box, centroid)
在iOS上怎么实现?
由于在手机上运行需要考虑模型大小和速度问题,所以我们选择使用tiny yolo。网络结构如下:Layer kernel stride output shape --------------------------------------------- Input (416, 416, 3) Convolution 3×3 1 (416, 416, 16) MaxPooling 2×2 2 (208, 208, 16) Convolution 3×3 1 (208, 208, 32) MaxPooling 2×2 2 (104, 104, 32) Convolution 3×3 1 (104, 104, 64) MaxPooling 2×2 2 (52, 52, 64) Convolution 3×3 1 (52, 52, 128) MaxPooling 2×2 2 (26, 26, 128) Convolution 3×3 1 (26, 26, 256) MaxPooling 2×2 2 (13, 13, 256) Convolution 3×3 1 (13, 13, 512) MaxPooling 2×2 1 (13, 13, 512) Convolution 3×3 1 (13, 13, 1024) Convolution 3×3 1 (13, 13, 1024) Convolution 1×1 1 (13, 13, 125) ---------------------------------------------
整个网络只有九层 convolution,注意该inference网络已经去掉了BN层。另外,最后一层maxpooling没有改变feature map的尺寸,所以该maxpooling的stride为1。
采用Metal搭建YOLO网络的代码如下:
public init(device: MTLDevice) {
print("Setting up neural network...")
let startTime = CACurrentMediaTime()

self.device = device
commandQueue = device.makeCommandQueue()

conv9_img = MPSImage(device: device, imageDescriptor: conv9_id) //save the result

lanczos = MPSImageLanczosScale(device: device)

let relu = MPSCNNNeuronReLU(device: device, a: 0.1)

conv1 = SlimMPSCNNConvolution(kernelWidth: 3,
kernelHeight: 3,
inputFeatureChannels: 3,
outputFeatureChannels: 16,
neuronFilter: relu,
device: device,
kernelParamsBinaryName: "conv1",
padding: true,
strideXY: (1,1))
maxpooling1 = MPSCNNPoolingMax(device: device, kernelWidth: 2, kernelHeight: 2, strideInPixelsX: 2, strideInPixelsY: 2)
conv2 = SlimMPSCNNConvolution(kernelWidth: 3,
kernelHeight: 3,
inputFeatureChannels: 16,
outputFeatureChannels: 32,
neuronFilter: relu,
device: device,
kernelParamsBinaryName: "conv2",
padding: true,
strideXY: (1,1))
maxpooling2 = MPSCNNPoolingMax(device: device, kernelWidth: 2, kernelHeight: 2, strideInPixelsX: 2, strideInPixelsY: 2)
conv3 = SlimMPSCNNConvolution(kernelWidth: 3,
kernelHeight: 3,
inputFeatureChannels: 32,
outputFeatureChannels: 64,
neuronFilter: relu,
device: device,
kernelParamsBinaryName: "conv3",
padding: true,
strideXY: (1,1))
maxpooling3 = MPSCNNPoolingMax(device: device, kernelWidth: 2, kernelHeight: 2, strideInPixelsX: 2, strideInPixelsY: 2)
conv4 = SlimMPSCNNConvolution(kernelWidth: 3,
kernelHeight: 3,
inputFeatureChannels: 64,
outputFeatureChannels: 128,
neuronFilter: relu,
device: device,
kernelParamsBinaryName: "conv4",
padding: true,
strideXY: (1,1))
maxpooling4 = MPSCNNPoolingMax(device: device, kernelWidth: 2, kernelHeight: 2, strideInPixelsX: 2, strideInPixelsY: 2)
conv5 = SlimMPSCNNConvolution(kernelWidth: 3,
kernelHeight: 3,
inputFeatureChannels: 128,
outputFeatureChannels: 256,
neuronFilter: relu,
device: device,
kernelParamsBinaryName: "conv5",
padding: true,
strideXY: (1,1))
maxpooling5 = MPSCNNPoolingMax(device: device, kernelWidth: 2, kernelHeight: 2, strideInPixelsX: 2, strideInPixelsY: 2)
conv6 = SlimMPSCNNConvolution(kernelWidth: 3,
kernelHeight: 3,
inputFeatureChannels: 256,
outputFeatureChannels: 512,
neuronFilter: relu,
device: device,
kernelParamsBinaryName: "conv6",
padding: true,
strideXY: (1,1))
maxpooling6 = MPSCNNPoolingMax(device: device, kernelWidth: 2, kernelHeight: 2, strideInPixelsX: 1, strideInPixelsY: 1)
//offset setting is necessary to make sure 13x13->13x13 after pooling
maxpooling6.offset = MPSOffset(x: 2, y: 2, z: 0)
maxpooling6.edgeMode = MPSImageEdgeMode.clamp
conv7 = SlimMPSCNNConvolution(kernelWidth: 3,
kernelHeight: 3,
inputFeatureChannels: 512,
outputFeatureChannels: 1024,
neuronFilter: relu,
device: device,
kernelParamsBinaryName: "conv7",
padding: true,
strideXY: (1,1))
conv8 = SlimMPSCNNConvolution(kernelWidth: 3,
kernelHeight: 3,
inputFeatureChannels: 1024,
outputFeatureChannels: 1024,
neuronFilter: relu,
device: device,
kernelParamsBinaryName: "conv8",
padding: true,
strideXY: (1,1))
conv9 = SlimMPSCNNConvolution(kernelWidth: 1,
kernelHeight: 1,
inputFeatureChannels: 1024,
outputFeatureChannels: 125,
neuronFilter: nil,
device: device,
kernelParamsBinaryName: "conv9",
padding: false,
strideXY: (1,1))

let endTime = CACurrentMediaTime()
print("Elapsed time: \(endTime - startTime) sec")
}
通过网络得到13x13x125的feature map后需要把它转换为对应的5个bounding boxes,转换方式如下:
转换的代码实现如下:
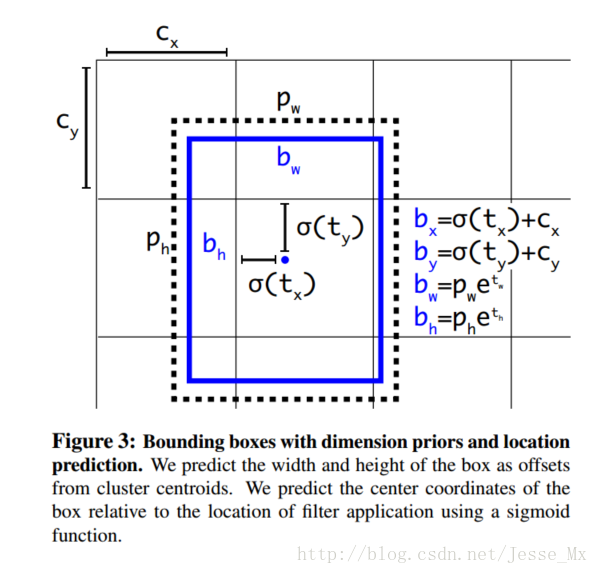
// The predicted tx and ty coordinates are relative to the location
// of the grid cell; we use the logistic sigmoid to constrain these
// coordinates to the range 0 - 1. Then we add the cell coordinates
// (0-12) and multiply by the number of pixels per grid cell (32).
// Now x and y represent center of the bounding box in the original
// 416x416 image space.
let x = (Float(cx) + Math.sigmoid(tx)) * blockSize
let y = (Float(cy) + Math.sigmoid(ty)) * blockSize

// The size of the bounding box, tw and th, is predicted relative to
// the size of an "anchor" box. Here we also transform the width and
// height into the original 416x416 image space.
let w = exp(tw) * anchors[2*b    ] * blockSize
let h = exp(th) * anchors[2*b + 1] * blockSize

// The confidence value for the bounding box is given by tc. We use
// the logistic sigmoid to turn this into a percentage.
let confidence = Math.sigmoid(tc)
转换为bounding boxes之后框共有13x13x5个,这里面很多框都不对,此时需要通过
bestClassScore * confidence>0.3来过滤无用的框。过滤之后还是会有很多满足条件的框,所有最后还需要通过非极大值抑制算法来去除冗余的框。
NMS的实现代码如下
/**
Removes bounding boxes that overlap too much with other boxes that have
a higher score.

Based on code from https://github.com/tensorflow/tensorflow/blob/master/tensorflow/core/kernels/non_max_suppression_op.cc
- Parameters:
- boxes: an array of bounding boxes and their scores
- limit: the maximum number of boxes that will be selected
- threshold: used to decide whether boxes overlap too much
*/
func nonMaxSuppression(boxes: [YOLO.Prediction], limit: Int, threshold: Float) -> [YOLO.Prediction] {

// Do an argsort on the confidence scores, from high to low.
let sortedIndices = boxes.indices.sorted { boxes[$0].score > boxes[$1].score }

var selected: [YOLO.Prediction] = []
var active = [Bool](repeating: true, count: boxes.count)
var numActive = active.count

// The algorithm is simple: Start with the box that has the highest score.
// Remove any remaining boxes that overlap it more than the given threshold
// amount. If there are any boxes left (i.e. these did not overlap with any
// previous boxes), then repeat this procedure, until no more boxes remain
// or the limit has been reached.
outer: for i in 0..<boxes.count {
if active[i] {
let boxA = boxes[sortedIndices[i]]
selected.append(boxA)
if selected.count >= limit { break }

for j in i+1..<boxes.count {
if active[j] {
let boxB = boxes[sortedIndices[j]]
if IOU(a: boxA.rect, b: boxB.rect) > threshold {
active[j] = false
numActive -= 1
if numActive <= 0 { break outer }
}
}
}
}
}
return selected
}
完整的实现代码:https://github.com/Revo-Future/YOLO-iOS
Reference:
http://blog.csdn.net/hrsstudy/article/details/71173305?utm_source=itdadao&utm_medium=referral

相关文章推荐
- 基于Opencv的目标检测与跟踪阴影去除算法实现
- 深度学习在 iOS 上的实践 —— 通过 YOLO 在 iOS 上实现实时物体检测
- OpenCV中feature2D学习——SIFT和SURF算法实现目标检测
- 【OpenCV学习笔记 019】SIFT和SURF算法实现目标检测
- 基于深度学习的目标检测算法:YOLO
- 目标检测算法(二)——具体原理以及实现
- 实战小项目之基于yolo的目标检测web api实现
- 目标检测算法:RCNN、YOLO vs DPM
- YOLO——基于回归的目标检测算法
- 利用SURF特征检测和FLANN最近邻算法实现图像的目标提取
- TX2实现yolov2(目标检测,计数,训练自己的数据集)
- OpenCV中feature2D学习——SIFT和SURF算法实现目标检测
- 记录实战小项目之基于yolo的目标检测web api实现
- VIBE运动目标检测算法实现
- 目标检测之YOLO算法
- 一文详解 YOLO 2 与 YOLO 9000 目标检测系统
- 基于粒子滤波器的目标跟踪算法及实现
- 运动目标检测跟踪各过程算法综述
- <轻量算法>根据核密度估计检测波峰算法 ---基于有限状态自动机和递归实现
- 目标检测方法系列:R-CNN, SPP, Fast R-CNN, Faster R-CNN, YOLO, SSD