1、微信小程序学习:基本控件的使用
2017-12-27 10:48
465 查看
最近公司app客户端没有新的需求了,接下来的工作任务是学习微信小程序的开发,先从最基本的控件开始学习。
wxss文件中的代码:
wxss文件中的代码:
js文件中的代码:
系统提供了一些常用的图标,我们可以自己设置图标的颜色和尺寸,也可以设置图标的类型,可选类型有以下几种:

(2)按钮添加点击事件

控制台输出结果:

一、视图容器
1、view的使用
wxml文件中的代码://创建一个view,class='style'是引用wxss文件中的样式 <view class='style'>Hello World</view>
wxss文件中的代码:
/**view的样式布局
* background-color:背景颜色
* text-align:文字对齐方式
* color:文字的颜色
* font-size:文字字体大小
* width:控件的宽度
* height:控件的高度
*/
.style {
background-color:#0000ff;
text-align: center;
color: #ff0000;
font-size: 20px;
width: 200px;
height: 100px;
}
2、scroll-view的使用
wxml文件中的代码://创建一个scroll-view,class='style'是引用wxss文件中的样式 <scroll-view class='style'>scroll-view</scroll-view>
wxss文件中的代码:
/**scroll-view的样式布局
* background-color:背景颜色
* text-align:文字对齐方式
* color:文字的颜色
* font-size:文字字体大小
* height:控件的高度
*/
.style {
background-color:#0000ff;
text-align: center;
color: #ff0000;
font-size: 20px;
height:500px;
}
3、swiper(滑块视图容器)的使用
wxml文件中的代码:<swiper indicator-dots="{{indicatorDots}}"
autoplay="{{autoplay}}" interval="{{interval}}" duration="{{duration}}">
<block wx:for="{{imgUrls}}">
<swiper-item>
<image src="{{item}}" class="slide-image" width="355" height="150"/>
</swiper-item>
</block>
</swiper>js文件中的代码:
Page({
data: {
imgUrls: [
'http://img02.tooopen.com/images/20150928/tooopen_sy_143912755726.jpg',
'http://img06.tooopen.com/images/20160818/tooopen_sy_175866434296.jpg',
'http://img06.tooopen.com/images/20160818/tooopen_sy_175833047715.jpg'
],
indicatorDots: true,
autoplay: true,
interval: 3000,
duration: 500
}
})
二、基础内容
1、icon的使用
wxml文件中的代码:<icon type='success' size='40' color='red'></icon>
系统提供了一些常用的图标,我们可以自己设置图标的颜色和尺寸,也可以设置图标的类型,可选类型有以下几种:
'success',
'success_no_circle',
'info',
'warn',
'waiting',
'cancel',
'download',
'search',
'clear'
2、text的使用
wxml文件中的代码:<text>text</text>
3、rich-text(富文本)的使用
wxml文件中的代码:<rich-text>tich-text</rich-text>
3、progress(进度条)的使用
wxml文件中的代码:/** *percent:百分比 *show-info:在进度条右侧显示百分比 *active:进度条从左往右的动画 */ <progress percent="20" show-info active />
二、表单组件
1、button的使用
(1)创建按钮/** wxss **/ //button默认的类型是default,系统还提供了另外两种类型:type="primary"和type="warn" <button type='default'>按钮</button>
(2)按钮添加点击事件
/** wxss **/
<button type='primary' bindtap="setLoading" loading="{{loading}}">按钮</button>
/** js **/
setLoading: function (e) {
this.setData({
loading: !this.data.loading
})
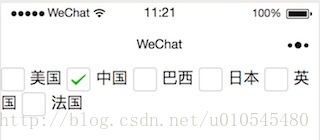
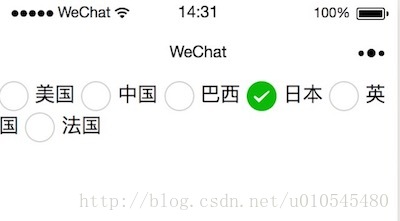
}2、checkbox的使用
/** wxss **/
<checkbox-group bindchange="checkboxChange">
<label class="checkbox" wx:for="{{items}}">
<checkbox value="{{item.name}}" checked="{{item.checked}}"/>{{item.value}}
</label>
</checkbox-group>
/**js **/
Page({
data: {
items: [
{ name: 'USA', value: '美国' },
{ name: 'CHN', value: '中国', checked: 'true' },
{ name: 'BRA', value: '巴西' },
{ name: 'JPN', value: '日本' },
{ name: 'ENG', value: '英国' },
{ name: 'TUR', value: '法国' },
]
},
checkboxChange: function (e) {
console.log('checkbox发生change事件,携带value值为:', e.detail.value)
}
})3、form(表单)的使用
/** wxss **/
<form bindsubmit="formSubmit" bindreset="formReset">
<checkbox-group name="checkbox">
<label><checkbox value="checkbox1"/>checkbox1</label>
<label><checkbox value="checkbox2"/>checkbox2</label>
</checkbox-group>

<button formType="submit">Submit</button>
<button formType="reset">Reset</button>
</form>
控制台输出结果:
4、input(输入框)的使用
/** wxss **/
<input placeholder="请输入账号">输入框</input>
5、label(文本框)的使用
/** wxss **/
<label>我是label</label>
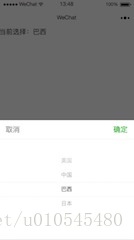
6、pikcer(选择器)的使用
/** wxss **/
<picker bindchange="bindPickerChange" value="{{index}}" range="{{array}}">
<view class="picker">
当前选择:{{array[index]}}
</view>
</picker>
/** js **/
Page({
data: {
array: ['美国', '中国', '巴西', '日本'],
index: 0,
},
bindPickerChange: function (e) {
console.log('picker发送选择改变,携带值为', e.detail.value)
this.setData({
index: e.detail.value
})
}
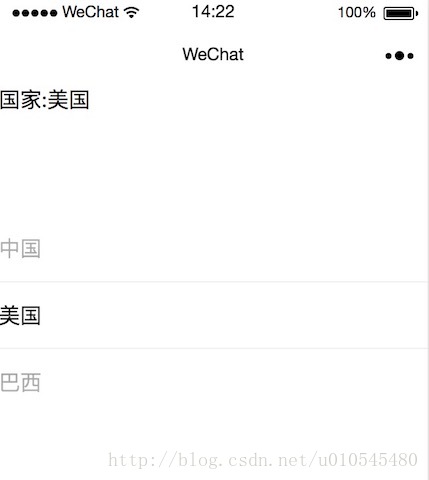
})7、pikcer-view(嵌入页面的滚动选择器)的使用
pikcer是弹出式的选择器,picker-view是直接嵌在页面上面的选择器/** wxss **/
<view>
<view>国家:{{country}}</view>
<picker-view indicator-style="height: 50px;" style="width: 100%; height: 300px;" value="{{value}}" bindchange="bindChange">
<picker-view-column>
<view wx:for="{{arr}}" style="line-height: 50px">{{item}}</view>
</picker-view-column>
</picker-view>
</view>/** js **/
Page({
data: {
arr:["中国","美国","巴西"]
},
bindChange: function (e) {
const val = e.detail.value
this.setData({
country: this.data.arr[val[0]],
})
}
})8、radio(单项选择器)的使用
/** wxss **/
<radio-group class="radio-group" bindchange="radioChange">
<label class="radio" wx:for="{{items}}">
<radio value="{{item.name}}" checked="{{item.checked}}"/>{{item.value}}
</label>
</radio-group>
/** js **/
Page({
data: {
items: [
{ name: 'USA', value: '美国' },
{ name: 'CHN', value: '中国', checked: 'true' },
{ name: 'BRA', value: '巴西' },
{ name: 'JPN', value: '日本' },
{ name: 'ENG', value: '英国' },
{ name: 'TUR', value: '法国' },
]
},
radioChange: function (e) {
console.log('radio发生change事件,携带value值为:', e.detail.value)
}
})9、slider(滑动选择器)的使用
/** wxss **/
<slider bindchange="slider2change" step="5"/>
10、slider(滑动选择器)的使用
/** wxss **/
<slider bindchange="slider2change" step="5"/>
9、slider(滑动选择器)的使用
/** wxss **/
<slider bindchange="slider2change" step="5"/>
11、switch(开关选择器)的使用
/** wxss **/
Page({
switch1Change: function (e) {
console.log('switch1 发生 change 事件,携带值为', e.detail.value)
},
switch2Change: function (e) {
console.log('switch2 发生 change 事件,携带值为', e.detail.value)
}
})
/** js **/
Page({
switch1Change: function (e) {
console.log('switch1 发生 change 事件,携带值为', e.detail.value)
},
switch2Change: function (e) {
console.log('switch2 发生 change 事件,携带值为', e.detail.value)
}
})12、textarea(多行输入框)的使用
/** wxss **/
<textarea bindblur="bindTextAreaBlur" auto-height placeholder="请输入内容" />
三、导航
小程序的导航栏样式在app.json中定义{
"pages":[
"pages/index/index",
"pages/logs/logs"
],
"window":{
"backgroundTextStyle":"light",
"navigationBarBackgroundColor": "#000000",
"navigationBarTitleText": "导航条",
"navigationBarTextStyle":"white"
}
}| 属性 | 类型 | 默认值 | 说明 |
|---|---|---|---|
| backgroundTextStyle | String | dark | 下拉背景字体、loading 图的样式,仅支持 dark/light |
| navigationBarBackgroundColor | HexColor | 000000 导航栏背景颜色,如”#000000” | |
| navigationBarTitleText | String | 导航栏标题 | |
| navigationBarTextStyle | String | white | 导航栏标题颜色,仅支持 black/white |
四、媒体组件
1、image(图片)的使用
/** wxss **/
<image style="width: 200px; height: 200px; background-color: #eeeeee;" src="{{src}}"></image>
/** js **/
Page({
data: {
src: 'https://mp.weixin.qq.com/debug/wxadoc/dev/image/cat/0.jpg?t=20171227'
}
})2、camera(相机)的使用
/** wxss **/
<camera device-position="back" flash="off" binderror="error" style="width: 100%; height: 300px;"></camera>
<button type="primary" bindtap="takePhoto">拍照</button>
<view>预览</view>
<image mode="widthFix" src="{{src}}"></image>
/** js **/
Page({
takePhoto() {
const ctx = wx.createCameraContext()
ctx.takePhoto({
quality: 'high',
success: (res) => {
this.setData({
src: res.tempImagePath
})
}
})
},
error(e) {
console.log(e.detail)
}
})

相关文章推荐
- 微信小程序学习2.js基本使用之block回调函数使用
- 微信小程序学习2.js基本使用之数据绑定
- IOS学习笔记(七)之UISegmentedControl分段控件的基本概念和使用方法
- 学习使用bootstrap基本控件(table、form、button)
- 微信小程序-UI控件的使用(3)
- (一)关于SWT程序的基本架构,如何使用控件以及使用Image,Font,Color等图形资源内容
- IOS学习笔记(七)之UISegmentedControl分段控件的基本概念和使用方法
- 微信小程序-UI控件的使用(6)
- 微信小程序中自定义函数的学习使用
- 微信小程序-UI控件的使用(1)
- 微信小程序中使用scroll-view控件实现上拉加载更多遇到的坑
- 3、微信小程序学习:加减控件
- Silverlight Telerik控件学习:TreeView数据绑定并初始化选中状态、PanelBar的Accordion效果、TabPanel、Frame基本使用
- 学习笔记_微信小程序开发--组建Swiper的使用
- 微信小程序-UI控件的使用(4)
- 微信小程序学习:使用picker封装省市区三级联动模板
- iPhone学习第一天,iphoen基本控件的使用
- PJSIP学习笔记——从simple_pjsua.c示例程序了解PJSUA-LIB的基本使用流程
- android学习五(android中基本控件的使用)
- 微信小程序-UI控件的使用(5)