Shiro之多Realm的认证及认证策略-yellowcong
2017-12-17 21:19
417 查看
多重认证是操作的是多个Realm。第一种方式是,在ModularRealmAuthenticator里面可以配置多个Reamls,默认的验证策略是,至少一个满足即可(AtLeastOneSuccessfulStrategy)。建议将多Realm配置在DefaultWebSecurityManager ,将验证策略和Reaml分开来管理,也就是下面,多重认证的第二种方式
源码下载地址
https://gitee.com/yellowcong/shior-dmeo/tree/master/test多重认证
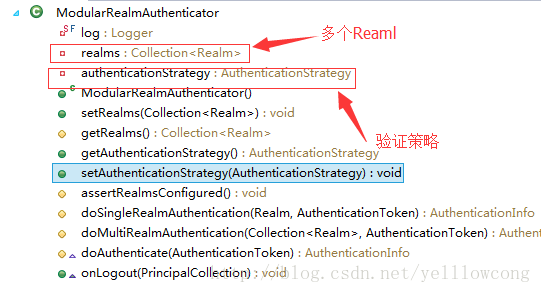
多重认证,主要的类是ModularRealmAuthenticator,他有两个需要配置的属性,一个是Collection(用于存储Realm),另一个是AuthenticationStrategy(用于存储验证的策略 )第一种方式:配置在ModularRealmAuthenticator
下面这段代码中,我配置了两个Reamls,第一个使用的是MD5码表,第二个是 SHA1的加密,验证的策略是两个都必须满足才可以让你登录<!-- 安全管理器 --> <bean id="securityManager" class="org.apache.shiro.web.mgt.DefaultWebSecurityManager"> <!-- 缓存管理器 --> <property name="cacheManager" ref="cacheManager" /> <!-- 验证 --> <property name="authenticator" ref="authenticator"/> </bean> <!-- 配置多个 realm --> <bean id="authenticator" class="org.apache.shiro.authc.pam.ModularRealmAuthenticator"> <property name="authenticationStrategy" > <bean class="org.apache.shiro.authc.pam.AllSuccessfulStrategy"/> </property> <!-- 多个验证策略 realmes --> <property name="realms"> <list> <!-- 这个认证,有一个先后的顺序 --> <ref bean="sampleRealm1"/> <ref bean="sampleRealm2"/> </list> </property> </bean> <!-- 授权 认证 ,自己定义的,领域(Realm),shiro需要配置一个领域(Realm),以便我们可以访问用户--> <bean id="sampleRealm1" class=" com.yellowcong.shior.realm.SampleRealm" > <!-- 如果不加入密码匹配的操作,密码就不会存在 --> <!-- 加入了密码匹配器之后,就会默认将前台传递过来的密码自动MD5加密 --> <property name="credentialsMatcher"> <bean class="org.apache.shiro.authc.credential.HashedCredentialsMatcher"> <!-- 加密的方式 --> <constructor-arg index="0" type="java.lang.String" value="MD5" /> <!-- 加密的次数,默认是1次 --> <property name="hashIterations" value="1"/> </bean> </property> </bean>
第二种方式:配置在DefaultWebSecurityManager
建议这一种策略,因为这种将授权策略和资源Realm分开了<!-- 安全管理器 --> <bean id="securityManager" class="org.apache.shiro.web.mgt.DefaultWebSecurityManager"> <!-- 缓存管理器 --> <property name="cacheManager" ref="cacheManager" /> <!-- 验证 --> <property name="authenticator" ref="authenticator"/> <!-- 多个验证策略 realmes --> <property name="realms"> <list> <!-- 这个认证,有一个先后的顺序 --> <ref bean="sampleRealm1"/> <ref bean="sampleRealm2"/> </list> </property> </bean> <!-- 授权策略 --> <bean id="authenticator" class="org.apache.shiro.authc.pam.ModularRealmAuthenticator"> <property name="authenticationStrategy" > <bean class="org.apache.shiro.authc.pam.AllSuccessfulStrategy"/> </property> </bean> <!-- 授权 认证 ,自己定义的,领域(Realm),shiro需要配置一个领域(Realm),以便我们可以访问用户--> <bean id="sampleRealm1" class=" com.yellowcong.shior.realm.SampleRealm" > <!-- 如果不加入密码匹配的操作,密码就不会存在 --> <!-- 加入了密码匹配器之后,就会默认将前台传递过来的密码自动MD5加密 --> <property name="credentialsMatcher"> <bean class="org.apache.shiro.authc.credential.HashedCredentialsMatcher"> <!-- 加密的方式 --> <constructor-arg index="0" type="java.lang.String" value="MD5" /> <!-- 加密的次数,默认是1次 --> <property name="hashIterations" value="1"/> </bean> </property> </bean> <!-- 授权 认证 ,自己定义的,领域(Realm),shiro需要配置一个领域(Realm),以便我们可以访问用户--> <bean id="sampleRealm2" class=" com.yellowcong.shior.realm.SampleRealm2" > <!-- 如果不加入密码匹配的操作,密码就不会存在 --> <!-- 加入了密码匹配器之后,就会默认将前台传递过来的密码自动SHA1加密 --> <property name="credentialsMatcher"> <bean class="org.apache.shiro.authc.credential.HashedCredentialsMatcher"> <!-- 加密的方式 --> <constructor-arg index="0" type="java.lang.String" value="SHA1" /> <!-- 加密的次数,默认是1次 --> <property name="hashIterations" value="1"/> </bean> </property> </bean>
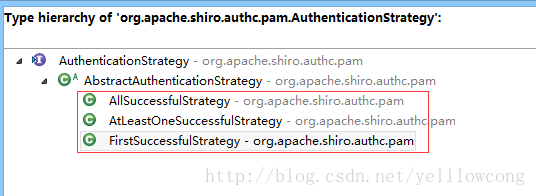
验证策略
在ModularRealmAuthenticator 中,多重验证中,默认的验证策略是AtLeastOneSuccessfulStrategy| 策略 | 意义 |
|---|---|
| AllSuccessfulStrategy | 所有都满足的情况 |
| AtLeastOneSuccessfulStrategy | 至少一条满足的情况 |
| FirstSuccessfulStrategy | 第一条满足的情况 |
代码
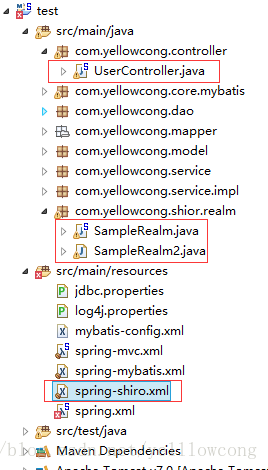
下面这两个验证器没啥太大差别,就是加盐和 加密方式不一样,在实际项目中,可能设置多个密钥,进行多重验证项目结构
spring-shiro.xml
<?xml version="1.0" encoding="UTF-8"?>
<beans xmlns="http://www.springframework.org/schema/beans"
xmlns:xsi="http://www.w3.org/2001/XMLSchema-instance" xmlns:aop="http://www.springframework.org/schema/aop"
xmlns:tx="http://www.springframework.org/schema/tx" xmlns:util="http://www.springframework.org/schema/util"
xmlns:context="http://www.springframework.org/schema/context"
xsi:schemaLocation=" http://www.springframework.org/schema/beans http://www.springframework.org/schema/beans/spring-beans.xsd http://www.springframework.org/schema/tx http://www.springframework.org/schema/tx/spring-tx.xsd http://www.springframework.org/schema/aop http://www.springframework.org/schema/aop/spring-aop.xsd http://www.springframework.org/schema/util http://www.springframework.org/schema/util/spring-util.xsd http://www.springframework.org/schema/context http://www.springframework.org/schema/context/spring-context.xsd">
<description>== Shiro Components ==</description>
<!-- 会话Session ID生成器 -->
<bean id="sessionIdGenerator" class="org.apache.shiro.session.mgt.eis.JavaUuidSessionIdGenerator"/>
<!-- 安全管理器 -->
<bean id="securityManager" class="org.apache.shiro.web.mgt.DefaultWebSecurityManager">
<!-- 缓存管理器 -->
<property name="cacheManager" ref="cacheManager" />

<!-- 验证 -->
<property name="authenticator" ref="authenticator"/>

<!-- 多个验证策略 realmes -->
<property name="realms">
<list>
<!-- 这个认证,有一个先后的顺序 -->
<ref bean="sampleRealm1"/>
<ref bean="sampleRealm2"/>
</list>
</property>
</bean>

<!-- 授权策略 -->
<bean id="authenticator" class="org.apache.shiro.authc.pam.ModularRealmAuthenticator">
<property name="authenticationStrategy" >
<bean class="org.apache.shiro.authc.pam.AllSuccessfulStrategy"/>
</property>
</bean>

<!-- 授权 认证 ,自己定义的,领域(Realm),shiro需要配置一个领域(Realm),以便我们可以访问用户-->
<bean id="sampleRealm1" class=" com.yellowcong.shior.realm.SampleRealm" >

<!-- 如果不加入密码匹配的操作,密码就不会存在 -->
<!-- 加入了密码匹配器之后,就会默认将前台传递过来的密码自动MD5加密 -->
<property name="credentialsMatcher">
<bean class="org.apache.shiro.authc.credential.HashedCredentialsMatcher">
<!-- 加密的方式 -->
<constructor-arg index="0" type="java.lang.String" value="MD5" />
<!-- 加密的次数,默认是1次 -->
<property name="hashIterations" value="1"/>
</bean>
</property>
</bean>

<!-- 授权 认证 ,自己定义的,领域(Realm),shiro需要配置一个领域(Realm),以便我们可以访问用户-->
<bean id="sampleRealm2" class=" com.yellowcong.shior.realm.SampleRealm2" >

<!-- 如果不加入密码匹配的操作,密码就不会存在 -->
<!-- 加入了密码匹配器之后,就会默认将前台传递过来的密码自动SHA1加密 -->
<property name="credentialsMatcher">
<bean class="org.apache.shiro.authc.credential.HashedCredentialsMatcher">
<!-- 加密的方式 -->
<constructor-arg index="0" type="java.lang.String" value="SHA1" />
<!-- 加密的次数,默认是1次 -->
<property name="hashIterations" value="1"/>
</bean>
</property>
</bean>
<!-- 给予shior的内存缓存系统 -->
<bean id="cacheManager" class="org.apache.shiro.cache.MemoryConstrainedCacheManager" />
<!-- Shior的过滤器配置 -->
<bean id="shiroFilter" class="org.apache.shiro.spring.web.ShiroFilterFactoryBean">
<property name="securityManager" ref="securityManager" />
<!-- 用户登录地址 -->
<property name="loginUrl" value="/user/login" />
<!-- 登录成功 -->
<property name="successUrl" value="/user/list" />
<!-- 未授权的钦奎光 -->
<property name="unauthorizedUrl" value="/user/error" />
<property name="filterChainDefinitions">
<value>
<!-- 设置访问用户list页面需要授权操作 -->
/user/list = authc
/user/error = anon
/users/user/login = anon
<!-- 配置js和img这些静态资源被任何人访问到 -->
/resources/img/** = anon
/resources/js/** = anon
</value>
</property>
</bean>
<!-- Shiro生命周期处理器-->
<bean id="lifecycleBeanPostProcessor" class="org.apache.shiro.spring.LifecycleBeanPostProcessor" />
<!-- AOP式方法级权限检查 -->
<bean class="org.springframework.aop.framework.autoproxy.DefaultAdvisorAutoProxyCreator"
depends-on="lifecycleBeanPostProcessor">
<property name="proxyTargetClass" value="true" />
</bean>
<bean class="org.apache.shiro.spring.security.interceptor.AuthorizationAttributeSourceAdvisor">
<property name="securityManager" ref="securityManager" />
</bean>
</beans>
SampleRealm.java
package com.yellowcong.shior.realm;

import java.util.HashSet;
import java.util.Set;

import javax.annotation.Resource;

import org.apache.shiro.authc.AuthenticationException;
import org.apache.shiro.authc.AuthenticationInfo;
import org.apache.shiro.authc.AuthenticationToken;
import org.apache.shiro.authc.SimpleAuthenticationInfo;
import org.apache.shiro.authc.UnknownAccountException;
import org.apache.shiro.authc.UsernamePasswordToken;
import org.apache.shiro.authz.AuthorizationInfo;
import org.apache.shiro.authz.SimpleAuthorizationInfo;
import org.apache.shiro.realm.AuthorizingRealm;
import org.apache.shiro.subject.PrincipalCollection;
import org.apache.shiro.util.ByteSource;
import org.springframework.beans.factory.annotation.Autowired;

import com.yellowcong.model.User;
import com.yellowcong.service.UserService;

/**
* 创建日期:2017年9月23日 <br/>
* 创建用户:yellowcong <br/>
* 功能描述:用于授权操作
*/
public class SampleRealm extends AuthorizingRealm {
private UserService userService;

@Resource(name="userService")
public void setUserService(UserService userService) {
this.userService = userService;
}

/**
* 用户授权,当用户访问需要有权限的页面的情况,需要访问这个方法来获取权限列表
*/
@Override
protected AuthorizationInfo doGetAuthorizationInfo(PrincipalCollection paramPrincipalCollection) {

SimpleAuthorizationInfo info =  new SimpleAuthorizationInfo();
// 根据用户ID查询角色(role),放入到Authorization里。
Set<String> roles = new HashSet<String>(); // 添加用户角色
roles.add("administrator");
info.setRoles(roles);
// 根据用户ID查询权限(permission),放入到Authorization里。
Set<String> permissions = new HashSet<String>(); // 添加权限
permissions.add("/role/**");
info.setStringPermissions(permissions);
return info;
}

/**
* 认证,用户登录
* 登陆的时候,会调用这个
*/
@Override
protected AuthenticationInfo doGetAuthenticationInfo(AuthenticationToken paramAuthenticationToken) throws AuthenticationException {
UsernamePasswordToken token = (UsernamePasswordToken) paramAuthenticationToken;

//数据库中,查询用户的信息
User user = userService.login(token.getUsername());

// token返回的是一个数组,将char类型转化为String类型
//这个是web前台传递过来的值
//这个密码的比对是通过Shiro自己给我们完成的
//密码是通过AuthenticatingRealm.getCredentialsMatcher 的方式来进行比对的
String pswDate = new String(token.getPassword());

//当用户为空的情况
if(user == null){
// 当没有用户的时候,抛出异常
throw new UnknownAccountException();
}

//第一个参数:用户名/用户对象
String username =token.getUsername();
//第二个参数:用户的密码
String password = user.getPassword();

//第三个参数:盐值(这个盐是 username)
ByteSource solt = ByteSource.Util.bytes(username);

//第四个参数:获取这个Realm的信息
String realmName =this.getName();

//他们拿到密码web的密码,同数据库获取到的密码进行比对操作
return new SimpleAuthenticationInfo(username, password, solt,realmName);
}

}
SampleRealm2.java
package com.yellowcong.shior.realm;

import java.util.HashSet;
import java.util.Set;

import javax.annotation.Resource;

import org.apache.shiro.authc.AuthenticationException;
import org.apache.shiro.authc.AuthenticationInfo;
import org.apache.shiro.authc.AuthenticationToken;
import org.apache.shiro.authc.SimpleAuthenticationInfo;
import org.apache.shiro.authc.UnknownAccountException;
import org.apache.shiro.authc.UsernamePasswordToken;
import org.apache.shiro.authz.AuthorizationInfo;
import org.apache.shiro.authz.SimpleAuthorizationInfo;
import org.apache.shiro.realm.AuthorizingRealm;
import org.apache.shiro.subject.PrincipalCollection;
import org.apache.shiro.util.ByteSource;
import org.springframework.beans.factory.annotation.Autowired;

import com.yellowcong.model.User;
import com.yellowcong.service.UserService;

/**
* 创建日期:2017年9月23日 <br/>
* 创建用户:yellowcong <br/>
* 功能描述:用于授权操作
*/
public class SampleRealm2 extends AuthorizingRealm {
private UserService userService;

@Resource(name="userService")
public void setUserService(UserService userService) {
this.userService = userService;
}

/**
* 用户授权,当用户访问需要有权限的页面的情况,需要访问这个方法来获取权限列表
*/
@Override
protected AuthorizationInfo doGetAuthorizationInfo(PrincipalCollection paramPrincipalCollection) {

SimpleAuthorizationInfo info =  new SimpleAuthorizationInfo();
// 根据用户ID查询角色(role),放入到Authorization里。
Set<String> roles = new HashSet<String>(); // 添加用户角色
roles.add("administrator");
info.setRoles(roles);
// 根据用户ID查询权限(permission),放入到Authorization里。
Set<String> permissions = new HashSet<String>(); // 添加权限
permissions.add("/role/**");
info.setStringPermissions(permissions);
return info;
}

/**
* 认证,用户登录
* 登陆的时候,会调用这个
*/
@Override
protected AuthenticationInfo doGetAuthenticationInfo(AuthenticationToken paramAuthenticationToken) throws AuthenticationException {
UsernamePasswordToken token = (UsernamePasswordToken) paramAuthenticationToken;

//数据库中,查询用户的信息
User user = userService.login(token.getUsername());

// token返回的是一个数组,将char类型转化为String类型
//这个是web前台传递过来的值
//这个密码的比对是通过Shiro自己给我们完成的
//密码是通过AuthenticatingRealm.getCredentialsMatcher 的方式来进行比对的
String pswDate = new String(token.getPassword());

//当用户为空的情况
if(user == null){
// 当没有用户的时候,抛出异常
throw new UnknownAccountException();
}

//第一个参数:用户名/用户对象
String username =token.getUsername();
//第二个参数:用户的密码
String password = user.getPassword();

//第三个参数:盐值(这个盐是 username)
ByteSource solt =null;

//第四个参数:获取这个Realm的信息
String realmName =this.getName();

//他们拿到密码web的密码,同数据库获取到的密码进行比对操作
return new SimpleAuthenticationInfo(username, password, solt,realmName);
}

}

相关文章推荐
- apache-shiro杂记(二) 关于多realm认证的策略
- apache-shiro杂记(二) 关于多realm认证的策略
- SSM整合shiro实现多用户表多Realm统一登录认证(大章附代码)
- Shiro 自定义realm授权与认证的实现
- Shiro 入门到毁灭(第三步) [realm实现认证之盐值加密]
- Shiro第二篇【介绍Shiro、认证流程、自定义realm、自定义realm支持md5】
- java鬼混笔记:shiro 2、自定义realm进行认证
- Shiro入门6:自定义realm查询数据库进行认证
- Spring-shiro源码陶冶-AuthorizingRealm用户认证以及授权
- 学习Shiro——采用jdbcRealm实现身份认证
- shiro的多数据源和认证策略
- shiro实现多个realm的认证和授权
- 当shiro不进入自定义realm的权限认证方法时
- shiro authorizingrealm实现认证授权
- Shiro 的身份认证-Realm
- 当shiro不进入自定义realm的权限认证方法时
- Shiro身份认证、Realm&JDBC Reaml
- shiro 认证 配置单个realm和多个realm时的写法
- Shiro开发框架,固定信息Realm认证。
- Shiro第二篇【介绍Shiro、认证流程、自定义realm、自定义realm支持md5】