Android一步一步剖析+实现仿支付宝手势密码自定义View
2017-12-12 11:43
671 查看
前言
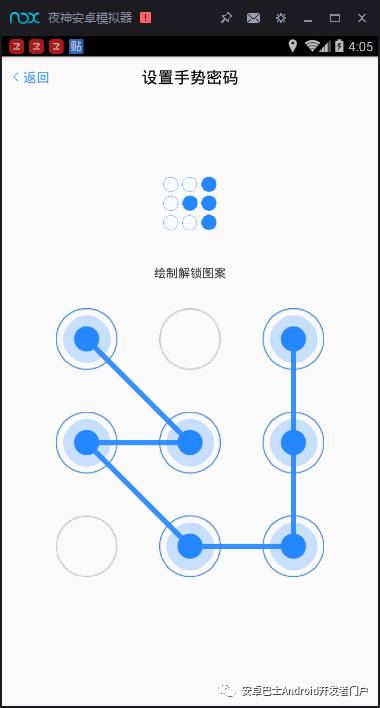
最近项目需求:要求在项目中添加手势密码和指纹验证,恰巧最近在苦练自定义View,于是参考了网上轮子和自己的理解,实现了如下的效果。
国际惯例:Without pic you say a JB(奖杯)

这GIF做的是真的垃圾,感兴趣的去看Demo把,后面我会放上链接的。
一、分析效果图:
所有的自定义view都是通过分析效果图,一点一点将效果图分解成一个个模块,然后单个模块实现,最后拼装成一个整体,下面就通过手势密码的效果图我们来剖析一波吧。

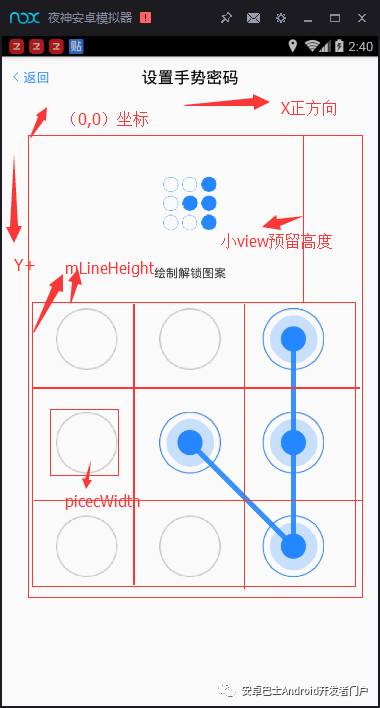
从上图我们可以把View剖析如下:
(1)View的总大小我们可以通过手势大View的宽度+手势小View的高度,通过onMeasure方法setMeasuredDimension(witdh,width+minHeight)来赋予布局大小,minHeight可以根据实际情况自己赋值。
(2)手势大View可以通过onMeasure方法,通过比较宽高得到最小值,来设置手势大View的正方形大小
(3)手势小View同理于手势大View,提示文字的位置,我们也很容易确认。
(4)手势大view的宽高得到了,那么手势大view每一个手势点的坐标和大小 我们就很容易得到。
(5)相信大家初学Java的时候肯定做过,用 号打印各种图形的操作,手势view相当于一个简单的33矩阵。我们知道了大小和坐标很容易画出来。
(6)小View也同理 可以实现,需要注意的是 在手势密码第一次注册的时候存在小View,在认证的时候无小view,我们可以根据状态,在onDraw中设置隐藏。
二、分析完后,我们就一步一步来实现吧:
1、首先模板应该具有通用性与可定制性,我们需要定义一个attrs。
通过效果图分析,我定义的attrs如下,在这里面,手势点我采用的是图片(图片可以让手势点更酷炫)
2、在View中接收赋值,点数图片我用的bitmap,如果无具体定义,这些属性都会给他默认值。代码如下:
3、在onMeasure中绘测手势View布局大小,通过最开始的分析,都很容易理解。
4、通过onSizeChange方法可以获取,根据mLineHeight(3*1的行高) 的值,可以定义大手势密码点和小手势密码点的宽高,然后通过Bitmap.createScaledBitmap方法,设置好手势点的大小图。细节可以看代码注解如下:
5、我们知道GestureView一般分为两种状态,一种是注册状态(包含小view的那种),另一种是认证状态(不包含小view的那种),所以我们要定义两种状态,来区分使用情况。
那么我们在每次注册成功的时候,需要保存手势状态,我们给状态存在SharedPreferences中
同理在初始化之前,我们要得到状态,判断当前view属于什么状态,这样才能判断onDraw中是否绘制小View
6、根据状态绘制手势密码点,连接线,和提示文字
(1)绘制9个未选中状态的大手势View点,通过canvas.drawBitmap(Bitmap bitmap, float left, float top, Paint paint)方法绘制,这里我们要注意位置计算的时候,只需要注意在android屏幕坐标系里,左上角的位置是(0,0),往右往下为正。
可能这么说有点抽象,不过也就是把坐标搞清楚了还是很简单的,画张图配合你理解,图中小View预留高度(panelHeight):
(2)可能到现在你就会很好奇,我设置的手势连线到底是怎么存储和校验的呢?问的好! 这个问题我开始也思考了很久,有轮子是通过一个二维数组实现的,通过这个二维数组我来了思路,联想到了Bean。我用Bean存储对应点的X和Y的坐标,把每个点的实例加入一个List<>中,就完成了手势绘制所有点的存储。
bean的代码如下:
(3)绘制连接线和选中点:连接线是通过过 onTouchEvent和onDraw,配合画出的,在OnTouchEvent中手指经过的点都会存在listDatas集合中,再通过 invalidate();方法通知onDraw,根据listDatas中的新增点数,来绘制出选中点和点之间的连接线。再此只给出onDraw中的代码,onTouchEvent中的逻辑会在下文详细说明。
注册手势成功的时候需要将手势集合,保存,用于下一次校验,我们存在SharedPreference中(注意:这个手势View只适用于本机拦截,所以存SharedPresference就够了)
获取存储集合:,我们再存的时候和取得时候,可以先存一个录入点的数量,更方便做判断。
(4) 小图和文字的绘制就很简单了,参考前几项 我就直接给代码了(刚才开会,思路被干扰了。。。。)
需要注意的是,小View在完成第一次绘制的时候,第二次绘制的时候需要保存第一次的样式,通过list存储比较,如下代码实现。
效果图如下:
绘制文字,确定好大体坐标就可了,在小view下面,很好理解,直接给代码了:
7、手势密码设置,必然要处理OnTouchEvent,这里的逻辑才是关键,我会详细分析。
(1)在这里我们封装的比较完善,我处理了验证超过验证次数会拦截手势View,这里面算是后期完善,但是为大家梳理思路的话就显得比较冗余,直接贴代码,先pass掉,敢兴趣去看demo:
(2)首先我们要判断我们的OnTouch事件,是否在大View的范围内,由于坐标开始规范的很清楚,这个很好判断
(3)MotionEvent.ACTION_DOWN: 当手指按下去的时候,我们要判断按下去的点,处于哪一个大手势点范围内,并把它加入List中。通知onDraw重绘,如上文所说的那样,把点改为选中状态。
(4)MotionEvent.ACTION_MOVE: 手指在View上滑动,滑动到哪个点就把,哪个点的坐标add到List中。在通知重绘
(5)MotionEvent.ACTION_UP: 分为两种情况,
1、认证状态,会从loadSharedPrefferenceData获取到以前的listdatas做比较,判断是否成功
2、注册状态,会比较第一次的listdatas,来判断两次验证是否一致,从而,处理成功和失败的逻辑。
至此,手势View的所有逻辑大概已经清楚了,下面做的是需要完善。
三、完善View,设置接口调用,失败倒计时,和关闭View是清理当前SP缓存。
1、仔细看的朋友会发现,ACTION.UP中有 postListener(true)这些东西,这就是我定义的接口,来返回认证状态。
(1)定义接口,三个参分别为:view所处状态,存储的List,是否成功(注册或认证)
(2)实例化接口,当前Activity必须继承接口
(3)给接口传递,实时数据Action.UP
2、验证失败倒计时,通过Handler,Timer和TimerTask实现
(1)、内部类TimeTask
(2)实例化,上次错误时间也是存储在SharedPreference,waiTime为定义好的超时时间。代码如下
(3)Handler处理消息:
3、清理手势View缓存,用于关闭View或者修改密码
四、简单使用:
1、以设置手势密码 为例:
(1)XML布局
布局预览:
Java代码(设置手势密码页面):
五:总结
这个自定义手势密码,是我参照个别轮子+我本人的理解,仿照支付宝手势密码设计的,整体流畅我已带大家分析了一波。该View还有很多需要完善的地方,我以后会慢慢完善,有什么指教或者疑问,请大家在下面留言。
Demo:
1、手势密码自定义View
2、指纹验证(由于仿支付宝安全的Demo,含指纹我就一块做了,用的三方)
Demo地址:https://github.com/ChaosOctopus/ChaosSecurityCenter
如果觉得对您有用,请给我一个赞,或者一个Star。
最近项目需求:要求在项目中添加手势密码和指纹验证,恰巧最近在苦练自定义View,于是参考了网上轮子和自己的理解,实现了如下的效果。
国际惯例:Without pic you say a JB(奖杯)
这GIF做的是真的垃圾,感兴趣的去看Demo把,后面我会放上链接的。
一、分析效果图:
所有的自定义view都是通过分析效果图,一点一点将效果图分解成一个个模块,然后单个模块实现,最后拼装成一个整体,下面就通过手势密码的效果图我们来剖析一波吧。
从上图我们可以把View剖析如下:
(1)View的总大小我们可以通过手势大View的宽度+手势小View的高度,通过onMeasure方法setMeasuredDimension(witdh,width+minHeight)来赋予布局大小,minHeight可以根据实际情况自己赋值。
(2)手势大View可以通过onMeasure方法,通过比较宽高得到最小值,来设置手势大View的正方形大小
(3)手势小View同理于手势大View,提示文字的位置,我们也很容易确认。
(4)手势大view的宽高得到了,那么手势大view每一个手势点的坐标和大小 我们就很容易得到。
(5)相信大家初学Java的时候肯定做过,用 号打印各种图形的操作,手势view相当于一个简单的33矩阵。我们知道了大小和坐标很容易画出来。
(6)小View也同理 可以实现,需要注意的是 在手势密码第一次注册的时候存在小View,在认证的时候无小view,我们可以根据状态,在onDraw中设置隐藏。
二、分析完后,我们就一步一步来实现吧:
1、首先模板应该具有通用性与可定制性,我们需要定义一个attrs。
通过效果图分析,我定义的attrs如下,在这里面,手势点我采用的是图片(图片可以让手势点更酷炫)
<declare-styleable name="SecurityCenter">
       <!-- 选中状态的手势点-->
       <attr name="selectedBitmap" format="reference"/>
       <!-- 未选中状态的手势点-->
       <attr name="unselectedBitmap" format="reference"/>
       <!-- 选中状态的手势小点-->
       <attr name="selectedBitmapSmall" format="reference"/>
       <!-- 未选中状态的手势小点-->
       <attr name="unselectedBitmapSmall" format="reference"/>
       <!-- 验证失败后再次验证的拦截时间-->
       <attr name="waitTime" format="integer"/>
       <!-- 验证的最大失败次数-->
       <attr name="maxFailCounts" format="integer"/>
       <!-- 绘制时最少连接的点数-->
       <attr name="minPoint" format="integer"/>
       <!-- 字体的颜色-->
       <attr name="paintColor" format="color"/>
       <!-- 字体的大小-->
       <attr name="paintTextSize" format="dimension"/>
   </declare-styleable>
2、在View中接收赋值,点数图片我用的bitmap,如果无具体定义,这些属性都会给他默认值。代码如下:
public ChaosGestureView(Context context, @Nullable AttributeSet attrs, int defStyleAttr) {
    super(context, attrs, defStyleAttr);
       TypedArray ta = context.obtainStyledAttributes(attrs,R.styleable.SecurityCenter);
       Drawable dw_selected = ta.getDrawable(R.styleable.SecurityCenter_selectedBitmap);
       Drawable dw_unSeclect = ta.getDrawable(R.styleable.SecurityCenter_unselectedBitmap);
       Drawable dw_selected_small = ta.getDrawable(R.styleable.SecurityCenter_selectedBitmapSmall);
       Drawable dw_unSeclect_small = ta.getDrawable(R.styleable.SecurityCenter_unselectedBitmapSmall);
        if (dw_selected!=null){
           selectedBitmap = ((BitmapDrawable) dw_selected).getBitmap();
       }else{
           selectedBitmap = BitmapFactory.decodeResource(getResources(), R.mipmap.icon_finger_selected);
       }
        if (dw_unSeclect!=null){
           unSelectedBitmap = ((BitmapDrawable) dw_unSeclect).getBitmap();
       }else{
           unSelectedBitmap = BitmapFactory.decodeResource(getResources(), R.mipmap.icon_finger_unselected);
       }
        if (dw_selected_small!=null){
           selectedBitmapSmall = ((BitmapDrawable) dw_selected_small).getBitmap();
       }else{
           selectedBitmapSmall = BitmapFactory.decodeResource(getResources(), R.mipmap.icon_finger_selected_small);
       }
        if (dw_unSeclect_small!=null){
           unSelectedBitmapSmall= ((BitmapDrawable) dw_unSeclect_small).getBitmap();
       }else{
           unSelectedBitmapSmall = BitmapFactory.decodeResource(getResources(), R.mipmap.icon_finger_unselected_new);
       }
        //等待时间,默认30s
       waitTime = ta.getInteger(R.styleable.SecurityCenter_waitTime,30);
        //尝试次数,默认5
       tempCount = ta.getInteger(R.styleable.SecurityCenter_maxFailCounts,5);
        //最小设置的点,默认4个
       minPointNums = ta.getInteger(R.styleable.SecurityCenter_minPoint,4);
       //设置画笔的颜色
       mPaint = new Paint();
       mPaint.setAntiAlias(true);
       mPaint.setDither(true);
       mPaint.setStrokeWidth(10);
       mPaint.setStyle(Paint.Style.STROKE);
        //画笔的颜色
       int color = ta.getColor(R.styleable.SecurityCenter_paintColor, context.getResources().getColor(R.color.black));
       mPaint.setColor(color);
        //字体的大小
       float textsize = ta.getDimension(R.styleable.SecurityCenter_paintTextSize, 40);
       mPaint.setTextSize(textsize);
        //避免重新创建时候的错误
       ta.recycle();

       initView(context);
   }
3、在onMeasure中绘测手势View布局大小,通过最开始的分析,都很容易理解。
@Override
   protected void onMeasure(int widthMeasureSpec, int heightMeasureSpec) {
        super.onMeasure(widthMeasureSpec, heightMeasureSpec);
        int widthSize = MeasureSpec.getSize(widthMeasureSpec);
        int widthMode = MeasureSpec.getMode(widthMeasureSpec);
        int heightSize = MeasureSpec.getSize(heightMeasureSpec);
        int heightMode = MeasureSpec.getMode(heightMeasureSpec);
        //width即为大View的单位宽 高
       int width = Math.min(widthSize, heightSize);
       if (widthMode == MeasureSpec.UNSPECIFIED) {
           width = heightSize;
       } else if (heightMode == MeasureSpec.UNSPECIFIED) {
           width = widthSize;
       }
       //大View一行3*1单位行高
       mLineHeight = width / 3;
       //大手势View为边长width的正方形,panelHeight是给小手势view预留的空间
       setMeasuredDimension(width, width + panelHeight);
   }
4、通过onSizeChange方法可以获取,根据mLineHeight(3*1的行高) 的值,可以定义大手势密码点和小手势密码点的宽高,然后通过Bitmap.createScaledBitmap方法,设置好手势点的大小图。细节可以看代码注解如下:
@Override
   protected void onSizeChanged(int w, int h, int oldw, int oldh) {
        super.onSizeChanged(w, h, oldw, oldh);
       mPanelWidth = Math.min(w, h);
        //大手势点宽度,为单位宽高的0.6倍,显得更好看一些不会很满
       pieceWidth = (int) (mLineHeight * 0.6f);
        //小手势点宽度,同理
       pieceWidthSmall = (int) (mLineHeight * 0.15f);
        //画出对应手势点的大小
       selectedBitmap = Bitmap.createScaledBitmap(selectedBitmap, (int) pieceWidth, (int) pieceWidth, false);
       unSelectedBitmap = Bitmap.createScaledBitmap(unSelectedBitmap, (int) pieceWidth, (int) pieceWidth, false);
       selectedBitmapSmall = Bitmap.createScaledBitmap(selectedBitmapSmall, (int) pieceWidthSmall, (int) pieceWidthSmall, false);
       unSelectedBitmapSmall = Bitmap.createScaledBitmap(unSelectedBitmapSmall, (int) pieceWidthSmall, (int) pieceWidthSmall, false);
   }
5、我们知道GestureView一般分为两种状态,一种是注册状态(包含小view的那种),另一种是认证状态(不包含小view的那种),所以我们要定义两种状态,来区分使用情况。
//手势初始化录入状态
   public static final int STATE_REGISTER = 101;
    //手势确认 使用状态
   public static final int STATE_LOGIN = 100;
    //设置一个参数记录当前是出于初始化阶段还是使用阶段,默认为确认状态
   private int stateFlag = STATE_LOGIN;
那么我们在每次注册成功的时候,需要保存手势状态,我们给状态存在SharedPreferences中
//成功后保存状态
   private boolean saveState() {
       SharedPreferences sp = mContext.getSharedPreferences("STATE_DATA", Activity.MODE_PRIVATE);
       SharedPreferences.Editor edit = sp.edit();
       edit.putInt("state", stateFlag);
       return edit.commit();
   }
同理在初始化之前,我们要得到状态,判断当前view属于什么状态,这样才能判断onDraw中是否绘制小View
//从SP中获取当前View处于什么状态,默认为初始化状态
   private int getState() {
       SharedPreferences mSharedPreference = mContext.getSharedPreferences("STATE_DATA", Activity.MODE_PRIVATE);
       return mSharedPreference.getInt("state", STATE_REGISTER);
   }
6、根据状态绘制手势密码点,连接线,和提示文字
(1)绘制9个未选中状态的大手势View点,通过canvas.drawBitmap(Bitmap bitmap, float left, float top, Paint paint)方法绘制,这里我们要注意位置计算的时候,只需要注意在android屏幕坐标系里,左上角的位置是(0,0),往右往下为正。
for (int i = 0; i < 3; i++) {
   for (int j = 0; j < 3; j++) {
               canvas.drawBitmap(unSelectedBitmap, (float) (mLineHeight * (j + 0.5) - pieceWidth / 2), (float) (mLineHeight * (i + 0.5) - pieceWidth / 2 + panelHeight), mPaint);
           }
       }
可能这么说有点抽象,不过也就是把坐标搞清楚了还是很简单的,画张图配合你理解,图中小View预留高度(panelHeight):
(2)可能到现在你就会很好奇,我设置的手势连线到底是怎么存储和校验的呢?问的好! 这个问题我开始也思考了很久,有轮子是通过一个二维数组实现的,通过这个二维数组我来了思路,联想到了Bean。我用Bean存储对应点的X和Y的坐标,把每个点的实例加入一个List<>中,就完成了手势绘制所有点的存储。
bean的代码如下:
//定义Bean,来存储手势坐标
   public class GestureBean {
       private int x;
       private int y;
       @Override
       public String toString() {
           return "GestureBean{" +
               "x=" + x +
               ", y=" + y +
               '}';
       }
       public GestureBean(int x, int y) {
           this.x = x;
           this.y = y;
       }
       public int getX() {
           return x;
       }
       public void setX(int x) {
           this.x = x;
       }
       public int getY() {
           return y;
       }
       public void setY(int y) {
           this.y = y;
       }
       @Override
       public boolean equals(Object o) {
           return ((GestureBean) o).getX() == x && ((GestureBean) o).getY() == y;
       }
   }
(3)绘制连接线和选中点:连接线是通过过 onTouchEvent和onDraw,配合画出的,在OnTouchEvent中手指经过的点都会存在listDatas集合中,再通过 invalidate();方法通知onDraw,根据listDatas中的新增点数,来绘制出选中点和点之间的连接线。再此只给出onDraw中的代码,onTouchEvent中的逻辑会在下文详细说明。
//用于判断状态
       GestureBean firstGestrue = null;
       GestureBean currGestrue = null;
        if (!listDatas.isEmpty()) {

           firstGestrue = listDatas.get(0);
            //画连接线
           for (int i = 1; i < listDatas.size(); i++) {
               currGestrue = listDatas.get(i);
               canvas.drawLine((float) (mLineHeight * (firstGestrue.getX() + 0.5)), (float) (mLineHeight * (firstGestrue.getY() + 0.5) + panelHeight), (float) (mLineHeight * (currGestrue.getX() + 0.5)), (float) (mLineHeight * (currGestrue.getY() + 0.5) + panelHeight), mPaint);
               firstGestrue = currGestrue;
           }
            //最后一条线
           lastGestrue = listDatas.get(listDatas.size() - 1);
           canvas.drawLine((float) (mLineHeight * (lastGestrue.getX() + 0.5)), (float) (mLineHeight * (lastGestrue.getY() + 0.5) + panelHeight), currX, currY, mPaint);
            //遍历数组,把把选中的点更换图片
           for (GestureBean bean : listDatas) {
               canvas.drawBitmap(selectedBitmap, (float) (mLineHeight * (bean.getX() + 0.5) - pieceWidth / 2), (float) (mLineHeight * (bean.getY() + 0.5) + panelHeight - pieceWidth / 2), mPaint);
           }
       }
注册手势成功的时候需要将手势集合,保存,用于下一次校验,我们存在SharedPreference中(注意:这个手势View只适用于本机拦截,所以存SharedPresference就够了)
//将点的xy list存入sp
   private boolean saveToSharedPrefference(List<GestureBean> data) {
       SharedPreferences sp = mContext.getSharedPreferences("GESTURAE_DATA", Activity.MODE_PRIVATE);
       SharedPreferences.Editor edit = sp.edit();
        //存入多少个点
       edit.putInt("data_size", data.size()); /*sKey is an array*/
       //和每个店的坐标
       for (int i = 0; i < data.size(); i++) {
           edit.remove("data_" + i);
           edit.putString("data_" + i, data.get(i).getX() + " " + data.get(i).getY());
       }        return edit.commit();
   }
获取存储集合:,我们再存的时候和取得时候,可以先存一个录入点的数量,更方便做判断。
//读取之前保存的List
   public List<GestureBean> loadSharedPrefferenceData() {
       List<GestureBean> list = new ArrayList<>();
       SharedPreferences mSharedPreference = mContext.getSharedPreferences("GESTURAE_DATA", Activity.MODE_PRIVATE);
        //取出点数
       int size = mSharedPreference.getInt("data_size", 0);
        //和坐标
       for (int i = 0; i < size; i++) {
           String str = mSharedPreference.getString("data_" + i, "0 0");
           list.add(new GestureBean(Integer.parseInt(str.split(" ")[0]), Integer.parseInt(str.split(" ")[1])));
       }        return list;
   }
(4) 小图和文字的绘制就很简单了,参考前几项 我就直接给代码了(刚才开会,思路被干扰了。。。。)
//如果处于初始化状态
       if (stateFlag == STATE_REGISTER) {
        //绘制上面的提示点  不需要提示点
           drawTipsPoint(canvas);
       } else {
        //上面的是文字 点没了
           drawTipsText(canvas);
       }
需要注意的是,小View在完成第一次绘制的时候,第二次绘制的时候需要保存第一次的样式,通过list存储比较,如下代码实现。
//绘制提示点
   private void drawTipsPoint(Canvas canvas) {
       //宽度为View宽度的一半
       float widthMiddleX = mPanelWidth / 2;
       //确定好相关坐标,找出第一个点的中心点
       float firstX = widthMiddleX - pieceWidthSmall / 4 - pieceWidthSmall / 2 - pieceWidthSmall;
       float firstY = panelHeight / 2 - pieceWidthSmall / 2 - pieceWidthSmall - pieceWidthSmall / 4 - 10;
       //画点,由于没有选中,画9个未选中点
       for (int i = 0; i < 3; i++) {
           for (int j = 0; j < 3; j++) {
               canvas.drawBitmap(unSelectedBitmapSmall, (float) (firstX + j * (pieceWidthSmall * 1.25)), (float) (firstY + i * (pieceWidthSmall * 1.25)), mPaint);
           }
       }
        //第二次确认前的小手势密码·显示第一次划过的痕迹
       if (listDatasCopy != null && !listDatasCopy.isEmpty()) {
            for (GestureBean bean : listDatasCopy) {
               canvas.drawBitmap(selectedBitmapSmall, (float) (firstX + bean.getX() * (pieceWidthSmall * 1.25)), (float) (firstY + bean.getY() * (pieceWidthSmall * 1.25)), mPaint);
           }
       }
       //随着手指ActionMove来改变选中点的颜色
       else if (listDatas != null && !listDatas.isEmpty()) {
            for (GestureBean bean : listDatas) {
               canvas.drawBitmap(selectedBitmapSmall, (float) (firstX + bean.getX() * (pieceWidthSmall * 1.25)), (float) (firstY + bean.getY() * (pieceWidthSmall * 1.25)), mPaint);
           }
       }
       drawMessage(canvas, "绘制解锁图案", mError);
   }
效果图如下:
绘制文字,确定好大体坐标就可了,在小view下面,很好理解,直接给代码了:
   //绘制提示语
   private void drawTipsText(Canvas canvas) {
       float widthMiddleX = mPanelWidth / 2;
       mPaint.setStyle(Paint.Style.FILL);
       int widthStr1 = (int) mPaint.measureText("输入手势来解锁");
       float baseX = widthMiddleX - widthStr1 / 2;
       float baseY = panelHeight / 2 + 50;
       Paint.FontMetrics fontMetrics = mPaint.getFontMetrics();
       float fontTotalHeight = fontMetrics.bottom - fontMetrics.top;
       float offY = fontTotalHeight / 2 - fontMetrics.bottom - 30;
       float newY = baseY + offY;
       canvas.drawText("输入手势来解锁", baseX, newY, mPaint);
       mPaint.setAntiAlias(true);
       mPaint.setDither(true);
       mPaint.setStrokeWidth(10);
   }
7、手势密码设置,必然要处理OnTouchEvent,这里的逻辑才是关键,我会详细分析。
(1)在这里我们封装的比较完善,我处理了验证超过验证次数会拦截手势View,这里面算是后期完善,但是为大家梳理思路的话就显得比较冗余,直接贴代码,先pass掉,敢兴趣去看demo:
if (mTimeOut) {
    switch (event.getAction()) {
        case MotionEvent.ACTION_DOWN:
            break;
        case MotionEvent.ACTION_MOVE:
            break;
        case MotionEvent.ACTION_UP:
            if (0 < leftTime && leftTime <= 30) {
                       AlertUtil.t(mContext, "尝试次数达到最大," + leftTime + "s后重试");
                   }
                    return true;
           }
       }
(2)首先我们要判断我们的OnTouch事件,是否在大View的范围内,由于坐标开始规范的很清楚,这个很好判断
  if (event.getY() >= ((mLineHeight * (0 + 0.5) - pieceWidth / 2 + panelHeight))){
      //得到XY用于判断 手指处于哪个点
           int x = (int) ((event.getY() - panelHeight) / mLineHeight);
           int y = (int) (event.getX() / mLineHeight);

           //当前手指的坐标
           currX = event.getX();
           currY = event.getY();
}
(3)MotionEvent.ACTION_DOWN: 当手指按下去的时候,我们要判断按下去的点,处于哪一个大手势点范围内,并把它加入List中。通知onDraw重绘,如上文所说的那样,把点改为选中状态。
case MotionEvent.ACTION_DOWN:
                   lastGestrue = null;
                   if (currX >= 0 && currX <= mPanelWidth && currY >= panelHeight && currY <= panelHeight + mPanelWidth) {
                   if (currY <= (x + 0.5) * mLineHeight + pieceWidth / 2 + panelHeight && currY >= (x + 0.5) * mLineHeight - pieceWidth / 2 + panelHeight &&
                               currX <= (y + 0.5) * mLineHeight + pieceWidth / 2 && currX >= (y + 0.5) * mLineHeight - pieceWidth / 2) {
                           //判断当前手指处于哪个点范围内,如果点没存在listData,存进去,第一个点
                           if (!listDatas.contains(new GestureBean(y, x))) {
                               listDatas.add(new GestureBean(y, x));
                           }
                       }
                   }
                   //重绘一次,第一个点显示被选中了
                   invalidate();
                   break;
(4)MotionEvent.ACTION_MOVE: 手指在View上滑动,滑动到哪个点就把,哪个点的坐标add到List中。在通知重绘
case MotionEvent.ACTION_MOVE:
            //手指移动在大View范围内
             if (currX >= 0 && currX <= mPanelWidth && currY >= panelHeight && currY <= panelHeight + mPanelWidth) {
                   //缩小响应范围 在此处需要注意的是 x跟currX在物理方向上是反的哦
                   if (currY <= (x + 0.5) * mLineHeight + pieceWidth / 2 + panelHeight && currY >= (x + 0.5) * mLineHeight - pieceWidth / 2 + panelHeight &&
                               currX <= (y + 0.5) * mLineHeight + pieceWidth / 2 && currX >= (y + 0.5) * mLineHeight - pieceWidth / 2) {
                         //滑倒的店处于哪个点范围内,如果点没存在listData,存进去
                         if (!listDatas.contains(new GestureBean(y, x))) {
                               listDatas.add(new GestureBean(y, x));//
                         }
                   }
              }
              //重绘
              invalidate();
              break;
(5)MotionEvent.ACTION_UP: 分为两种情况,
1、认证状态,会从loadSharedPrefferenceData获取到以前的listdatas做比较,判断是否成功
2、注册状态,会比较第一次的listdatas,来判断两次验证是否一致,从而,处理成功和失败的逻辑。
case MotionEvent.ACTION_UP:
        if (lastGestrue != null) {
                       currX = (float) ((lastGestrue.getX() + 0.5) * mLineHeight);
                       currY = (float) ((lastGestrue.getY() + 0.5) * mLineHeight);
                   }
                   //如果View处于认证状态
                   if (stateFlag == STATE_LOGIN) {
                       //相同那么认证成功
                       if (listDatas.equals(loadSharedPrefferenceData())) {
                           mError = false;
                           postListener(true);
                           invalidate();
                           listDatas.clear();
                           return true;
                       } else {
                    if (--tempCount == 0) {//尝试次数达到上限
                               mError = true;
                               mTimeOut = true;
                               listDatas.clear();
                               Date date = new Date();
                               PreferenceCache.putGestureTime(date.getTime());
                               mTimerTask = new InnerTimerTask(handler);
                               mTimer.schedule(mTimerTask, 0, 1000);
                               invalidate();
                               return true;
                           }
                           mError = true;
                           AlertUtil.t(mContext, "手势错误,还可以再输入" + tempCount + "次");
                           listDatas.clear();
                       }

                   }
                   //View处于注册状态
                   else if (stateFlag == STATE_REGISTER) {
                       //第一次认证状态
                       if (listDatasCopy == null || listDatasCopy.isEmpty()) {
                            if (listDatas.size() < minPointNums) {
                               listDatas.clear();
                               mError = true;
                               AlertUtil.t(mContext, "点数不能小于" + minPointNums + "个");
                               invalidate();
                               return true;
                           }
                           listDatasCopy.addAll(listDatas);
                           listDatas.clear();
                           mError = false;
                           AlertUtil.t(mContext, "请再一次绘制");
                       } else {
                           //两次认证成功
                           if (listDatas.equals(listDatasCopy)) {
                               saveToSharedPrefference(listDatas);
                               mError = false;
                               stateFlag = STATE_LOGIN;
                               postListener(true);
                               saveState();
                           } else {
                               mError = true;
                               AlertUtil.t(mContext, "与上次手势绘制不一致,请重新设置");
                           }
                           listDatas.clear();
                           invalidate();
                           return true;
                       }
                   }
                   invalidate();
                   break;
至此,手势View的所有逻辑大概已经清楚了,下面做的是需要完善。
三、完善View,设置接口调用,失败倒计时,和关闭View是清理当前SP缓存。
1、仔细看的朋友会发现,ACTION.UP中有 postListener(true)这些东西,这就是我定义的接口,来返回认证状态。
(1)定义接口,三个参分别为:view所处状态,存储的List,是否成功(注册或认证)
//定义接口 ,传递View状态
   public interface GestureCallBack{
        void gestureVerifySuccessListener(int stateFlag, List<GestureBean> data, boolean success);
   }
(2)实例化接口,当前Activity必须继承接口
//让当前的Activity继承View的接口
try {
     estureCallBack = (GestureCallBack) mContext;
} catch (final ClassCastException e) {
     throw new ClassCastException(mContext.toString() + " must implement GestureCallBack");
}
(3)给接口传递,实时数据Action.UP
 //给接口传递数据
   private void postListener(boolean success) {
        if (gestureCallBack != null) {
           gestureCallBack.gestureVerifySuccessListener(stateFlag, listDatas, success);
       }
   }
2、验证失败倒计时,通过Handler,Timer和TimerTask实现
(1)、内部类TimeTask
//定义一个内部TimerTask类用于记录,错误倒计时
   static class InnerTimerTask extends TimerTask{
       Handler handler;

       public InnerTimerTask(Handler handler) {
        this.handler = handler;
       }
       @Override
       public void run() {
           handler.sendMessage(handler.obtainMessage());
       }
   }
(2)实例化,上次错误时间也是存储在SharedPreference,waiTime为定义好的超时时间。代码如下
mTimer = new Timer();
        //计算上次失败时间与现在的时间差
       try {
           long lastTime = PreferenceCache.getGestureTime();
           Date date = new Date();
           if (lastTime !=0 && (date.getTime()-lastTime)/1000<waitTime){
               //失败时间未到,还处于锁定状态
               mTimeOut = true;
               leftTime = (int)(waitTime-((date.getTime()-lastTime))/1000);
               mTimerTask = new InnerTimerTask(handler);
               mTimer.schedule(mTimerTask,0,1000);
           }else{
               mTimeOut = false;
               leftTime = waitTime;
           }

       }catch (RuntimeException e){
           e.printStackTrace();
       }
(3)Handler处理消息:
//接受TimerTask消息,通知UI
   private Handler handler = new Handler(){
        @Override
       public void handleMessage(Message msg) {
          leftTime--;
          if (leftTime == 0){
               if (mTimer != null)
                  mTimerTask.cancel();
              mTimeOut = false;
              AlertUtil.t(mContext,"请绘制解锁图案");
              mError = false;
              invalidate();
              //将计时信息还原
              reSet();
              return;
          }
          mError = true;
          invalidate();
       }
   };
3、清理手势View缓存,用于关闭View或者修改密码
   //清除以前保存的状态,用于关闭View
   public boolean clearCache() {
       SharedPreferences sp = mContext.getSharedPreferences("STATE_DATA", Activity.MODE_PRIVATE);
       SharedPreferences.Editor edit = sp.edit();
       edit.putInt("state", STATE_REGISTER);
       stateFlag = STATE_REGISTER;
       invalidate();        return edit.commit();
   }
   //用于更改手势密码,清除以前密码
   public boolean clearCacheLogin() {
       SharedPreferences sp = mContext.getSharedPreferences("STATE_DATA", Activity.MODE_PRIVATE);
       SharedPreferences.Editor edit = sp.edit();
       edit.putInt("state", STATE_LOGIN);
       stateFlag = STATE_LOGIN;
       invalidate();
        return edit.commit();
   }
四、简单使用:
1、以设置手势密码 为例:
(1)XML布局
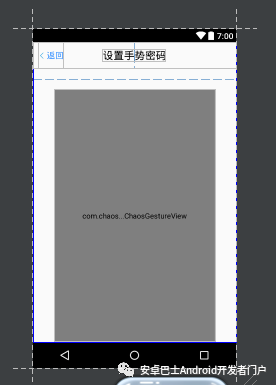
<LinearLayout xmlns:android="http://schemas.android.com/apk/res/android"
   xmlns:app="http://schemas.android.com/apk/res-auto"
   xmlns:tools="http://schemas.android.com/tools"
   android:layout_width="match_parent"
   android:layout_height="match_parent"
   android:orientation="vertical"
   tools:context="com.chaos.chaossecuritycenter.activity.SettingPatternPswActivity">
   <RelativeLayout
       android:layout_width="match_parent"
       android:layout_height="50dp">
       <TextView
           android:id="@+id/tv_setting_back"
           android:layout_marginLeft="10dp"
           android:textSize="16sp"
           android:drawableLeft="@mipmap/back"
           android:textColor="@color/bak_blue"
           android:gravity="center_vertical"
           android:layout_width="wrap_content"
           android:layout_height="match_parent"
           android:text="返回"/>
       <TextView
           android:layout_width="wrap_content"
           android:layout_height="wrap_content"
           android:layout_centerInParent="true"
           android:text="设置手势密码"
           android:textColor="@color/black"
           android:textSize="20sp" />
   </RelativeLayout>

   <com.chaos.chaossecuritycenter.weight.ChaosGestureView
       android:id="@+id/gesture"
       android:layout_width="match_parent"
       android:layout_height="0dp"
       android:layout_marginLeft="40dp"
       android:layout_marginRight="40dp"
       android:layout_marginTop="40dp"
       android:layout_weight="1"
       app:selectedBitmap="@mipmap/icon_finger_selected"
       app:unselectedBitmap="@mipmap/icon_finger_unselected"
       app:selectedBitmapSmall="@mipmap/icon_finger_selected_small"
       app:unselectedBitmapSmall="@mipmap/icon_finger_unselected_new"
       app:waitTime="30"
       app:maxFailCounts="5"
       app:minPoint="4"
       app:paintColor="@color/bak_blue"
       app:paintTextSize="15sp"
      />
</LinearLayout>
布局预览:
Java代码(设置手势密码页面):
public class SettingPatternPswActivity extends AppCompatActivity implements ChaosGestureView.GestureCallBack{
   private TextView tv_back;
   private ChaosGestureView gestureView;
   private int jumpFlg;
   private int flag;
   @Override
   protected void onCreate(Bundle savedInstanceState) {
       super.onCreate(savedInstanceState);
       setContentView(R.layout.activity_setting_pattern_psw);
       jumpFlg = getIntent().getIntExtra("jumpFlg", 0);
       flag = getIntent().getIntExtra("flag", 0);
       initView();
   }
   private void initView() {
       tv_back = (TextView) findViewById(R.id.tv_setting_back);
       gestureView = (ChaosGestureView) findViewById(R.id.gesture);
       gestureView.setGestureCallBack(this);
       //不调用这个方法会造成第二次启动程序直接进入手势识别而不是手势设置
       gestureView.clearCache();
       tv_back.setOnClickListener(new View.OnClickListener() {
           @Override
           public void onClick(View view) {
               finish();
           }
       });
   }
   @Override
   public void gestureVerifySuccessListener(int stateFlag, List<ChaosGestureView.GestureBean> data, boolean success) {
       if (stateFlag == GestureView.STATE_LOGIN) {
           PreferenceCache.putGestureFlag(true);
           finish();
       }
   }
   @Override
   public void onPointerCaptureChanged(boolean hasCapture) {

   }
}
五:总结
这个自定义手势密码,是我参照个别轮子+我本人的理解,仿照支付宝手势密码设计的,整体流畅我已带大家分析了一波。该View还有很多需要完善的地方,我以后会慢慢完善,有什么指教或者疑问,请大家在下面留言。
Demo:
1、手势密码自定义View
2、指纹验证(由于仿支付宝安全的Demo,含指纹我就一块做了,用的三方)
Demo地址:https://github.com/ChaosOctopus/ChaosSecurityCenter
如果觉得对您有用,请给我一个赞,或者一个Star。

相关文章推荐
- Android View进阶之实现仿支付宝手势密码自定义View
- android 自定义ImageView实现图片手势滑动,多点触摸放大缩小效果
- 【Android】自定义ImageView实现图片的平移、缩放、旋转(手势操作)
- android 自定义ImageView实现图片手势滑动,多点触摸放大缩小效果
- 一步一步实现Android自定义组合View
- Android-仿支付宝手势密码(九宫格)简单实现-修复相关BUG
- android 自定义ImageView实现图片手势滑动,多点触摸放大缩小效果
- 自定义view,实现手势密码功能
- 通过手势实现Android自定义View的缩放
- android 自定义ImageView实现图片手势滑动,多点触摸放大缩小效果
- android 自定义ImageView实现图片手势滑动,多点触摸放大缩小效果
- android 自定义ImageView实现图片手势滑动,多点触摸放大缩小效果
- android 自定义ImageView实现图片手势滑动,多点触摸放大缩小效果
- Androin学习笔记五十四: android 自定义ImageView实现图片手势滑动,多点触摸放大缩小效果
- Android——实现支付宝手势密码
- android 自定义ImageView实现图片手势滑动,多点触摸放大缩小效果
- Android例子源码仿支付宝手势密码的功能实现
- android 自定义ImageView实现图片手势滑动,多点触摸放大缩小效果 .
- Android进阶之自定义View实战(二)九宫格手势解锁实现
- android 自定义ImageView实现图片手势滑动,多点触摸放大缩小效果