android状态栏一体化(改变状态栏的背景颜色)
2017-12-11 21:03
288 查看
Android 沉浸式状态栏、状态栏一体化、透明状态栏、仿ios透明状态栏
http://blog.csdn.net/jdsjlzx/article/details/50437779 注:状态栏的字体颜色位白色, 如果状态栏背景为白色,上面的博客已经解决了。
原文出处:http://niorgai.github.io/2016/03/20/Android-transulcent-status-bar/
最近业务上看到一个设计图挺好看,所以研究了一下透明状态栏,注意不是沉浸式状态栏,在参考了网上的一些资料后,整理出了这篇博客.
Github Demo 链接:
StatusBarCompat
参考文章:
由沉浸式状态栏引发的血案
Translucent System Bar 的最佳实践
该使用 fitsSystemWindows 了!
首先强调,对于状态栏的处理有两种不同的方式, 这里从Translucent System Bar 的最佳实践直接盗了两张图做对比~.
先定义几个名词:
全屏模式: 左边图所示.
着色模式: 右边图所示.
ContentView: activity.findViewById(Window.ID_ANDROID_CONTENT) 获取的 View , 即 setContentView 方法所设置的 View, 实质为 FrameLayout.
ContentParent: ContentView 的 parent , 实质为 LinearLayout.
ChildView: ContentView 的第一个子 View ,即布局文件中的 layout .
再介绍一下相关的函数:
fitsSystemWindows, 该属性可以设置是否为系统 View 预留出空间, 当设置为 true 时,会预留出状态栏的空间.
ContentView, 实质为 ContentFrameLayout, 但是重写了 dispatchFitSystemWindows 方法, 所以对其设置 fitsSystemWindows 无效.
ContentParent, 实质为 FitWindowsLinearLayout, 里面第一个 View 是 ViewStubCompat, 如果主题没有设置 title ,它就不会 inflate .第二个 View 就是 ContentView.
自5.0引入 Material Design ,状态栏对开发者更加直接,可以直接调用 setStatusBarColor 来设置状态栏的颜色.
全屏模式:
[js]
view plain
copy
Window window = activity.getWindow();
//设置透明状态栏,这样才能让 ContentView 向上
window.addFlags(WindowManager.LayoutParams.FLAG_TRANSLUCENT_STATUS);
//需要设置这个 flag 才能调用 setStatusBarColor 来设置状态栏颜色
window.addFlags(WindowManager.LayoutParams.FLAG_DRAWS_SYSTEM_BAR_BACKGROUNDS);
//设置状态栏颜色
window.setStatusBarColor(statusColor);
ViewGroup mContentView = (ViewGroup) activity.findViewById(Window.ID_ANDROID_CONTENT);
View mChildView = mContentView.getChildAt(0);
if (mChildView != null) {
//注意不是设置 ContentView 的 FitsSystemWindows, 而是设置 ContentView 的第一个子 View . 使其不为系统 View 预留空间.
ViewCompat.setFitsSystemWindows(mChildView, false);
}
着色模式:
[js]
view plain
copy
Window window = activity.getWindow();
//取消设置透明状态栏,使 ContentView 内容不再覆盖状态栏
window.clearFlags(WindowManager.LayoutParams.FLAG_TRANSLUCENT_STATUS);
//需要设置这个 flag 才能调用 setStatusBarColor 来设置状态栏颜色
window.addFlags(WindowManager.LayoutParams.FLAG_DRAWS_SYSTEM_BAR_BACKGROUNDS);
//设置状态栏颜色
window.setStatusBarColor(statusColor);
ViewGroup mContentView = (ViewGroup) activity.findViewById(Window.ID_ANDROID_CONTENT);
View mChildView = mContentView.getChildAt(0);
if (mChildView != null) {
//注意不是设置 ContentView 的 FitsSystemWindows, 而是设置 ContentView 的第一个子 View . 预留出系统 View 的空间.
ViewCompat.setFitsSystemWindows(mChildView, true);
}
4.4-5.0因为没有直接的 API 可以调用,需要自己兼容处理,网上的解决方法基本都是创建一下高度为状态栏的 View ,通过设置这个 View 的背景色来模拟状态栏. 这里我尝试了三种方法来兼容处理.
方法1: 向 ContentView 添加假 View , 设置 ChildView 的 marginTop 属性来模拟 fitsSystemWindows .
全屏模式:
[js]
view plain
copy
Window window = activity.getWindow();
ViewGroup mContentView = (ViewGroup) activity.findViewById(Window.ID_ANDROID_CONTENT);
//首先使 ChildView 不预留空间
View mChildView = mContentView.getChildAt(0);
if (mChildView != null) {
ViewCompat.setFitsSystemWindows(mChildView, false);
}
int statusBarHeight = getStatusBarHeight(activity);
//需要设置这个 flag 才能设置状态栏
window.addFlags(WindowManager.LayoutParams.FLAG_TRANSLUCENT_STATUS);
//避免多次调用该方法时,多次移除了 View
if (mChildView != null && mChildView.getLayoutParams() != null && mChildView.getLayoutParams().height == statusBarHeight) {
//移除假的 View.
mContentView.removeView(mChildView);
mChildView = mContentView.getChildAt(0);
}
if (mChildView != null) {
FrameLayout.LayoutParams lp = (FrameLayout.LayoutParams) mChildView.getLayoutParams();
//清除 ChildView 的 marginTop 属性
if (lp != null && lp.topMargin >= statusBarHeight) {
lp.topMargin -= statusBarHeight;
mChildView.setLayoutParams(lp);
}
}
着色模式:
[js]
view plain
copy
Window window = activity.getWindow();
ViewGroup mContentView = (ViewGroup) activity.findViewById(Window.ID_ANDROID_CONTENT);
//First translucent status bar.
window.addFlags(WindowManager.LayoutParams.FLAG_TRANSLUCENT_STATUS);
int statusBarHeight = getStatusBarHeight(activity);
View mChildView = mContentView.getChildAt(0);
if (mChildView != null) {
FrameLayout.LayoutParams lp = (FrameLayout.LayoutParams) mChildView.getLayoutParams();
//如果已经为 ChildView 设置过了 marginTop, 再次调用时直接跳过
if (lp != null && lp.topMargin < statusBarHeight && lp.height != statusBarHeight) {
//不预留系统空间
ViewCompat.setFitsSystemWindows(mChildView, false);
lp.topMargin += statusBarHeight;
mChildView.setLayoutParams(lp);
}
}
View statusBarView = mContentView.getChildAt(0);
if (statusBarView != null && statusBarView.getLayoutParams() != null && statusBarView.getLayoutParams().height == statusBarHeight) {
//避免重复调用时多次添加 View
statusBarView.setBackgroundColor(statusColor);
return;
}
statusBarView = new View(activity);
ViewGroup.LayoutParams lp = new ViewGroup.LayoutParams(ViewGroup.LayoutParams.MATCH_PARENT, statusBarHeight);
statusBarView.setBackgroundColor(statusColor);
//向 ContentView 中添加假 View
mContentView.addView(statusBarView, 0, lp);
方法2: 向 ContentParent 添加假 View ,设置 ContentView 和 ChildView 的 fitsSystemWindows.
全屏模式:
[js]
view plain
copy
Window window = activity.getWindow();
window.addFlags(WindowManager.LayoutParams.FLAG_TRANSLUCENT_STATUS);
ViewGroup mContentView = (ViewGroup) activity.findViewById(Window.ID_ANDROID_CONTENT);
ViewGroup mContentParent = (ViewGroup) mContentView.getParent();
View statusBarView = mContentParent.getChildAt(0);
if (statusBarView != null && statusBarView.getLayoutParams() != null && statusBarView.getLayoutParams().height == getStatusBarHeight(activity)) {
//移除假的 View
mContentParent.removeView(statusBarView);
}
//ContentView 不预留空间
if (mContentParent.getChildAt(0) != null) {
ViewCompat.setFitsSystemWindows(mContentParent.getChildAt(0), false);
}
//ChildView 不预留空间
View mChildView = mContentView.getChildAt(0);
if (mChildView != null) {
ViewCompat.setFitsSystemWindows(mChildView, false);
}
着色模式(会有一条黑线,无法解决):
[js]
view plain
copy
Window window = activity.getWindow();
window.addFlags(WindowManager.LayoutParams.FLAG_TRANSLUCENT_STATUS);
ViewGroup mContentView = (ViewGroup) activity.findViewById(Window.ID_ANDROID_CONTENT);
ViewGroup mContentParent = (ViewGroup) mContentView.getParent();
View statusBarView = mContentParent.getChildAt(0);
if (statusBarView != null && statusBarView.getLayoutParams() != null && statusBarView.getLayoutParams().height == getStatusBarHeight(activity)) {
//避免重复调用时多次添加 View
statusBarView.setBackgroundColor(statusColor);
return;
}
//创建一个假的 View, 并添加到 ContentParent
statusBarView = new View(activity);
ViewGroup.LayoutParams lp = new ViewGroup.LayoutParams(ViewGroup.LayoutParams.MATCH_PARENT,
getStatusBarHeight(activity));
statusBarView.setBackgroundColor(statusColor);
mContentParent.addView(statusBarView, 0, lp);
//ChildView 不需要预留系统空间
View mChildView = mContentView.getChildAt(0);
if (mChildView != null) {
ViewCompat.setFitsSystemWindows(mChildView, false);
}
方法3:向 ContentView 添加假 View , 设置 ChildView 的 fitsSystemWindows.
全屏模式:
[js]
view plain
copy
Window window = activity.getWindow();
window.addFlags(WindowManager.LayoutParams.FLAG_TRANSLUCENT_STATUS);
ViewGroup mContentView = (ViewGroup) activity.findViewById(Window.ID_ANDROID_CONTENT);
View statusBarView = mContentView.getChildAt(0);
//移除假的 View
if (statusBarView != null && statusBarView.getLayoutParams() != null && statusBarView.getLayoutParams().height == getStatusBarHeight(activity)) {
mContentView.removeView(statusBarView);
}
//不预留空间
if (mContentView.getChildAt(0) != null) {
ViewCompat.setFitsSystemWindows(mContentView.getChildAt(0), false);
}
着色模式:
[js]
view plain
copy
Window window = activity.getWindow();
window.addFlags(WindowManager.LayoutParams.FLAG_TRANSLUCENT_STATUS);
ViewGroup mContentView = (ViewGroup) activity.findViewById(Window.ID_ANDROID_CONTENT);
int statusBarHeight = getStatusBarHeight(activity);
View mTopView = mContentView.getChildAt(0);
if (mTopView != null && mTopView.getLayoutParams() != null && mTopView.getLayoutParams().height == statusBarHeight) {
//避免重复添加 View
mTopView.setBackgroundColor(statusColor);
return;
}
//使 ChildView 预留空间
if (mTopView != null) {
ViewCompat.setFitsSystemWindows(mTopView, true);
}
//添加假 View
mTopView = new View(activity);
ViewGroup.LayoutParams lp = new ViewGroup.LayoutParams(ViewGroup.LayoutParams.MATCH_PARENT, statusBarHeight);
mTopView.setBackgroundColor(statusColor);
mContentView.addView(mTopView, 0, lp);
其实全屏模式在三种模式下实现都是一样的,主要是着色模式实现不同.
对比一下三种着色模式实现的方式:
StatusBarCompat2 主要问题不能切换.
StatusBarCompat1 在4.4上会有一条黑线, 如果可以解决我觉得这是最靠谱的解决方法.
StatusBarCompat 类算是我最后给出的解决方案吧, 目前使用效果比较完善.推荐使用
用户可以随时在同一个 Activity 中切换不同的状态栏模式.
就算子 View 重写了 dispatchFitSystemWindows 也不会有影响.

gank1.png
gank2.png
下载地址:干货集中营
github:GanK
http://blog.csdn.net/jdsjlzx/article/details/50437779 注:状态栏的字体颜色位白色, 如果状态栏背景为白色,上面的博客已经解决了。
原文出处:http://niorgai.github.io/2016/03/20/Android-transulcent-status-bar/
最近业务上看到一个设计图挺好看,所以研究了一下透明状态栏,注意不是沉浸式状态栏,在参考了网上的一些资料后,整理出了这篇博客.
Github Demo 链接:
StatusBarCompat
参考文章:
由沉浸式状态栏引发的血案
Translucent System Bar 的最佳实践
该使用 fitsSystemWindows 了!
首先强调,对于状态栏的处理有两种不同的方式, 这里从Translucent System Bar 的最佳实践直接盗了两张图做对比~.
| 全屏( ContentView 可以进入状态栏) | 非全屏 ( ContentView 与状态栏分离, 状态栏直接着色) |
|---|---|
 |  |
全屏模式: 左边图所示.
着色模式: 右边图所示.
ContentView: activity.findViewById(Window.ID_ANDROID_CONTENT) 获取的 View , 即 setContentView 方法所设置的 View, 实质为 FrameLayout.
ContentParent: ContentView 的 parent , 实质为 LinearLayout.
ChildView: ContentView 的第一个子 View ,即布局文件中的 layout .
再介绍一下相关的函数:
fitsSystemWindows, 该属性可以设置是否为系统 View 预留出空间, 当设置为 true 时,会预留出状态栏的空间.
ContentView, 实质为 ContentFrameLayout, 但是重写了 dispatchFitSystemWindows 方法, 所以对其设置 fitsSystemWindows 无效.
ContentParent, 实质为 FitWindowsLinearLayout, 里面第一个 View 是 ViewStubCompat, 如果主题没有设置 title ,它就不会 inflate .第二个 View 就是 ContentView.
5.0以上的处理:
自5.0引入 Material Design ,状态栏对开发者更加直接,可以直接调用 setStatusBarColor 来设置状态栏的颜色.全屏模式:
[js]
view plain
copy
Window window = activity.getWindow();
//设置透明状态栏,这样才能让 ContentView 向上
window.addFlags(WindowManager.LayoutParams.FLAG_TRANSLUCENT_STATUS);
//需要设置这个 flag 才能调用 setStatusBarColor 来设置状态栏颜色
window.addFlags(WindowManager.LayoutParams.FLAG_DRAWS_SYSTEM_BAR_BACKGROUNDS);
//设置状态栏颜色
window.setStatusBarColor(statusColor);
ViewGroup mContentView = (ViewGroup) activity.findViewById(Window.ID_ANDROID_CONTENT);
View mChildView = mContentView.getChildAt(0);
if (mChildView != null) {
//注意不是设置 ContentView 的 FitsSystemWindows, 而是设置 ContentView 的第一个子 View . 使其不为系统 View 预留空间.
ViewCompat.setFitsSystemWindows(mChildView, false);
}
着色模式:
[js]
view plain
copy
Window window = activity.getWindow();
//取消设置透明状态栏,使 ContentView 内容不再覆盖状态栏
window.clearFlags(WindowManager.LayoutParams.FLAG_TRANSLUCENT_STATUS);
//需要设置这个 flag 才能调用 setStatusBarColor 来设置状态栏颜色
window.addFlags(WindowManager.LayoutParams.FLAG_DRAWS_SYSTEM_BAR_BACKGROUNDS);
//设置状态栏颜色
window.setStatusBarColor(statusColor);
ViewGroup mContentView = (ViewGroup) activity.findViewById(Window.ID_ANDROID_CONTENT);
View mChildView = mContentView.getChildAt(0);
if (mChildView != null) {
//注意不是设置 ContentView 的 FitsSystemWindows, 而是设置 ContentView 的第一个子 View . 预留出系统 View 的空间.
ViewCompat.setFitsSystemWindows(mChildView, true);
}
4.4-5.0的处理:
4.4-5.0因为没有直接的 API 可以调用,需要自己兼容处理,网上的解决方法基本都是创建一下高度为状态栏的 View ,通过设置这个 View 的背景色来模拟状态栏. 这里我尝试了三种方法来兼容处理.方法1: 向 ContentView 添加假 View , 设置 ChildView 的 marginTop 属性来模拟 fitsSystemWindows .
全屏模式:
[js]
view plain
copy
Window window = activity.getWindow();
ViewGroup mContentView = (ViewGroup) activity.findViewById(Window.ID_ANDROID_CONTENT);
//首先使 ChildView 不预留空间
View mChildView = mContentView.getChildAt(0);
if (mChildView != null) {
ViewCompat.setFitsSystemWindows(mChildView, false);
}
int statusBarHeight = getStatusBarHeight(activity);
//需要设置这个 flag 才能设置状态栏
window.addFlags(WindowManager.LayoutParams.FLAG_TRANSLUCENT_STATUS);
//避免多次调用该方法时,多次移除了 View
if (mChildView != null && mChildView.getLayoutParams() != null && mChildView.getLayoutParams().height == statusBarHeight) {
//移除假的 View.
mContentView.removeView(mChildView);
mChildView = mContentView.getChildAt(0);
}
if (mChildView != null) {
FrameLayout.LayoutParams lp = (FrameLayout.LayoutParams) mChildView.getLayoutParams();
//清除 ChildView 的 marginTop 属性
if (lp != null && lp.topMargin >= statusBarHeight) {
lp.topMargin -= statusBarHeight;
mChildView.setLayoutParams(lp);
}
}
着色模式:
[js]
view plain
copy
Window window = activity.getWindow();
ViewGroup mContentView = (ViewGroup) activity.findViewById(Window.ID_ANDROID_CONTENT);
//First translucent status bar.
window.addFlags(WindowManager.LayoutParams.FLAG_TRANSLUCENT_STATUS);
int statusBarHeight = getStatusBarHeight(activity);
View mChildView = mContentView.getChildAt(0);
if (mChildView != null) {
FrameLayout.LayoutParams lp = (FrameLayout.LayoutParams) mChildView.getLayoutParams();
//如果已经为 ChildView 设置过了 marginTop, 再次调用时直接跳过
if (lp != null && lp.topMargin < statusBarHeight && lp.height != statusBarHeight) {
//不预留系统空间
ViewCompat.setFitsSystemWindows(mChildView, false);
lp.topMargin += statusBarHeight;
mChildView.setLayoutParams(lp);
}
}
View statusBarView = mContentView.getChildAt(0);
if (statusBarView != null && statusBarView.getLayoutParams() != null && statusBarView.getLayoutParams().height == statusBarHeight) {
//避免重复调用时多次添加 View
statusBarView.setBackgroundColor(statusColor);
return;
}
statusBarView = new View(activity);
ViewGroup.LayoutParams lp = new ViewGroup.LayoutParams(ViewGroup.LayoutParams.MATCH_PARENT, statusBarHeight);
statusBarView.setBackgroundColor(statusColor);
//向 ContentView 中添加假 View
mContentView.addView(statusBarView, 0, lp);
方法2: 向 ContentParent 添加假 View ,设置 ContentView 和 ChildView 的 fitsSystemWindows.
全屏模式:
[js]
view plain
copy
Window window = activity.getWindow();
window.addFlags(WindowManager.LayoutParams.FLAG_TRANSLUCENT_STATUS);
ViewGroup mContentView = (ViewGroup) activity.findViewById(Window.ID_ANDROID_CONTENT);
ViewGroup mContentParent = (ViewGroup) mContentView.getParent();
View statusBarView = mContentParent.getChildAt(0);
if (statusBarView != null && statusBarView.getLayoutParams() != null && statusBarView.getLayoutParams().height == getStatusBarHeight(activity)) {
//移除假的 View
mContentParent.removeView(statusBarView);
}
//ContentView 不预留空间
if (mContentParent.getChildAt(0) != null) {
ViewCompat.setFitsSystemWindows(mContentParent.getChildAt(0), false);
}
//ChildView 不预留空间
View mChildView = mContentView.getChildAt(0);
if (mChildView != null) {
ViewCompat.setFitsSystemWindows(mChildView, false);
}
着色模式(会有一条黑线,无法解决):
[js]
view plain
copy
Window window = activity.getWindow();
window.addFlags(WindowManager.LayoutParams.FLAG_TRANSLUCENT_STATUS);
ViewGroup mContentView = (ViewGroup) activity.findViewById(Window.ID_ANDROID_CONTENT);
ViewGroup mContentParent = (ViewGroup) mContentView.getParent();
View statusBarView = mContentParent.getChildAt(0);
if (statusBarView != null && statusBarView.getLayoutParams() != null && statusBarView.getLayoutParams().height == getStatusBarHeight(activity)) {
//避免重复调用时多次添加 View
statusBarView.setBackgroundColor(statusColor);
return;
}
//创建一个假的 View, 并添加到 ContentParent
statusBarView = new View(activity);
ViewGroup.LayoutParams lp = new ViewGroup.LayoutParams(ViewGroup.LayoutParams.MATCH_PARENT,
getStatusBarHeight(activity));
statusBarView.setBackgroundColor(statusColor);
mContentParent.addView(statusBarView, 0, lp);
//ChildView 不需要预留系统空间
View mChildView = mContentView.getChildAt(0);
if (mChildView != null) {
ViewCompat.setFitsSystemWindows(mChildView, false);
}
方法3:向 ContentView 添加假 View , 设置 ChildView 的 fitsSystemWindows.
全屏模式:
[js]
view plain
copy
Window window = activity.getWindow();
window.addFlags(WindowManager.LayoutParams.FLAG_TRANSLUCENT_STATUS);
ViewGroup mContentView = (ViewGroup) activity.findViewById(Window.ID_ANDROID_CONTENT);
View statusBarView = mContentView.getChildAt(0);
//移除假的 View
if (statusBarView != null && statusBarView.getLayoutParams() != null && statusBarView.getLayoutParams().height == getStatusBarHeight(activity)) {
mContentView.removeView(statusBarView);
}
//不预留空间
if (mContentView.getChildAt(0) != null) {
ViewCompat.setFitsSystemWindows(mContentView.getChildAt(0), false);
}
着色模式:
[js]
view plain
copy
Window window = activity.getWindow();
window.addFlags(WindowManager.LayoutParams.FLAG_TRANSLUCENT_STATUS);
ViewGroup mContentView = (ViewGroup) activity.findViewById(Window.ID_ANDROID_CONTENT);
int statusBarHeight = getStatusBarHeight(activity);
View mTopView = mContentView.getChildAt(0);
if (mTopView != null && mTopView.getLayoutParams() != null && mTopView.getLayoutParams().height == statusBarHeight) {
//避免重复添加 View
mTopView.setBackgroundColor(statusColor);
return;
}
//使 ChildView 预留空间
if (mTopView != null) {
ViewCompat.setFitsSystemWindows(mTopView, true);
}
//添加假 View
mTopView = new View(activity);
ViewGroup.LayoutParams lp = new ViewGroup.LayoutParams(ViewGroup.LayoutParams.MATCH_PARENT, statusBarHeight);
mTopView.setBackgroundColor(statusColor);
mContentView.addView(mTopView, 0, lp);
其实全屏模式在三种模式下实现都是一样的,主要是着色模式实现不同.
对比一下三种着色模式实现的方式:
| 方法1 | 方法2 | 方法3 | |
|---|---|---|---|
| 原理 | 向 ContentView 中添加假 View, 然后利用 ChildView 的 marginTop 属性来模拟 fitsSystemWindows ,主要是通过修改 marginTop 的值可以在全屏模式和着色模式之间切换. | 因为 ParentView 的实质是一个 LinearLayout , 可以再其顶部添加 View . | 向 ContentView 中添加假 View, 然后利用ChildView 的 fitsSystemWindows 属性来控制位置, 但是实现缺陷就是不能随时切换两种模式. |
| 缺陷 | 改变了 ChildView 的 marginTop 值 | 着色模式下,会像由沉浸式状态栏引发的血案中一样出现一条黑线 | 不能在不重启 Activity 的情况下切换模式. |
| 对应 Github demo 中代码 | StatusBarCompat类 | StatusBarCompat1类 | StatusBarCompat2 类 |
总结
StatusBarCompat2 主要问题不能切换.StatusBarCompat1 在4.4上会有一条黑线, 如果可以解决我觉得这是最靠谱的解决方法.
StatusBarCompat 类算是我最后给出的解决方案吧, 目前使用效果比较完善.推荐使用
用户可以随时在同一个 Activity 中切换不同的状态栏模式.
就算子 View 重写了 dispatchFitSystemWindows 也不会有影响.
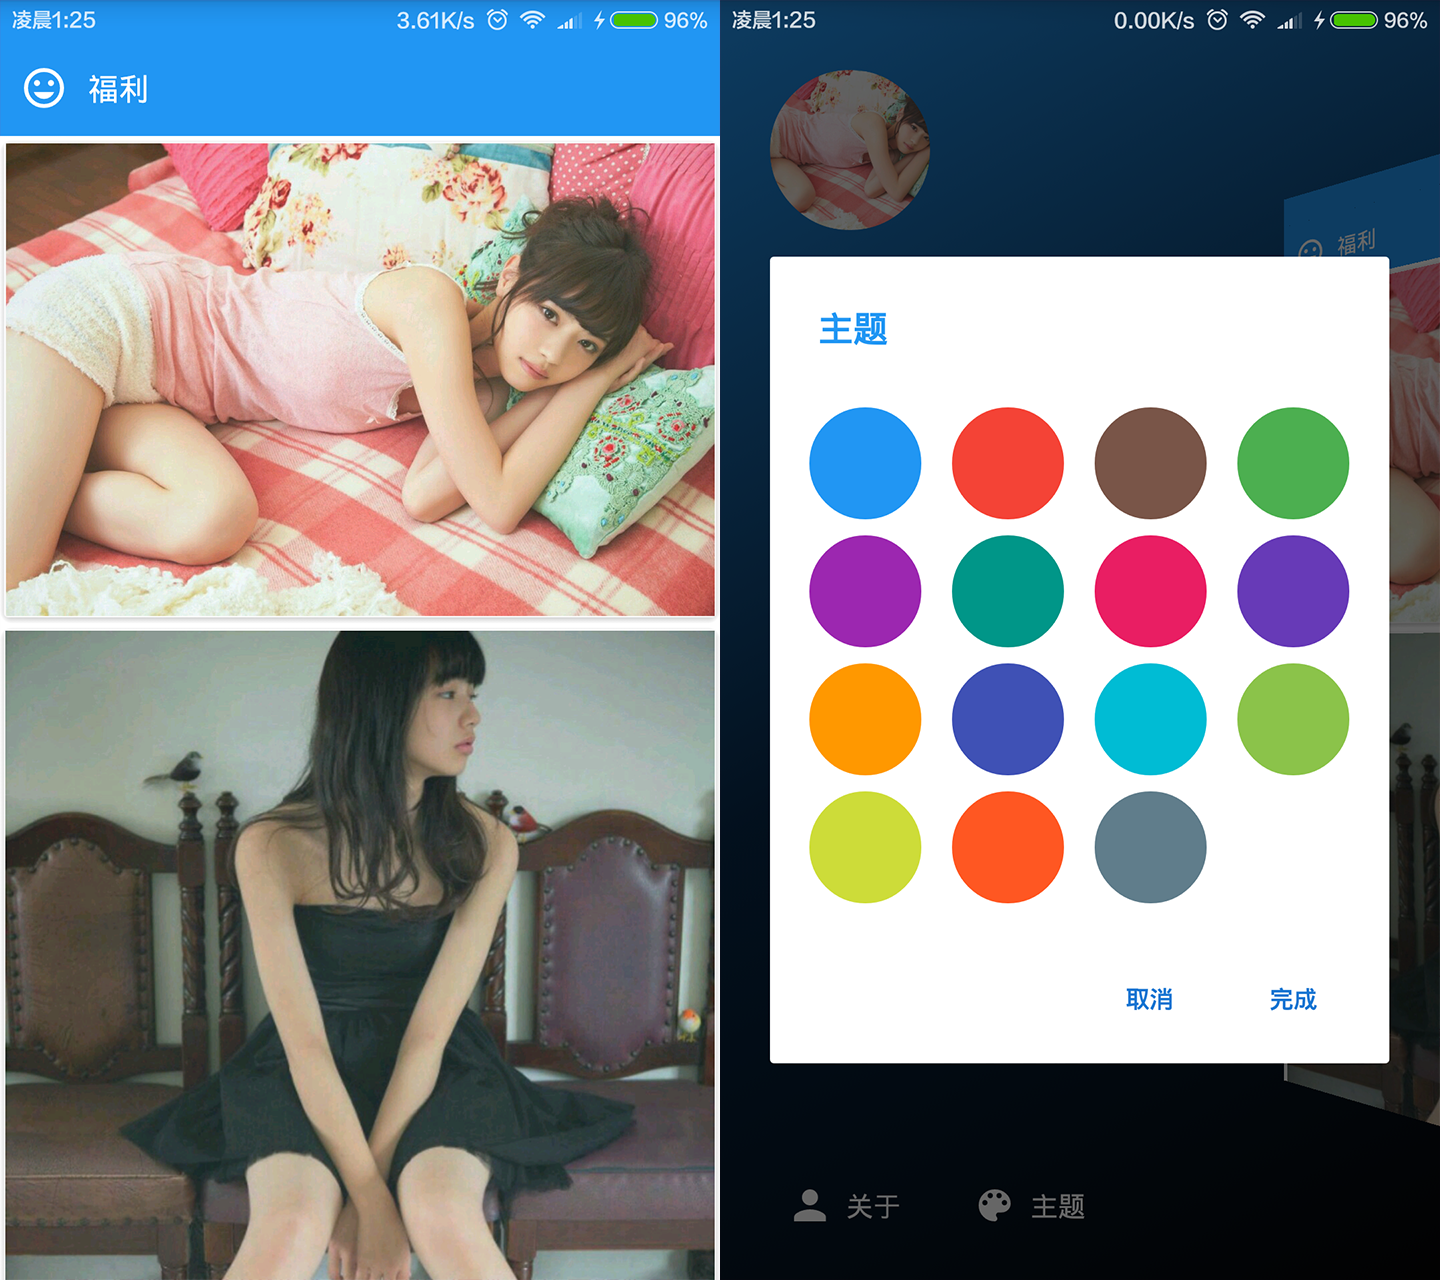
推荐干货集中营Android客户端,实现了沉浸式状态栏,无缝换肤,带3D感觉的侧滑菜单
主页及侧滑页截图
gank1.png
福利及换肤截图
gank2.png
下载地址:干货集中营
github:GanK

相关文章推荐
- android状态栏一体化(改变状态栏的背景颜色)开源工程推荐
- android状态栏一体化(改变状态栏的背景颜色)开源工程推荐
- android状态栏一体化(改变状态栏的背景颜色)
- android状态栏一体化(改变状态栏的背景颜色)开源工程推荐
- android状态栏一体化(改变状态栏的背景颜色)开源工程推荐
- android状态栏一体化(改变状态栏的背景颜色)开源工程推荐
- android状态栏一体化(改变状态栏的背景颜色)类似于IOS
- android状态栏一体化(改变状态栏的背景颜色)开源工程推荐
- Android状态栏一体化 (改变状态栏的背景颜色)
- android状态栏一体化(改变状态栏的背景颜色)开源工程推荐
- android状态栏一体化(改变状态栏的背景颜色)开源工程推荐
- Android状态栏一体化(改变状态栏的背景颜色)开源工程推荐
- android状态栏一体化(改变状态栏的背景颜色)
- android状态栏一体化(改变状态栏的背景颜色)开源工程推荐
- Android状态栏一体化(改变状态栏的背景颜色)开源工程
- android状态栏一体化(改变状态栏的背景颜色)开源工程推荐
- Android改变状态栏的背景颜色使其与APP风格一体化
- android状态栏一体化(改变状态栏的背景颜色)开源工程推荐
- Android 非常简单的实现 Fragment状态栏一体化布局,状态栏字体的颜色改变,
- Android学习第八弹之改变状态栏的颜色使其与APP风格一体化