AndroidStudio多渠道打包
2017-12-11 19:02
316 查看
说到多渠道,这里不得不提一下友盟统计,友盟统计是大家日常开发中常用的渠道统计工具,而我们的打包方法就是基于友盟统计实施的。按照友盟官方文档说明,渠道信息通常需要在AndroidManifest.xml中配置如下值:
上面的value值Channel_ID就是渠道标识。我们的期望的就是在编译时候这个值能够自动变化以满足区分多渠道的需求。
2
3
或者批量修改
所谓ProductFlavors其实就是可定义的产品特性,配合 manifest merger 使用的时候就可以达成在一次编译过程中产生多个具有自己特性配置的版本。上面这个配置的作用就是,为每个渠道包产生不同的 UMENG_CHANNEL_VALUE 的值。
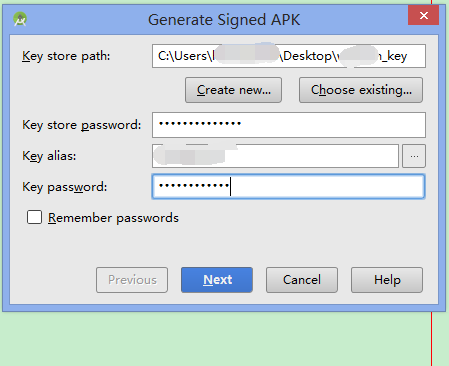
在AndroidStudio菜单栏点击Build菜单–>Generate signed APK–>选择key,并输入密码
然后下一步,选择打包渠道
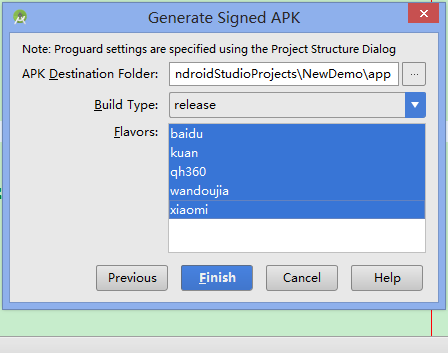
最后点击完成按钮
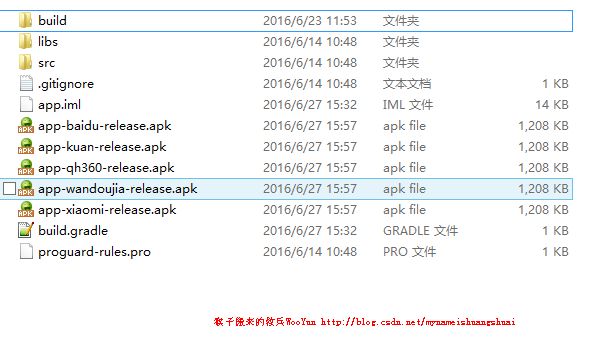
上图可以看到,我们已经成功的将五个渠道包打好。
解决Error:All flavors must now belong to a named flavor dimension. Learn more
at https://d.android.com
这个问题是Android studio升级到3.0之后,运行的时候会提示gradle要升级到3.5版本才能编译。于是我把我的gradle升级到了
gradle-4.1-milestone-1 版本,是2017年7月份最新版本了。
于是我把主程序的build.gradle中的gradle版本改成了这个,具体指定哪个版本我也不知道,于是就写了个3.0+
dependencies {
classpath 'com.android.tools.build:gradle:3.0+'
}
然后再次编译,又发现了毒。
提示:Error:All flavors must now belong to a named flavor dimension.Learn more at https://d.android.com/r/tools/flavorDimensions-missing-error-message.html
这个一个错误,意思是:所有的flavors都必须属于同一个风格。
=。=懵逼
去翻墙看了它提供的地址才知道:
Plugin 3.0.0 includes a new dependency mechanism that automatically matches variants when consuming a library. This means an app's debug variant automatically consumes a library's debug variant, and so on. It also works when using flavors—an app's redDebug variant will consume a library's redDebug variant. To make this work, the plugin now requires that all flavors belong to a named flavor dimension —even if you intend to use only a single dimension. Otherwise, you will get the following build error:
[cpp] view
plain copy
Error:All flavors must now belong to a named flavor dimension.
The flavor 'flavor_name' is not assigned to a flavor dimension.
To resolve this error, assign each flavor to a named dimension, as shown in the sample below. Because dependency matching is now taken care of by the plugin, you should name your flavor dimensions carefully. For example, if all your app and library modules use the foo dimension, you'll have less control over which flavors are matched by the plugin.
[cpp] view
plain copy
// Specifies a flavor dimension.
flavorDimensions "color"
productFlavors {
red {
// Assigns this product flavor to the 'color' flavor dimension.
// This step is optional if you are using only one dimension.
dimension "color"
...
}
blue {
dimension "color"
...
}
}
大致是说,Plugin 3.0.0之后有一种自动匹配消耗库的机制,便于debug variant 自动消耗一个库,然后就是必须要所有的flavor 都属于同一个维度。
为了避免flavor 不同产生误差的问题,应该在所有的库模块都使用同一个foo尺寸。
= 。=还是懵逼。说一堆依然不是很理解。
但是我们从中已经知道解决方案了:
在主app的build.gradle里面的
defaultConfig {
targetSdkVersion:***
minSdkVersion :***
versionCode:***
versionName :***
//版本名后面添加一句话,意思就是flavor dimension 它的维度就是该版本号,这样维度就是都是统一的了
flavorDimensions "versionCode"
}
就直接解决这个问题。然后app 就可以happy的运行起来了。
除了使用AndroidStudio图形打包操作以外,我们也可以使用命令行进行打包操作,具体步骤如下:

注意,此时这里的APK包名显示为unsigned,也就是说未签名,我们可以继续在build.gradle文件中配置签名信息
这次生成的就是含有签名的渠道包。
如果我们想打包wandoujia渠道的release版本,执行如下命令就好了:
如果我们想打包wandoujia渠道的debug版本,执行如下命令就好了:
如果我们只打wandoujia渠道版本,则:
此命令会生成wandoujia渠道的Release和Debug版本
同理我想打全部Release版本:
这条命令会把Product Flavor下的所有渠道的Release版本都打出来。
下面是我个人的build.gradle配置文件,分享给大家,以作参考
上面的signingConfigs配置中,可以写两个代码块,分别名为debugConfig和releaseConfig,并在其中写好一个完整签名需要的keyAlias、keyPassword、storeFile file、storePassword。
然后在buildTypes中,分两个代码块,分别是debug时用的,和release时用的。在其中引用刚刚写好的debugConfig和releaseConfig即可。
注意:signingConfigs代码块一定要写在buildTypes前面,否则会报下面这种错:
签名密码写在gradle中不安全,故最好在打包上线的时候将相关代码注释掉。
<meta-data android:value="Channel ID" android:name="UMENG_CHANNEL"/>1
上面的value值Channel_ID就是渠道标识。我们的期望的就是在编译时候这个值能够自动变化以满足区分多渠道的需求。
(一)在AndroidManifest.xml里设置动态渠道变量
<meta-data
android:name="UMENG_CHANNEL"
android:value="${UMENG_CHANNEL_VALUE}" />12
3
(二)在build.gradle设置productFlavors
这里假定我们需要打包的渠道为酷安市场、360、小米、百度、豌豆荚
android {
productFlavors {
kuan {
manifestPlaceholders = [UMENG_CHANNEL_VALUE: "kuan"]
}
xiaomi {
manifestPlaceholders = [UMENG_CHANNEL_VALUE: "xiaomi"]
}
qh360 {
manifestPlaceholders = [UMENG_CHANNEL_VALUE: "qh360"]
}
baidu {
manifestPlaceholders = [UMENG_CHANNEL_VALUE: "baidu"]
}
wandoujia {
manifestPlaceholders = [UMENG_CHANNEL_VALUE: "wandoujia"]
}
}
}
或者批量修改
android {
productFlavors {
kuan {}
xiaomi {}
qh360 {}
baidu {}
wandoujia {}
}

productFlavors.all {
flavor -> flavor.manifestPlaceholders = [UMENG_CHANNEL_VALUE: name]
}
}
所谓ProductFlavors其实就是可定义的产品特性,配合 manifest merger 使用的时候就可以达成在一次编译过程中产生多个具有自己特性配置的版本。上面这个配置的作用就是,为每个渠道包产生不同的 UMENG_CHANNEL_VALUE 的值。
(三)执行打包操作
在AndroidStudio菜单栏点击Build菜单–>Generate signed APK–>选择key,并输入密码 然后下一步,选择打包渠道
最后点击完成按钮
上图可以看到,我们已经成功的将五个渠道包打好。
解决Error:All flavors must now belong to a named flavor dimension. Learn more
at https://d.android.com
这个问题是Android studio升级到3.0之后,运行的时候会提示gradle要升级到3.5版本才能编译。于是我把我的gradle升级到了
gradle-4.1-milestone-1 版本,是2017年7月份最新版本了。
于是我把主程序的build.gradle中的gradle版本改成了这个,具体指定哪个版本我也不知道,于是就写了个3.0+
dependencies {
classpath 'com.android.tools.build:gradle:3.0+'
}
然后再次编译,又发现了毒。
提示:Error:All flavors must now belong to a named flavor dimension.Learn more at https://d.android.com/r/tools/flavorDimensions-missing-error-message.html
这个一个错误,意思是:所有的flavors都必须属于同一个风格。
=。=懵逼
去翻墙看了它提供的地址才知道:
Plugin 3.0.0 includes a new dependency mechanism that automatically matches variants when consuming a library. This means an app's debug variant automatically consumes a library's debug variant, and so on. It also works when using flavors—an app's redDebug variant will consume a library's redDebug variant. To make this work, the plugin now requires that all flavors belong to a named flavor dimension —even if you intend to use only a single dimension. Otherwise, you will get the following build error:
[cpp] view
plain copy
Error:All flavors must now belong to a named flavor dimension.
The flavor 'flavor_name' is not assigned to a flavor dimension.
To resolve this error, assign each flavor to a named dimension, as shown in the sample below. Because dependency matching is now taken care of by the plugin, you should name your flavor dimensions carefully. For example, if all your app and library modules use the foo dimension, you'll have less control over which flavors are matched by the plugin.
[cpp] view
plain copy
// Specifies a flavor dimension.
flavorDimensions "color"
productFlavors {
red {
// Assigns this product flavor to the 'color' flavor dimension.
// This step is optional if you are using only one dimension.
dimension "color"
...
}
blue {
dimension "color"
...
}
}
大致是说,Plugin 3.0.0之后有一种自动匹配消耗库的机制,便于debug variant 自动消耗一个库,然后就是必须要所有的flavor 都属于同一个维度。
为了避免flavor 不同产生误差的问题,应该在所有的库模块都使用同一个foo尺寸。
= 。=还是懵逼。说一堆依然不是很理解。
但是我们从中已经知道解决方案了:
在主app的build.gradle里面的
defaultConfig {
targetSdkVersion:***
minSdkVersion :***
versionCode:***
versionName :***
//版本名后面添加一句话,意思就是flavor dimension 它的维度就是该版本号,这样维度就是都是统一的了
flavorDimensions "versionCode"
}
就直接解决这个问题。然后app 就可以happy的运行起来了。
(四)执行打包命令 ./gradlew assembleRelease
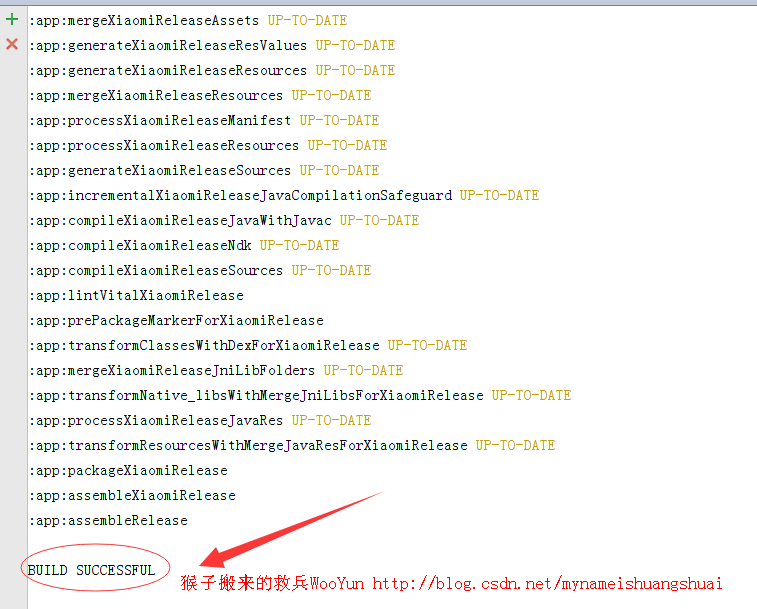
除了使用AndroidStudio图形打包操作以外,我们也可以使用命令行进行打包操作,具体步骤如下:
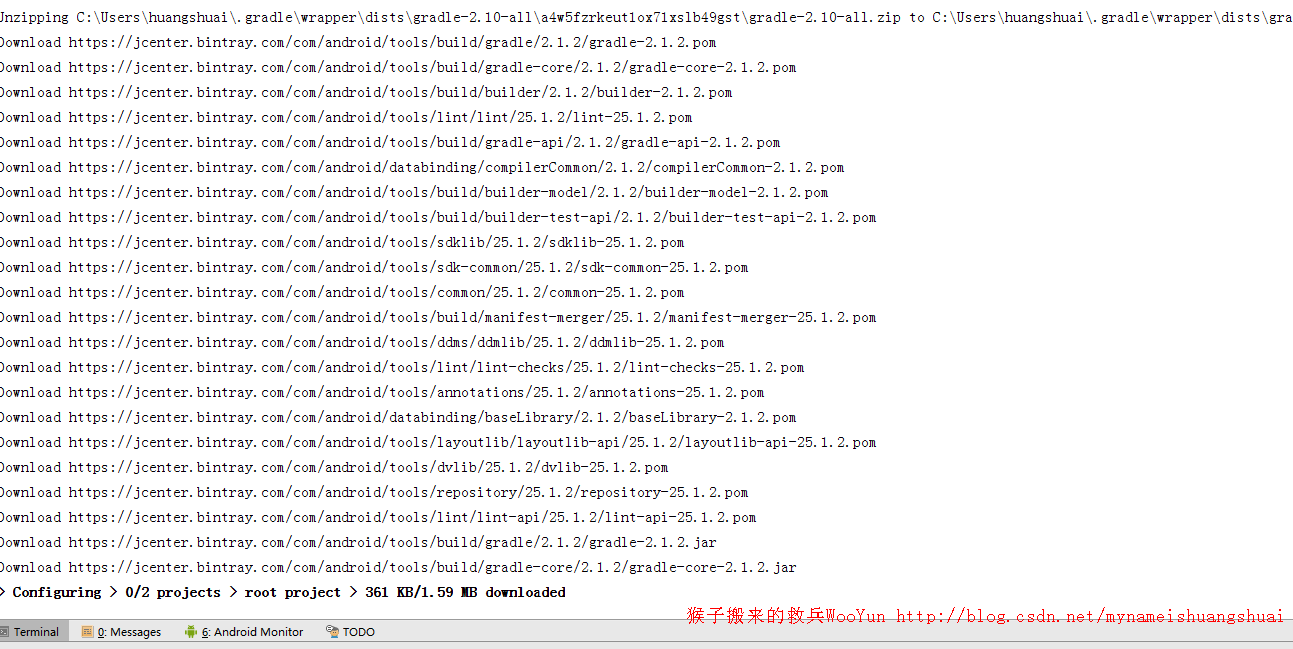
在AndroidStudio窗口左下角打开Terminal面板,输入gradlew assembleRelease命令
如果系统中没有安装Gradle,则会自动下载完成安装及初始化
打包成功后会提示BUILD SUCCESSRUL
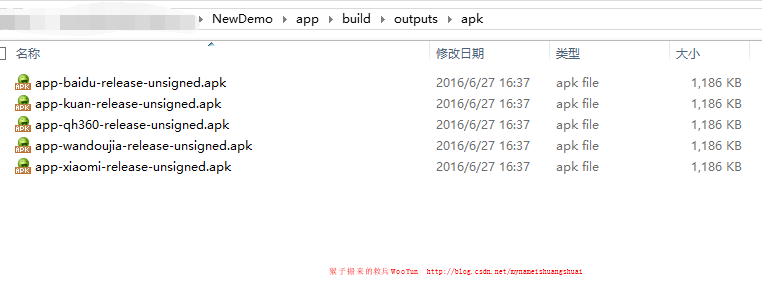
在app–>build–>outputs–>apk路径中就可以看到打包成功后的APK
注意,此时这里的APK包名显示为unsigned,也就是说未签名,我们可以继续在build.gradle文件中配置签名信息
signingConfigs {
release{
storeFile file("../wooyun_keystore") //签名文件路径
storePassword "123456"
keyAlias "123456"
keyPassword "123456"  //签名密码
}
}
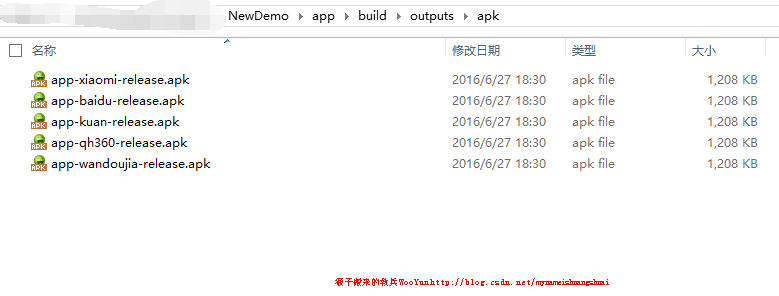
然后再次执行gradlew assembleRelease命令
这次生成的就是含有签名的渠道包。
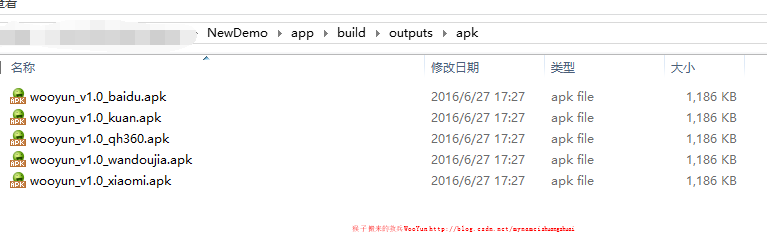
当我们的渠道包版本比较多时,可以自定义所打APK包名称,用以区分
// 自定义输出配置,这里我们加上APK版本号1.0
applicationVariants.all { variant ->
variant.outputs.each { output ->
def outputFile = output.outputFile
if (outputFile != null && outputFile.name.endsWith('.apk')) {
// 输出apk名称为wooyun_v1.0_wandoujia.apk
def fileName = "wooyun_v${defaultConfig.versionName}_${variant.productFlavors[0].name}.apk"
output.outputFile = new File(outputFile.parent, fileName)
}
}
}
assemble是Gradle中的编译打包命令,有如下用法:
如果我们想打包wandoujia渠道的release版本,执行如下命令就好了:gradlew assembleWandoujiaRelease
如果我们想打包wandoujia渠道的debug版本,执行如下命令就好了:
gradlew assembleWandoujiaDebug1
如果我们只打wandoujia渠道版本,则:
gradlew assembleWandoujia
此命令会生成wandoujia渠道的Release和Debug版本
同理我想打全部Release版本:
gradlew assembleRelease
这条命令会把Product Flavor下的所有渠道的Release版本都打出来。
下面是我个人的build.gradle配置文件,分享给大家,以作参考
apply plugin: 'com.android.application'

android {
compileSdkVersion 23
buildToolsVersion "23.0.3"

defaultConfig {
applicationId "com.wooyun.castiel"
minSdkVersion 15
targetSdkVersion 23
versionCode 1
versionName "1.0"
}

//签名
signingConfigs {
debugConfig {
storeFile file("../wooyun_keystore")      //签名文件
storePassword "123456"
keyAlias "123456"
keyPassword "123456"  //签名密码
}
release{
storeFile file("../wooyun_keystore")      //签名文件
storePassword "123456"
keyAlias "123456"
keyPassword "123456"  //签名密码
}
}

buildTypes {
release {
minifyEnabled false
proguardFiles getDefaultProguardFile('proguard-android.txt'), 'proguard-rules.pro'
// 自定义输出配置
applicationVariants.all { variant ->
variant.outputs.each { output ->
def outputFile = output.outputFile
if (outputFile != null && outputFile.name.endsWith('.apk')) {
// 输出apk名称为wooyun_v1.0_wandoujia.apk
def fileName = "wooyun_v${defaultConfig.versionName}_${variant.productFlavors[0].name}.apk"
output.outputFile = new File(outputFile.parent, fileName)
}
}
}
}
}

productFlavors {
kuan {}
xiaomi {}
qh360 {}
baidu {}
wandoujia {}
}

productFlavors.all {
flavor -> flavor.manifestPlaceholders = [UMENG_CHANNEL_VALUE: name]
}
}

dependencies {
compile fileTree(dir: 'libs', include: ['*.jar'])
testCompile 'junit:junit:4.12'
compile 'com.android.support:appcompat-v7:23.4.0'
}
上面的signingConfigs配置中,可以写两个代码块,分别名为debugConfig和releaseConfig,并在其中写好一个完整签名需要的keyAlias、keyPassword、storeFile file、storePassword。
然后在buildTypes中,分两个代码块,分别是debug时用的,和release时用的。在其中引用刚刚写好的debugConfig和releaseConfig即可。
注意:signingConfigs代码块一定要写在buildTypes前面,否则会报下面这种错:
Could not find property 'debugConfig' on SigningConfig container.
签名密码写在gradle中不安全,故最好在打包上线的时候将相关代码注释掉。

相关文章推荐
- Android 多渠道打包的 Android Studio / IDEA 插件
- Android Studio3.0.0以上APP多渠道打包
- Android Studio多渠道打包、自定义打包APK名称
- 手把手教你AndroidStudio多渠道打包
- AndroidStudio多渠道打包
- Android:AndroidStudio多渠道打包
- AndroidStudio多渠道打包心得
- Android Studio多渠道打包和代码混淆教程
- 【Android Studio探索之路系列】之十:Gradle项目构建系统(四):Android Studio项目多渠道打包
- Android Studio使用Gradle多渠道自动打包
- 手把手教你AndroidStudio多渠道打包
- [Android Studio 权威教程]多渠道打包和一键完成(全部产品)打包并签名
- Android Studio多渠道打包和代码混淆教程
- Android Studio之Gradle多渠道打包
- AndroidStudio多渠道打包
- 手把手教你AndroidStudio多渠道打包
- Android Studio多渠道打包并动态更换应用名、icon、参数等(一)
- AndroidStudio多渠道打包
- 手把手教你AndroidStudio多渠道打包
- Android Studio多渠道打包