学徒浅析Android——Android原生下载机制针对0K大小文件下载异常的分析
2017-12-10 21:21
302 查看
本篇文章已授权微信公众号 guolin_blog(郭霖)独家发布
最近在进行一次测试用例中,发现测试手机在利用本地下载功能下载0K大小的文件时,进度条一直处于进度模糊状态中,虽然查看本地存储路径,发现文件已经存在,但是页面上并没有提示下载成功,此时只能对下载执行暂停或删除操作。最初只是怀疑是自身应用的问题,但是在试了自己的华为畅享5s(Android5.1)、联想S560(Android.4.2)(暴露贫穷了)及朋友的ZTE小鲜(Android6.0)、华为P9(Android7.0)等三款不同厂商的设备后,发现都有相同的现象,所以怀疑这是android自身的一个待优化点(说bug有点严重了,毕竟0K大小的文件谁会经常遇到呢)。在此基础上,对AOSP的DownloadProvider进行了一番研究,源码资源大家可以访问http://androidxref.com/,最新的Android
Oreo源码也可以在上面查阅。
下面的调查以Android7.0和Android8.0的DownloadProvider源码为基础展开。将探讨两个问题:
(1)进度条样式为什么是进度模糊样式?
(2)0K文件是否真正意义上下载成功了?
Android的本地下载分为三部分:
1、frameworks/base/core/java/android/app/下的DownloadManager.java和frameworks/base/core/java/android/provider/下的Downloads.java
2、packages/apps/providers/下的DownloadProvider
3、frameworks/base/packages/下的DocumentsUI
其中,DocumentsUI就是我们常见的下载列表。而DownloadManager.java就是开放给开发者调用的下载器,也是系统自身使用的下载器,Downloads.java负责表路径和下载状态标记的管理,DownloadProvider负责下载过程中数据的处理和展示。鉴于ANDROID下载机制中,默认下载进度是以通知的形式展示的,所以我通过检索Notification,发现只在DownloadProvider中出现了调用,那么问题的根源可能就存在在DownloadProvider中。
DownloadProvider类目录结构如下:
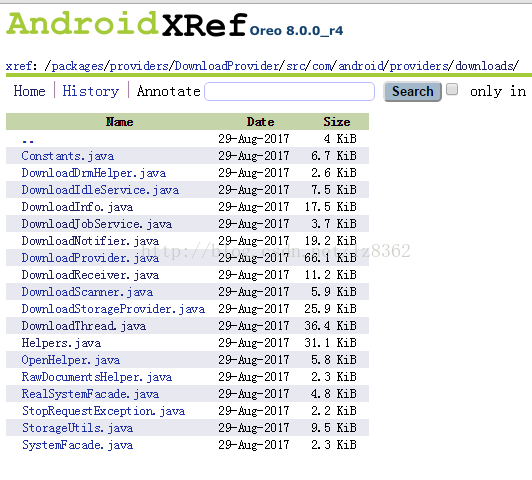
可以发现一个很明显的DownloadNotifier.java,分析其代码,DownloadNotifier在构造函数中创建了一个NotificationManager对象,代码详情如下:
更新下载通知的操作由update()(低版本中叫updateWith())来实现,该方法将被具体的下载线程进行调用,而通知样式围绕下载状态标记的具体实现则是updateWithLocked()内部的一个私有方法updateWithLocked(Cursor
cursor)(这个方法名一直没有变),代码详情如下:
在解析updateWithLocked()方法前,先介绍下DownloadProvider是如何调用DownloadNotifier.update()方法的。DownloadProvider下载运行图如下:
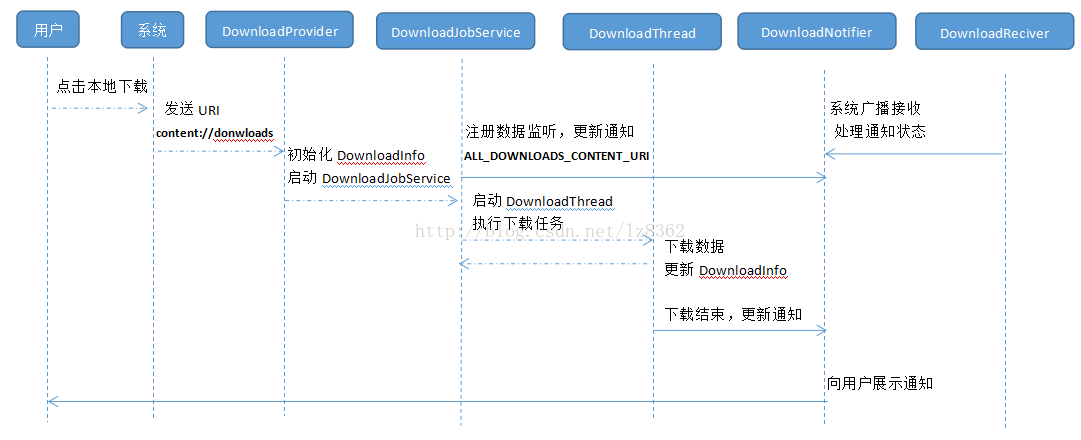
下载记录是统一保存在Downloads.Impl.ALL_DOWNLOADS_CONTENT_URI指向的表中,当用户执行下载操作时,系统通过URI调起DownloadProvider.java,该类负责统一管理DownloadProvider下各类的使用,首先初始化待访问的数据集合DownloadInfo,启动DownloadJobService管理本次下载,DownloadJobService会把DownloadProvider提供的DownloadInfo交给DownloadThread完成更新和操作,同时具体的数据读写也在DownloadThread中完成。DownloadJobService会先注册一个数据监听器:
监听下载过程中数据库的变化,及时调用DownloadNotifier.update()更新进度条。等到下载结束时,DownloadThread会再一次调用DownloadNotifier.update()。这便是下载中通知变化的流程。
下面来分析下updateWithLocked()中对通知更新的实现流程,总体上可以分成三步走:
1、不管入参是Cursor还是ArrayList<DoenloadInfo>,都是通过访问Downloads.Impl.ALL_DOWNLOADS_CONTENT_URI(content://downloads/all_downloads)获得当前下载记录。针对每条数据,根据status和visibility字段生成一个标记,作为key,一并保存到ArrayMap<String,
IntArray> clustered中。
标记整体分为两部分:下载状态;当前调用下载的应用包名/下载记录的ID
标记生成方法如下:buildNotificationTag(Cursor cursor)
2、对clustered中每一条下载记录创建一条对应的通知对象。此时用到了一个全局变量mActiveNotifs,存放当前活跃的通知。
private final ArrayMap<String, Long> mActiveNotifs = new ArrayMap<>();
根据clustered中提供的标记通过getNotificationTagType方法提取中下载类型type,实际上通过getNotificationTagType的实现代码,type就是步骤1中提到的下载状态,getNotificationTagType实现代码如下:
根据type的不同,通知将配置不同的文字、图片等样式,
3、删除未更新的过期通知。即只展示当前正在下载的通知。
关键看步骤2中当前进度的计算这段逻辑,代码如下:
进度值的计算是在状态标记为TYPE_ACTIVE时才会触发。那么什么时候进入TYPE_ACTIVE状态呢,Downloads提供了详细的下载状态,但是DownloadManager可以更清晰的告诉我们。DownloadManager在Downloads基础上转化成五种下载状态:
DownloadManager.STATUS_PENDING
DownloadManager.STATUS_RUNNING
DownloadManager.STATUS_PAUSED
DownloadManager.STATUS_SUCCESSFUL
DownloadManager.STATUS_FAILED
任何一次下载都要经过 STATUS_PENDING->STATUS_RUNNING->STATUS_SUCCESSFUL/STATUS_FAILED 这样一个过程。重看buildNotificationTag(),你会发现TYPE_ACTIVE是通过isActiveAndVisible()生成的,代码如下:
STATUS_RUNNING表示当前下载链接已经建立成功,开始获取文件大小,并执行下载。换句话说,STATUS_RUNNING阶段不会因为文件大小是0K,就直接从STATUS_PENDING执行到STATUS_SUCCESSFUL/STATUS_FAILED,这是一个必要的过程。所以0K大小的文件下载时也会执行进度值计算。进度百分比percent分别通过字段total_bytes和current_bytes提供,total_bytes默认值为-1,只有当成功获取到文件大小时才会被赋值。正常下载过程中,进度条设置为builder.setProgress(100,
percent, false);当下载状态为TYPE_ACTIVE且下载文件大小为0时,进度条设置为builder.setProgress(100, 0, true);这个true表示当前进度条为非明确样式,即表示进度的加载条充满进度槽并持续滚动,这样就导致了下载0K文件时进度条样式的不统一。
进度条样式的问题到这里就可以告一段落了,关于0K文件是否下载成功,我们可以回看DownloadThread。DownloadThread中读写操作是有transferData(InputStream
in, OutputStream out, FileDescriptor outFd)来实现。这里有一个入参FileDescriptor。顾名思义它会先创建一个待写入的目标文件。transferData()中的读写操作如下:
由于是一个0K文件,in.read(buffer)实际上是读不到数据的,所以len依然是-1,这就导致while循环不能完整执行,后续的写入操作、标志更新操作等都没有被执行,由于又没有异常产生,通知页面便始终处于下载中状态,直到超时。所以我在本地存储路径下看到的文件,实际上是没有执行写入操作的,严格意义上并没有下载成功。
这就是关于0K大小文件的下载异常分析,虽然在平时的文件下载需求中不大会出现0K这种现象,但不代表着永远不会遇到,也许你下载的文件的是破损压缩文件、上传失败的压缩文件或者是标记文件,这种场景下还是要考虑进来的,毕竟存在即为合理。对于0K文件直接本地创建即可,无需执行读写操作。
最近在进行一次测试用例中,发现测试手机在利用本地下载功能下载0K大小的文件时,进度条一直处于进度模糊状态中,虽然查看本地存储路径,发现文件已经存在,但是页面上并没有提示下载成功,此时只能对下载执行暂停或删除操作。最初只是怀疑是自身应用的问题,但是在试了自己的华为畅享5s(Android5.1)、联想S560(Android.4.2)(暴露贫穷了)及朋友的ZTE小鲜(Android6.0)、华为P9(Android7.0)等三款不同厂商的设备后,发现都有相同的现象,所以怀疑这是android自身的一个待优化点(说bug有点严重了,毕竟0K大小的文件谁会经常遇到呢)。在此基础上,对AOSP的DownloadProvider进行了一番研究,源码资源大家可以访问http://androidxref.com/,最新的Android
Oreo源码也可以在上面查阅。
下面的调查以Android7.0和Android8.0的DownloadProvider源码为基础展开。将探讨两个问题:
(1)进度条样式为什么是进度模糊样式?
(2)0K文件是否真正意义上下载成功了?
Android的本地下载分为三部分:
1、frameworks/base/core/java/android/app/下的DownloadManager.java和frameworks/base/core/java/android/provider/下的Downloads.java
2、packages/apps/providers/下的DownloadProvider
3、frameworks/base/packages/下的DocumentsUI
其中,DocumentsUI就是我们常见的下载列表。而DownloadManager.java就是开放给开发者调用的下载器,也是系统自身使用的下载器,Downloads.java负责表路径和下载状态标记的管理,DownloadProvider负责下载过程中数据的处理和展示。鉴于ANDROID下载机制中,默认下载进度是以通知的形式展示的,所以我通过检索Notification,发现只在DownloadProvider中出现了调用,那么问题的根源可能就存在在DownloadProvider中。
DownloadProvider类目录结构如下:
可以发现一个很明显的DownloadNotifier.java,分析其代码,DownloadNotifier在构造函数中创建了一个NotificationManager对象,代码详情如下:
DownloadNotifier的构造函数(Android8.0)
public DownloadNotifier(Context context) {
mContext = context;
mNotifManager = context.getSystemService(NotificationManager.class);

// Ensure that all our channels are ready to use
mNotifManager.createNotificationChannel(new NotificationChannel(CHANNEL_ACTIVE,
context.getText(R.string.download_running),
NotificationManager.IMPORTANCE_LOW));
mNotifManager.createNotificationChannel(new NotificationChannel(CHANNEL_WAITING,
context.getText(R.string.download_queued),
NotificationManager.IMPORTANCE_DEFAULT));
mNotifManager.createNotificationChannel(new NotificationChannel(CHANNEL_COMPLETE,
context.getText(com.android.internal.R.string.done_label),
NotificationManager.IMPORTANCE_DEFAULT));
}

DownloadNotifier的构造函数(Android8.0以下)
public DownloadNotifier(Context context) {
mContext = context;
mNotifManager = (NotificationManager) context.getSystemService(
Context.NOTIFICATION_SERVICE);
}
更新下载通知的操作由update()(低版本中叫updateWith())来实现,该方法将被具体的下载线程进行调用,而通知样式围绕下载状态标记的具体实现则是updateWithLocked()内部的一个私有方法updateWithLocked(Cursor
cursor)(这个方法名一直没有变),代码详情如下:
Android7.0及以上
public void update() {
try (Cursor cursor = mContext.getContentResolver().query(
Downloads.Impl.ALL_DOWNLOADS_CONTENT_URI, UpdateQuery.PROJECTION,
Downloads.Impl.COLUMN_DELETED + " == '0'", null, null)) {
synchronized (mActiveNotifs) {
updateWithLocked(cursor);
}
}
}
Android7.0以下
public void updateWith(Collection<DownloadInfo> downloads) {
synchronized (mActiveNotifs) {
updateWithLocked(downloads);
}
}
在解析updateWithLocked()方法前,先介绍下DownloadProvider是如何调用DownloadNotifier.update()方法的。DownloadProvider下载运行图如下:
下载记录是统一保存在Downloads.Impl.ALL_DOWNLOADS_CONTENT_URI指向的表中,当用户执行下载操作时,系统通过URI调起DownloadProvider.java,该类负责统一管理DownloadProvider下各类的使用,首先初始化待访问的数据集合DownloadInfo,启动DownloadJobService管理本次下载,DownloadJobService会把DownloadProvider提供的DownloadInfo交给DownloadThread完成更新和操作,同时具体的数据读写也在DownloadThread中完成。DownloadJobService会先注册一个数据监听器:
public void onCreate() {
super.onCreate();
getContentResolver().registerContentObserver(ALL_DOWNLOADS_CONTENT_URI, true, mObserver);
}
private ContentObserver mObserver = new ContentObserver(Helpers.getAsyncHandler()) {
@Override
public void onChange(boolean selfChange) {
Helpers.getDownloadNotifier(DownloadJobService.this).update();
}
};监听下载过程中数据库的变化,及时调用DownloadNotifier.update()更新进度条。等到下载结束时,DownloadThread会再一次调用DownloadNotifier.update()。这便是下载中通知变化的流程。
下面来分析下updateWithLocked()中对通知更新的实现流程,总体上可以分成三步走:
1、不管入参是Cursor还是ArrayList<DoenloadInfo>,都是通过访问Downloads.Impl.ALL_DOWNLOADS_CONTENT_URI(content://downloads/all_downloads)获得当前下载记录。针对每条数据,根据status和visibility字段生成一个标记,作为key,一并保存到ArrayMap<String,
IntArray> clustered中。
标记整体分为两部分:下载状态;当前调用下载的应用包名/下载记录的ID
标记生成方法如下:buildNotificationTag(Cursor cursor)
private static String buildNotificationTag(Cursor cursor) {
final long id = cursor.getLong(UpdateQuery._ID);
final int status = cursor.getInt(UpdateQuery.STATUS);
final int visibility = cursor.getInt(UpdateQuery.VISIBILITY);
final String notifPackage = cursor.getString(UpdateQuery.NOTIFICATION_PACKAGE);

if (isQueuedAndVisible(status, visibility)) {
return TYPE_WAITING + ":" + notifPackage;
} else if (isActiveAndVisible(status, visibility)) {
return TYPE_ACTIVE + ":" + notifPackage;
} else if (isCompleteAndVisible(status, visibility)) {
// Complete downloads always have unique notifs
return TYPE_COMPLETE + ":" + id;
} else {
return null;
}
}2、对clustered中每一条下载记录创建一条对应的通知对象。此时用到了一个全局变量mActiveNotifs,存放当前活跃的通知。
private final ArrayMap<String, Long> mActiveNotifs = new ArrayMap<>();
根据clustered中提供的标记通过getNotificationTagType方法提取中下载类型type,实际上通过getNotificationTagType的实现代码,type就是步骤1中提到的下载状态,getNotificationTagType实现代码如下:
private static int getNotificationTagType(String tag) {
return Integer.parseInt(tag.substring(0, tag.indexOf(':')));
}
根据type的不同,通知将配置不同的文字、图片等样式,
3、删除未更新的过期通知。即只展示当前正在下载的通知。
关键看步骤2中当前进度的计算这段逻辑,代码如下:
// Calculate and show progress
String remainingText = null;
String percentText = null;
if (type == TYPE_ACTIVE) {
long current = 0;
long total = 0;
long speed = 0;
synchronized (mDownloadSpeed) {
for (int j = 0; j < cluster.size(); j++) {
cursor.moveToPosition(cluster.get(j));

final long id = cursor.getLong(UpdateQuery._ID);
final long currentBytes = cursor.getLong(UpdateQuery.CURRENT_BYTES);
final long totalBytes = cursor.getLong(UpdateQuery.TOTAL_BYTES);

if (totalBytes != -1) {
current += currentBytes;
total += totalBytes;
speed += mDownloadSpeed.get(id);
}
}
}
if (total > 0) {
percentText =
NumberFormat.getPercentInstance().format((double) current / total);

if (speed > 0) {
final long remainingMillis = ((total - current) * 1000) / speed;
remainingText = res.getString(R.string.download_remaining,
DateUtils.formatDuration(remainingMillis));
}

final int percent = (int) ((current * 100) / total);
builder.setProgress(100, percent, false);
} else {
builder.setProgress(100, 0, true);
}
}

mNotifManager.notify(tag, 0, notif);
进度值的计算是在状态标记为TYPE_ACTIVE时才会触发。那么什么时候进入TYPE_ACTIVE状态呢,Downloads提供了详细的下载状态,但是DownloadManager可以更清晰的告诉我们。DownloadManager在Downloads基础上转化成五种下载状态:
DownloadManager.STATUS_PENDING
DownloadManager.STATUS_RUNNING
DownloadManager.STATUS_PAUSED
DownloadManager.STATUS_SUCCESSFUL
DownloadManager.STATUS_FAILED
任何一次下载都要经过 STATUS_PENDING->STATUS_RUNNING->STATUS_SUCCESSFUL/STATUS_FAILED 这样一个过程。重看buildNotificationTag(),你会发现TYPE_ACTIVE是通过isActiveAndVisible()生成的,代码如下:
private static boolean isActiveAndVisible(int status, int visibility) {
return status == STATUS_RUNNING &&
(visibility == VISIBILITY_VISIBLE
|| visibility == VISIBILITY_VISIBLE_NOTIFY_COMPLETED);
}STATUS_RUNNING表示当前下载链接已经建立成功,开始获取文件大小,并执行下载。换句话说,STATUS_RUNNING阶段不会因为文件大小是0K,就直接从STATUS_PENDING执行到STATUS_SUCCESSFUL/STATUS_FAILED,这是一个必要的过程。所以0K大小的文件下载时也会执行进度值计算。进度百分比percent分别通过字段total_bytes和current_bytes提供,total_bytes默认值为-1,只有当成功获取到文件大小时才会被赋值。正常下载过程中,进度条设置为builder.setProgress(100,
percent, false);当下载状态为TYPE_ACTIVE且下载文件大小为0时,进度条设置为builder.setProgress(100, 0, true);这个true表示当前进度条为非明确样式,即表示进度的加载条充满进度槽并持续滚动,这样就导致了下载0K文件时进度条样式的不统一。
进度条样式的问题到这里就可以告一段落了,关于0K文件是否下载成功,我们可以回看DownloadThread。DownloadThread中读写操作是有transferData(InputStream
in, OutputStream out, FileDescriptor outFd)来实现。这里有一个入参FileDescriptor。顾名思义它会先创建一个待写入的目标文件。transferData()中的读写操作如下:
private void transferData(InputStream in, OutputStream out, FileDescriptor outFd)throws StopRequestException {
final byte buffer[] = new byte[Constants.BUFFER_SIZE];
while (true) {
if (mPolicyDirty) checkConnectivity();

if (mShutdownRequested) {
throw new StopRequestException(STATUS_HTTP_DATA_ERROR,
"Local halt requested; job probably timed out");
}

int len = -1;
try {
len = in.read(buffer);
} catch (IOException e) {
throw new StopRequestException(
STATUS_HTTP_DATA_ERROR, "Failed reading response: " + e, e);
}

if (len == -1) {
break;
}
try {
// When streaming, ensure space before each write
if (mInfoDelta.mTotalBytes == -1) {
final long curSize = Os.fstat(outFd).st_size;
final long newBytes = (mInfoDelta.mCurrentBytes + len) - curSize;

StorageUtils.ensureAvailableSpace(mContext, outFd, newBytes);
}

out.write(buffer, 0, len);

mMadeProgress = true;
mInfoDelta.mCurrentBytes += len;

updateProgress(outFd);

} catch (ErrnoException e) {
throw new StopRequestException(STATUS_FILE_ERROR, e);
} catch (IOException e) {
throw new StopRequestException(STATUS_FILE_ERROR, e);
}
}
...
}由于是一个0K文件,in.read(buffer)实际上是读不到数据的,所以len依然是-1,这就导致while循环不能完整执行,后续的写入操作、标志更新操作等都没有被执行,由于又没有异常产生,通知页面便始终处于下载中状态,直到超时。所以我在本地存储路径下看到的文件,实际上是没有执行写入操作的,严格意义上并没有下载成功。
这就是关于0K大小文件的下载异常分析,虽然在平时的文件下载需求中不大会出现0K这种现象,但不代表着永远不会遇到,也许你下载的文件的是破损压缩文件、上传失败的压缩文件或者是标记文件,这种场景下还是要考虑进来的,毕竟存在即为合理。对于0K文件直接本地创建即可,无需执行读写操作。

相关文章推荐
- Android2.2以上版本下载网络文件getContentLength()大小异常
- 2 关于android上下载网络文件大小异常的问题
- Android2.2以上版本下载网络文件getContentLength()大小异常
- Android2.2以上版本下载网络文件getContentLength()大小异常
- 关于android上下载网络文件大小异常的问题
- 深度分析:Android4.3下MMS发送到附件为音频文件(音频为系统内置音频)的彩信给自己,添加音频-发送彩信-接收彩信-下载音频附件-预览-播放(一,添加附件)
- Android-Activity、Handler、ANR异常、多线程文件断点下载
- Android 文件下载大小和网络不一致(偏大)
- Android 内存浅析【管理、机制、分析】
- 深度分析:Android4.3下MMS发送到附件为音频文件(音频为系统内置音频)的彩信给自己,添加音频-发送彩信-接收彩信-下载音频附件-预览-播放(二,发送彩信<2>)
- 深度分析:Android4.3下MMS发送到附件为音频文件(音频为系统内置音频)的彩信给自己,添加音频-发送彩信-接收彩信-下载音频附件-预览-播放(三,接收彩信<1,接收短信>)
- android之XMPP过程分析(连接、文件监听、登录、异常重连)
- 深度分析:Android4.3下MMS发送到附件为音频文件(音频为系统内置音频)的彩信给自己,添加音频-发送彩信-接收彩信-下载音频附件-预览-播放(三,接收彩信<2,下载彩信>)
- android开发下载的文件大小始终大于服务器的文件的大小问题解决
- 深度分析:Android4.3下MMS发送到附件为音频文件(音频为系统内置音频)的彩信给自己,添加音频-发送彩信-接收彩信-下载音频附件-预览-播放(二,发送彩信<2>)
- 深度分析:Android4.3下MMS发送到附件为音频文件(音频为系统内置音频)的彩信给自己,添加音频-发送彩信-接收彩信-下载音频附件-预览-播放(一,添加附件)
- 【android浅析】android项目文件结构目录分析
- Android 利用缓存机制实现文件下载
- 深度分析:Android4.3下MMS发送到附件为音频文件(音频为系统内置音频)的彩信给自己,添加音频-发送彩信-接收彩信-下载音频附件-预览-播放(二,发送彩信<1>)
- 深度分析:Android4.3下MMS发送到附件为音频文件(音频为系统内置音频)的彩信给自己,添加音频-发送彩信-接收彩信-下载音频附件-预览-播放(二,发送彩信<1>)