springboot+rabbitMq整合开发实战一
2017-12-03 22:00
846 查看
springboot+rabbitMq整合开发实战一
消息队列mq相信诸位都听过,甚至还用的相当娴熟,我也是近来才接触,个人感觉相当不错,特别是在业务模块的开发中进行异步解耦有很大的作用。这篇博文主要介绍两点:简单的消息队列监听消费、exchange+routingKey的消息队列监听消费。顺带介绍一下自己对于rabbitMq的理解,以及在springboot微服务项目中的实战应用。
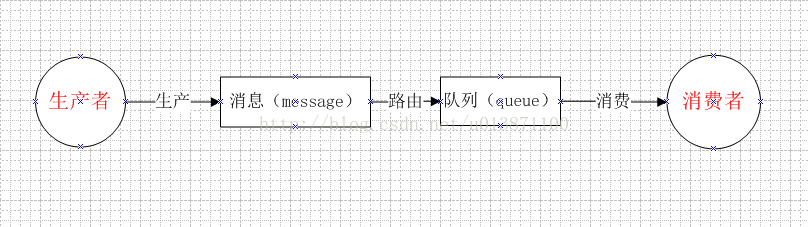
其实,不管是简单的还是复杂的消息队列监听,终究都离不开下面涉及的角色与动作:
在介绍下面实战前,首先需要把amqp jar包引入项目中:
配置文件applicaton.properties:
一:简单的消息队列监听消费模式
正如字面上意思,简单的消息队列监听消费,其实就是生产者直接生产消息路由到指定的队列并由指定的消费者进行监听消费,下面即为代码上的实战
首先是充当生产者的控制层(或者业务层甚至是监听层都可以):
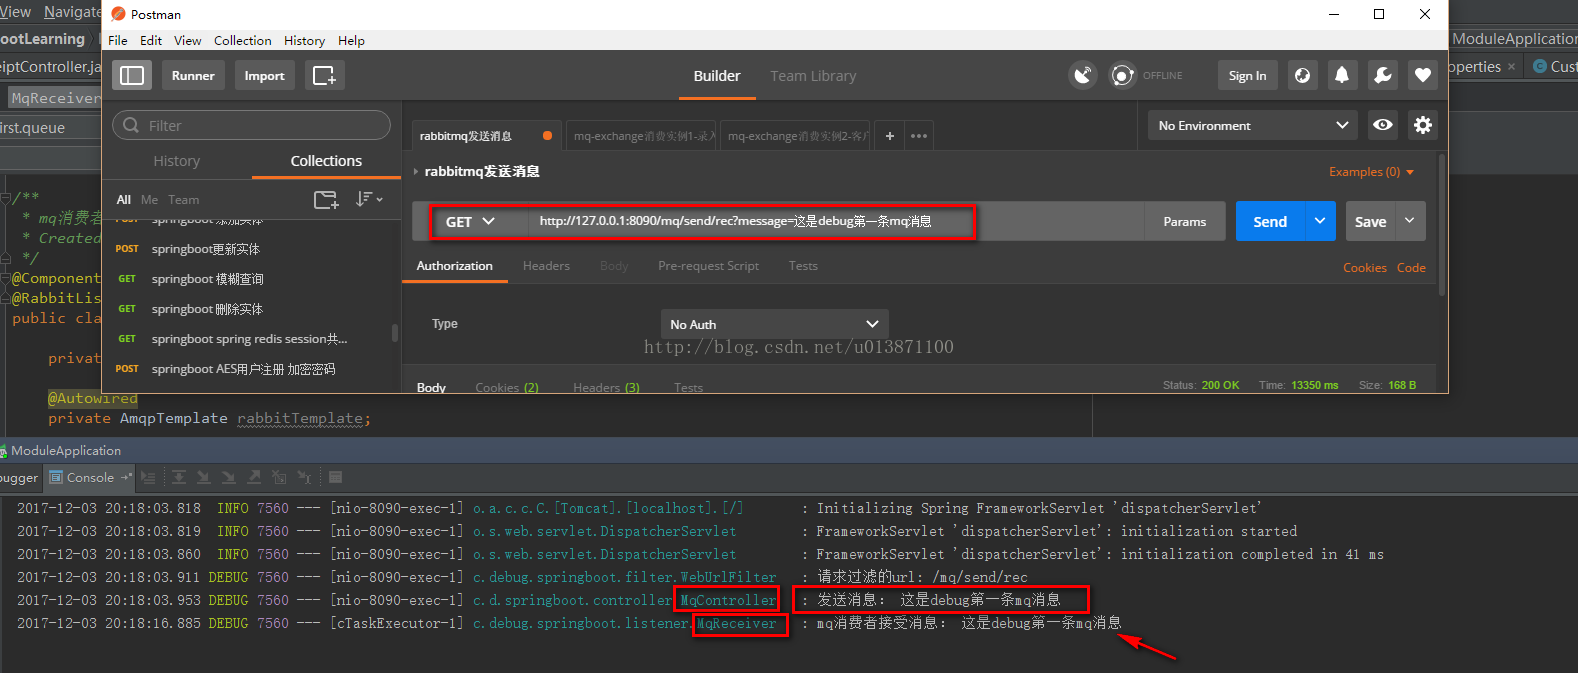
其中下面方法第一个参数为:queue名,第二个参数为:message,在这里为一个String:这是mq的第一条消息
接下来当然是队列对应的consumer:
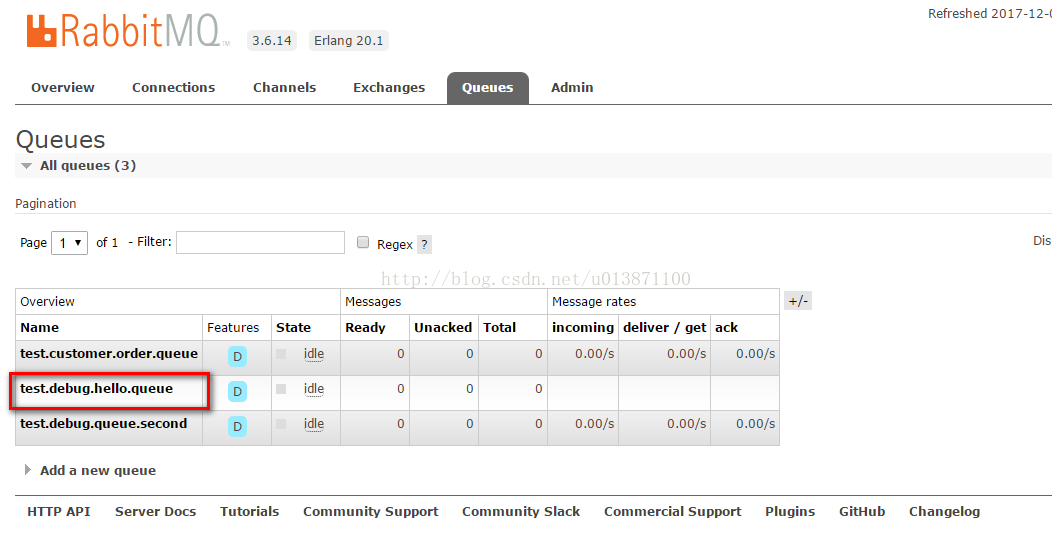
run一下项目,可以在mq后台看到该条queue,用postman模拟发一条消息,即可看到该message被消费了:
二、exchange+routingKey的消息队列监听消费
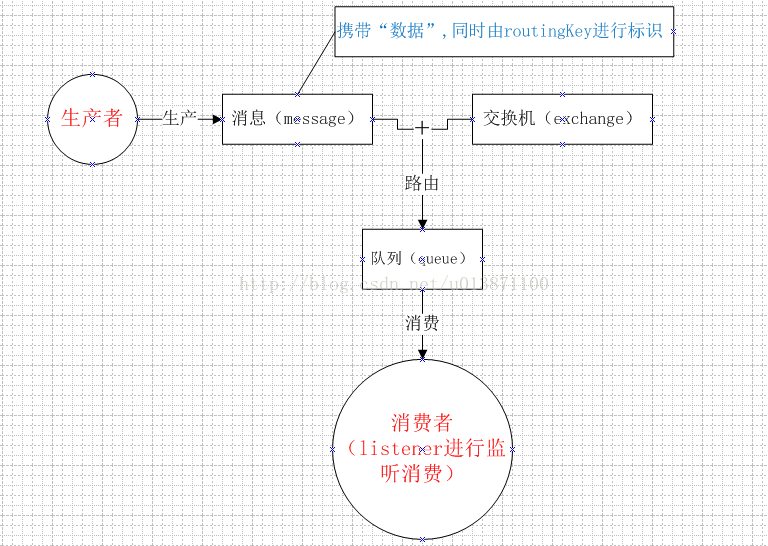
上面的那种方式其实比较不稳定,有可能消息到达不了消费者进行监听消费。下面介绍的这种,则是在很多业务系统普遍使用的方式,原理可用下满图表示:
为了模拟这个过程,我特地设想了当前比较普遍的一个业务流程:用户在下单之后对客户进行收钱,后端接收相应数据产生收款单数据。
首先,需要有一个rabbitmq的配置,其中就配置了 这个业务流程用mq实现时涉及到exchange、routingKey、queue的配置
package com.debug.springboot.config;
import com.debug.springboot.listener.SecondMqListener;
import org.springframework.amqp.core.*;
import org.springframework.amqp.rabbit.config.SimpleRabbitListenerContainerFactory;
import org.springframework.amqp.rabbit.connection.CachingConnectionFactory;
import org.springframework.amqp.rabbit.connection.ConnectionFactory;
import org.springframework.amqp.rabbit.core.RabbitTemplate;
import org.springframework.amqp.rabbit.listener.SimpleMessageListenerContainer;
import org.springframework.beans.factory.annotation.Autowired;
import org.springframework.context.annotation.Bean;
import org.springframework.context.annotation.Configuration;
import org.springframework.core.env.Environment;
/**
* mq配置
* Created by zhonglinsen on 2017/12/2.
*/
@Configuration
public class RabbitMqConfig {
@Autowired
private Environment env;
@Autowired
private CachingConnectionFactory connectionFactory;
/*@Autowired
private ConnectionFactory connectionFactory;*/
@Bean
public RabbitTemplate rabbitTemplate(){
RabbitTemplate rabbitTemplate=new RabbitTemplate(connectionFactory);
return rabbitTemplate;
}
//TODO: DirectExchange+routingKey -> Queue 队列绑定
@Bean
public DirectExchange receiptExchange(){
return new DirectExchange(env.getProperty("mq.second.queue.exchange"),true,false);
}
@Bean
public Queue receiptQueue(){
return new Queue(env.getProperty("mq.second.queue.name"),true);
}
@Bean
public Binding receiptBinding(){
return BindingBuilder.bind(receiptQueue()).to(receiptExchange()).with(env.getProperty("mq.second.queue.routingKey"));
}
//TODO: 队列消息绑定 由容器管理队列与消息的生命周期
@Autowired
private SecondMqListener secondMqListener;
@Bean
public SimpleMessageListenerContainer simpleMessageListenerContainer(){
SimpleMessageListenerContainer container=new SimpleMessageListenerContainer(connectionFactory);
container.setConcurrentConsumers(1);
container.setMaxConcurrentConsumers(1);
container.setAcknowledgeMode(AcknowledgeMode.MANUAL); //手动确认消费
container.setQueues(receiptQueue());
container.setMessageListener(secondMqListener);
return container;
}
}
其中,SecondMqListener即为消费者:队列的监听-这里,采用的是消费监听模式是“确认消费模式”:此种模式比较安全可靠,因为对于生产者发起的消息进行的监听最终进行了确认,即真正确认了“该消息已被消费,而不是丢失”,具体的代码如下:
package com.debug.springboot.listener;
import com.debug.springboot.entity.Receipt;
import com.fasterxml.jackson.databind.ObjectMapper;
import com.rabbitmq.client.Channel;
import org.slf4j.Logger;
import org.slf4j.LoggerFactory;
import org.springframework.amqp.core.Message;
import org.springframework.amqp.rabbit.core.ChannelAwareMessageListener;
import org.springframework.beans.factory.annotation.Autowired;
import org.springframework.stereotype.Component;
/**
* mq监听器:消息确认消费模式
* Created by zhonglinsen on 2017/12/2.
*/
@Component
public class SecondMqListener implements ChannelAwareMessageListener{
private static final Logger log= LoggerFactory.getLogger(SecondMqListener.class);
@Autowired
private ObjectMapper objectMapper;
@Override
public void onMessage(Message message, Channel channel) throws Exception {
long deliveryTag=message.getMessageProperties().getDeliveryTag();
try {
/*byte[] body=message.getBody();
log.debug("第二消息确认监听器-消费者 接收到消费发送的消息: {} ",new String(body,"UTF-8"));*/
byte[] body=message.getBody();
Receipt entity=objectMapper.readValue(body, Receipt.class);
log.debug("消息监听-消费者 接收到收款单信息:{} ",entity);
channel.basicAck(deliveryTag,false);
}catch (Exception e){
log.error("消息体解析异常:",e.fillInStackTrace());
channel.basicReject(deliveryTag,false);
}
}
}
接下来,就是消息的生产者(在这里采用现实中项目的开发模式:即控制层与业务逻辑层 作为生产者)
首先是控制层:
package com.debug.springboot.controller;
import com.debug.springboot.dto.PushOrderDto;
import com.debug.springboot.dto.ReceiptAddDto;
import com.debug.springboot.response.BaseResponse;
import com.debug.springboot.response.Status;
import com.debug.springboot.service.ReceiptService;
import org.slf4j.Logger;
import org.slf4j.LoggerFactory;
import org.springframework.beans.factory.annotation.Autowired;
import org.springframework.http.MediaType;
import org.springframework.stereotype.Controller;
import org.springframework.validation.BindingResult;
import org.springframework.web.bind.annotation.RequestBody;
import org.springframework.web.bind.annotation.RequestMapping;
import org.springframework.web.bind.annotation.RequestMethod;
import org.springframework.web.bind.annotation.ResponseBody;
import javax.validation.Valid;
/**
* 收款单controller
* Created by zhonglinsen on 2017/12/2.
*/
@Controller
public class ReceiptController {
private static final Logger log= LoggerFactory.getLogger(ReceiptController.class);
private static final String prefix="receipt";
@Autowired
private ReceiptService receiptService;
/**
* 收客户钱,录收款单
* @param addDto
* @param bindingResult
* @return
* @throws Exception
*/
@RequestMapping(value = prefix+"/add",method = RequestMethod.POST,consumes = MediaType.APPLICATION_JSON_UTF8_VALUE,produces = MediaType.APPLICATION_JSON_UTF8_VALUE)
@ResponseBody
public BaseResponse add(@Valid @RequestBody ReceiptAddDto addDto, BindingResult bindingResult) throws Exception{
if (bindingResult.hasErrors()){
return new BaseResponse(Status.Invalid_Params);
}
//其余业务上的校验逻辑:比如日期格式、客户id对应的客户是否存在、客户id对应的客户是否可以收款 ....
BaseResponse response=new BaseResponse(Status.Success);
try {
receiptService.insert(addDto);
}catch (Exception e){
log.error("录入收款单发生异常: {} ",addDto,e.fillInStackTrace());
response=new BaseResponse(Status.Fail);
}
return response;
}
}
业务逻辑处理层:
package com.debug.springboot.service;
import com.debug.springboot.dto.PushOrderDto;
import com.debug.springboot.dto.ReceiptAddDto;
import com.debug.springboot.entity.Receipt;
import com.fasterxml.jackson.databind.ObjectMapper;
import org.slf4j.Logger;
import org.slf4j.LoggerFactory;
import org.springframework.amqp.core.Message;
import org.springframework.amqp.core.MessageBuilder;
import org.springframework.amqp.rabbit.core.RabbitTemplate;
import org.springframework.amqp.support.converter.Jackson2JsonMessageConverter;
import org.springframework.beans.BeanUtils;
import org.springframework.beans.factory.annotation.Autowired;
import org.springframework.core.env.Environment;
import org.springframework.stereotype.Service;
import java.text.SimpleDateFormat;
/**
* 收款单service
* Created by zhonglinsen on 2017/12/2.
*/
@Service
public class ReceiptService {
private static final Logger log= LoggerFactory.getLogger(ReceiptService.class);
private SimpleDateFormat dateFormat=new SimpleDateFormat();
@Autowired
private Environment env;
@Autowired
private RabbitTemplate rabbitTemplate;
@Autowired
private ObjectMapper objectMapper;
/**
* 录入收款单
* @param addDto
* @throws Exception
*/
public void insert(ReceiptAddDto addDto) throws Exception{
Receipt entity=new Receipt();
BeanUtils.copyProperties(addDto,entity);
dateFormat=new SimpleDateFormat(env.getProperty("receipt.date.format"));
entity.setReceiptDate(dateFormat.parse(addDto.getReceiptDateStr()));
log.debug("开始录入收款单,收款单信息: {} ",entity);
//TODO:更新客户相关信息逻辑:如收款次数、合同信息、地址信息等
//TODO:真正的录入收款单记录1-dao层操作
//TODO:真正的录入收款单记录1-mq操作-异步,解耦先有业务模块的整体逻辑,降低整个业务模块的响应速度
Message message= MessageBuilder.withBody(objectMapper.writeValueAsBytes(entity)).build();
rabbitTemplate.setMessageConverter(new Jackson2JsonMessageConverter());
//方式一:
/*rabbitTemplate.setExchange(env.getProperty("mq.second.queue.exchange"));
rabbitTemplate.setRoutingKey(env.getProperty("mq.second.queue.routingKey"));
rabbitTemplate.send(message);*/
//方式二:exchange+routingKey 携带着消息 -> 队列 ->进行监听消费
rabbitTemplate.convertAndSend(env.getProperty("mq.second.queue.exchange"),env.getProperty("mq.second.queue.routingKey"),message);
}
}
下面是run项目之后mq控制台与postman的展示:

其中,用于接收前端数据的ReceiptAddDto如下:
package com.debug.springboot.dto;
import org.hibernate.validator.constraints.NotBlank;
import javax.validation.constraints.NotNull;
import java.io.Serializable;
import java.math.BigDecimal;
/**
* 收客户钱,录收款单
* Created by zhonglinsen on 2017/12/2.
*/
public class ReceiptAddDto implements Serializable {
//收款单编号
private String receiptNo;
//收款金额
@NotNull
private BigDecimal receiptPrice;
//收款日期
@NotBlank
private String receiptDateStr;
//客户id
@NotNull
private String customerId;
public String getReceiptNo() {
return receiptNo;
}
public void setReceiptNo(String receiptNo) {
this.receiptNo = receiptNo;
}
public BigDecimal getReceiptPrice() {
return receiptPrice;
}
public void setReceiptPrice(BigDecimal receiptPrice) {
this.receiptPrice = receiptPrice;
}
public String getReceiptDateStr() {
return receiptDateStr;
}
public void setReceiptDateStr(String receiptDateStr) {
this.receiptDateStr = receiptDateStr;
}
public String getCustomerId() {
return customerId;
}
public void setCustomerId(String customerId) {
this.customerId = customerId;
}
@Override
public String toString() {
return "ReceiptAddDto{" +
"receiptNo='" + receiptNo + '\'' +
", receiptPrice=" + receiptPrice +
", receiptDateStr=" + receiptDateStr +
", customerId='" + customerId + '\'' +
'}';
}
}
通用的用于表示业务处理过程中的状态展示:
package com.debug.springboot.response;
import java.io.Serializable;
/**
* Created by zhonglinsen on 2017/9/24.
*/
public class BaseResponse<T> implements Serializable{
private Integer code;
private String msg;
private T data;
public BaseResponse(Status status) {
this.code = status.getCode();
this.msg = status.getMsg();
}
public BaseResponse(Status status, T data) {
this.data = data;
this.code=status.getCode();
this.msg=status.getMsg();
}
public BaseResponse(Integer code, String msg, T data) {
this.code = code;
this.msg = msg;
this.data = data;
}
public BaseResponse() {
}
public Integer getCode() {
return code;
}
public void setCode(Integer code) {
this.code = code;
}
public String getMsg() {
return msg;
}
public void setMsg(String msg) {
this.msg = msg;
}
public T getData() {
return data;
}
public void setData(T data) {
this.data = data;
}
}
好了,就先介绍到这里,下篇博客,将介绍一下“消息确认模式为直接消费以及采用延迟队列监控处理用户的下单并处理已超时的未付款的下单记录”。对于本篇博客,如果有相关疑问,可以留言,或者加入群讨论:java开源技术交流:583522159。我叫debug
消息队列mq相信诸位都听过,甚至还用的相当娴熟,我也是近来才接触,个人感觉相当不错,特别是在业务模块的开发中进行异步解耦有很大的作用。这篇博文主要介绍两点:简单的消息队列监听消费、exchange+routingKey的消息队列监听消费。顺带介绍一下自己对于rabbitMq的理解,以及在springboot微服务项目中的实战应用。
其实,不管是简单的还是复杂的消息队列监听,终究都离不开下面涉及的角色与动作:
在介绍下面实战前,首先需要把amqp jar包引入项目中:
<!--amqp-->
<dependency>
<groupId>org.springframework.boot</groupId>
<artifactId>spring-boot-starter-amqp</artifactId>
<version>1.4.3.RELEASE</version>
</dependency>
配置文件applicaton.properties:
#rabbitmq配置
spring.rabbitmq.host=127.0.0.1
spring.rabbitmq.port=5672
spring.rabbitmq.username=guest
spring.rabbitmq.password=guest

mq.env=test

mq.first.message=这是mq的第一条消息
mq.first.queue=${mq.env}.debug.hello.queue

mq.second.queue.exchange=${mq.env}.debug.queue.exchange
mq.second.queue.routingKey=${mq.env}.debug.queue.routingKey
mq.second.queue.name=${mq.env}.debug.queue.second

mq.customer.order.topic.exchange=${mq.env}.customer.order.topicExchange
mq.customer.order.queue=${mq.env}.customer.order.queue
mq.customer.order.routingKey=${mq.env}.customer.order.routingKey

#其余配置
receipt.date.format=yyyy-MM-dd
一:简单的消息队列监听消费模式
正如字面上意思,简单的消息队列监听消费,其实就是生产者直接生产消息路由到指定的队列并由指定的消费者进行监听消费,下面即为代码上的实战
首先是充当生产者的控制层(或者业务层甚至是监听层都可以):
package com.debug.springboot.controller;

import com.debug.springboot.response.BaseResponse;
import com.debug.springboot.response.Status;
import com.google.common.base.Strings;
import org.slf4j.Logger;
import org.slf4j.LoggerFactory;
import org.springframework.amqp.core.AmqpTemplate;
import org.springframework.beans.factory.annotation.Autowired;
import org.springframework.core.env.Environment;
import org.springframework.http.MediaType;
import org.springframework.stereotype.Controller;
import org.springframework.web.bind.annotation.RequestMapping;
import org.springframework.web.bind.annotation.RequestMethod;
import org.springframework.web.bind.annotation.ResponseBody;

/**
* rabbit-mq测试controller
* Created by zhonglinsen on 2017/11/30.
*/
@Controller
public class MqController {

private static final Logger log= LoggerFactory.getLogger(MqController.class);

private static final String prex="mq";

@Autowired
private Environment env;

@Autowired
private AmqpTemplate rabbitTemplate;

@RequestMapping(value = prex+"/send/rec",method = RequestMethod.GET,produces = MediaType.APPLICATION_JSON_UTF8_VALUE)
@ResponseBody
public BaseResponse sendAndRec(String message) throws Exception{
if (Strings.isNullOrEmpty(message)){
message=env.getProperty("mq.first.message");
}
log.debug("发送消息: {} ",message);
rabbitTemplate.convertAndSend(env.getProperty("mq.first.queue"),message);
return new BaseResponse(Status.Success);
}

}
其中下面方法第一个参数为:queue名,第二个参数为:message,在这里为一个String:这是mq的第一条消息
rabbitTemplate.convertAndSend(env.getProperty("mq.first.queue"),message);接下来当然是队列对应的consumer:
package com.debug.springboot.listener;

import org.slf4j.Logger;
import org.slf4j.LoggerFactory;
import org.springframework.amqp.core.AmqpTemplate;
import org.springframework.amqp.rabbit.annotation.RabbitHandler;
import org.springframework.amqp.rabbit.annotation.RabbitListener;
import org.springframework.beans.factory.annotation.Autowired;
import org.springframework.stereotype.Component;

/**
* mq消费者
* Created by zhonglinsen on 2017/11/30.
*/
@Component
@RabbitListener(queues = "${mq.first.queue}")
public class MqReceiver {

private static final Logger log= LoggerFactory.getLogger(MqReceiver.class);

@Autowired
private AmqpTemplate rabbitTemplate;

@RabbitHandler
public void receive(String message){
log.debug("mq消费者接受消息: {} ",message);
}
}
run一下项目,可以在mq后台看到该条queue,用postman模拟发一条消息,即可看到该message被消费了:
二、exchange+routingKey的消息队列监听消费
上面的那种方式其实比较不稳定,有可能消息到达不了消费者进行监听消费。下面介绍的这种,则是在很多业务系统普遍使用的方式,原理可用下满图表示:
为了模拟这个过程,我特地设想了当前比较普遍的一个业务流程:用户在下单之后对客户进行收钱,后端接收相应数据产生收款单数据。
首先,需要有一个rabbitmq的配置,其中就配置了 这个业务流程用mq实现时涉及到exchange、routingKey、queue的配置
package com.debug.springboot.config;
import com.debug.springboot.listener.SecondMqListener;
import org.springframework.amqp.core.*;
import org.springframework.amqp.rabbit.config.SimpleRabbitListenerContainerFactory;
import org.springframework.amqp.rabbit.connection.CachingConnectionFactory;
import org.springframework.amqp.rabbit.connection.ConnectionFactory;
import org.springframework.amqp.rabbit.core.RabbitTemplate;
import org.springframework.amqp.rabbit.listener.SimpleMessageListenerContainer;
import org.springframework.beans.factory.annotation.Autowired;
import org.springframework.context.annotation.Bean;
import org.springframework.context.annotation.Configuration;
import org.springframework.core.env.Environment;
/**
* mq配置
* Created by zhonglinsen on 2017/12/2.
*/
@Configuration
public class RabbitMqConfig {
@Autowired
private Environment env;
@Autowired
private CachingConnectionFactory connectionFactory;
/*@Autowired
private ConnectionFactory connectionFactory;*/
@Bean
public RabbitTemplate rabbitTemplate(){
RabbitTemplate rabbitTemplate=new RabbitTemplate(connectionFactory);
return rabbitTemplate;
}
//TODO: DirectExchange+routingKey -> Queue 队列绑定
@Bean
public DirectExchange receiptExchange(){
return new DirectExchange(env.getProperty("mq.second.queue.exchange"),true,false);
}
@Bean
public Queue receiptQueue(){
return new Queue(env.getProperty("mq.second.queue.name"),true);
}
@Bean
public Binding receiptBinding(){
return BindingBuilder.bind(receiptQueue()).to(receiptExchange()).with(env.getProperty("mq.second.queue.routingKey"));
}
//TODO: 队列消息绑定 由容器管理队列与消息的生命周期
@Autowired
private SecondMqListener secondMqListener;
@Bean
public SimpleMessageListenerContainer simpleMessageListenerContainer(){
SimpleMessageListenerContainer container=new SimpleMessageListenerContainer(connectionFactory);
container.setConcurrentConsumers(1);
container.setMaxConcurrentConsumers(1);
container.setAcknowledgeMode(AcknowledgeMode.MANUAL); //手动确认消费
container.setQueues(receiptQueue());
container.setMessageListener(secondMqListener);
return container;
}
}
其中,SecondMqListener即为消费者:队列的监听-这里,采用的是消费监听模式是“确认消费模式”:此种模式比较安全可靠,因为对于生产者发起的消息进行的监听最终进行了确认,即真正确认了“该消息已被消费,而不是丢失”,具体的代码如下:
package com.debug.springboot.listener;
import com.debug.springboot.entity.Receipt;
import com.fasterxml.jackson.databind.ObjectMapper;
import com.rabbitmq.client.Channel;
import org.slf4j.Logger;
import org.slf4j.LoggerFactory;
import org.springframework.amqp.core.Message;
import org.springframework.amqp.rabbit.core.ChannelAwareMessageListener;
import org.springframework.beans.factory.annotation.Autowired;
import org.springframework.stereotype.Component;
/**
* mq监听器:消息确认消费模式
* Created by zhonglinsen on 2017/12/2.
*/
@Component
public class SecondMqListener implements ChannelAwareMessageListener{
private static final Logger log= LoggerFactory.getLogger(SecondMqListener.class);
@Autowired
private ObjectMapper objectMapper;
@Override
public void onMessage(Message message, Channel channel) throws Exception {
long deliveryTag=message.getMessageProperties().getDeliveryTag();
try {
/*byte[] body=message.getBody();
log.debug("第二消息确认监听器-消费者 接收到消费发送的消息: {} ",new String(body,"UTF-8"));*/
byte[] body=message.getBody();
Receipt entity=objectMapper.readValue(body, Receipt.class);
log.debug("消息监听-消费者 接收到收款单信息:{} ",entity);
channel.basicAck(deliveryTag,false);
}catch (Exception e){
log.error("消息体解析异常:",e.fillInStackTrace());
channel.basicReject(deliveryTag,false);
}
}
}
接下来,就是消息的生产者(在这里采用现实中项目的开发模式:即控制层与业务逻辑层 作为生产者)
首先是控制层:
package com.debug.springboot.controller;
import com.debug.springboot.dto.PushOrderDto;
import com.debug.springboot.dto.ReceiptAddDto;
import com.debug.springboot.response.BaseResponse;
import com.debug.springboot.response.Status;
import com.debug.springboot.service.ReceiptService;
import org.slf4j.Logger;
import org.slf4j.LoggerFactory;
import org.springframework.beans.factory.annotation.Autowired;
import org.springframework.http.MediaType;
import org.springframework.stereotype.Controller;
import org.springframework.validation.BindingResult;
import org.springframework.web.bind.annotation.RequestBody;
import org.springframework.web.bind.annotation.RequestMapping;
import org.springframework.web.bind.annotation.RequestMethod;
import org.springframework.web.bind.annotation.ResponseBody;
import javax.validation.Valid;
/**
* 收款单controller
* Created by zhonglinsen on 2017/12/2.
*/
@Controller
public class ReceiptController {
private static final Logger log= LoggerFactory.getLogger(ReceiptController.class);
private static final String prefix="receipt";
@Autowired
private ReceiptService receiptService;
/**
* 收客户钱,录收款单
* @param addDto
* @param bindingResult
* @return
* @throws Exception
*/
@RequestMapping(value = prefix+"/add",method = RequestMethod.POST,consumes = MediaType.APPLICATION_JSON_UTF8_VALUE,produces = MediaType.APPLICATION_JSON_UTF8_VALUE)
@ResponseBody
public BaseResponse add(@Valid @RequestBody ReceiptAddDto addDto, BindingResult bindingResult) throws Exception{
if (bindingResult.hasErrors()){
return new BaseResponse(Status.Invalid_Params);
}
//其余业务上的校验逻辑:比如日期格式、客户id对应的客户是否存在、客户id对应的客户是否可以收款 ....
BaseResponse response=new BaseResponse(Status.Success);
try {
receiptService.insert(addDto);
}catch (Exception e){
log.error("录入收款单发生异常: {} ",addDto,e.fillInStackTrace());
response=new BaseResponse(Status.Fail);
}
return response;
}
}
业务逻辑处理层:
package com.debug.springboot.service;
import com.debug.springboot.dto.PushOrderDto;
import com.debug.springboot.dto.ReceiptAddDto;
import com.debug.springboot.entity.Receipt;
import com.fasterxml.jackson.databind.ObjectMapper;
import org.slf4j.Logger;
import org.slf4j.LoggerFactory;
import org.springframework.amqp.core.Message;
import org.springframework.amqp.core.MessageBuilder;
import org.springframework.amqp.rabbit.core.RabbitTemplate;
import org.springframework.amqp.support.converter.Jackson2JsonMessageConverter;
import org.springframework.beans.BeanUtils;
import org.springframework.beans.factory.annotation.Autowired;
import org.springframework.core.env.Environment;
import org.springframework.stereotype.Service;
import java.text.SimpleDateFormat;
/**
* 收款单service
* Created by zhonglinsen on 2017/12/2.
*/
@Service
public class ReceiptService {
private static final Logger log= LoggerFactory.getLogger(ReceiptService.class);
private SimpleDateFormat dateFormat=new SimpleDateFormat();
@Autowired
private Environment env;
@Autowired
private RabbitTemplate rabbitTemplate;
@Autowired
private ObjectMapper objectMapper;
/**
* 录入收款单
* @param addDto
* @throws Exception
*/
public void insert(ReceiptAddDto addDto) throws Exception{
Receipt entity=new Receipt();
BeanUtils.copyProperties(addDto,entity);
dateFormat=new SimpleDateFormat(env.getProperty("receipt.date.format"));
entity.setReceiptDate(dateFormat.parse(addDto.getReceiptDateStr()));
log.debug("开始录入收款单,收款单信息: {} ",entity);
//TODO:更新客户相关信息逻辑:如收款次数、合同信息、地址信息等
//TODO:真正的录入收款单记录1-dao层操作
//TODO:真正的录入收款单记录1-mq操作-异步,解耦先有业务模块的整体逻辑,降低整个业务模块的响应速度
Message message= MessageBuilder.withBody(objectMapper.writeValueAsBytes(entity)).build();
rabbitTemplate.setMessageConverter(new Jackson2JsonMessageConverter());
//方式一:
/*rabbitTemplate.setExchange(env.getProperty("mq.second.queue.exchange"));
rabbitTemplate.setRoutingKey(env.getProperty("mq.second.queue.routingKey"));
rabbitTemplate.send(message);*/
//方式二:exchange+routingKey 携带着消息 -> 队列 ->进行监听消费
rabbitTemplate.convertAndSend(env.getProperty("mq.second.queue.exchange"),env.getProperty("mq.second.queue.routingKey"),message);
}
}
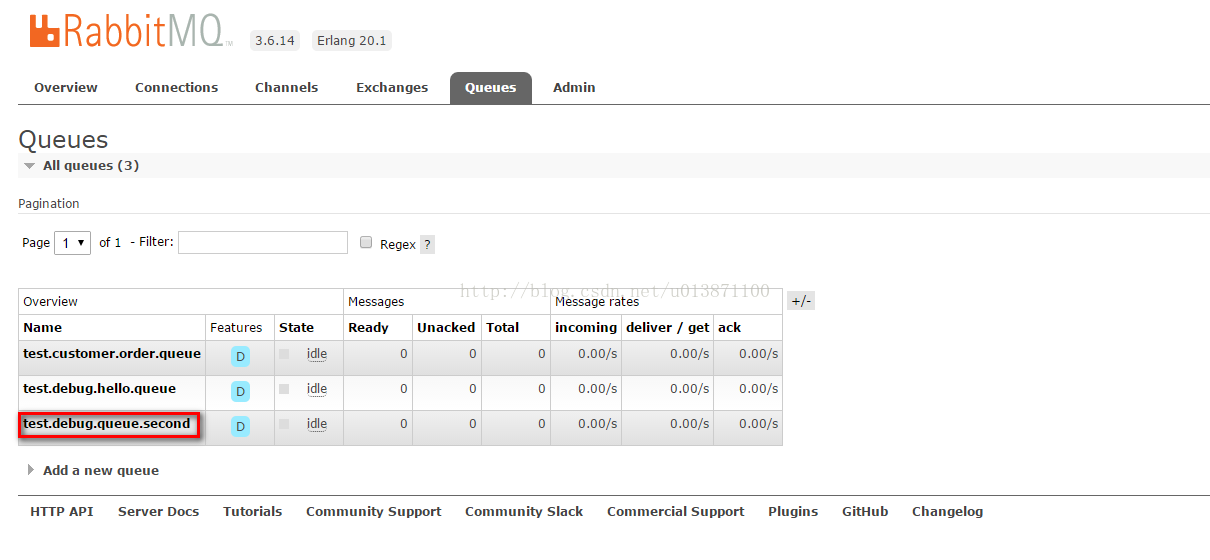
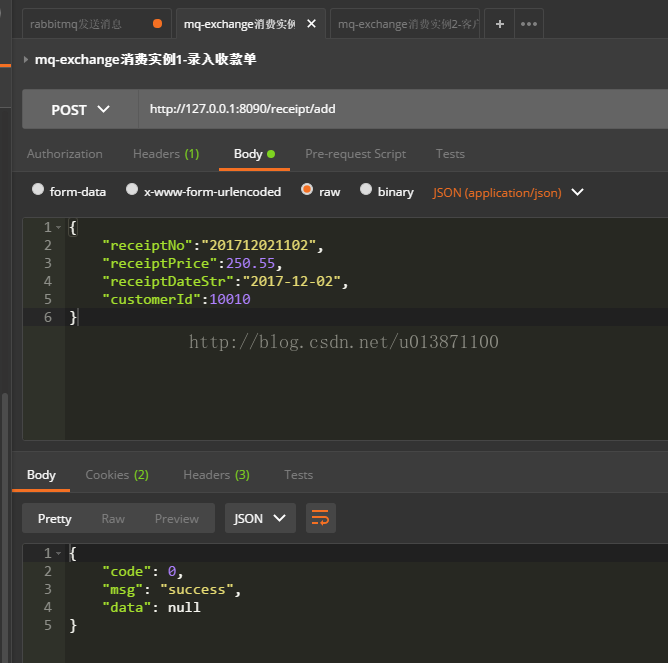
下面是run项目之后mq控制台与postman的展示:
其中,用于接收前端数据的ReceiptAddDto如下:
package com.debug.springboot.dto;
import org.hibernate.validator.constraints.NotBlank;
import javax.validation.constraints.NotNull;
import java.io.Serializable;
import java.math.BigDecimal;
/**
* 收客户钱,录收款单
* Created by zhonglinsen on 2017/12/2.
*/
public class ReceiptAddDto implements Serializable {
//收款单编号
private String receiptNo;
//收款金额
@NotNull
private BigDecimal receiptPrice;
//收款日期
@NotBlank
private String receiptDateStr;
//客户id
@NotNull
private String customerId;
public String getReceiptNo() {
return receiptNo;
}
public void setReceiptNo(String receiptNo) {
this.receiptNo = receiptNo;
}
public BigDecimal getReceiptPrice() {
return receiptPrice;
}
public void setReceiptPrice(BigDecimal receiptPrice) {
this.receiptPrice = receiptPrice;
}
public String getReceiptDateStr() {
return receiptDateStr;
}
public void setReceiptDateStr(String receiptDateStr) {
this.receiptDateStr = receiptDateStr;
}
public String getCustomerId() {
return customerId;
}
public void setCustomerId(String customerId) {
this.customerId = customerId;
}
@Override
public String toString() {
return "ReceiptAddDto{" +
"receiptNo='" + receiptNo + '\'' +
", receiptPrice=" + receiptPrice +
", receiptDateStr=" + receiptDateStr +
", customerId='" + customerId + '\'' +
'}';
}
}
通用的用于表示业务处理过程中的状态展示:
package com.debug.springboot.response;
import java.io.Serializable;
/**
* Created by zhonglinsen on 2017/9/24.
*/
public class BaseResponse<T> implements Serializable{
private Integer code;
private String msg;
private T data;
public BaseResponse(Status status) {
this.code = status.getCode();
this.msg = status.getMsg();
}
public BaseResponse(Status status, T data) {
this.data = data;
this.code=status.getCode();
this.msg=status.getMsg();
}
public BaseResponse(Integer code, String msg, T data) {
this.code = code;
this.msg = msg;
this.data = data;
}
public BaseResponse() {
}
public Integer getCode() {
return code;
}
public void setCode(Integer code) {
this.code = code;
}
public String getMsg() {
return msg;
}
public void setMsg(String msg) {
this.msg = msg;
}
public T getData() {
return data;
}
public void setData(T data) {
this.data = data;
}
}
好了,就先介绍到这里,下篇博客,将介绍一下“消息确认模式为直接消费以及采用延迟队列监控处理用户的下单并处理已超时的未付款的下单记录”。对于本篇博客,如果有相关疑问,可以留言,或者加入群讨论:java开源技术交流:583522159。我叫debug

相关文章推荐
- springboot+rabbitMq整合开发实战二:模拟用户下单的过程
- springboot+Rabit实战一:(Rabbit MQ windows 环境搭建)
- springboot+rabbitmq整合示例程
- Spring Boot整合RabbitMQ开发实战详解
- SpringBoot RabbitMQ 整合进阶版
- spring boot整合activemq rabbitmq
- springboot+rabbitmq 整合实例
- springboot+rabbitmq整合示例程
- springboot+rabbitmq整合示例程
- 4 微服务实战系列 - SpringBoot RabbitMQ 实战解决项目中实践
- Springboot+RabbitMQ整合
- SPRING BOOT+ELASTICSEARCH+RABBITMQ
- springboot+RabbitMQ+InfluxDB+Grafara监控实践
- 使用Gradle整合SpringBoot+Vue.js-开发调试与打包
- spring-boot rabbitmq 例子
- [ Activiti ] Spring Boot 整合Activiti 6.0.0 工作流开发
- SpringBoot + RabbitMQ 使用Demo
- 集群与负载均衡系列(6)——消息队列之rabbitMQ+spring-boot+spring amqp发送可靠的消息
- JAVA Maven SSM框架以及SpringBoot,mybatise框架整合实例开发的脚手架
- ElasticSearch整合springboot实战