3、TensorFlow 的数据模型-----张量(Tensor)
2017-11-26 11:10
627 查看
一、Tensor 类简介
Tensor 定义A Tensor is a symbolic handle to one of the outputs of an Operation. It does not hold the values of that operation’s output, but instead provides a means of computing those values in a TensorFlow
tf.Session.
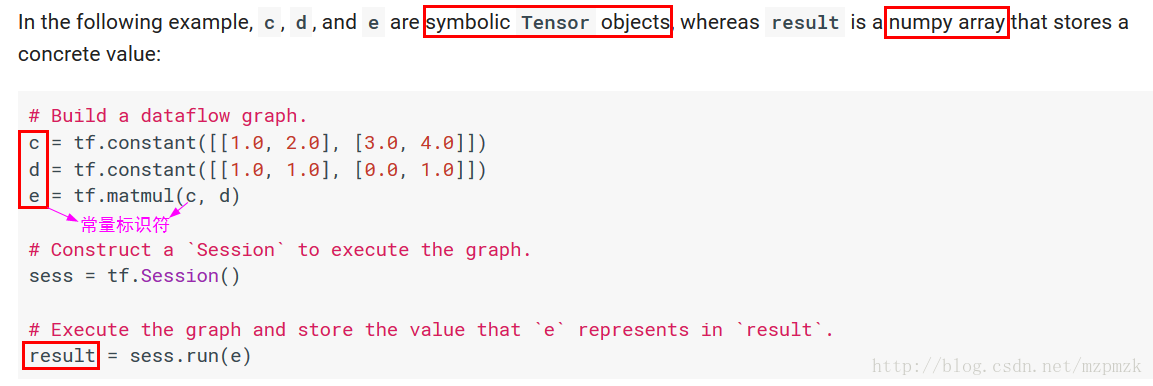
在 TensorFlow 中,所有在节点之间传递的
数据都为 Tensor 对象(可以看作
n 维的数组),常用图像数据的表示形式 为:
batch*height*width*channel

Tensor-like objects
tf.Tensor
tf.Variable
numpy.ndarray
list (and lists of tensor-like objects)
Scalar Python types: bool, float, int, str
Note: By default, TensorFlow will create a new
tf.Tensoreach time you use the same tensor-like object.
Some special tensors
tf.constant():返回一个
常量 tensor
tf.Variable():返回一个
tensor-like 对象,表示变量
tf.SparseTensor():返回一个
tensor-like 对象
tf.placeholder():return a tensor that may be used as a
handle for feeding a value, but not evaluated directly.
二、Tensor 创建
TF op:可接收标准 Python 数据类型,如整数、字符串、由它们构成的列表或者Numpy 数组,并将它们自动转化为张量。
单个数值将被转化为0阶张量(或标量),
数值列表将被转化为1阶张量(向量),由
列表构成的列表将被转化为2阶张量(矩阵),以此类推。
1、常量 Tensor 的创建
Constant Value Tensors
# 产生全 0 的张量
tf.zeros(shape, dtype=tf.float32, name=None)
tf.zeros_like(tensor, dtype=None, name=None)

# 产生全 1 的张量
tf.ones(shape, dtype=tf.float32, name=None)
tf.ones_like(tensor, dtype=None, name=None)

# Creates a tensor of shape  and fills it with value
tf.fill(shape, value, name=None)
tf.fill([2, 3], 9) ==> [[9, 9, 9]
[9, 9, 9]]

# 产生常量 Tensor, value 值可为 python 标准数据类型、Numpy 等
tf.constant(value, dtype=None, shape=None, name='Const')
tf.constant(-1.0, shape=[2, 3]) => [[-1., -1., -1.]  # Note: 注意 shape 的用法(广播机制)
[-1., -1., -1.]]
tf.constant([1,2,3,4,5,6], shape=[2,3]) => [[1, 2, 3]
[4, 5, 6]]
Sequences
# 产生 N 个等距分布在[start, stop]间元素组成的数组,包括start & stop
tf.linspace(start, stop, N, name=None)

# []为可选参数,步长默认为1,stop 的值取不到,它产生一个数字序列
tf.range([start], stop, [step=1], name='range')
Random Tensors
# 正态分布,默认均值为0,标准差为1.0,数据类型为float32
tf.random_normal(shape, mean=0.0, stddev=1.0, dtype=tf.float32, seed=None, name=None)

# 正态分布,但那些到均值的距离超过2倍标准差的随机数将被丢弃,然后重新抽取,直到取得足够数量的随机数为止, 随机数 x
# 的取值范围是$[mean - 2*stddev, mean + 2*stddev]$, 从而可以防止有元素与该张量中的其他元素显著不同的情况出现
tf.truncated_normal(shape, mean=0.0, stddev=1.0, dtype=tf.float32, seed=None, name=None)

# 产生在[minval, maxval)之间形状为 shape 的均匀分布, 默认是[0, 1)之间形状为 shape 的均匀分布
tf.random_uniform(shape, minval=0.0, maxval=1, dtype=tf.float32, seed=None, name=None)

# Randomly shuffles a tensor along its first dimension
tf.random_shuffle(value, seed=None, name=None)

# Randomly crops a tensor to a given size
tf.random_crop(value, size, seed=None, name=None)
# Note:If a dimension should not be cropped, pass the full size of that dimension.
# For example, RGB images can be cropped with size = [crop_height, crop_width, 3]

# Sets the graph-level random seed
tf.set_random_seed(seed)
# 1. To generate the same repeatable sequence for an op across sessions
# set the seed for the op, a = tf.random_uniform([1], seed=1)
# 2. To make the random sequences generated by all ops be repeatable across sessions
# set a graph-level seed, tf.set_random_seed(1234)

# 其它
tf.multinomial(logits, num_samples, seed=None, name=None)
tf.random_gamma(shape,alpha,beta=None,dtype=tf.float32,seed=None,name=None)
2、变量 Tensor 的创建
I、Class tf.Variable()
常用属性dtype、shape、name
initializer:The initializer operation for this variable.
op:The Operation that produces this tensor as an output.
device:The name of the device on which this tensor will be produced, or None.
graph:The Graph that contains this tensor.
initial_value:Returns the Tensor used as the initial value for the variable.
常用方法
eval(session=None):Evaluates this tensor in a Session. Returns A numpy ndarray with a copy of the value of this variable
get_shape():Alias of Tensor.shape.
set_shape(shape): It can be used to provide additional information about the shape of this tensor that cannot be inferred from the graph alone。
initialized_value():Returns the value of the initialized variable.
read_value():Returns the value of this variable, read in the current context.
assign(value, use_locking=False):Assigns a new value to the variable.
assign_add(delta, use_locking=False)
assign_sub(delta, use_locking=False)
Class Variable 定义
# tf.constant 是 op,而 tf.Variable() 是一个类,初始化的对象有多个op
var_obj = tf.Variable(
initial_value,
dtype=None,
name=None,
trainable=True,
collections=None,
validate_shape=True
)

# 初始化参数
initial_value:可由 Python 内置数据类型提供,也可由常量 Tensor 的内置 op 来快速构建,但所有这些 op 都需要提供 shape

trainable:指明了该变量是否可训练, 会加入 `GraphKeys.TRAINABLE_VARIABLES` collection 中去。

collections: List of graph collections keys. The new variable is added to these collections. Defaults to [GraphKeys.GLOBAL_VARIABLES].

validate_shape: If False, allows the variable to be initialized with a value of unknown shape. If True, the default, the shape of initial_value must be known.

# 返回值
变量实例对象(Tensor-like)
II、tf.get_variable()
# Gets an existing variable with these parameters or create a new one
tf.get_variable(
name,
shape=None,
dtype=None,
initializer=None,
trainable=True,
regularizer=None,
collections=None,
caching_device=None,
partitioner=None,
validate_shape=True,
use_resource=None,
custom_getter=None
)

# 初始化参数
name: The name of the new or existing variable.
shape: Shape of the new or existing variable.
dtype: Type of the new or existing variable (defaults to DT_FLOAT).
initializer: Initializer for the variable if one is created.

trainable: If True also add the variable to the graph collection tf.GraphKeys.TRAINABLE_VARIABLES.

regularizer: A (Tensor -> Tensor or None) function; the result of applying it on a newly created variable will be added to the collection tf.GraphKeys.REGULARIZATION_LOSSES and can be used for regularization.

collections: List of graph collections keys to add the Variable to. Defaults to [GraphKeys.GLOBAL_VARIABLES] (see tf.Variable).

# 返回值
The created or existing Variable, 拥有变量类的所有属性和方法。

# Note:
>>> name 参数必须要指定,如果仅给出 shape 参数而未指定 initializer,那么它的值将由 tf.glorot_uniform_initializer 随机产生,数据类型为tf.float32;
>>> 另外,initializer 可以为一个张量,这种情况下,变量的值和形状即为此张量的值和形状(就不必指定shape 了)。
>>> 此函数经常和 tf.variable_scope() 一起使用,产生共享变量
III、initializer 参数的初始化
一般要在 tf.get_variable()函数中指定
shape,因为
initializer要用到。
tf.constant_initializer()、tf.zeros_initializer()、tf.ones_initializer()
tf.constant_initializer(
value=0,
dtype=dtypes.float32,
verify_shape=False
)

# 通常偏置项就是用它初始化的。由它衍生出的两个初始化方法:
I、tf.zeros_initializer()
II、tf.ones_initializer()

init = tf.constant_initializer()
x = tf.get_variable('x', shape=[2, 3], initializer=init) # 必须指定shape
sess.run(x.initializer)
sess.run(x)
>>> array([[ 0.,  0.,  0.],
[ 0.,  0.,  0.]], dtype=float32)
tf.truncated_normal_initializer()、tf.random_normal_initializer()
# 生成截断正态分布的随机数,方差一般选0.01等比较小的数
tf.truncated_normal_initializer(
mean=0.0,
stddev=1.0,
seed=None,
dtype=tf.float32
)

# 生成标准正态分布的随机数,方差一般选0.01等比较小的数
tf.random_normal_initializer(
mean=0.0,
stddev=1.0,
seed=None,
dtype=tf.float32
)
tf.random_uniform_initializer()、tf.uniform_unit_scaling_initializer()
# 生成均匀分布的随机数
tf.random_uniform_initializer(
minval=0,
maxval=None,
seed=None,
dtype=tf.float32
)

# 和均匀分布差不多,只是这个初始化方法不需要指定最小最大值,是通过计算出来的
# 它的分布区间为[-max_val, max_val]
tf.uniform_unit_scaling_initializer(
factor=1.0,
seed=None,
dtype=tf.float32
)

max_val = math.sqrt(3 / input_size) * self.factor
# input size is obtained by multiplying W's all dimensions but the last one
# for a linear layer factor is 1.0, relu: ~1.43, tanh: ~1.15
tf.variance_scaling_initializer()
tf.variance_scaling_initializer(
scale=1.0,
mode='fan_in',
distribution='normal',
seed=None,
dtype=tf.float32
)

# 初始化参数
scale: Scaling factor (positive float).
mode: One of "fan_in", "fan_out", "fan_avg".
distribution: Random distribution to use. One of "normal", "uniform".

# 1、当 distribution="normal" 的时候:
生成 truncated normal distribution(截断正态分布)的随机数,其中mean = 0, stddev = sqrt(scale / n),
n 的计算与 mode 参数有关:
如果mode = "fan_in", n 为输入单元的结点数
如果mode = "fan_out",n 为输出单元的结点数
如果mode = "fan_avg",n 为输入和输出单元结点数的平均值

# 2、当distribution="uniform”的时候:
生成均匀分布的随机数,假设分布区间为[-limit, limit],则limit = sqrt(3 * scale / n)
tf.glorot_uniform_initializer()、tf.glorot_normal_initializer()
为了使得在经过多层网络后,信号不被过分放大或过分减弱,我们尽可能保持每个神经元的输入和输出的方差一致! 从数学角度来讲,就是让权重满足均值为 0,方差为 2fanin+fanout,随机分布的形式可以为均匀分布或者高斯分布。
# 又称 Xavier uniform initializer
tf.glorot_uniform_initializer(
seed=None,
dtype=tf.float32
)

# It draws samples from a uniform distribution within [a=-limit, b=limit]
limit: sqrt(6 / (fan_in + fan_out))
fan_in:the number of input units in the weight tensor
fan_out:the number of output units in the weight tensor
mean = (b + a) / 2
stddev = (b - a)**2 /12

# 又称 Xavier normal initializer
tf.glorot_normal_initializer(
seed=None,
dtype=tf.float32
)

# It draws samples from a truncated normal distribution centered on 0 with
# stddev = sqrt(2 / (fan_in + fan_out))
fan_in:the number of input units in the weight tensor
fan_out:the number of output units in the weight tensor
三、 Tensor 初始化及访问
1、Constants 初始化
Constants are initialized when youcall tf.constant, and their value can never change.
2、Variables 初始化
Variables are not initialized when you call tf.Variable. To initialize all the variables in a TensorFlow program, you must explicitlycall a special operationas follows:
# 变量使用前一定要初始化
init = tf.global_variables_initializer() # 初始化全部变量
sess.run(init)

# 使用变量的 initializer 属性初始化
sess.run(v.initializer)
用另一个变量的初始化值给当前变量初始化
由于
tf.global_variables_initializer()是并行地初始化所有变量,所以直接使用另一个变量的初始化值来初始化当前变量会报错(因为你用另一个变量的值时,它没有被初始化)
在这种情况下需要使用另一个变量的
initialized_value()属性。你可以直接把已初始化的值作为新变量的初始值,或者把它当做tensor计算得到一个值赋予新变量。
# Create a variable with a random value.
weights = tf.Variable(tf.random_normal([784, 200], stddev=0.35), name="weights")

# Create another variable with the same value as 'weights'.
w2 = tf.Variable(weights.initialized_value(), name="w2")

# Create another variable with twice the value of 'weights'
w_twice = tf.Variable(weights.initialized_value() * 0.2, name="w_twice")
改变变量的值:通过 TF 中的赋值操作,
update = tf.assign(old_variable, new_value)or
v.assign(new_value)
3、Tensor 的访问
索引一维 Tensor 的索引和 Python 列表类似
(可以逆序索引(arr[ : : -1])和负索引arr[-3])
二维 Tensor 的索引:
arr[i, j] == arr[i][j]
在多维 Tensor 中,如果省略了后面的索引,则返回的对象会是一个维度低一点的
ndarray(但它含有高一级维度上的某条轴上的所有数据)
条件索引:
arr[conditon] # conditon 可以使用 & | 进行多条件组合
切片
一维 Tensor 的切片和 Python 列表类似
二维 Tensor 的索引:
arr[r1:r2, c1:c2:step] # 也可指定 step 进行切片
四、Tensor 常用属性
dtypetf.float32/64、tf.int8/16/32/64
tf.string、tf.bool、tf.complex64、tf.qint8
不带小数点的数会被默认为
tf.int32,带小数点的会默认为
tf.float32
可使用
tf.cast(x, dtype, name=None)转换数据类型
shape
Tensor 的 shape 刻画了张量每一维的长度,张量的维数由
tf.rank(tensor)来表示
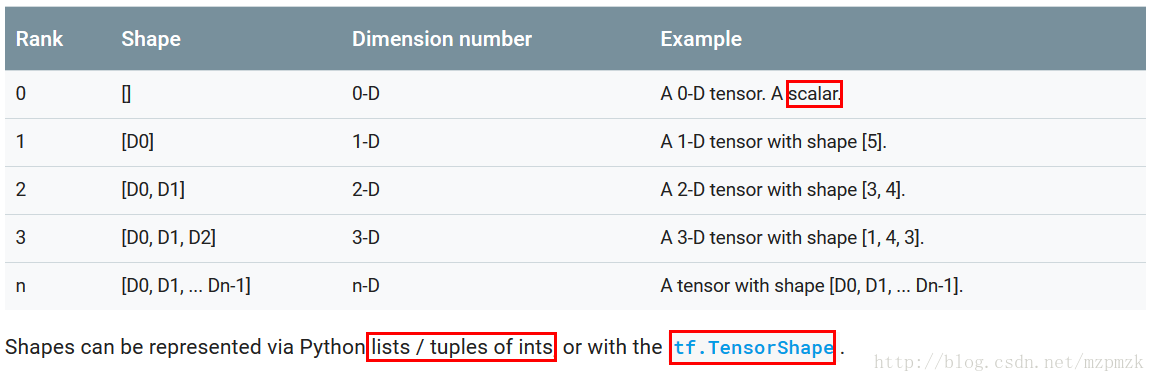
取得Tensor shape 的值
使用
shape 属性或者
get_shape() 方法, This method returns a TensorShape object This can be used for debugging, and providing early error messages
设计计算图时,使用
tf.shape()函数, returns a tensor
Use
batch_size = tf.shape(input)[0]to extract the batch dimension from a Tensor called input, and store it in a Tensor called batch_size.
改变 Tensor shape
使用
tf.reshape(tensor, shape, name=None)函数:返回一个新的 tensor,shape 中的某一维可以用
-1指定让 reshape 函数取自动计算此维的长度
使用
Tensor.set_shape()方法:In some cases, the inferred shape may have
unknown dimensions. If the caller has
additional informationabout the values of these dimensions,
Tensor.set_shape()can be used to augment the inferred shape.

passing in the value None as a shape (instead of using a list/tuple that contains None), will tell TensorFlow to allow a tensor of any shape
name
eg: w1 = tf.Variable(tf.random_normal([2, 3], stddev=1), name='weight1'), 这里面定义了变量
w1,为什么又给了它一个
name='weight1'? 这个 tensor 中的 name 属性和其变量名有什么区别呢?为什么要这样做呢?
答:
w1是代码中的变量名,代码中都用这个。
name='weight1'这个是参数名(权重),在参数存储或读取的时候使用,方便在其它环境(C++等)中部署。还有个作用是跟 scope 配合使用的,用于参数共享。
op
The Operation that produces this tensor as an output.
device
The name of the device on which this tensor will be produced, or None.
graph
The Graph that contains this tensor.
五、Tensor 常用方法
eval(feed_dict=None, session=None)
Evaluates this tensor in a Session,
If session=none, the default session will be used.
get_shape()
Alias of Tensor.shape
set_shape(shape)
It can be used to provide additional information about the shape of this tensor that cannot be inferred from the graph alone
_, image_data = tf.TFRecordReader(...).read(...)
image = tf.image.decode_png(image_data, channels=3)

# The height and width dimensions of `image` are data dependent, and
# cannot be computed without executing the op.
print(image.shape)
==> TensorShape([Dimension(None), Dimension(None), Dimension(3)])

# We know that each image in this dataset is 28 x 28 pixels.
image.set_shape([28, 28, 3])
print(image.shape)
==> TensorShape([Dimension(28), Dimension(28), Dimension(3)])
六、Tensor 变换常用方法
1.Casting:数据类型转换
tf.string_to_number(string_tensor, out_type=None, name=None)
tf.to_double(x, name='ToDouble')
tf.to_float(x, name='ToFloat')
tf.to_int32(x, name='ToInt32')
tf.to_int64(x, name='ToInt64')

tf.cast(x, dtype, name=None)  # Casts a tensor to a new type
# tensor `a` is [1.8, 2.2], dtype=tf.float
tf.cast(a, tf.int32) ==> [1, 2]  # dtype=tf.int32

# 其它
tf.bitcast
tf.saturate_cast
tf.to_bfloat16
2. Shapes and Shaping:取得张量形状和改变张量形状
# 改变 Tensor 的形状
tf.reshape(tensor, shape, name=None)
# Flatten:令 shape=[-1] 即可
# Reshape:shape 乘积不变即可,当某一维传入-1时,它会自动推得此维度的大小

# 转置
tf.transpose(a, perm=None, name='transpose')

# 返回 tensor 各个维度的大小
tf.shape(input, name=None)
# 't' is [[[1, 1, 1], [2, 2, 2]], [[3, 3, 3], [4, 4, 4]]]
sess.run(tf.shape(t)) ==> array([2, 2, 3], dtype=int32)   # 必须要 run 才能得出结果
# 亦可以使用 TF 变量对象 Var 的get_shape() 方法来实现Var.get_shape()

# 返回 tensor 中元素的总数
tf.size(input, name=None)

# 返回 Tensor 的维度(轴)的个数,类似于 Numpy 中的 ndim 属性
tf.rank(input, name=None)

# inserts a dimension of 1 into a tensor's shape
tf.expand_dims(
input,
axis=None,
name=None,
)
# 例1,'t' is a tensor of shape [2]
tf.shape(tf.expand_dims(t, 0))  # [1, 2]
tf.shape(tf.expand_dims(t, 1))  # [2, 1]
tf.shape(tf.expand_dims(t, -1))  # [2, 1],支持负索引

# 例2,'t2' is a tensor of shape [2, 3, 5]
tf.shape(tf.expand_dims(t2, 0))  # [1, 2, 3, 5], make it a batch of 1 image
tf.shape(tf.expand_dims(t2, 2))  # [2, 3, 1, 5]
tf.shape(tf.expand_dims(t2, 3))  # [2, 3, 5, 1]

# 若 axis 没指定,则移除 shape 中所有的 1,若指定某个轴,则只移除相应位置shape 中的 1
tf.squeeze(
input,
axis=None,
name=None,
)
# 例1,'t' is a tensor of shape [1, 2, 1, 3, 1, 1]
tf.shape(tf.squeeze(t))  # [2, 3]

# 例2, remove specific size 1 dimensions
tf.shape(tf.squeeze(t, axis=[2, 4]))  # [1, 2, 3, 1]

# 其它
tf.broadcast_dynamic_shape
tf.broadcast_static_shape
tf.shape_n
tf.meshgrid
3. Slicing and Joining:切片和连接
切片:可使用 TF 函数实现,也可使用 python 原始切片方式实现(
切出 1 份)
tf.slice(input_, begin, size, name=None)
# begin(zero-based):切片的起点坐标,一般用 list 来表示
# size(one-based):切出多大,size[i] is the number of elements of the 'i'th dimension of input that you want to slice
# If size[i] is -1, all remaining elements in dimension i are included in the slice

For example:
# 'input' is [[[1, 1, 1], [2, 2, 2]],
#             [[3, 3, 3], [4, 4, 4]],
#             [[5, 5, 5], [6, 6, 6]]]
tf.slice(input, [1, 0, 0], [1, 1, 3]) ==> [[[3, 3, 3]]]
tf.slice(input, [1, 0, 0], [1, 2, 3]) ==> [[[3, 3, 3],
[4, 4, 4]]]
tf.slice(input, [1, 0, 0], [2, 1, -1]) ==> [[[3, 3, 3]],
[[5, 5, 5]]]
# 亦可以使用 python 原始切片方式实现,eg: input[1, 0:2, 0:3]和第三个效果相同
分割:沿着坐标轴将 Tensor 分割成尺寸相同的 n 等份或者尺寸不同的
n 份
tf.split(value, num_or_size_splits, axis=0, num=None, name='split')
# num_or_size_splits
integer:splits value along dimension axis into integer smaller tensors
list:plits value along dimension axis into len(list) smaller tensors.等份每一份的大小是list[i]

For example:
# 'value' is a tensor with shape [5, 30]
# Split 'value' into 3 tensors with sizes [4, 15, 11] along dimension 1
split0, split1, split2 = tf.split(value, [4, 15, 11], 1)
tf.shape(split0) ==> [5, 4]
tf.shape(split1) ==> [5, 15]
tf.shape(split2) ==> [5, 11]
# Split 'value' into 3 tensors along dimension 1
split0, split1, split2 = tf.split(value, num_or_size_splits=3, axis=1)
tf.shape(split0) ==> [5, 10]
连接:沿着某坐标轴连接 N 个张量(Numpy 连接传入的是
tuple, 此处为
list)
tf.concat(values, axis, name='concat')  # 维度不变
For example:
t1 = [[1, 2, 3], [4, 5, 6]]
t2 = [[7, 8, 9], [10, 11, 12]]
tf.concat([t1, t2], 0) ==> [[1, 2, 3], [4, 5, 6], [7, 8, 9], [10, 11, 12]]
tf.concat([t1, t2], 1) ==> [[1, 2, 3, 7, 8, 9], [4, 5, 6, 10, 11, 12]]

# tensor t3 with shape [2, 3]
# tensor t4 with shape [2, 3]
tf.shape(tf.concat([t3, t4], 0)) ==> [4, 3]
tf.shape(tf.concat([t3, t4], 1)) ==> [2, 6]

tf.stack(values, axis, name='concat')  # 维度+1
# Stacks a list of rank-R tensors into one rank-(R+1) tensor
# Given a list of length N=2 of tensors of shape (3, 3);
if axis == 0 then the output tensor will have the shape (N, 3, 3).
if axis == 1 then the output tensor will have the shape (3, N, 3).
if axis == 1 then the output tensor will have the shape (3, 3, N).

a = np.array([[1, 2, 3],
[4, 5, 6],
[7, 8, 9]])

b = np.array([[ 2,  4,  6],
[ 8, 10, 12],
[14, 16, 18]])

# Note: 做 stack 之前把 a, b 的维度+1变为(1, 3, 3)
# 沿着 x 轴(垂直向下)连接 a, b 的第 0 维元素
sess.run(tf.stack([a,b], axis=0))
array([[[ 1,  2,  3],
[ 4,  5,  6],
[ 7,  8,  9]],

[[ 2,  4,  6],
[ 8, 10, 12],
[14, 16, 18]]])

# 沿着 y 轴(水平向右)连接 a, b 的第 1 维元素
sess.run(tf.stack([a,b], axis=1))
array([[[ 1,  2,  3],
[ 2,  4,  6]],

[[ 4,  5,  6],
[ 8, 10, 12]],

[[ 7,  8,  9],
[14, 16, 18]]])

# 沿着 z 轴(竖直向上)连接 a, b 的第 2 维元素
sess.run(tf.stack([a,b], axis=2))
array([[[ 1,  2],
[ 2,  4],
[ 3,  6]],

[[ 4,  8],
[ 5, 10],
[ 6, 12]],

[[ 7, 14],
[ 8, 16],
[ 9, 18]]])
补零
tf.pad(tensor, paddings, mode='CONSTANT', name=None)
paddings: is an integer tensor with shape [n, 2],n是 tensor 的维度
For example:
# 't' is [[1, 2, 3], [4, 5, 6]].
# 'paddings' is [[1, 1,], [2, 2]].
# paddings[0, 0/1]: 沿着第 0 维(x轴)在 tensor 上方/下方补 1 圈零
# paddings[1, 0/1]: 沿着第 1 维(y轴)在 tensor 左方/右方补 2 圈零
tf.pad(t, paddings, "CONSTANT") ==> [[0, 0, 0, 0, 0, 0, 0],
[0, 0, 1, 2, 3, 0, 0],
[0, 0, 4, 5, 6, 0, 0],
[0, 0, 0, 0, 0, 0, 0]]
one_hot 向量的生成
tf.one_hot(indices, depth, on_value=1, off_value=0, axis=-1, dtype=None, name=None)
# 将 indices 中的每个元素 j 扩展成一个深度为 depth 的向量,输出维度+1
# 此向量中索引位置 j 的取值为 1,其余位置的取值为 0
# If indices is a scalar the output shape will be a vector of length depth

# If indices is a vector of length features, the output shape will be:
features x depth if axis == -1
depth x features if axis == 0

# If indices is a matrix (batch) with shape [batch, features], the output shape will be:
batch x features x depth if axis == -1
batch x depth x features if axis == 1
depth x batch x features if axis == 0

# 使用onehot的直接原因是:现在多分类cnn网络的输出通常是softmax层,而它的输出是一个概率分布
# 从而要求输入的标签也以概率分布的形式出现,进而计算交叉熵之类
其它
tf.extract_image_patches
tf.strided_slice
tf.tile
tf.parallel_stack
tf.unstack
tf.reverse_sequence
tf.reverse
tf.reverse_v2
tf.space_to_batch_nd
tf.space_to_batch
tf.required_space_to_batch_paddings
tf.batch_to_space_nd
tf.batch_to_space
tf.space_to_depth
tf.depth_to_space
tf.gather
tf.gather_nd
tf.unique_with_counts
tf.scatter_nd
tf.dynamic_partition
tf.dynamic_stitch
tf.boolean_mask
tf.sequence_mask
tf.dequantize
tf.quantize_v2
tf.quantized_concat
tf.setdiff1d
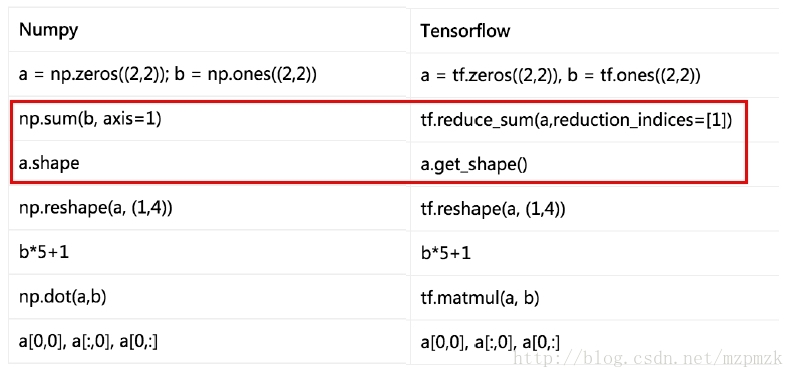
七、Numpy VS TensorFLow
相同点:Both are N-d array libraries,创建、访问、常用属性和方法都非常相似不同点:
Numpy has Ndarray support, but doesn’t offer methods to create tensor functions and automatically compute derivatives (+ no GPU support)
Numpy 方法中 shape 通常传入的是一个 tuple, 而 Tensor 中shape 通常传入一个 list
八、参考资料
1、https://www.tensorflow.org/programmers_guide/tensors2、https://www.tensorflow.org/api_docs/python/tf/Tensor
3、https://www.tensorflow.org/api_guides/python/constant_op
4、https://www.tensorflow.org/api_guides/python/state_ops
5、https://www.tensorflow.org/api_guides/python/array_ops
6、https://cs224d.stanford.edu/lectures/CS224d-Lecture7.pdf
7、tensorflow 1.0 学习:参数初始化(initializer)
8、https://github.com/tensorflow/tensorflow/blob/r1.4/tensorflow/python/ops/init_ops.py

相关文章推荐
- tensorflow 张量的阶、形状、数据类型及None在tensor中表示的意思。
- Effective TensorFlow Chapter 5: 在TensorFlow中,给模型喂数据(feed data)
- tensorflow 张量的阶、形状、数据类型及None在tensor中表示的意思
- TensorFlow数据模型——张量
- TensorFlow数据模型-张量
- TensorFlow数据模型--张量
- tensorflow中张量(tensor)的属性——维数(阶)、形状和数据类型
- 用tensorflow训练自己的数据_3、训练模型
- Tensorflow + ResNet101 + fasterRcnn 训练自己的模型 数据(一)
- 第三课:把tensorflow,模型和测试数据导入Android工程
- tensorflow tutorials(三):用tensorflow建立逻辑回归模型
- tensorflow之如何打印tensor张量的值
- TensorFlow——训练自己的数据(三)模型训练
- 在TensorFlow上使用LeNet-5模型识别MNIST数据
- 学习笔记TF049:TensorFlow 模型存储加载、队列线程、加载数据、自定义操作
- windows下tensorflow两种加载模型的测试数据方法
- 谷歌发布TensorFlow 1.4与TensorFlow Lattice:利用先验知识提升模型准确度 搜狐科技 10-12 15:29 选自:Google Research Blog 参与:李泽南、
- tensorflow 学习笔记(六) - 用自己的数据集训练CNN模型
- Effective TensorFlow Chapter 9: TensorFlow模型原型的设计和利用python ops的高级可视化
- tensorflow学习-示例1(MNIST数据集合上的softmax分类模型)