iOS之基于FreeStreamer的简单音乐播放器示例
前提准备
为了能够有明确的思路来做这个demo,我下载了QQ音乐和网易云音乐,然后分别对比,最终选择了QQ音乐来参照,先是获取了其中的所有资源文件(如果有不知道怎么提取资源文件的,可以参考iOS提取APP中的图片资源),在这之后就是研究使用技术,这里我选择了FreeStreamer,虽然系统也有,但是该框架可能更好用点。
实现部分
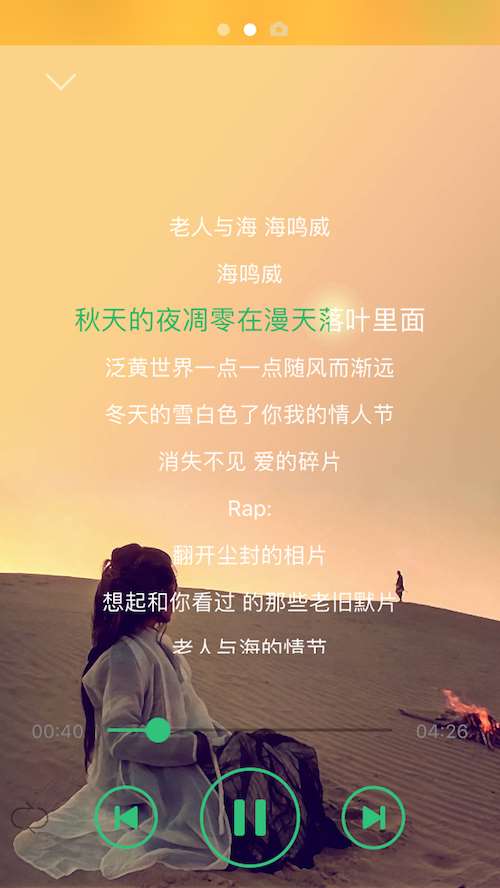
在这之前,先来看看大概效果图吧

再看完效果图之后,我们就来看看这其中涉及到的几个难点吧(在我看开~)
1、先让播放器跑起来
这里我使用的是pods来管理三方库,代码如下
platform:ios,'8.0'
target "GLMusicBox" do
pod 'FreeStreamer', '~> 3.7.3'
pod 'SDWebImage', '~> 4.0.0'
pod 'MJRefresh', '~> 3.1.11'
pod 'Masonry', '~> 1.0.2'
pod 'Reachability', '~> 3.2'
pod 'AFNetworking', '~> 3.0'
pod 'IQKeyboardManager', '~> 3.3.2'
end
针对FreeStreamer我简单进行了封装下
#import "FSAudioStream.h"
@class GLMusicLRCModel;typedef NS_ENUM(NSInteger,GLLoopState){
GLSingleLoop = 0,//单曲循环
GLForeverLoop,//重复循环
GLRandomLoop,//随机播放
GLOnceLoop//列表一次顺序播放
};@protocol GLMusicPlayerDelegate/**
*
实时更新
*
**/
- (void)updateProgressWithCurrentPosition:(FSStreamPosition)currentPosition endPosition:(FSStreamPosition)endPosition;
- (void)updateMusicLrc;
@end
@interface GLMusicPlayer : FSAudioStream
/**
*
播放列表
*
**/
@property (nonatomic,strong) NSMutableArray *musicListArray;
/**
当前播放歌曲的歌词
*/
@property (nonatomic,strong) NSMutableArray *musicLRCArray;
/**
*
当前播放
*
**/
@property (nonatomic,assign,readonly) NSUInteger currentIndex;
/**
*
当前播放的音乐的标题
*
**/
@property (nonatomic,strong) NSString *currentTitle;
/**
是否是暂停状态
*/
@property (nonatomic,assign) BOOL isPause;
@property (nonatomic,weak) idglPlayerDelegate;
//默认 重复循环 GLForeverLoop
@property (nonatomic,assign) GLLoopState loopState;
/**
*
单例播放器
*
**/
+ (instancetype)defaultPlayer;
/**
播放队列中的指定的文件
@param index 序号
*/
- (void)playMusicAtIndex:(NSUInteger)index;
/**
播放前一首
*/
- (void)playFont;
/**
播放下一首
*/
- (void)playNext;
@end
这里继承了FSAudioStream,并且采用了单例模式
+ (instancetype)defaultPlayer
{
static GLMusicPlayer *player = nil;
static dispatch_once_t onceToken;
dispatch_once(&onceToken, ^{
FSStreamConfiguration *config = [[FSStreamConfiguration alloc] init];
config.httpConnectionBufferSize *=2;
config.enableTimeAndPitchConversion = YES;
player = [[super alloc] initWithConfiguration:config];
player.delegate = (id)self;
player.onFailure = ^(FSAudioStreamError error, NSString *errorDescription) {
//播放错误
//有待解决
};
player.onCompletion = ^{
//播放完成
NSLog(@" 打印信息: 播放完成1");
};
player.onStateChange = ^(FSAudioStreamState state) {
switch (state) {
case kFsAudioStreamPlaying:
{
NSLog(@" 打印信息 playing.....");
player.isPause = NO;
[GLMiniMusicView shareInstance].palyButton.selected = YES;
}
break;
case kFsAudioStreamStopped:
{
NSLog(@" 打印信息 stop.....%@",player.url.absoluteString);
}
break;
case kFsAudioStreamPaused:
{
//pause
player.isPause = YES;
[GLMiniMusicView shareInstance].palyButton.selected = NO;
NSLog(@" 打印信息: pause");
}
break;
case kFsAudioStreamPlaybackCompleted:
{
NSLog(@" 打印信息: 播放完成2");
[player playMusicForState];
}
break;
default:
break;
}
};
//设置音量
[player setVolume:0.5];
//设置播放速率
[player setPlayRate:1];
player.loopState = GLForeverLoop;
});
return player;
}
然后实现了播放方法
- (void)playFromURL:(NSURL *)url
{
//根据地址 在本地找歌词
NSMutableDictionary *dic = [NSMutableDictionary dictionaryWithContentsOfFile:[[NSBundle mainBundle] pathForResource:@"musiclist" ofType:@"plist"]];
for (NSString *playStringKey in dic.allKeys) {
if ([[dic valueForKey:playStringKey] isEqualToString:url.absoluteString]) {
self.currentTitle = playStringKey;
break;
}
}
[self stop];
if (![url.absoluteString isEqualToString:self.url.absoluteString]) {
[super playFromURL:url];
}else{
[self play];
}
NSLog(@" 当前播放歌曲:%@",self.currentTitle);
[GLMiniMusicView shareInstance].titleLable.text = self.currentTitle;
//获取歌词
NSString *lrcFile = [NSString stringWithFormat:@"%@.lrc",self.currentTitle];
self.musicLRCArray = [NSMutableArray arrayWithArray:[GLMusicLRCModel musicLRCModelsWithLRCFileName:lrcFile]];
if (![self.musicListArray containsObject:url]) {
[self.musicListArray addObject:url];
}
//更新主界面歌词UI
if (self.glPlayerDelegate && [self.glPlayerDelegate respondsToSelector:@selector(updateMusicLrc)])
{
[self.glPlayerDelegate updateMusicLrc];
}
_currentIndex = [self.musicListArray indexOfObject:url];if (!_progressTimer) {
_progressTimer = [CADisplayLink displayLinkWithTarget:self selector:@selector(updateProgress)];
[_progressTimer addToRunLoop:[NSRunLoop mainRunLoop] forMode:NSRunLoopCommonModes];
}
}
在上面的代码中,有许多逻辑是后面加的,比如更新UI界面,获取歌词等处理,如果要实现简单的播放,则可以不用重写该方法,直接通过playFromURL就可以实现我们的播放功能。
2、更新UI
这里的UI暂不包括歌词的更新,而只是进度条的更新,要更新进度条,比不可少的是定时器,这里我没有选择NSTimer,而是选择了CADisplayLink,至于为什么,我想大家应该都比较了解,可以这么来对比,下面引用一段其他博客的对比:
iOS设备的屏幕刷新频率是固定的,CADisplayLink在正常情况下会在每次刷新结束都被调用,精确度相当高。
NSTimer的精确度就显得低了点,比如NSTimer的触发时间到的时候,runloop如果在阻塞状态,触发时间就会推迟到下一个runloop周期。并且 NSTimer新增了tolerance属性,让用户可以设置可以容忍的触发的时间的延迟范围。
CADisplayLink使用场合相对专一,适合做UI的不停重绘,比如自定义动画引擎或者视频播放的渲染。NSTimer的使用范围要广泛的多,各种需要单次或者循环定时处理的任务都可以使用。在UI相关的动画或者显示内容使用 CADisplayLink比起用NSTimer的好处就是我们不需要在格外关心屏幕的刷新频率了,因为它本身就是跟屏幕刷新同步的
使用方法
if (!_progressTimer) {
_progressTimer = [CADisplayLink displayLinkWithTarget:self selector:@selector(updateProgress)];
[_progressTimer addToRunLoop:[NSRunLoop mainRunLoop] forMode:NSRunLoopCommonModes];
}
更新进度
- (void)updateProgress
{
if (self.glPlayerDelegate && [self.glPlayerDelegate respondsToSelector:@selector(updateProgressWithCurrentPosition:endPosition:)])
{
[self.glPlayerDelegate updateProgressWithCurrentPosition:self.currentTimePlayed endPosition:self.duration];
}
[self showLockScreenCurrentTime:(self.currentTimePlayed.second + self.currentTimePlayed.minute * 60) totalTime:(self.duration.second + self.duration.minute * 60)];
}
在这里有两个属性:currentTimePlayed和duration,分别保存着当前播放时间和总时间,是如下的结构体
typedef struct {
unsigned minute;
unsigned second;
/**
* Playback time in seconds.
*/
float playbackTimeInSeconds;
/**
* Position within the stream, where 0 is the beginning
* and 1.0 is the end.
*/
float position;
} FSStreamPosition;
我们在更新UI的时候,主要可以根据其中的minute和second来,如果播放了90s,那么minute就为1,而second为30,所以我们在计算的时候,应该是这样的(self.currentTimePlayed.second + self.currentTimePlayed.minute * 60)
当然在更新进度条的时候,我们也可以通过position直接来给slider进行赋值,这表示当前播放的比例
#pragma mark == GLMusicPlayerDelegate
- (void)updateProgressWithCurrentPosition:(FSStreamPosition)currentPosition endPosition:(FSStreamPosition)endPosition
{
//更新进度条
self.playerControlView.slider.value = currentPosition.position;
self.playerControlView.leftTimeLable.text = [NSString translationWithMinutes:currentPosition.minute seconds:currentPosition.second];
self.playerControlView.rightTimeLable.text = [NSString translationWithMinutes:endPosition.minute seconds:endPosition.second];
//更新歌词
[self updateMusicLrcForRowWithCurrentTime:currentPosition.position *(endPosition.minute *60 + endPosition.second)];
self.playerControlView.palyMusicButton.selected = [GLMusicPlayer defaultPlayer].isPause;
}
本项目中,slider控件没有用系统的,而是简单的写了一个,大概如下
@interface GLSlider : UIControl
//进度条颜色
@property (nonatomic,strong) UIColor *progressColor;
//缓存条颜色
@property (nonatomic,strong) UIColor *progressCacheColor;
//滑块颜色
@property (nonatomic,strong) UIColor *thumbColor;
//设置进度值 0-1
@property (nonatomic,assign) CGFloat value;
//设置缓存进度值 0-1
@property (nonatomic,assign) CGFloat cacheValue;
@end
static CGFloat const kProgressHeight = 2;
static CGFloat const kProgressLeftPadding = 2;
static CGFloat const kThumbHeight = 16;
@interface GLSlider()
//滑块 默认
@property (nonatomic,strong) CALayer *thumbLayer;
//进度条
@property (nonatomic,strong) CALayer *progressLayer;
//缓存进度条
@property (nonatomic,strong) CALayer *progressCacheLayer;
@property (nonatomic,assign) BOOL isTouch;
@end
@implementation GLSlider
- (id)initWithFrame:(CGRect)frame
{
self = [super initWithFrame:frame];
if (self) {
[self addSubLayers];
}
return self;
}
....
这里是添加了缓存进度条的,但是由于时间关系,代码中还未实时更新缓存进度
3、更新歌词界面
说到歌词界面,我们看到QQ音乐的效果是这样的,逐行逐字进行更新,注意不是逐行更新。考虑到逐字进行更新,那么我们必须要对lable进行干点什么,这里对其进行了继承,并添加了些方法
@interface GLMusicLrcLable : UILabel
//进度
@property (nonatomic,assign) CGFloat progress;
@end
#import "GLMusicLrcLable.h"
@implementation GLMusicLrcLable
- (void)setProgress:(CGFloat)progress
{
_progress = progress;
//重绘
[self setNeedsDisplay];
}
- (void)drawRect:(CGRect)rect
{
[super drawRect:rect];
CGRect fillRect = CGRectMake(0, 0, self.bounds.size.width * _progress, self.bounds.size.height);
[UICOLOR_FROM_RGB(45, 185, 105) set];
UIRectFillUsingBlendMode(fillRect, kCGBlendModeSourceIn);
}
@end
注意UIRectFillUsingBlendMode该方法能够实现逐字进行渐变的效果
逐字的问题解决了,那么就剩下逐行问题了,逐行的问题应该不难,是的。我们只需要在指定的时间内将其滚动就行,如下
复制代码 代码如下:[self.lrcTableView scrollToRowAtIndexPath:currentIndexPath atScrollPosition:UITableViewScrollPositionMiddle animated:YES]
但是这中要注意一个问题,那就是必须做到,在下一行进行展示的时候,取消上一行的效果,如下
//设置当前行的状态
[currentCell reloadCellForSelect:YES];
//取消上一行的选中状态
[previousCell reloadCellForSelect:NO];
- (void)reloadCellForSelect:(BOOL)select
{
if (select) {
_lrcLable.font = [UIFont systemFontOfSize:17];
}else{
_lrcLable.font = [UIFont systemFontOfSize:14];
_lrcLable.progress = 0;
}
}
其中_lrcLable.progress = 0;必须要,否则我们的文字颜色不会改变
在大问题已经解决的情况下,我们就需要关心另一个重要的问题了,那就是歌词。这里先介绍一个网站,可以获取歌曲名和歌词的
(找了好久....) 歌曲歌词获取 ,不过好多好听的歌曲居然播放不了,你懂得,大天朝版权问题....找一首歌,播放就能看到看到歌词了。关于歌词,有许多格式,这里我用的是lrc格式,应该还算比较主流,格式大概如下
[ti:老人与海]
[ar:海鸣威 ]
[al:单曲]
[by:www.5nd.com From 那时花开]
[00:04.08]老人与海 海鸣威
[00:08.78]海鸣威
[00:37.06]秋天的夜凋零在漫天落叶里面
[00:42.43]泛黄世界一点一点随风而渐远
[00:47.58]冬天的雪白色了你我的情人节
[00:53.24]消失不见 爱的碎片
[00:57.87]Rap:
[00:59.32]翻开尘封的相片
[01:00.87]想起和你看过 的那些老旧默片
[01:02.50]老人与海的情节
[01:04.23]画面中你却依稀 在浮现
在有了格式后,我们就需要一个模型,来分离歌曲信息了,下面是我建的模型
#import @interface GLMusicLRCModel : NSObject
//该段歌词对应的时间
@property (nonatomic,assign) NSTimeInterval time;
//歌词
@property (nonatomic,strong) NSString *title;
/**
*
将特点的歌词格式进行转换
*
**/
+ (id)musicLRCWithString:(NSString *)string;
/**
*
根据歌词的路径返回歌词模型数组
*
**/
+ (NSArray *)musicLRCModelsWithLRCFileName:(NSString *)name;
@end
#import "GLMusicLRCModel.h"
@implementation GLMusicLRCModel
+(id)musicLRCWithString:(NSString *)string
{
GLMusicLRCModel *model = [[GLMusicLRCModel alloc] init];
NSArray *lrcLines =[string componentsSeparatedByString:@"]"];
if (lrcLines.count == 2) {
model.title = lrcLines[1];
NSString *timeString = lrcLines[0];
timeString = [timeString stringByReplacingOccurrencesOfString:@"[" withString:@""];
timeString = [timeString stringByReplacingOccurrencesOfString:@"]" withString:@""];
NSArray *times = [timeString componentsSeparatedByString:@":"];
if (times.count == 2) {
NSTimeInterval time = [times[0] integerValue]*60 + [times[1] floatValue];
model.time = time;
}
}else if(lrcLines.count == 1){
}
return model;
}
+(NSArray *)musicLRCModelsWithLRCFileName:(NSString *)name
{
NSString *lrcPath = [[NSBundle mainBundle] pathForResource:name ofType:nil];
NSString *lrcString = [NSString stringWithContentsOfFile:lrcPath encoding:NSUTF8StringEncoding error:nil];
NSArray *lrcLines = [lrcString componentsSeparatedByString:@"\n"];
NSMutableArray *lrcModels = [NSMutableArray array];
for (NSString *lrcLineString in lrcLines) {
if ([lrcLineString hasPrefix:@"[ti"] || [lrcLineString hasPrefix:@"[ar"] || [lrcLineString hasPrefix:@"[al"] || ![lrcLineString hasPrefix:@"["]) {
continue;
}
GLMusicLRCModel *lrcModel = [GLMusicLRCModel musicLRCWithString:lrcLineString];
[lrcModels addObject:lrcModel];
}
return lrcModels;
}
@end
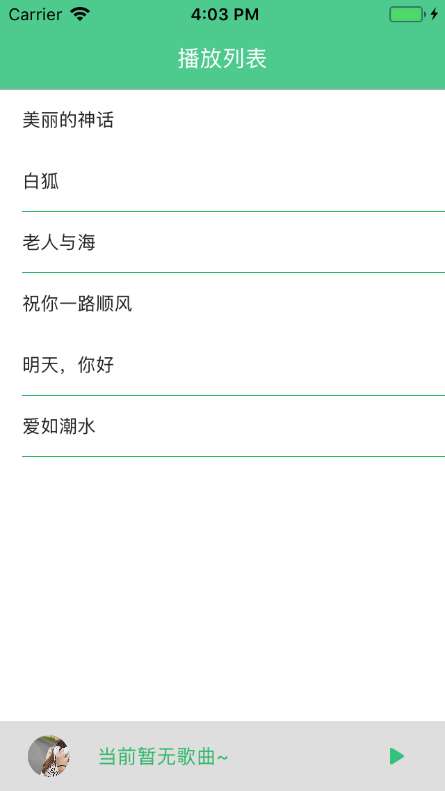
在歌词模型准备好之后,我们要展示歌词,这里我选择的是tableview,通过每一个cell来加载不同的歌词,然后通过歌词的时间信息来更新和滚动
#pragma mark == UITableViewDataSource
- (NSInteger)tableView:(UITableView *)tableView numberOfRowsInSection:(NSInteger)section
{
return [GLMusicPlayer defaultPlayer].musicLRCArray.count;
}
- (UITableViewCell *)tableView:(UITableView *)tableView cellForRowAtIndexPath:(NSIndexPath *)indexPath
{
MusicLRCTableViewCell *cell = [tableView dequeueReusableCellWithIdentifier:@"musicLrc" forIndexPath:indexPath];
cell.selectionStyle = UITableViewCellSelectionStyleNone;
cell.backgroundColor = [UIColor clearColor];
cell.contentView.backgroundColor = [UIColor clearColor];
cell.lrcModel = [GLMusicPlayer defaultPlayer].musicLRCArray[indexPath.row];
if (indexPath.row == self.currentLcrIndex) {
[cell reloadCellForSelect:YES];
}else{
[cell reloadCellForSelect:NO];
}
return cell;
}
这里面唯一比较麻烦的可能就是更新歌词了,在上面的定时器中,我们也通过代理来更新了进度条,所以我也将更新歌词的部分放在了代理中,这样可以达到实时更新的目的,下面看看方法
//逐行更新歌词
- (void)updateMusicLrcForRowWithCurrentTime:(NSTimeInterval)currentTime
{
for (int i = 0; i < [GLMusicPlayer defaultPlayer].musicLRCArray.count; i ++) {
GLMusicLRCModel *model = [GLMusicPlayer defaultPlayer].musicLRCArray[i];
NSInteger next = i + 1;
GLMusicLRCModel *nextLrcModel = nil;
if (next < [GLMusicPlayer defaultPlayer].musicLRCArray.count) {
nextLrcModel = [GLMusicPlayer defaultPlayer].musicLRCArray[next];
}
if (self.currentLcrIndex != i && currentTime >= model.time)
{
BOOL show = NO;
if (nextLrcModel) {
if (currentTime < nextLrcModel.time) {
show = YES;
}
}else{
show = YES;
}
if (show) {
NSIndexPath *currentIndexPath = [NSIndexPath indexPathForRow:i inSection:0];
NSIndexPath *previousIndexPath = [NSIndexPath indexPathForRow:self.currentLcrIndex inSection:0];
self.currentLcrIndex = i;
MusicLRCTableViewCell *currentCell = [self.lrcTableView cellForRowAtIndexPath:currentIndexPath];
MusicLRCTableViewCell *previousCell = [self.lrcTableView cellForRowAtIndexPath:previousIndexPath];//设置当前行的状态
[currentCell reloadCellForSelect:YES];
//取消上一行的选中状态
[previousCell reloadCellForSelect:NO];if (!self.isDrag) {
[self.lrcTableView scrollToRowAtIndexPath:currentIndexPath atScrollPosition:UITableViewScrollPositionMiddle animated:YES];
}
}
}
if (self.currentLcrIndex == i) {
MusicLRCTableViewCell *cell = [self.lrcTableView cellForRowAtIndexPath:[NSIndexPath indexPathForRow:i inSection:0]];
CGFloat totalTime = 0;
if (nextLrcModel) {
totalTime = nextLrcModel.time - model.time;
}else{
totalTime = [GLMusicPlayer defaultPlayer].duration.minute * 60 + [GLMusicPlayer defaultPlayer].duration.second - model.time;
}
CGFloat progressTime = currentTime - model.time;
cell.lrcLable.progress = progressTime / totalTime;
}
}
}
到此为止,我们一个简单的播放器就差不多实现了,但是这...并没有完,相比QQ音乐而言,它还差一个播放顺序切换的功能和锁屏播放功能
4、切换播放顺序
这个比较简单,只是需要注意在切换的时候,注意数组的越界和不同模式的处理
这里,我定义了如下几种模式
typedef NS_ENUM(NSInteger,GLLoopState){
GLSingleLoop = 0,//单曲循环
GLForeverLoop,//重复循环
GLRandomLoop,//随机播放
GLOnceLoop//列表一次顺序播放
};
切换代码
//不同状态下 播放歌曲
- (void)playMusicForState
{
switch (self.loopState) {
case GLSingleLoop:
{
[self playMusicAtIndex:self.currentIndex];
}
break;
case GLForeverLoop:
{
if (self.currentIndex == self.musicListArray.count-1) {
[self playMusicAtIndex:0];
}else{
[self playMusicAtIndex:self.currentIndex + 1];
}
}
break;
case GLRandomLoop:
{
//取随机值
int index = arc4random() % self.musicListArray.count;
[self playMusicAtIndex:index];
}
break;
case GLOnceLoop:
{
if (self.currentIndex == self.musicListArray.count-1) {
[self stop];
}else{
[self playMusicAtIndex:self.currentIndex + 1];
}
}
break;
default:
break;
}
}
5、锁屏播放
就如上图2中那样,由于在iOS 11中好像不能支持背景图片和歌词展示,可能是为了界面更加简洁吧,所以我这里也就没有加该功功能,只是简答的有个播放界面和几个控制按钮
首先需要在工程中这样设置,保证在后台播放

然后就是在appdelegate中添加如下代码
AVAudioSession *session = [AVAudioSession sharedInstance];
//  [session setActive:YES error:nil];
[session setActive:YES withOptions:AVAudioSessionSetActiveOptionNotifyOthersOnDeactivation error:nil];
[session setCategory:AVAudioSessionCategoryPlayback error:nil];
[[UIApplication sharedApplication] beginReceivingRemoteControlEvents];
并且添加控制事件
#pragma mark == event response
-(void)remoteControlReceivedWithEvent:(UIEvent *)event{
NSLog(@"%ld",event.subtype);
if (event.type == UIEventTypeRemoteControl) {
switch (event.subtype) {
case UIEventSubtypeRemoteControlPlay:
{
//点击播放按钮或者耳机线控中间那个按钮
[[GLMusicPlayer defaultPlayer] pause];
}
break;
case UIEventSubtypeRemoteControlPause:
{
//点击暂停按钮
[[GLMusicPlayer defaultPlayer] pause];
}
break;
case UIEventSubtypeRemoteControlStop :
{
//点击停止按钮
[[GLMusicPlayer defaultPlayer] stop];
}
break;
case UIEventSubtypeRemoteControlTogglePlayPause:
{
//点击播放与暂停开关按钮(iphone抽屉中使用这个)
[[GLMusicPlayer defaultPlayer] pause];
}
break;
case UIEventSubtypeRemoteControlNextTrack:
{
//点击下一曲按钮或者耳机中间按钮两下
[[GLMusicPlayer defaultPlayer] playNext];
}
break;
case UIEventSubtypeRemoteControlPreviousTrack:
{
//点击上一曲按钮或者耳机中间按钮三下
[[GLMusicPlayer defaultPlayer] playFont];
}
break;
case UIEventSubtypeRemoteControlBeginSeekingBackward:
{
//快退开始 点击耳机中间按钮三下不放开
}
break;
case UIEventSubtypeRemoteControlEndSeekingBackward:
{
//快退结束 耳机快退控制松开后
}
break;
case UIEventSubtypeRemoteControlBeginSeekingForward:
{
//开始快进 耳机中间按钮两下不放开
}
break;
case UIEventSubtypeRemoteControlEndSeekingForward:
{
//快进结束 耳机快进操作松开后
}
break;
default:
break;
}
}
}
beginReceivingRemoteControlEvents为允许传递远程控制事件,remoteControlReceivedWithEvent为接收一个远程控制事件,关于控制事件的类型,在代码中,已经注释过,这里就不再说了。
控制事件搞定了,剩下的就是界面的展示了,主要是歌曲信息的展示,通过如下的代码就能实现
NSMutableDictionary *musicInfoDict = [[NSMutableDictionary alloc] init];
//设置歌曲题目
[musicInfoDict setObject:self.currentTitle forKey:MPMediaItemPropertyTitle];
//设置歌手名
[musicInfoDict setObject:@"" forKey:MPMediaItemPropertyArtist];
//设置专辑名
[musicInfoDict setObject:@"" forKey:MPMediaItemPropertyAlbumTitle];
//设置歌曲时长
[musicInfoDict setObject:[NSNumber numberWithFloat:totalTime]
forKey:MPMediaItemPropertyPlaybackDuration];
//设置已经播放时长
[musicInfoDict setObject:[NSNumber numberWithFloat:currentTime]
forKey:MPNowPlayingInfoPropertyElapsedPlaybackTime];
[[MPNowPlayingInfoCenter defaultCenter] setNowPlayingInfo:musicInfoDict];
关于歌曲信息的设置,可以不按照我这样,定时器中时刻进行刷新,只需要在播放、暂停、快进快退这些时间有变化的地方传入当前歌曲的关键信息就可以,系统会自动去根据播放情况去更新锁屏界面上的进度条,而不需要我们时刻传入当前播放时间。这里我为了偷懒,就加在里面了。为了防止频繁操作,我采取了个方法,在其他地方看到的,就是监听锁屏情况
//监听锁屏状态 lock=1则为锁屏状态
uint64_t locked;
__block int token = 0;
notify_register_dispatch("com.apple.springboard.lockstate",&token,dispatch_get_main_queue(),^(int t){
});
notify_get_state(token, &locked);
//监听屏幕点亮状态 screenLight = 1则为变暗关闭状态
uint64_t screenLight;
__block int lightToken = 0;
notify_register_dispatch("com.apple.springboard.hasBlankedScreen",&lightToken,dispatch_get_main_queue(),^(int t){
});
notify_get_state(lightToken, &screenLight);
通过该情况来设置。
在上面锁屏播放的过程中,出现一个问题,就是当我切换歌曲的时候,不管是在锁屏情况下,还是在app内
通过各种查找,大概找到问题,首先在appdelegate中将[session setActive:YES error:nil]改成了[session setActive:YES withOptions:AVAudioSessionSetActiveOptionNotifyOthersOnDeactivation error:nil],然后再播放的地方加了一个[self stop],先停止播放
- (void)playFromURL:(NSURL *)url
{
//根据地址 在本地找歌词
NSMutableDictionary *dic = [NSMutableDictionary dictionaryWithContentsOfFile:[[NSBundle mainBundle] pathForResource:@"musiclist" ofType:@"plist"]];
for (NSString *playStringKey in dic.allKeys) {
if ([[dic valueForKey:playStringKey] isEqualToString:url.absoluteString]) {
self.currentTitle = playStringKey;
break;
}
}
[self stop];
if (![url.absoluteString isEqualToString:self.url.absoluteString]) {
[super playFromURL:url];
}else{
[self play];
}
到此为止,一个简单的播放器就差不多了,由于时间关系,可能还有些bug,希望大家能多多提出来,我好进行修正。下面还是附上 demo ,后续我还将加一个功能,因为这两天公司有个很老的项目,有个下载问题,有点蛋疼,所以准备些一个队列下载,然后顺便加到播放器上。
说说遇到的坑
第一个就是我们项目中也有用到科大讯飞的语音.和录音的功能这些东西都需要对AVAudioSession进行操作.在切换使用AVAudioSession的时候就会报[AVAudioSession setActive:withOptions:error:]: Deactivating an audio session that has running I/O. All I/O should be stopped or paused prior to deactivating the audio session. 这样的错误,这个错会导致音频在播放但是没有声音. 我的解决办法是搜索框架中所有的setActive:NO,把NO改成YES,这个问题就完美的解决了.
第二个坑就是当刚开始缓存但是没有出声音的时候这个时候调暂停的方法是没用的,即使调用了暂停的方法.但是音频还是会播放.我刚开始的解决办法是在监听FSAudioStreamState的kFsAudioStreamPlaying状态.在playFromURL:的时候设置了一个属性Buffering置为YES,在调用kFsAudioStreamPlaying的置为NO,这样在暂停方法里这样写
- (void)suspentFM {
if (self.isSuspendFM==YES) return;
if (self.Buffering ==YES) {
[_audioStream stop];
}else {
[_audioStream pause];
}
self.isSuspendFM = YES;
_suspentBtn.hidden = NO;
}
就解决了这个问题.但是解决的并不完美.kFsAudioStreamPlaying这个状态会调用很多次.这样在少数情况下还是会有问题,具体情况已经忘了.于是乎我就放出了终极大招在定时器里监听进度
if ( progressView.progress<0.007) {
self.Buffering = YES;
}else {
self.Buffering = NO;
}
到这里才完美的解决这个问题
在接下来说使用小技巧吧.就是缓存的进度和播放的进度
FSStreamPosition cur = self.audioStream.currentTimePlayed;
self.playbackTime =cur.playbackTimeInSeconds/1;
self.ProgressView.progress = cur.position;//播放进度
self.progress = cur.position;
float prebuffer = (float)self.audioStream.prebufferedByteCount;
float contentlength = (float)self.audioStream.contentLength;
if (contentlength>0) {
self.ProgressView.cacheProgress = prebuffer /contentlength;//缓存进度
}
以上就是本文的全部内容,希望对大家的学习有所帮助,也希望大家多多支持脚本之家。
您可能感兴趣的文章:

- iOS之基于FreeStreamer的简单音乐播放器
- iOS之基于FreeStreamer的简单音乐播放器
- IOS 基于AV Foundation框架开发简单音乐播放器
- ios 流媒体播放器实现流程及FreeStreamer的使用的示例
- IOS 基于AV Foundation框架开发简单音乐播放器
- iOS 6编程-基于AV Foundation框架开发简单音乐播放器
- [转载] STL allocator的介绍和一个基于malloc/free的allocator的简单实现
- 最简单的基于FFmpeg的移动端例子附件:IOS自带播放器
- iOS 5 新增的UIPageViewController 简单示例
- 最简单的基于FFmpeg的移动端例子:IOS HelloWorld
- 最简单的基于FFmpeg的移动端例子附件:IOS自带播放器
- PHP基于简单递归函数求一个数阶乘的方法示例
- 最简单的基于librtmp的示例:发布(FLV通过RTMP发布)
- iOS_基于ScrollView的一个简单相册
- iOS 简单实用的音乐播放器,少年,自己做个歌单吧。。。。。。
- 最简单的基于DirectShow的示例:视频播放器自定义版
- 最简单的基于librtmp的示例:接收(RTMP保存为FLV)
- JavaScript基于DOM操作实现简单的数学运算功能示例
- 最简单的基于Flash的流媒体示例:网页播放器(HTTP,RTMP,HLS)
- Java基于解释器模式实现定义一种简单的语言功能示例