Elastic Search系统学习之一: 入门
2017-11-12 17:01
851 查看
一、ES单机安装
1、windows[版本 5.6.4]
步骤一: 下载
https://www.elastic.co/cn/products/elasticsearch
步骤二:运行msi


步骤三:执行
C:\Windows\system32>cd %PROGRAMFILES%\Elastic\Elasticsearch\bin
C:\Program Files\Elastic\Elasticsearch\bin>.\elasticsearch.exe
2、安装kibana
步骤一:下载
https://www.elastic.co/cn/downloads/kibana
步骤二:解压
步骤三:修改配置
config/kibana.yml
elasticsearch.url 指向es的实例,默认是9200端口
步骤四:运行
bin\kibana.bat
步骤五:健康检查
打开kibana: localhost:5601
点击: dev tools

检查一:集群健康状况
GET /_cat/health?v
或 cmd中输入:
curl -XGET localhost:9200/_cat/health?v&pretty
检查二:获取节点列表
GET /_cat/nodes?v
或cmd中输入
curl -XGET localhost:9200/_cat/nodes?v&pretty
检查三: 获取indeces列表
GET /_cat/indices?v
或者
curl -XGET localhost:9200/_cat/indices?v&pretty
3、logstash安装与使用示例
步骤一:下载
https://www.elastic.co/downloads/logstash
步骤二:启动Logstash并验证
存储示例
lxq@slave-01:~/elastic-search/logstash-6.0.0$ bin/logstash
Sending Logstash's logs to /home/lxq/elastic-search/logstash-6.0.0/logs which is now configured via log4j2.properties
... ...
[2017-11-16T12:04:30,674][INFO ][logstash.agent ] Pipelines running {:count=>1, :pipelines=>["main"]}
hello,world //输入
2017-11-16T04:05:13.809Z slave-01 hello,world //输出
步骤三: 简单配置示例
1> 配置文件: logstash-simple.conf
输入: 标准输入
输出: 标准输出,elasticsearch
2> 运行:$ bin/logstash -f logstash-simple.conf
输入:this is my choice
输出:
lxq@slave-01:~/elastic-search/no-x-pack/logstash-6.0.0$ sh start.sh
......
The stdin plugin is now waiting for input:
[2017-11-17T10:44:41,032][INFO ][logstash.agent ] Pipelines running {:count=>1, :pipelines=>["main"]}
this is my choice
{
"@version" => "1",
"host" => "slave-01",
"@timestamp" => 2017-11-17T02:44:46.210Z,
"message" => "this is my choice"
}
3> 查看kibana:

步骤四: 从beats输入示例
参考:http://www.open-open.com/lib/view/open1489462086763.html
1> 创建配置文件
lxq@slave-01:~/elastic-search/no-x-pack/logstash-6.0.0$ cat logstash-beats.conf
input {
beats {
port => 5044
}
}
output {
stdout {
codec => rubydebug
}
elasticsearch {
hosts => ["localhost:9200"]
}
}
2> 启动服务
$ bin/logstash -f logstash-beats.conf
4、 安装filebeat
步骤一:安装filebeat<采用tar包形式>并配置编辑filebeat.yml
1> 日志输入配置
2> 输出配置
输出一: elasticsearch
输出二:logstash
3> kibana配置
如果es和kibana采用安全配置
步骤二:加ES的载索引模板
1> 配置模板加载 filebeat.yml
或
2> 手动加载模板
3> 传递认证
前提: es安装了x-pack
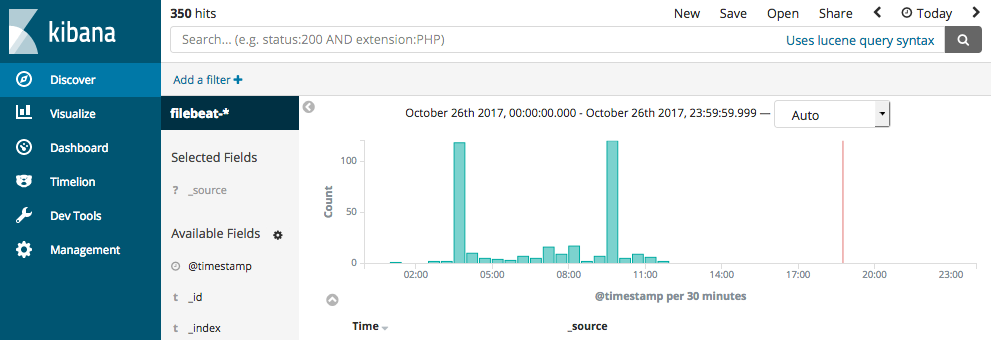
步骤三: 设置kibana仪表盘
步骤四:启动
步骤五: 查看kibana仪表盘
注:实际上只有Timelion显示结果

下面是教程显示结果: 我暂时没有得到
二、 索引
命令格式
<REST Verb> /<Index>/<Type>/<ID>
1、创建索引
PUT /customer?pretty 创建索引customer,pretty意思是要pretty打印json回应
GET /_cat/indices?v
或
curl -XPUT 'localhost:9200/customer?pretty&pretty'
curl -XGET 'localhost:9200/_cat/indices?v&pretty'
health status index uuid pri rep docs.count docs.deleted store.size pri.store.size
yellow open .kibana zzWKZeFBTPSopaocBs49KA 1 1 1 0 3.2kb 3.2kb
yellow open customer TfppMzJ-TMKVA-hiFjTpfg 5 1 0 0 810b 810b
5个主分片和一个备份
2、输入文档
PUT /customer/external/1?pretty
{
"name": "John Doe"
}
返回:
{
"_index": "customer",
"_type": "external",
"_id": "1",
"_version": 1,
"result": "created",
"_shards": {
"total": 2,
"successful": 1,
"failed": 0
},
"created": true
}
3、读取文档:
GET /customer/external/1?pretty
或
curl -XGET 'localhost:9200/customer/external/1?pretty&pretty'
返回
{
"_index": "customer",
"_type": "external",
"_id": "1",
"_version": 1,
"found": true,
"_source": {
"name": "John Doe"
}
}
4、删除索引
DELETE /customer?pretty
GET /_cat/indices?v
或者
curl -XDELETE 'localhost:9200/customer?pretty&pretty'
curl -XGET 'localhost:9200/_cat/indices?v&pretty'
返回
health status index uuid pri rep docs.count docs.deleted store.size pri.store.size
yellow open .kibana zzWKZeFBTPSopaocBs49KA 1 1 1 0 3.2kb 3.2kb
5、修改数据
PUT /customer/external/1?pretty
{
"name": "John Doe"
}
或
curl -XPUT 'localhost:9200/customer/external/1?pretty&pretty' -H 'Content-Type: application/json' -d'
{
"name": "John Doe"
}
PUT /customer/external/1?pretty
{
"name": "Jane Doe"
}
或
curl -XPUT 'localhost:9200/customer/external/1?pretty&pretty' -H 'Content-Type: application/json' -d'
{
"name": "Jane Doe"
}
无id输入文档: 随机生成文档id
POST /customer/external?pretty
{
"name": "Jane Doe"
}
返回
{
"_index": "customer",
"_type": "external",
"_id": "AV-w2SEZZOdxCuM9B7Ws",
"_version": 1,
"result": "created",
"_shards": {
"total": 2,
"successful": 1,
"failed": 0
},
"created": true
}
6、更新文档
更新指定字段:
POST /customer/external/1/_update?pretty
{
"doc": { "name": "Jane xxx Doe" }
}
或
curl -XPOST 'localhost:9200/customer/external/1/_update?pretty&pretty' -H 'Content-Type: application/json' -d'
{
"doc": { "name": "Jane Doe" }
}
'
跟新的时候添加字段
POST /customer/external/1/_update?pretty
{
"doc": { "name": "Jane Doe", "age": 20 }
}
或
curl -XPOST 'localhost:9200/customer/external/1/_update?pretty&pretty' -H 'Content-Type: application/json' -d'
{
"doc": { "name": "Jane Doe", "age": 20 }
}
'
通过脚本: 年龄增加
POST /customer/external/1/_update?pretty
{
"script" : "ctx._source.age += 5"
}
7、删除文档
DELETE /customer/external/2?pretty
GET /customer/external/2?pretty
8、批处理POST /customer/external/_bulk?pretty
更新id1,id2
{"index":{"_id":"1"}}
{"name": "John Doe" }
{"index":{"_id":"2"}}
{"name": "Jane Doe" }
更新id1,删除id2
POST /customer/external/_bulk?pretty
{"update":{"_id":"1"}}
{"doc": { "name": "John Doe becomes Jane Doe" } }
{"delete":{"_id":"2"}}
9、数据集
下载: https://raw.githubusercontent.com/elastic/elasticsearch/master/docs/src/test/resources/accounts.json#
数据: 存储在accounts.json中
注意: 采用gMINGW64软件,在windows系统下cmd窗口不那么适配curl命令
lxq@lxq MINGW64 /d/data/es-data
$ curl -H "Content-Type: application/json" -XPOST 'localhost:9200/bank/account/_bulk?pretty&refresh' --data-binary "@accounts.json"
$ curl 'localhost:9200/_cat/indices?v'
错误:
"error" : {
"type" : "process_cluster_event_timeout_exception",
"reason" : "failed to process cluster event (create-index [bank], cause [auto(bulk api)]) within 1m"
}
解决:
重新安装elastic search解决的
10、搜索API
GET /bank/_search?q=*&sort=account_number:asc&pretty
或
GET /bank/_search
{
"query": { "match_all": {} },
"sort": [
{ "account_number": "asc" }
]
}
或
curl -XGET 'localhost:9200/bank/_search?q=*&sort=account_number:asc&pretty&pretty'
11、query描述语言query dsl: 检索
1> 获取所有
GET /bank/_search
{
"query": { "match_all": {} }
}
2> 限制数
GET /bank/_search
{
"query": { "match_all": {} },
"size": 1
}
3> 指定起始和数
GET /bank/_search
{
"query": { "match_all": {} },
"from": 10,
"size": 10
}
4> 添加排序
GET /bank/_search
{
"query": { "match_all": {} },
"sort": { "balance": { "order": "desc" } }
}
5> 限定返回域
GET /bank/_search
{
"query": { "match_all": {} },
"_source": ["account_number", "balance"]
}
或
curl -XGET 'localhost:9200/bank/_search?pretty' -H 'Content-Type: application/json' -d'
{
"query": { "match_all": {} },
"_source": ["account_number", "balance"]
}
'
6> 限定域搜索
GET /bank/_search
{
"query": { "match": { "account_number": 20 } }
}
或
curl -XGET 'localhost:9200/bank/_search?pretty' -H 'Content-Type: application/json' -d'
{
"query": { "match": { "account_number": 20 } }
}
'
7> 域限定or检索
GET /bank/_search
{
"query": { "match": { "address": "mill lane" } }
}
或curl -XGET 'localhost:9200/bank/_search?pretty' -H 'Content-Type: application/json' -d'
{
"query": { "match": { "address": "mill lane" } }
}
‘
8> 域限定短语检索
GET /bank/_search
{
"query": { "match_phrase": { "address": "mill lane" } }
}
或
curl -XGET 'localhost:9200/bank/_search?pretty' -H 'Content-Type: application/json' -d'
{
"query": { "match_phrase": { "address": "mill lane" } }
}
'
9> 域限定and检索
GET /bank/_search
{
"query": {
"bool": {
"must": [
{ "match": { "address": "mill" } },
{ "match": { "address": "lane" } }
]
}
}
}
或
curl -XGET 'localhost:9200/bank/_search?pretty' -H 'Content-Type: application/json' -d'
{
"query": {
"bool": {
"must": [
{ "match": { "address": "mill" } },
{ "match": { "address": "lane" } }
]
}
}
}
'
10> 域限定or检索
GET /bank/_search
{
"query": {
"bool": {
"should": [
{ "match": { "address": "mill" } },
{ "match": { "address": "lane" } }
]
}
}
}
或
curl -XGET 'localhost:9200/bank/_search?pretty' -H 'Content-Type: application/json' -d'
{
"query": {
"bool": {
"should": [
{ "match": { "address": "mill" } },
{ "match": { "address": "lane" } }
]
}
}
}
'
11> 排除搜索: 都不包含
GET /bank/_search
{
"query": {
"bool": {
"must_not": [
{ "match": { "address": "mill" } },
{ "match": { "address": "lane" } }
]
}
}
}
或
curl -XGET 'localhost:9200/bank/_search?pretty' -H 'Content-Type: application/json' -d'
{
"query": {
"bool": {
"must_not": [
{ "match": { "address": "mill" } },
{ "match": { "address": "lane" } }
]
}
}
}
'
12> 联合操作 must bool must_not
GET /bank/_search
{
"query": {
"bool": {
"must": [
{ "match": { "age": "40" } }
],
"must_not": [
{ "match": { "state": "ID" } }
]
}
}
}
或
curl -XGET 'localhost:9200/bank/_search?pretty' -H 'Content-Type: application/json' -d'
{
"query": {
"bool": {
"must": [
{ "match": { "age": "40" } }
],
"must_not": [
{ "match": { "state": "ID" } }
]
}
}
}
'
12、[b]query描述语言query dsl: 过滤[/b]
GET /bank/_search
{
"query": {
"bool": {
"must": { "match_all": {} },
"filter": {
"range": {
"balance": {
"gte": 20000,
"lte": 30000
}
}
}
}
}
}
或
curl -XGET 'localhost:9200/bank/_search?pretty' -H 'Content-Type: application/json' -d'
{
"query": {
"bool": {
"must": { "match_all": {} },
"filter": {
"range": {
"balance": {
"gte": 20000,
"lte": 30000
}
}
}
}
}
}
'
13、聚合
1> 相当于:
SELECT state, COUNT(*) FROM bank GROUP BY state ORDER BY COUNT(*) DESC
GET /bank/_search
{
"size": 0,
"aggs": {
"group_by_state": {
"terms": {
"field": "state.keyword"
}
}
}
}
或者
curl -XGET 'localhost:9200/bank/_search?pretty' -H 'Content-Type: application/json' -d'
{
"size": 0,
"aggs": {
"group_by_state": {
"terms": {
"field": "state.keyword"
}
}
}
}
'
2> 嵌套计算
GET /bank/_search
{
"size": 0,
"aggs": {
"group_by_state": {
"terms": {
"field": "state.keyword"
},
"aggs": {
"average_balance": {
"avg": {
"field": "balance"
}
}
}
}
}
}
或
curl -XGET 'localhost:9200/bank/_search?pretty' -H 'Content-Type: application/json' -d'
{
"size": 0,
"aggs": {
"group_by_state": {
"terms": {
"field": "state.keyword"
},
"aggs": {
"average_balance": {
"avg": {
"field": "balance"
}
}
}
}
}
}
'
3> 嵌套计算并排序
GET /bank/_search
{
"size": 0,
"aggs": {
"group_by_state": {
"terms": {
"field": "state.keyword",
"order": {
"average_balance": "desc"
}
},
"aggs": {
"average_balance": {
"avg": {
"field": "balance"
}
}
}
}
}
}
或
curl -XGET 'localhost:9200/bank/_search?pretty' -H 'Content-Type: application/json' -d'
{
"size": 0,
"aggs": {
"group_by_state": {
"terms": {
"field": "state.keyword",
"order": {
"average_balance": "desc"
}
},
"aggs": {
"average_balance": {
"avg": {
"field": "balance"
}
}
}
}
}
}
'
3> 嵌套操作
GET /bank/_search
{
"size": 0,
"aggs": {
"group_by_age": {
"range": {
"field": "age",
"ranges": [
{
"from": 20,
"to": 30
},
{
"from": 30,
"to": 40
},
{
"from": 40,
"to": 50
}
]
},
"aggs": {
"group_by_gender": {
"terms": {
"field": "gender.keyword"
},
"aggs": {
"average_balance": {
"avg": {
"field": "balance"
}
}
}
}
}
}
}
}
或
curl -XGET 'localhost:9200/bank/_search?pretty' -H 'Content-Type: application/json' -d'
{
"size": 0,
"aggs": {
"group_by_age": {
"range": {
"field": "age",
"ranges": [
{
"from": 20,
"to": 30
},
{
"from": 30,
"to": 40
},
{
"from": 40,
"to": 50
}
]
},
"aggs": {
"group_by_gender": {
"terms": {
"field": "gender.keyword"
},
"aggs": {
"average_balance": {
"avg": {
"field": "balance"
}
}
}
}
}
}
}
}
'
三、如果elastic安装了认证
curl操作需要添加认证信息
curl --user [name]:[password] process
例如:
$ curl --user elastic:elastic -H "Content-Type: application/json" -XPOST '127.0.0.1:9200/bank/account/_bulk?pretty&refresh' --data-binary "@accounts.json"
$ curl --user elastic:elastic '127.0.0.1:9200/_cat/indices?v'
1、windows[版本 5.6.4]
步骤一: 下载
https://www.elastic.co/cn/products/elasticsearch
步骤二:运行msi
步骤三:执行
C:\Windows\system32>cd %PROGRAMFILES%\Elastic\Elasticsearch\bin
C:\Program Files\Elastic\Elasticsearch\bin>.\elasticsearch.exe
2、安装kibana
步骤一:下载
https://www.elastic.co/cn/downloads/kibana
步骤二:解压
步骤三:修改配置
config/kibana.yml
elasticsearch.url 指向es的实例,默认是9200端口
步骤四:运行
bin\kibana.bat
步骤五:健康检查
打开kibana: localhost:5601
点击: dev tools
检查一:集群健康状况
GET /_cat/health?v
或 cmd中输入:
curl -XGET localhost:9200/_cat/health?v&pretty
检查二:获取节点列表
GET /_cat/nodes?v
或cmd中输入
curl -XGET localhost:9200/_cat/nodes?v&pretty
检查三: 获取indeces列表
GET /_cat/indices?v
或者
curl -XGET localhost:9200/_cat/indices?v&pretty
3、logstash安装与使用示例
步骤一:下载
https://www.elastic.co/downloads/logstash
步骤二:启动Logstash并验证
存储示例
lxq@slave-01:~/elastic-search/logstash-6.0.0$ bin/logstash
Sending Logstash's logs to /home/lxq/elastic-search/logstash-6.0.0/logs which is now configured via log4j2.properties
... ...
[2017-11-16T12:04:30,674][INFO ][logstash.agent ] Pipelines running {:count=>1, :pipelines=>["main"]}
hello,world //输入
2017-11-16T04:05:13.809Z slave-01 hello,world //输出
步骤三: 简单配置示例
1> 配置文件: logstash-simple.conf
input { stdin { } }
output {
elasticsearch { hosts => ["localhost:9200"] }
stdout { codec => rubydebug }
}
输入: 标准输入
输出: 标准输出,elasticsearch
2> 运行:$ bin/logstash -f logstash-simple.conf
输入:this is my choice
输出:
lxq@slave-01:~/elastic-search/no-x-pack/logstash-6.0.0$ sh start.sh
......
The stdin plugin is now waiting for input:
[2017-11-17T10:44:41,032][INFO ][logstash.agent ] Pipelines running {:count=>1, :pipelines=>["main"]}
this is my choice
{
"@version" => "1",
"host" => "slave-01",
"@timestamp" => 2017-11-17T02:44:46.210Z,
"message" => "this is my choice"
}
3> 查看kibana:
步骤四: 从beats输入示例
参考:http://www.open-open.com/lib/view/open1489462086763.html
1> 创建配置文件
lxq@slave-01:~/elastic-search/no-x-pack/logstash-6.0.0$ cat logstash-beats.conf
input {
beats {
port => 5044
}
}
output {
stdout {
codec => rubydebug
}
elasticsearch {
hosts => ["localhost:9200"]
}
}
2> 启动服务
$ bin/logstash -f logstash-beats.conf
4、 安装filebeat
步骤一:安装filebeat<采用tar包形式>并配置编辑filebeat.yml
1> 日志输入配置
filebeat.prospectors:
- type: log
enabled: true
paths:
- /home/lxq/elastic-search/logstash-tutorial-dataset
2> 输出配置
输出一: elasticsearch
output.elasticsearch:
hosts: ["192.168.1.42:9200"]
输出二:logstash
output.logstash:
hosts: ["127.0.0.1:5044"]
3> kibana配置
setup.kibana:
host: "localhost:5601"
如果es和kibana采用安全配置
output.elasticsearch:
hosts: ["myEShost:9200"]
username: elastic
password: elastic
setup.kibana:
host: "mykibanahost:5601"
username: elastic
password: elastic
步骤二:加ES的载索引模板
1> 配置模板加载 filebeat.yml
setup.template.name: "filebeat"
setup.template.fields: "path/to/fields.yml"
setup.template.overwrite: false
或
2> 手动加载模板
./filebeat setup --template
3> 传递认证
前提: es安装了x-pack
filebeat setup --template -e -E output.elasticsearch.username=elastic -E output.elasticsearch.password=elastic
步骤三: 设置kibana仪表盘
1>加载仪表盘
# ./filebeat setup --dashboards

2>传递认证
# filebeat setup --dashboards -e -E output.elasticsearch.username=elastic -E output.elasticsearch.password=elastic -E setup.kibana.username=elastic -E setup.kibana.password=elastic
步骤四:启动
sudo chown root:root filebeat.yml
sudo ./filebeat -e -c filebeat.yml
步骤五: 查看kibana仪表盘
注:实际上只有Timelion显示结果
下面是教程显示结果: 我暂时没有得到
二、 索引
命令格式
<REST Verb> /<Index>/<Type>/<ID>
1、创建索引
PUT /customer?pretty 创建索引customer,pretty意思是要pretty打印json回应
GET /_cat/indices?v
或
curl -XPUT 'localhost:9200/customer?pretty&pretty'
curl -XGET 'localhost:9200/_cat/indices?v&pretty'
health status index uuid pri rep docs.count docs.deleted store.size pri.store.size
yellow open .kibana zzWKZeFBTPSopaocBs49KA 1 1 1 0 3.2kb 3.2kb
yellow open customer TfppMzJ-TMKVA-hiFjTpfg 5 1 0 0 810b 810b
5个主分片和一个备份
2、输入文档
PUT /customer/external/1?pretty
{
"name": "John Doe"
}
返回:
{
"_index": "customer",
"_type": "external",
"_id": "1",
"_version": 1,
"result": "created",
"_shards": {
"total": 2,
"successful": 1,
"failed": 0
},
"created": true
}
3、读取文档:
GET /customer/external/1?pretty
或
curl -XGET 'localhost:9200/customer/external/1?pretty&pretty'
返回
{
"_index": "customer",
"_type": "external",
"_id": "1",
"_version": 1,
"found": true,
"_source": {
"name": "John Doe"
}
}
4、删除索引
DELETE /customer?pretty
GET /_cat/indices?v
或者
curl -XDELETE 'localhost:9200/customer?pretty&pretty'
curl -XGET 'localhost:9200/_cat/indices?v&pretty'
返回
health status index uuid pri rep docs.count docs.deleted store.size pri.store.size
yellow open .kibana zzWKZeFBTPSopaocBs49KA 1 1 1 0 3.2kb 3.2kb
5、修改数据
PUT /customer/external/1?pretty
{
"name": "John Doe"
}
或
curl -XPUT 'localhost:9200/customer/external/1?pretty&pretty' -H 'Content-Type: application/json' -d'
{
"name": "John Doe"
}
PUT /customer/external/1?pretty
{
"name": "Jane Doe"
}
或
curl -XPUT 'localhost:9200/customer/external/1?pretty&pretty' -H 'Content-Type: application/json' -d'
{
"name": "Jane Doe"
}
无id输入文档: 随机生成文档id
POST /customer/external?pretty
{
"name": "Jane Doe"
}
返回
{
"_index": "customer",
"_type": "external",
"_id": "AV-w2SEZZOdxCuM9B7Ws",
"_version": 1,
"result": "created",
"_shards": {
"total": 2,
"successful": 1,
"failed": 0
},
"created": true
}
6、更新文档
更新指定字段:
POST /customer/external/1/_update?pretty
{
"doc": { "name": "Jane xxx Doe" }
}
或
curl -XPOST 'localhost:9200/customer/external/1/_update?pretty&pretty' -H 'Content-Type: application/json' -d'
{
"doc": { "name": "Jane Doe" }
}
'
跟新的时候添加字段
POST /customer/external/1/_update?pretty
{
"doc": { "name": "Jane Doe", "age": 20 }
}
或
curl -XPOST 'localhost:9200/customer/external/1/_update?pretty&pretty' -H 'Content-Type: application/json' -d'
{
"doc": { "name": "Jane Doe", "age": 20 }
}
'
通过脚本: 年龄增加
POST /customer/external/1/_update?pretty
{
"script" : "ctx._source.age += 5"
}
7、删除文档
DELETE /customer/external/2?pretty
GET /customer/external/2?pretty
8、批处理POST /customer/external/_bulk?pretty
更新id1,id2
{"index":{"_id":"1"}}
{"name": "John Doe" }
{"index":{"_id":"2"}}
{"name": "Jane Doe" }
更新id1,删除id2
POST /customer/external/_bulk?pretty
{"update":{"_id":"1"}}
{"doc": { "name": "John Doe becomes Jane Doe" } }
{"delete":{"_id":"2"}}
9、数据集
下载: https://raw.githubusercontent.com/elastic/elasticsearch/master/docs/src/test/resources/accounts.json#
数据: 存储在accounts.json中
注意: 采用gMINGW64软件,在windows系统下cmd窗口不那么适配curl命令
lxq@lxq MINGW64 /d/data/es-data
$ curl -H "Content-Type: application/json" -XPOST 'localhost:9200/bank/account/_bulk?pretty&refresh' --data-binary "@accounts.json"
$ curl 'localhost:9200/_cat/indices?v'
错误:
"error" : {
"type" : "process_cluster_event_timeout_exception",
"reason" : "failed to process cluster event (create-index [bank], cause [auto(bulk api)]) within 1m"
}
解决:
重新安装elastic search解决的
10、搜索API
GET /bank/_search?q=*&sort=account_number:asc&pretty
或
GET /bank/_search
{
"query": { "match_all": {} },
"sort": [
{ "account_number": "asc" }
]
}
或
curl -XGET 'localhost:9200/bank/_search?q=*&sort=account_number:asc&pretty&pretty'
11、query描述语言query dsl: 检索
1> 获取所有
GET /bank/_search
{
"query": { "match_all": {} }
}
2> 限制数
GET /bank/_search
{
"query": { "match_all": {} },
"size": 1
}
3> 指定起始和数
GET /bank/_search
{
"query": { "match_all": {} },
"from": 10,
"size": 10
}
4> 添加排序
GET /bank/_search
{
"query": { "match_all": {} },
"sort": { "balance": { "order": "desc" } }
}
5> 限定返回域
GET /bank/_search
{
"query": { "match_all": {} },
"_source": ["account_number", "balance"]
}
或
curl -XGET 'localhost:9200/bank/_search?pretty' -H 'Content-Type: application/json' -d'
{
"query": { "match_all": {} },
"_source": ["account_number", "balance"]
}
'
6> 限定域搜索
GET /bank/_search
{
"query": { "match": { "account_number": 20 } }
}
或
curl -XGET 'localhost:9200/bank/_search?pretty' -H 'Content-Type: application/json' -d'
{
"query": { "match": { "account_number": 20 } }
}
'
7> 域限定or检索
GET /bank/_search
{
"query": { "match": { "address": "mill lane" } }
}
或curl -XGET 'localhost:9200/bank/_search?pretty' -H 'Content-Type: application/json' -d'
{
"query": { "match": { "address": "mill lane" } }
}
‘
8> 域限定短语检索
GET /bank/_search
{
"query": { "match_phrase": { "address": "mill lane" } }
}
或
curl -XGET 'localhost:9200/bank/_search?pretty' -H 'Content-Type: application/json' -d'
{
"query": { "match_phrase": { "address": "mill lane" } }
}
'
9> 域限定and检索
GET /bank/_search
{
"query": {
"bool": {
"must": [
{ "match": { "address": "mill" } },
{ "match": { "address": "lane" } }
]
}
}
}
或
curl -XGET 'localhost:9200/bank/_search?pretty' -H 'Content-Type: application/json' -d'
{
"query": {
"bool": {
"must": [
{ "match": { "address": "mill" } },
{ "match": { "address": "lane" } }
]
}
}
}
'
10> 域限定or检索
GET /bank/_search
{
"query": {
"bool": {
"should": [
{ "match": { "address": "mill" } },
{ "match": { "address": "lane" } }
]
}
}
}
或
curl -XGET 'localhost:9200/bank/_search?pretty' -H 'Content-Type: application/json' -d'
{
"query": {
"bool": {
"should": [
{ "match": { "address": "mill" } },
{ "match": { "address": "lane" } }
]
}
}
}
'
11> 排除搜索: 都不包含
GET /bank/_search
{
"query": {
"bool": {
"must_not": [
{ "match": { "address": "mill" } },
{ "match": { "address": "lane" } }
]
}
}
}
或
curl -XGET 'localhost:9200/bank/_search?pretty' -H 'Content-Type: application/json' -d'
{
"query": {
"bool": {
"must_not": [
{ "match": { "address": "mill" } },
{ "match": { "address": "lane" } }
]
}
}
}
'
12> 联合操作 must bool must_not
GET /bank/_search
{
"query": {
"bool": {
"must": [
{ "match": { "age": "40" } }
],
"must_not": [
{ "match": { "state": "ID" } }
]
}
}
}
或
curl -XGET 'localhost:9200/bank/_search?pretty' -H 'Content-Type: application/json' -d'
{
"query": {
"bool": {
"must": [
{ "match": { "age": "40" } }
],
"must_not": [
{ "match": { "state": "ID" } }
]
}
}
}
'
12、[b]query描述语言query dsl: 过滤[/b]
GET /bank/_search
{
"query": {
"bool": {
"must": { "match_all": {} },
"filter": {
"range": {
"balance": {
"gte": 20000,
"lte": 30000
}
}
}
}
}
}
或
curl -XGET 'localhost:9200/bank/_search?pretty' -H 'Content-Type: application/json' -d'
{
"query": {
"bool": {
"must": { "match_all": {} },
"filter": {
"range": {
"balance": {
"gte": 20000,
"lte": 30000
}
}
}
}
}
}
'
13、聚合
1> 相当于:
SELECT state, COUNT(*) FROM bank GROUP BY state ORDER BY COUNT(*) DESC
GET /bank/_search
{
"size": 0,
"aggs": {
"group_by_state": {
"terms": {
"field": "state.keyword"
}
}
}
}
或者
curl -XGET 'localhost:9200/bank/_search?pretty' -H 'Content-Type: application/json' -d'
{
"size": 0,
"aggs": {
"group_by_state": {
"terms": {
"field": "state.keyword"
}
}
}
}
'
2> 嵌套计算
GET /bank/_search
{
"size": 0,
"aggs": {
"group_by_state": {
"terms": {
"field": "state.keyword"
},
"aggs": {
"average_balance": {
"avg": {
"field": "balance"
}
}
}
}
}
}
或
curl -XGET 'localhost:9200/bank/_search?pretty' -H 'Content-Type: application/json' -d'
{
"size": 0,
"aggs": {
"group_by_state": {
"terms": {
"field": "state.keyword"
},
"aggs": {
"average_balance": {
"avg": {
"field": "balance"
}
}
}
}
}
}
'
3> 嵌套计算并排序
GET /bank/_search
{
"size": 0,
"aggs": {
"group_by_state": {
"terms": {
"field": "state.keyword",
"order": {
"average_balance": "desc"
}
},
"aggs": {
"average_balance": {
"avg": {
"field": "balance"
}
}
}
}
}
}
或
curl -XGET 'localhost:9200/bank/_search?pretty' -H 'Content-Type: application/json' -d'
{
"size": 0,
"aggs": {
"group_by_state": {
"terms": {
"field": "state.keyword",
"order": {
"average_balance": "desc"
}
},
"aggs": {
"average_balance": {
"avg": {
"field": "balance"
}
}
}
}
}
}
'
3> 嵌套操作
GET /bank/_search
{
"size": 0,
"aggs": {
"group_by_age": {
"range": {
"field": "age",
"ranges": [
{
"from": 20,
"to": 30
},
{
"from": 30,
"to": 40
},
{
"from": 40,
"to": 50
}
]
},
"aggs": {
"group_by_gender": {
"terms": {
"field": "gender.keyword"
},
"aggs": {
"average_balance": {
"avg": {
"field": "balance"
}
}
}
}
}
}
}
}
或
curl -XGET 'localhost:9200/bank/_search?pretty' -H 'Content-Type: application/json' -d'
{
"size": 0,
"aggs": {
"group_by_age": {
"range": {
"field": "age",
"ranges": [
{
"from": 20,
"to": 30
},
{
"from": 30,
"to": 40
},
{
"from": 40,
"to": 50
}
]
},
"aggs": {
"group_by_gender": {
"terms": {
"field": "gender.keyword"
},
"aggs": {
"average_balance": {
"avg": {
"field": "balance"
}
}
}
}
}
}
}
}
'
三、如果elastic安装了认证
curl操作需要添加认证信息
curl --user [name]:[password] process
例如:
$ curl --user elastic:elastic -H "Content-Type: application/json" -XPOST '127.0.0.1:9200/bank/account/_bulk?pretty&refresh' --data-binary "@accounts.json"
$ curl --user elastic:elastic '127.0.0.1:9200/_cat/indices?v'

相关文章推荐
- 开源分布式搜索平台ELK(Elasticsearch+Logstash+Kibana)入门学习资源索引
- ELK (ElasticSearch + Logstash + Kibaba + Marvel)系统的搭建学习与简单使用
- ElasticSearch入门学习-基础示例(1)
- elasticsearch入门学习
- 开源分布式搜索平台ELK(Elasticsearch+Logstash+Kibana)入门学习资源索引
- elasticsearch入门学习备忘
- ElasticSearch学习13_ElasticSearch RESTful搜索引擎_Java Jest使用入门
- ELK (ElasticSearch + Logstash + Kibaba + Marvel)系统的搭建学习与简单使用
- .net Elasticsearch 学习入门笔记
- 开源分布式搜索平台ELK(Elasticsearch+Logstash+Kibana)入门学习资源索引
- Elastic search系统学习之三:设置elasticsearch
- (转)开源分布式搜索平台ELK(Elasticsearch+Logstash+Kibana)入门学习资源索引
- .net Elasticsearch 学习入门笔记
- Android系统源码学习入门(一)环境搭建
- Elasticsearch.Net使用(一)【入门篇】
- Kibana+Logstash+Elasticsearch 日志查询系统
- ELK(ElasticSearch+Logstash+Kibana)+redis日志收集分析系统
- 真实记录我入门学习Linux系统的经历
- Elasticsearch入门介绍