【tensorflow】CycleGAN + anaconda3 + tflearn + keras
2017-11-11 21:22
225 查看
前言:
初学者接触一样新的东西,总是想先感受一下它的魅力所在。最近刚看完一些 tensorflow 的教程,想找些例子来感受一下。于是,就到 github 上搜了一些相关的案例,主要以主流的网络模型为主。本文主要是分享一个关于生成对抗网络(GAN)的应用案例,下文会附有 github 地址。
整理本文的目的还有一个:一开始我都是基于 anaconda2(python-2.7)安装的 tensorflow 和其他相关插件或框架。正好本文案例需要基于 python-3.6,于是我在同一个 ubuntu 系统上安装了 anaconda3,并基于 python-3.6 安装并配置了 tensorflow-GPU版,tflearn,keras 等深度学习相关环境。借此机会,将整个流程整理于此。
本文主要内容如下所示:
1)安装 anaconda3(同一个 ubuntu 系统下可同时安装 anaconda2 和 anaconda3)
2)基于 anaconda3(pip)安装 tensorflow、tflearn、keras
3)实践案例:CycleGAN
4)分享 ubuntu 版本的 anaconda2 和 anaconda3 安装包(最近官网比较不好下载)
Reference:
github地址:https://github.com/yangxue0827/CycleGAN-TensorFlow
anaconda2 安装包:http://pan.baidu.com/s/1eShGFKm 密码:u5a6
anaconda3 安装包:http://pan.baidu.com/s/1mij6soo 密码:2pzw
实践环境:
1)python-3.6.0
2)tensorflow-1.0.3
安装和配置实践环境:
1)安装 anaconda3:
- 下载 Anaconda3-5.0.1-Linux-x86_64.sh
- cd 到 Anaconda3-5.0.1-Linux-x86_64.sh 的目录下并执行如下命令:
- 如果你的当前系统也存在多个anaconda,可以通过配置文件指定你所需的版本,如下所示:
如下图所示:
2)安装 tensorflow(参考网址:http://tflearn.org/installation/)
安装过程请依次执行如下命令:
成功安装的提示如下所示:
3)安装 tflearn[b](参考网址:http://tflearn.org/installation/)[/b]
输入如下命令进行安装,如果遇到类似因下载导致的问题,请重新执行命令再次安装即可。
安装成功的提示如下所示:
4)安装 keras:
- 安装相关插件:
- 安装 keras:
- 查看 keras 版本:
实践步骤:
1)下载数据集:apple2orange
2)将数据集转化为 tfrecode 格式
3)训练模型
注意:
跑别人代码之前最好也要大致看下代码,本文实践的案例代码中,循环结束条件值得注意!!
我在1080Ti机器上挂了一天一夜(最后直接 ctrl + c 强制结束程序),生成了将近 100G 容量的模型参数,四个 loss 的变化几乎趋于平稳。
ba85
初学者接触一样新的东西,总是想先感受一下它的魅力所在。最近刚看完一些 tensorflow 的教程,想找些例子来感受一下。于是,就到 github 上搜了一些相关的案例,主要以主流的网络模型为主。本文主要是分享一个关于生成对抗网络(GAN)的应用案例,下文会附有 github 地址。
整理本文的目的还有一个:一开始我都是基于 anaconda2(python-2.7)安装的 tensorflow 和其他相关插件或框架。正好本文案例需要基于 python-3.6,于是我在同一个 ubuntu 系统上安装了 anaconda3,并基于 python-3.6 安装并配置了 tensorflow-GPU版,tflearn,keras 等深度学习相关环境。借此机会,将整个流程整理于此。
本文主要内容如下所示:
1)安装 anaconda3(同一个 ubuntu 系统下可同时安装 anaconda2 和 anaconda3)
2)基于 anaconda3(pip)安装 tensorflow、tflearn、keras
3)实践案例:CycleGAN
4)分享 ubuntu 版本的 anaconda2 和 anaconda3 安装包(最近官网比较不好下载)
Reference:
github地址:https://github.com/yangxue0827/CycleGAN-TensorFlow
anaconda2 安装包:http://pan.baidu.com/s/1eShGFKm 密码:u5a6
anaconda3 安装包:http://pan.baidu.com/s/1mij6soo 密码:2pzw
实践环境:
1)python-3.6.0
2)tensorflow-1.0.3
安装和配置实践环境:
1)安装 anaconda3:
- 下载 Anaconda3-5.0.1-Linux-x86_64.sh
- cd 到 Anaconda3-5.0.1-Linux-x86_64.sh 的目录下并执行如下命令:
bash Anaconda3-5.0.1-Linux-x86_64.sh
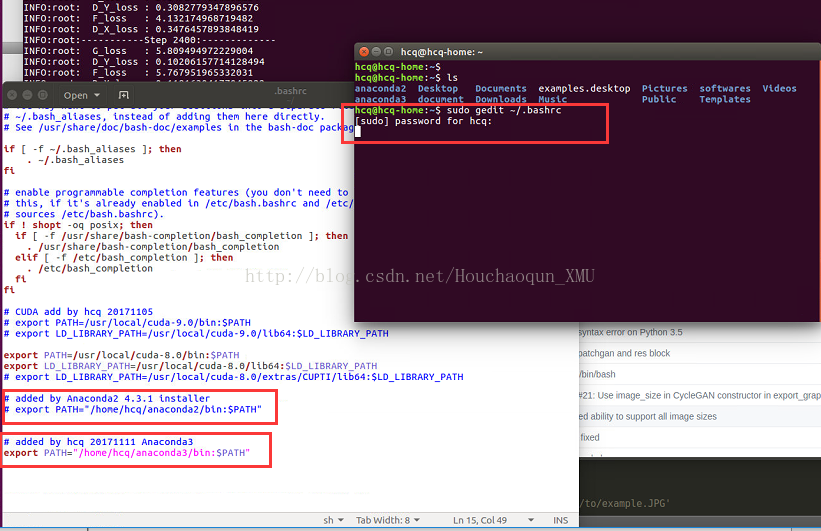
- 如果你的当前系统也存在多个anaconda,可以通过配置文件指定你所需的版本,如下所示:
sudo gedit ~/.bashrc    // 打开配置文件进行编辑
source ~/.bashrc    // 立即生效配置文件的内容
如下图所示:
2)安装 tensorflow(参考网址:http://tflearn.org/installation/)
安装过程请依次执行如下命令:
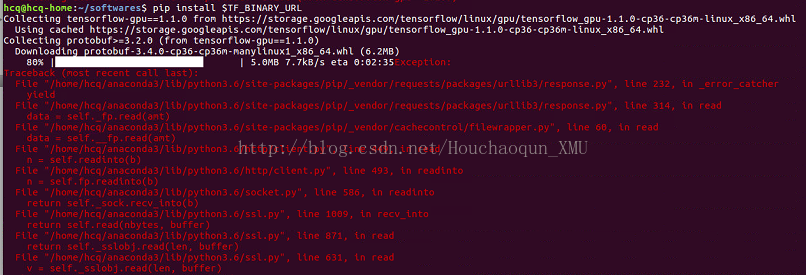
export TF_BINARY_URL=https://storage.googleapis.com/tensorflow/linux/gpu/tensorflow_gpu-1.1.0-cp36-cp36m-linux_x86_64.whl
pip install $TF_BINARY_URL
安装过程中,如果遇到如下错误,请不要担心,再重新 pip 一次试试看。(可能是最近网络限制比较严重)
成功安装的提示如下所示:
hcq@hcq-home:~/softwares$ pip install $TF_BINARY_URL
Collecting tensorflow-gpu==1.1.0 from https://storage.googleapis.com/tensorflow/linux/gpu/tensorflow_gpu-1.1.0-cp36-cp36m-linux_x86_64.whl Using cached https://storage.googleapis.com/tensorflow/linux/gpu/tensorflow_gpu-1.1.0-cp36-cp36m-linux_x86_64.whl Requirement already satisfied: werkzeug>=0.11.10 in /home/hcq/anaconda3/lib/python3.6/site-packages (from tensorflow-gpu==1.1.0)
Collecting protobuf>=3.2.0 (from tensorflow-gpu==1.1.0)
Downloading protobuf-3.4.0-cp36-cp36m-manylinux1_x86_64.whl (6.2MB)
100% |████████████████████████████████| 6.2MB 18kB/s
Requirement already satisfied: wheel>=0.26 in /home/hcq/anaconda3/lib/python3.6/site-packages (from tensorflow-gpu==1.1.0)
Requirement already satisfied: six>=1.10.0 in /home/hcq/anaconda3/lib/python3.6/site-packages (from tensorflow-gpu==1.1.0)
Requirement already satisfied: numpy>=1.11.0 in /home/hcq/anaconda3/lib/python3.6/site-packages (from tensorflow-gpu==1.1.0)
Requirement already satisfied: setuptools in /home/hcq/anaconda3/lib/python3.6/site-packages (from protobuf>=3.2.0->tensorflow-gpu==1.1.0)
Installing collected packages: protobuf, tensorflow-gpu
Successfully installed protobuf-3.4.0 tensorflow-gpu-1.1.0
hcq@hcq-home:~/softwares$ python
Python 3.6.3 |Anaconda, Inc.| (default, Oct 13 2017, 12:02:49)
[GCC 7.2.0] on linux
Type "help", "copyright", "credits" or "license" for more information.
>>> import tensorflow as tf
tf.>>> tf.__version__
'1.1.0'
>>> exit()
3)安装 tflearn[b](参考网址:http://tflearn.org/installation/)[/b]
输入如下命令进行安装,如果遇到类似因下载导致的问题,请重新执行命令再次安装即可。
pip install tflearn
安装成功的提示如下所示:
hcq@hcq-home:~$ pip install tflearn

Collecting tflearn
Downloading tflearn-0.3.2.tar.gz (98kB)
100% |████████████████████████████████| 102kB 135kB/s
Requirement already satisfied: numpy in ./anaconda3/lib/python3.6/site-packages (from tflearn)
Requirement already satisfied: six in ./anaconda3/lib/python3.6/site-packages (from tflearn)
Requirement already satisfied: Pillow in ./anaconda3/lib/python3.6/site-packages (from tflearn)
Requirement already satisfied: olefile in ./anaconda3/lib/python3.6/site-packages (from Pillow->tflearn)
Building wheels for collected packages: tflearn
Running setup.py bdist_wheel for tflearn ... done
Stored in directory: /home/hcq/.cache/pip/wheels/fb/06/72/0478c938ca315c6fddcce8233b80ec91a115ce4496a27e8c90
Successfully built tflearn
Installing collected packages: tflearn
Successfully installed tflearn-0.3.2
4)安装 keras:
- 安装相关插件:
hcq@hcq-home:~/document/deepLearning/tensorflow/tensorflow/examples/tutorials$ pip install -U --pre pip setuptools wheel
Requirement already up-to-date: pip in /home/hcq/anaconda3/lib/python3.6/site-packages
Retrying (Retry(total=4, connect=None, read=None, redirect=None)) after connection broken by 'ReadTimeoutError("HTTPSConnectionPool(host='pypi.python.org', port=443): Read timed out. (read timeout=15)",)': /simple/setuptools/
Retrying (Retry(total=3, connect=None, read=None, redirect=None)) after connection broken by 'ReadTimeoutError("HTTPSConnectionPool(host='pypi.python.org', port=443): Read timed out. (read timeout=15)",)': /simpl
4000
e/setuptools/
Retrying (Retry(total=2, connect=None, read=None, redirect=None)) after connection broken by 'ReadTimeoutError("HTTPSConnectionPool(host='pypi.python.org', port=443): Read timed out. (read timeout=15)",)': /simple/setuptools/
Collecting setuptools
Downloading setuptools-36.7.1-py2.py3-none-any.whl (482kB)
100% |████████████████████████████████| 491kB 1.9MB/s
Collecting wheel
Using cached wheel-0.30.0-py2.py3-none-any.whl
Installing collected packages: setuptools, wheel
Found existing installation: setuptools 36.5.0.post20170921
Uninstalling setuptools-36.5.0.post20170921:
Successfully uninstalled setuptools-36.5.0.post20170921
Found existing installation: wheel 0.29.0
Uninstalling wheel-0.29.0:
Successfully uninstalled wheel-0.29.0
Successfully installed setuptools-36.7.1 wheel-0.30.0
hcq@hcq-home:~/document/deepLearning/tensorflow/tensorflow/examples/tutorials$ pip install -U --pre numpy scipy matplotlib scikit-learn scikit-image
Retrying (Retry(total=4, connect=None, read=None, redirect=None)) after connection broken by 'ReadTimeoutError("HTTPSConnectionPool(host='pypi.python.org', port=443): Read timed out. (read timeout=15)",)': /simple/numpy/
Requirement already up-to-date: numpy in /home/hcq/anaconda3/lib/python3.6/site-packages
Collecting scipy
Downloading scipy-1.0.0-cp36-cp36m-manylinux1_x86_64.whl (50.0MB)
100% |████████████████████████████████| 50.0MB 34kB/s
Requirement already up-to-date: matplotlib in /home/hcq/anaconda3/lib/python3.6/site-packages
Requirement already up-to-date: scikit-learn in /home/hcq/anaconda3/lib/python3.6/site-packages
Collecting scikit-image
Downloading scikit_image-0.13.1-cp36-cp36m-manylinux1_x86_64.whl (35.8MB)
100% |████████████████████████████████| 35.8MB 45kB/s
Requirement already up-to-date: six>=1.10 in /home/hcq/anaconda3/lib/python3.6/site-packages (from matplotlib)
Requirement already up-to-date: python-dateutil>=2.0 in /home/hcq/anaconda3/lib/python3.6/site-packages (from matplotlib)
Collecting pytz (from matplotlib)
Using cached pytz-2017.3-py2.py3-none-any.whl
Requirement already up-to-date: cycler>=0.10 in /home/hcq/anaconda3/lib/python3.6/site-packages (from matplotlib)
Requirement already up-to-date: pyparsing!=2.0.4,!=2.1.2,!=2.1.6,>=2.0.1 in /home/hcq/anaconda3/lib/python3.6/site-packages (from matplotlib)
Requirement already up-to-date: networkx>=1.8 in /home/hcq/anaconda3/lib/python3.6/site-packages (from scikit-image)
Collecting pillow>=2.1.0 (from scikit-image)
Downloading Pillow-4.3.0-cp36-cp36m-manylinux1_x86_64.whl (5.8MB)
100% |████████████████████████████████| 5.8MB 120kB/s
Requirement already up-to-date: PyWavelets>=0.4.0 in /home/hcq/anaconda3/lib/python3.6/site-packages (from scikit-image)
Requirement already up-to-date: decorator>=4.1.0 in /home/hcq/anaconda3/lib/python3.6/site-packages (from networkx>=1.8->scikit-image)
Requirement already up-to-date: olefile in /home/hcq/anaconda3/lib/python3.6/site-packages (from pillow>=2.1.0->scikit-image)
Installing collected packages: scipy, pillow, scikit-image, pytz
Found existing installation: scipy 0.19.1
Uninstalling scipy-0.19.1:
Successfully uninstalled scipy-0.19.1
Found existing installation: Pillow 4.2.1
Uninstalling Pillow-4.2.1:
Successfully uninstalled Pillow-4.2.1
Found existing installation: scikit-image 0.13.0
Uninstalling scikit-image-0.13.0:
Successfully uninstalled scikit-image-0.13.0
Found existing installation: pytz 2017.2
Uninstalling pytz-2017.2:
Successfully uninstalled pytz-2017.2
Successfully installed pillow-4.3.0 pytz-2017.3 scikit-image-0.13.1 scipy-1.0.0- 安装 keras:
hcq@hcq-home:~/document/deepLearning/tensorflow/tensorflow/examples/tutorials$ pip install -U --pre keras
Collecting keras
Retrying (Retry(total=4, connect=None, read=None, redirect=None)) after connection broken by 'ReadTimeoutError("HTTPSConnectionPool(host='pypi.python.org', port=443): Read timed out. (read timeout=15)",)': /simple/keras/
Using cached Keras-2.0.9-py2.py3-none-any.whl
Requirement already up-to-date: numpy>=1.9.1 in /home/hcq/anaconda3/lib/python3.6/site-packages (from keras)
Retrying (Retry(total=4, connect=None, read=None, redirect=None)) after connection broken by 'ReadTimeoutError("HTTPSConnectionPool(host='pypi.python.org', port=443): Read timed out. (read timeout=15)",)': /simple/scipy/
Retrying (Retry(total=3, connect=None, read=None, redirect=None)) after connection broken by 'ReadTimeoutError("HTTPSConnectionPool(host='pypi.python.org', port=443): Read timed out. (read timeout=15)",)': /simple/scipy/
Retrying (Retry(total=2, connect=None, read=None, redirect=None)) after connection broken by 'ReadTimeoutError("HTTPSConnectionPool(host='pypi.python.org', port=443): Read timed out. (read timeout=15)",)': /simple/scipy/
Requirement already up-to-date: scipy>=0.14 in /home/hcq/anaconda3/lib/python3.6/site-packages (from keras)
Requirement already up-to-date: six>=1.9.0 in /home/hcq/anaconda3/lib/python3.6/site-packages (from keras)
Requirement already up-to-date: pyyaml in /home/hcq/anaconda3/lib/python3.6/site-packages (from keras)
Installing collected packages: keras
Successfully installed keras-2.0.9
- 查看 keras 版本:
hcq@hcq-home:~/document/deepLearning/tensorflow/tensorflow/examples/tutorials$ python
Python 3.6.3 |Anaconda, Inc.| (default, Oct 13 2017, 12:02:49)
[GCC 7.2.0] on linux
Type "help", "copyright", "credits" or "license" for more information.
>>> import keras
Using TensorFlow backend.
2017-11-11 20:35:04.425788: W tensorflow/core/platform/cpu_feature_guard.cc:45] The TensorFlow library wasn't compiled to use SSE4.1 instructions, but these are available on your machine and could speed up CPU computations.
2017-11-11 20:35:04.425811: W tensorflow/core/platform/cpu_feature_guard.cc:45] The TensorFlow library wasn't compiled to use SSE4.2 instructions, but these are available on your machine and could speed up CPU computations.
2017-11-11 20:35:04.425831: W tensorflow/core/platform/cpu_feature_guard.cc:45] The TensorFlow library wasn't compiled to use AVX instructions, but these are available on your machine and could speed up CPU computations.
2017-11-11 20:35:04.425836: W tensorflow/core/platform/cpu_feature_guard.cc:45] The TensorFlow library wasn't compiled to use AVX2 instructions, but these are available on your machine and could speed up CPU computations.
2017-11-11 20:35:04.425840: W tensorflow/core/platform/cpu_feature_guard.cc:45] The TensorFlow library wasn't compiled to use FMA instructions, but these are available on your machine and could speed up CPU computations.
2017-11-11 20:35:04.725142: I tensorflow/stream_executor/cuda/cuda_gpu_executor.cc:901] successful NUMA node read from SysFS had negative value (-1), but there must be at least one NUMA node, so returning NUMA node zero
2017-11-11 20:35:04.725375: I tensorflow/core/common_runtime/gpu/gpu_device.cc:887] Found device 0 with properties:
name: GeForce GTX 1080 Ti
major: 6 minor: 1 memoryClockRate (GHz) 1.582
pciBusID 0000:01:00.0
Total memory: 10.90GiB
Free memory: 10.37GiB
2017-11-11 20:35:04.725387: I tensorflow/core/common_runtime/gpu/gpu_device.cc:908] DMA: 0
2017-11-11 20:35:04.725390: I tensorflow/core/common_runtime/gpu/gpu_device.cc:918] 0:   Y
2017-11-11 20:35:04.725395: I tensorflow/core/common_runtime/gpu/gpu_device.cc:977] Creating TensorFlow device (/gpu:0) -> (device: 0, name: GeForce GTX 1080 Ti, pci bus id: 0000:01:00.0)
>>> keras.__version__
'2.0.9'
>>> exit()
实践步骤:
1)下载数据集:apple2orange
bash download_dataset.sh apple2orange
hcq@hcq-home:~/document/deepLearning/github/CycleGAN-TensorFlow$ bash download_dataset.sh apple2orange
WARNING: timestamping does nothing in combination with -O. See the manual
for details.

--2017-11-11 20:38:31--  https://people.eecs.berkeley.edu/~taesung_park/CycleGAN/datasets/apple2orange.zip Resolving people.eecs.berkeley.edu (people.eecs.berkeley.edu)... 128.32.189.73
Connecting to people.eecs.berkeley.edu (people.eecs.berkeley.edu)|128.32.189.73|:443... connected.
HTTP request sent, awaiting response... 200 OK
Length: 78456409 (75M) [application/zip]
Saving to: ‘./data/apple2orange.zip’

./data/apple2orange.zip          100%[=========================================================>]  74.82M  77.1KB/s    in 19m 55s

2017-11-11 20:58:27 (64.1 KB/s) - ‘./data/apple2orange.zip’ saved [78456409/78456409]

Archive:  ./data/apple2orange.zip
creating: ./data/apple2orange/trainA/
inflating: ./data/apple2orange/trainA/n07740461_6908.jpg
inflating: ./data/apple2orange/trainA/n07740461_7635.jpg
inflating: ./data/apple2orange/trainA/n07740461_586.jpg
inflating: ./data/apple2orange/trainA/n07740461_9813.jpg
inflating: ./data/apple2orange/trainA/n07740461_6835.jpg
inflating: ./data/apple2orange/trainA/n07740461_2818.jpg
inflating: ./data/apple2orange/trainA/n07740461_2918.jpg
inflating: ./data/apple2orange/trainA/n07740461_1213.jpg
inflating: ./data/apple2orange/trainA/n07740461_2476.jpg
inflating: ./data/apple2orange/trainA/n07740461_13596.jpg
inflating: ./data/apple2orange/trainA/n07740461_4093.jpg
inflating: ./data/apple2orange/trainA/n07740461_14738.jpg
inflating: ./data/apple2orange/trainA/n07740461_6477.jpg
inflating: ./data/apple2orange/trainA/n07740461_11356.jpg
inflating: ./data/apple2orange/trainA/n07740461_7594.jpg
inflating: ./data/apple2orange/trainA/n07740461_5119.jpg
inflating: ./data/apple2orange/trainA/n07740461_10458.jpg
inflating: ./data/apple2orange/trainA/n07740461_11597.jpg
inflating: ./data/apple2orange/trainA/n07740461_318.jpg
inflating: ./data/apple2orange/trainA/n07740461_5822.jpg
inflating: ./data/apple2orange/trainA/n07740461_5127.jpg
inflating: ./data/apple2orange/trainA/n07740461_9944.jpg
inflating: ./data/apple2orange/trainA/n07740461_6967.jpg
inflating: ./data/apple2orange/trainA/n07740461_2912.jpg
inflating: ./data/apple2orange/trainA/n07740461_6899.jpg
inflating: ./data/apple2orange/trainA/n07740461_2433.jpg
2)将数据集转化为 tfrecode 格式
python build_data.py
hcq@hcq-home:~/document/deepLearning/github/CycleGAN-TensorFlow$ python build_data.py
Convert X data to tfrecords...
Processed 0/995.
Processed 500/995.
Done.
Convert Y data to tfrecords...
Processed 0/1019.
Processed 500/1019.
Processed 1000/1019.
Done.
3)训练模型
python train.py
hcq@hcq-home:~/document/deepLearning/github/CycleGAN-TensorFlow$ python train.py
2017-11-11 21:12:46.330073: W tensorflow/core/platform/cpu_feature_guard.cc:45] The TensorFlow library wasn't compiled to use SSE4.1 instructions, but these are available on your machine and could speed up CPU computations.
2017-11-11 21:12:46.330096: W tensorflow/core/platform/cpu_feature_guard.cc:45] The TensorFlow library wasn't compiled to use SSE4.2 instructions, but these are available on your machine and could speed up CPU computations.
2017-11-11 21:12:46.330100: W tensorflow/core/platform/cpu_feature_guard.cc:45] The TensorFlow library wasn't compiled to use AVX instructions, but these are available on your machine and could speed up CPU computations.
2017-11-11 21:12:46.330104: W tensorflow/core/platform/cpu_feature_guard.cc:45] The TensorFlow library wasn't compiled to use AVX2 instructions, but these are available on your machine and could speed up CPU computations.
2017-11-11 21:12:46.330107: W tensorflow/core/platform/cpu_feature_guard.cc:45] The TensorFlow library wasn't compiled to use FMA instructions, but these are available on your machine and could speed up CPU computations.
2017-11-11 21:12:46.458938: I tensorflow/stream_executor/cuda/cuda_gpu_executor.cc:901] successful NUMA node read from SysFS had negative value (-1), but there must be at least one NUMA node, so returning NUMA node zero
2017-11-11 21:12:46.459199: I tensorflow/core/common_runtime/gpu/gpu_device.cc:887] Found device 0 with properties:
name: GeForce GTX 1080 Ti
major: 6 minor: 1 memoryClockRate (GHz) 1.582
pciBusID 0000:01:00.0
Total memory: 10.90GiB
Free memory: 10.32GiB
2017-11-11 21:12:46.459225: I tensorflow/core/common_runtime/gpu/gpu_device.cc:908] DMA: 0
2017-11-11 21:12:46.459230: I tensorflow/core/common_runtime/gpu/gpu_device.cc:918] 0:   Y
2017-11-11 21:12:46.459235: I tensorflow/core/common_runtime/gpu/gpu_device.cc:977] Creating TensorFlow device (/gpu:0) -> (device: 0, name: GeForce GTX 1080 Ti, pci bus id: 0000:01:00.0)
INFO:root:-----------Step 0:-------------
INFO:root:  G_loss   : 15.38237476348877
INFO:root:  D_Y_loss : 4.083390712738037
INFO:root:  F_loss   : 14.519253730773926
INFO:root:  D_X_loss : 2.165428400039673
INFO:root:Model saved in file: checkpoints/20171111-2112/model.ckpt-0
INFO:root:-----------Step 100:-------------
INFO:root:  G_loss   : 6.808972358703613
INFO:root:  D_Y_loss : 0.3321700990200043
INFO:root:  F_loss   : 6.736189365386963
INFO:root:  D_X_loss : 0.2477291226387024
INFO:root:-----------Step 200:-------------
INFO:root:  G_loss   : 7.838279724121094
INFO:root:  D_Y_loss : 0.1743094027042389
INFO:root:  F_loss   : 7.912574768066406
INFO:root:  D_X_loss : 0.3958353102207184
INFO:root:-----------Step 300:-------------
INFO:root:  G_loss   : 5.21237325668335
INFO:root:  D_Y_loss : 0.21838340163230896
INFO:root:  F_loss   : 5.495391845703125
INFO:root:  D_X_loss : 0.3632132411003113
INFO:root:-----------Step 400:-------------
INFO:root:  G_loss   : 6.005130290985107
INFO:root:  D_Y_loss : 0.22439110279083252
INFO:root:  F_loss   : 5.847727298736572
INFO:root:  D_X_loss : 0.13978296518325806
INFO:root:-----------Step 500:-------------
INFO:root:  G_loss   : 7.873769283294678
INFO:root:  D_Y_loss : 0.23162519931793213
INFO:root:  F_loss   : 8.158646583557129
INFO:root:  D_X_loss : 0.1464659571647644
INFO:root:-----------Step 600:-------------
INFO:root:  G_loss   : 5.959292888641357
INFO:root:  D_Y_loss : 0.17525678873062134
INFO:root:  F_loss   : 5.774515628814697
INFO:root:  D_X_loss : 0.1583157181739807
INFO:root:-----------Step 700:-------------
INFO:root:  G_loss   : 4.8391923904418945
INFO:root:  D_Y_loss : 0.21791815757751465
INFO:root:  F_loss   : 4.925660610198975
INFO:root:  D_X_loss : 0.16106563806533813
INFO:root:-----------Step 800:-------------
INFO:root:  G_loss   : 6.469336986541748
INFO:root:  D_Y_loss : 0.33488142490386963
INFO:root:  F_loss   : 6.449634075164795
INFO:root:  D_X_loss : 0.11806195974349976
INFO:root:-----------Step 900:-------------
INFO:root:  G_loss   : 7.549140453338623
INFO:root:  D_Y_loss : 0.3149040639400482
INFO:root:  F_loss   : 7.6132941246032715
INFO:root:  D_X_loss : 0.23004615306854248
INFO:root:-----------Step 1000:-------------
INFO:root:  G_loss   : 4.577487468719482
INFO:root:  D_Y_loss : 0.43083035945892334
INFO:root:  F_loss   : 4.519003868103027
INFO:root:  D_X_loss : 0.4922957420349121
注意:
跑别人代码之前最好也要大致看下代码,本文实践的案例代码中,循环结束条件值得注意!!
我在1080Ti机器上挂了一天一夜(最后直接 ctrl + c 强制结束程序),生成了将近 100G 容量的模型参数,四个 loss 的变化几乎趋于平稳。
ba85

相关文章推荐
- 【tensorflow】CycleGAN + anaconda3 + tflearn + keras
- 【tensorflow】CycleGAN + anaconda3 + tflearn + keras
- 【tensorflow】CycleGAN + anaconda3 + tflearn + keras
- 【tensorflow】CycleGAN + anaconda3 + tflearn + keras
- 【tensorflow】CycleGAN + anaconda3 + tflearn + keras
- 【tensorflow】CycleGAN + anaconda3 + tflearn + keras
- 【tensorflow】CycleGAN + anaconda3 + tflearn + keras
- 【tensorflow】CycleGAN + anaconda3 + tflearn + keras
- 【tensorflow】CycleGAN + anaconda3 + tflearn + keras
- 环境搭建—Windows10下Anaconda3安装tensorflow,theano,keras,pytorch以及为keras切换不同的后端
- Ubuntu安装anaconda,tensorflow,keras,pytorch
- 多用户linux下安装tensorflow、keras环境;如何在系统自带python和Anaconda间切换
- 如何在ubuntu16.04子用户(非管理员账户)下安装anaconda, keras, tensorflow, cv2
- digits本地配置+Anaconda,Theano, Tensorflow, Keras的安装
- 170819 Anaconda两行命令安装tensorflow-gpu+keras-gpu及Gpu vs Cpu验证
- windows10(64位)Anaconda3+Python3.6搭建Tensorflow(cpu版本)及keras
- Anaconda3 配置TensorFlow,opencv,keras
- 如何在64位win7系统安装Anaconda、CPU版tensorflow、keras、pycharm
- 先安装keras、TensorFlow后使用Anaconda安装Jupyter
- window下Anaconda安装tensorflow、keras