Python Tkinter GUI(三)显示图片
2017-11-10 16:49
519 查看
怎么才能让界面显得美观呢?布局,色彩,图片这些都可以让界面看着舒服,操作体验好。这章看看如何添加图片,以及比较坑的地方,撸起袖子就是干。
1.文本
2.图片
在同目录下放三张图片,分别是img_png.png,img_jpg.jpg,img_gif.gif
恭喜你,获得了一个bug
报错:couldn't recognize data in image file "img_png.png”,意思是不能识别”img_png.png”这图片,原因是不能用png,jpg格式的图片,但是可以支持gif格式。强行把png后缀改为gif,这是不行的,你必须使用工具转出gif格式。
正确代码:
运行:

2.设置图片的button
添加两张按钮图片放在同目录下,分别是button_png.png,button_gif.gif
button显示图片有2种方式,分别是image,bitmap
image:跟上面是一样的,得使用gif格式。
bitmap:格式是xbm,当然系统也提供了一部分xbm文件,比如:Tkinter.BitmapImage(file = 'xx.xbm')
运行之后你会发现按钮上的文本不见了,一脸懵逼。
整体代码如下:
运行效果
1.安装Pillow
pyCharm --> preferences
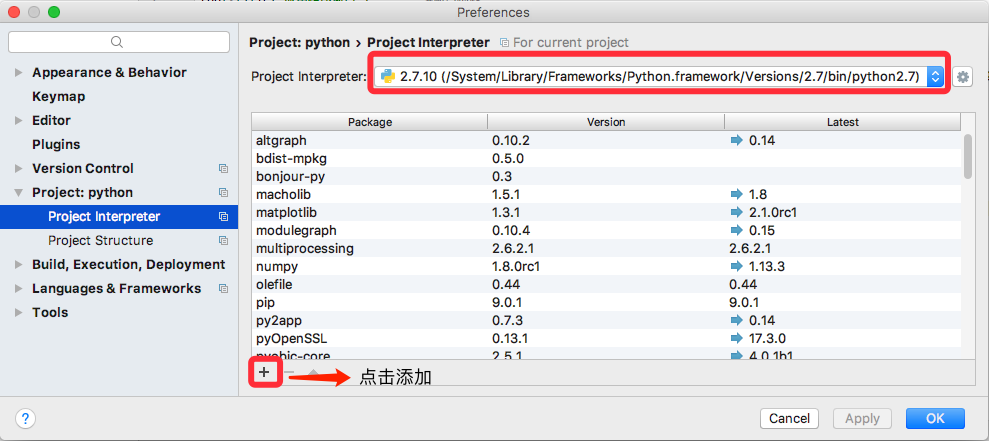
Project:python --> Project Interpreter

选择Project Interpreter,然后左下角有个+号,点击添加第三方库
搜索Pillow并下载安装
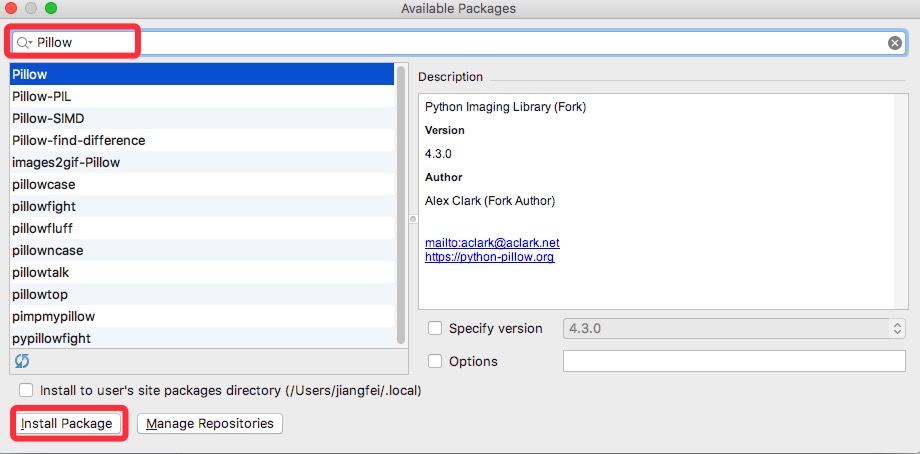
安装成功了会显示在列表中,并运用Pillow

2.代码
导入PIL模块
添加图片
这章到这就结束了,功能都是很小,这里并没有对Label,Button细讲。有兴趣的可以去官网看看Label,Button控件的介绍及功能。
一、Label
Label,文本,可以显示文本,也可以用来显示图片。1.文本
label_text = Tkinter.Label(root, text = '文本');
label_text.pack();
2.图片
在同目录下放三张图片,分别是img_png.png,img_jpg.jpg,img_gif.gif
img_png = Tkinter.PhotoImage(file = 'img_png.png')
label_img = Tkinter.Label(root, image = img_png)
label_img.pack()
恭喜你,获得了一个bug
报错:couldn't recognize data in image file "img_png.png”,意思是不能识别”img_png.png”这图片,原因是不能用png,jpg格式的图片,但是可以支持gif格式。强行把png后缀改为gif,这是不行的,你必须使用工具转出gif格式。
正确代码:
img_gif = Tkinter.PhotoImage(file = 'img_gif.gif')
label_img = Tkinter.Label(root, image = img_gif)
label_img.pack()
运行:
二、button
1.不设置图片的buttonbutton = Tkinter.Button(root, text = '不带图按钮') button.pack()
2.设置图片的button
添加两张按钮图片放在同目录下,分别是button_png.png,button_gif.gif
button显示图片有2种方式,分别是image,bitmap
image:跟上面是一样的,得使用gif格式。
bitmap:格式是xbm,当然系统也提供了一部分xbm文件,比如:Tkinter.BitmapImage(file = 'xx.xbm')
#带图button,image button_img_gif = Tkinter.PhotoImage(file = 'button_gif.gif') button_img = Tkinter.Button(root, image = button_img_gif, text = '带图按钮') button_img.pack() #带图button,bitmap button_bitmap = Tkinter.Button(root, bitmap = 'error', text = '带图按钮') button_bitmap.pack()
运行之后你会发现按钮上的文本不见了,一脸懵逼。
整体代码如下:
#!/usr/bin/python
# -*- coding: UTF-8 -*-
import Tkinter
root = Tkinter.Tk()
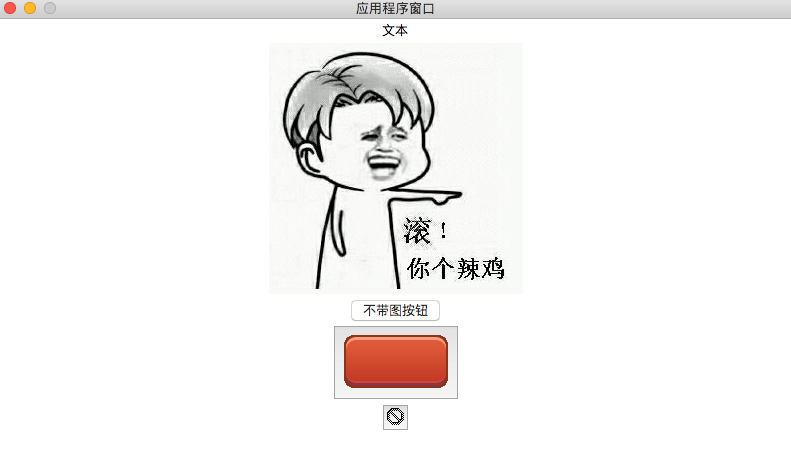
root.title('应用程序窗口') #窗口标题
root.resizable(False, False) #固定窗口大小
windowWidth = 800 #获得当前窗口宽
windowHeight = 500 #获得当前窗口高
screenWidth,screenHeight = root.maxsize() #获得屏幕宽和高
geometryParam = '%dx%d+%d+%d'%(windowWidth, windowHeight, (screenWidth-windowWidth)/2, (screenHeight - windowHeight)/2)
root.geometry(geometryParam) #设置窗口大小及偏移坐标
root.wm_attributes('-topmost',1)#窗口置顶
#label文本
label_text = Tkinter.Label(root, text = '文本'); label_text.pack();
#label图片
img_gif = Tkinter.PhotoImage(file = 'img_gif.gif') label_img = Tkinter.Label(root, image = img_gif) label_img.pack()
#不带图button
button = Tkinter.Button(root, text = '不带图按钮')
button.pack()
#带图button,image
button_img_gif = Tkinter.PhotoImage(file = 'button_gif.gif')
button_img = Tkinter.Button(root, image = button_img_gif, text = '带图按钮')
button_img.pack()

#带图button,bitmap
button_bitmap = Tkinter.Button(root, bitmap = 'error', text = '带图按钮')
button_bitmap.pack()
root.mainloop()
运行效果
三、Pillow第三方库添加png,jpg格式图片
想要使用格式png,jpg来添加图片,使用第三方库(这时真想吐槽,你TM添加个图片还要使用第三方库),这秘籍的名字叫做Pillow。Pillow主要是用来处理图片,你仔细去研究它,你会发现它功能很强大。1.安装Pillow
pyCharm --> preferences
Project:python --> Project Interpreter
选择Project Interpreter,然后左下角有个+号,点击添加第三方库
搜索Pillow并下载安装
安装成功了会显示在列表中,并运用Pillow
2.代码
导入PIL模块
from PIL import Image, ImageTk
添加图片
img_open = Image.open('img_png.png')
img_png = ImageTk.PhotoImage(img_open)
label_img = Tkinter.Label(root, image = img_png)
label_img.pack()
这章到这就结束了,功能都是很小,这里并没有对Label,Button细讲。有兴趣的可以去官网看看Label,Button控件的介绍及功能。

相关文章推荐
- 【python】如何在tkinter中动态显示label图片
- python tkinter canvas 显示图片
- Python之tkinter:动态演示调用python库的tkinter带你进入GUI世界(Button展示图片事件/)——Jason niu
- Python3 Tkinter基础 Label imag显示图片
- python使用Tkinter显示网络图片的方法
- Python3 Tkinter基础 Label 让字体显示在图片的上方 设置字体颜色fg,字体字体大小font
- Python3下用tkinter和PIL实现简单的显示图片
- Python3.4 tkinter,PIL图片转换(GUI)
- Python:GUI之tkinter学习笔记2界面布局显示
- 关于python GUI编程(Tkinter) 创建子窗口及在窗口上用图片绘图
- 用python tkinter显示Mandelbrot图
- python 1: 解决linux系统下python中的matplotlib模块内的pyplot输出图片不能显示中文的问题
- PythonGui->显示窗口
- Python之tkinter:动态演示调用python库的tkinter带你进入GUI世界(Canvas)——Jason niu
- python的GUI编程(Tkinter库)(二)
- 在Ubuntu中使用Python的matplotlib库时图片不能显示问题的解决方法
- PYTHON Tkinter GUI
- python 读取并显示图片的两种方法
- python 读取二进制 显示图片
- 鱼c笔记——Python的GUI编程(七):Tkinter的Text组件实用技巧