Tensorflow 从bin文件中读取数据并
2017-11-06 20:17
309 查看
Tensorflow 程序读取数据一共有3种方法:
供给数据(feeding):在程序运行的每一步,让Python代码来供给数据
从文件读取数据: 让一个输入管线从文件中读取数据
预加载数据:在tensorflow图中定义常量或变量来保存所有数据(适用于数据量小的时候)
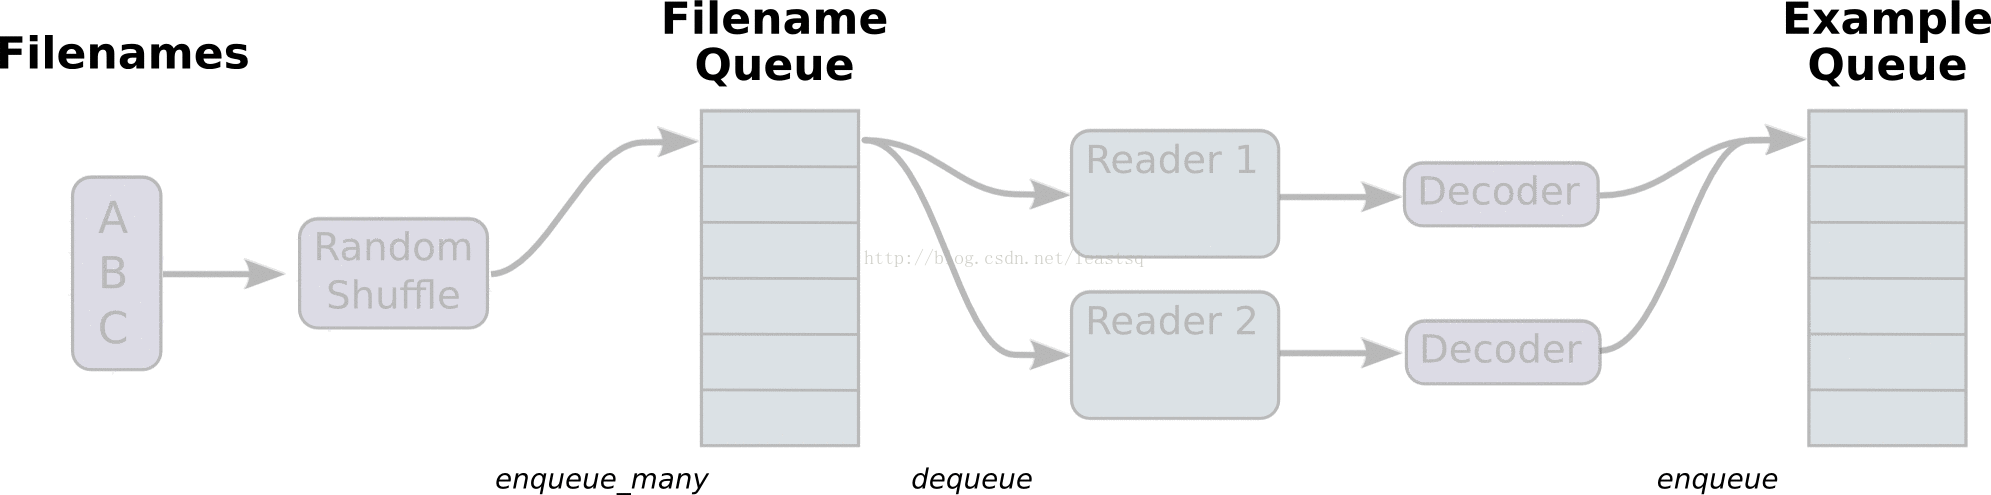
一个典型的文件读取管线会包含下面这些步骤:
文件名列表
可配置的 文件名乱序(shuffling)
可配置的 最大训练迭代数(epoch limit)
文件名队列
针对输入文件格式的阅读器
纪录解析器
可配置的预处理器
样本队列
以下以tensorflow/models/image/cifar10/cifar10_input.py 为例分步说明
1.得到文件名列表
[python] view
plain copy
filenames=[os.path.join(data_dir,'data_batch_%d.bin'%i) for i in range(1,6)] #得到一个文件名列表
for f in filenames:
if not tf.gfile.Exists(f):
raise ValueError('Failed to find file: '+ f)
此处用list表示文件名列表,然后依次检验文件是否存在,以抛出异常
2.将文件名列表交给tf.train.string_input_producer函数,得到一个先入先出的队列(Queue),文件阅读器会需要它来读取数据
其中可配置参数中有shuffle,是bool值,判断要不要用乱序操作
[python] view
plain copy
filename_queue=tf.train.string_input_producer(filenames)#生成一个先入先出队列,需要用文件阅读器来读取其数据
3.得到文件名队列后,针对输入文件格式,创建阅读器进行读取
例如:若从CSV文件中读取数据,需要使用TextLineReader和decode_csv来进行读取和解码
若是CIFAR-10 dataset文件,因为每条记录的长度固定,一个字节的标签+3072像素数据
所以此处采用FixedLengthRecordReader()和decode_raw来进行读取和解码
每次read的执行都会从文件中读取一行内容, decode_csv 操作会解析这一行内容并将其转为张量列表。如果输入的参数有缺失,record_default参数可以根据张量的类型来设置默认值。
在调用run或者eval去执行read之前, 你必须调用tf.train.start_queue_runners来将文件名填充到队列。否则read操作会被阻塞到文件名队列中有值为止。(程序挂起就死掉了,只能强制结束进程)
tf.transpose 将张量的维度变化 ,
1.tensorflow 里面的 tensor是先从高维向低维算起的
比如:’x’ is [[[1 2 3]
[4 5 6]]
[[7 8 9]
[10 11 12]]]
x的维数就是[2,2,3]
而perm的意思就是将tensor对应的不同的维数之间变换
比如perm = [2,1,0],则原tensor = [3, 2,2],全部倒过来
perm = [0,2,1],则原tensor = [2,3,2], 后两维置换
tf.transpose(x, perm=[0, 2, 1]) ==>
[[[1 4]
[2 5]
[3 6]]
[[7 10]
[8 11]
[9 12]]]
而不是
[[[1 3 2]
[4 6 5]]
[[7 9 8]
[10 12 11]]]
本例中将读取数据单独写到一个函数中
[python] view
plain copy
<strong>def read_cifar10(filename_queue):</strong>
"""Reads and parses(解析) examples from CIFAR10 data files
Args:
filename_queue:A queue of strings with the filenames to read from
Returns:
An object representing a single example, with the following fields:
height:行数32
width:列数32
depth:颜色通道数3
key:a scalar string Tensor describing the filename & record number for this example
label: an int32 Tensor with the label in the range 0~9
uint8 image: a [height, width, depth] uint8 Tensor with the image data
"""
class CIFAR10Record:
pass
result=CIFAR10Record()
#CIFAR10数据库中图片的维度
label_bytes=1 #2 for CIFAR-100
result.height=32
result.width=32
result.depth=3
image_bytes=result.height*result.width*result.depth
#每个记录都由一个字节的标签和3072字节的图像数据组成,长度固定
record_bytes=label_bytes+image_bytes
#read a record, getting filenames from the filename_queue
reader=tf.FixedLengthRecordReader(record_bytes=record_bytes)
result.key,value=reader.read(filename_queue)#注意这里read每次只读取一行!
<span style="white-space:pre"> </span>
#Convert from a string to a vector of uint8 that is record_bytes long
record_bytes=tf.decode_raw(value,tf.uint8)#decode_raw可以将一个字符串转换为一个uint8的张量
#The first bytes represent the label, which we convert from uint8->int32
result.label=tf.cast(tf.strided_slice(record_bytes,[0],[label_bytes]),tf.int32)
#将剩下的图像数据部分reshape为【depth,height,width】的形式
depth_major=tf.reshape(tf.strided_slice(record_bytes,[label_bytes],[label_bytes+image_bytes]),[result.depth,result.height,result.width])
#from【depth,height,width】to【height,width,depth】
result.uint8image=tf.transpose(depth_major,[1,2,0])
return result #返回的是一个类的对象!
read_cifar10返回了一个训练样本,包括result.label和reaule.uint8image两个数据成员
4.预处理
针对输入进来的一个样本,进行的预处理可以使加噪,添加失真,翻转等
[python] view
plain copy
read_input=read_cifar10(filename_queue)
reshaped_image=tf.cast(read_input.uint8image,tf.float32)
height=IMAGE_SIZE
width=IMAGE_SIZE
#Image processing for training the network. Note the many random
#distrotions applied to the image 预处理图片,添加噪声,失真等。
#Randomly crop(裁剪) a [height,width]section of the image
distorted_image=tf.random_crop(reshaped_image,[height,width,3])
#随机水平翻转图片,50%的概率
distorted_image=tf.image.random_flip_left_right(distorted_image)
#在图片的RGB加上一个随机的delta,delta<=max_dalta
distorted_image=tf.image.random_brightness(distorted_image,max_delta=63)
#contrast就是对图片的RGB三个channel,分别算出整张图片的mean,然后分别对相应channel的每一个像素做
#x = (x-mean) * contrast_factor + mean 其中对于random_contrast函数,contrast_factor随机取自
#[lower, upper]
distorted_image=tf.image.random_contrast(distorted_image,lower=0.2,upper=1.8)
#减去均值像素,并除以像素方差 (图片标准化)
float_image=tf.image.per_image_standardization(distorted_image)
#set the shapes of tensors
float_image.set_shape([height,width,3])
read_input.label.set_shape([1])
#确保随机乱序有好的混合效果
min_fraction_of_examples_in_queue=0.4
min_queue_examples= int(NUM_EXAMPLES_PER_EPOCH_FOR_TRAIN* min_fraction_of_examples_in_queue)
print('Filling queue with %d CIFAR images before starting to train.'% min_queue_examples+'This will take a few minutes.')
#Generate a batch of images and labels by building up a queue of examples
return _generate_image_and_label_batch(float_image,read_input.label,min_queue_examples,batch_size,shuffle=True)
5.得到样本队列
在数据输入管线的末端,我们需要有另一个队列来执行输入样本的training, evaluation, inference,要对样本进行批处理
所以使用tf.train.shuffle_batch函数用16个不同的reader读到的样本组成batch返回
[python] view
plain copy
def _generate_image_and_label_batch(image,label,min_queue_examples,batch_size,shuffle):
"""
Construct a queued batch of images and labels.
:param image: 3-D Tensor of[Height, width,3] of type.float32
:param label:1-D Tensor of type.int32
:param min_queue_examples: int32,minimum number of samples to retain in the queue that provides of batches of examples
:param batch_size: Number of images per batch
:param shuffle: boolean indicating whether to use shuffling queue (乱序)
:return:
images: Images. 4D tensor of [batch_size,height,width,3]size
labels: Labels.1D tensor of [batch_size]size
"""
#Create a queue that shuffles the examples, and then
#read 'batch_size' images +labels from the example queue\
<strong> num_preprocess_threads=16</strong>
#读取图片加上预处理要花费不少时间,所以我们在16个独自线程上运行它们,which fill a TensorFlow queue
#这种方案可以保证同一时刻只在一个文件中进行读取操作(但读取速度依然优于单线程),而不是同时读取多个文件
#优点是:
#避免了两个不同的线程从同一个文件中读取同一个样本
#避免了过多的磁盘搜索操作
if shuffle:
#创建bathces of ‘batch_size’个图片和'batch_size'个labels
images,label_batch=tf.train.shuffle_batch(
[image,label],
batch_size=batch_size,
num_threads=num_preprocess_threads,
capacity=min_queue_examples+3*batch_size,#capacity必须比min_after_dequeue大
min_after_dequeue=min_queue_examples) #min_after_dequeue 定义了我们会从多大的buffer中随机采样
#大的值意味着更好的乱序但更慢的开始,和更多内存占用
else: #不乱序
images,label_batch=tf.train.batch(
[image,label],
batch_size=batch_size,
num_threads=num_preprocess_threads,
capacity=min_queue_examples+3*batch_size)
#display the training images in the visualizer
tf.summary.image('images',images)
return images,tf.reshape(label_batch,[batch_size])
线程和队列
队列就是tensorFlow图中的节点,这是一种有状态的节点,就像变量一样,其他节点可以修改它的内容。
具体来说,其他节点可以把新元素插入到队列后端(rear),也可以把前端元素删除
队列的使用:
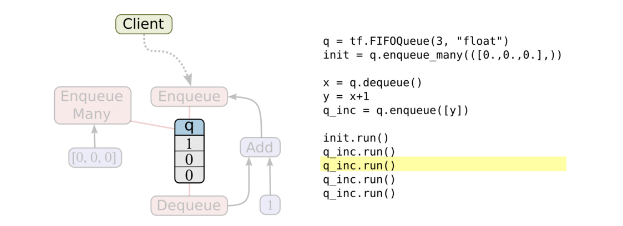
队列类型有先进先出(FIFO Queue),或者是随机的(RandomShuffleQueue)
FIFO Que
创建一个先进先出队列,以及一个“出队,+1,入队”操作:
[python] view
plain copy
import tensorflow as tf
#创建的图:一个先入先出队列,以及初始化,出队,+1,入队操作
q = tf.FIFOQueue(3, "float")
init = q.enqueue_many(([0.1, 0.2, 0.3],))
x = q.dequeue()
y = x + 1
q_inc = q.enqueue([y])
#开启一个session,session是会话,会话的潜在含义是状态保持,各种tensor的状态保持
with tf.Session() as sess:
sess.run(init)
for i in range(2):
sess.run(q_inc)
quelen = sess.run(q.size())
for i in range(quelen):
print (sess.run(q.dequeue()))
输出结果:
0.3
1.1
1.2
注意先入先出的规则!
一个典型的输入结构:是使用一个RandomShuffleQueue来作为模型训练的输入,多个线程准备训练样本,并且把这些样本推入队列,一个训练线程执行一个训练操作,此操作会从队列中移出最小批次的样本(mini-batches)
之前的例子中,入队操作都在主线程中进行,Session中可以多个线程一起运行。 在数据输入的应用场景中,入队操作从硬盘上读取输入,放到内存当中,速度较慢。 使用QueueRunner可以创建一系列新的线程进行入队操作,让主线程继续使用数据。如果在训练神经网络的场景中,就是训练网络和读取数据是异步的,主线程在训练网络,另一个线程在将数据从硬盘读入内存。
再举一个例子:
[python] view
plain copy
import tensorflow as tf
import sys
q=tf.FIFOQueue(1000,"float")
#计数器
counter=tf.Variable(0.0)
#操作:给计数器加一
increment_op=tf.assign_add(counter,tf.constant(1.0))
#操作:将计数器加入队列
enqueue_op=q.enqueue(counter)
#创建一个队列管理器QueueRunner,用这两个操作向q中添加元素,目前我们只使用一个线程:
qr=tf.train.QueueRunner(q,enqueue_ops=[increment_op,enqueue_op]*1)
#主线程:
sess=tf.Session()
sess.run(tf.global_variables_initializer())
enqueue_threads=qr.create_threads(sess,start=True) #启动入队线程
#主线程:
for i in range(0,5):
print(sess.run(q.dequeue()))
结果是:2.0
172.0
225.0
272.0
367.0
并不是如普通计数器一样的1,2,3,4,5,原因就是+1操作和入队操作不同步!可能+1操作执行了很多次之后,才会进行一次入队操作,并且出队结束后,本应程序要结束,但是因为入队线程没有显示结束,所以,整个程序就跟挂起一样,也结束不了。
Tensorflow 的session对象是支持多线程的,因此多个线程可以很方便地使用同一个会话(session),并且并行地执行操作。
然而,在Python程序实现并行运算并不容易,所有线程都必须被同步终止,异常必须能被正常地捕获并报告,会话终止的时候,队列必须能被正确地关闭。
所幸TensorFlow提供了两个类来帮助多线程的实现:tf.Coordinator和 tf.QueueRunner。从设计上这两个类必须被一起使用。Coordinator类可以用来同时停止多个工作线程并且向那个在等待所有工作线程终止的程序报告异常。QueueRunner类用来协调多个工作线程同时将多个张量推入同一个队列中。
使用tf.train.Coordinator来终止其他线程,Coordinator类主要有如下几个方法:
should_stop():如果线程应该停止则返回True
request_stop(<exception>):请求该线程停止
join(<list of threads>):等待被指定的线程终止
加入Coordinator后上述例子变为:
[python] view
plain copy
import tensorflow as tf
import sys
q=tf.FIFOQueue(1000,"float")
#计数器
counter=tf.Variable(0.0)
#操作:给计数器加一
increment_op=tf.assign_add(counter,tf.constant(1.0))
#操作:将计数器加入队列
enqueue_op=q.enqueue(counter)
#创建一个队列管理器QueueRunner,用这两个操作向q中添加元素,目前我们只使用一个线程:
qr=tf.train.QueueRunner(q,enqueue_ops=[increment_op,enqueue_op]*1)
#主线程:
sess=tf.Session()
sess.run(tf.global_variables_initializer())
coord=tf.train.Coordinator()
enqueue_threads=qr.create_threads(sess,coord=coord,start=True) #启动入队线程,Coordinator是线程的参数
#主线程:
for i in range(0,5):
print(sess.run(q.dequeue()))
coord.request_stop() #通知其他线程关闭
coord.join(enqueue_threads)#其他所有线程关之后,这一函数才能返回
返回结果为:3.0
28.0
48.0
73.0
94.0
供给数据(feeding):在程序运行的每一步,让Python代码来供给数据
从文件读取数据: 让一个输入管线从文件中读取数据
预加载数据:在tensorflow图中定义常量或变量来保存所有数据(适用于数据量小的时候)
一个典型的文件读取管线会包含下面这些步骤:
文件名列表
可配置的 文件名乱序(shuffling)
可配置的 最大训练迭代数(epoch limit)
文件名队列
针对输入文件格式的阅读器
纪录解析器
可配置的预处理器
样本队列
以下以tensorflow/models/image/cifar10/cifar10_input.py 为例分步说明
1.得到文件名列表
[python] view
plain copy
filenames=[os.path.join(data_dir,'data_batch_%d.bin'%i) for i in range(1,6)] #得到一个文件名列表
for f in filenames:
if not tf.gfile.Exists(f):
raise ValueError('Failed to find file: '+ f)
此处用list表示文件名列表,然后依次检验文件是否存在,以抛出异常
2.将文件名列表交给tf.train.string_input_producer函数,得到一个先入先出的队列(Queue),文件阅读器会需要它来读取数据
其中可配置参数中有shuffle,是bool值,判断要不要用乱序操作
[python] view
plain copy
filename_queue=tf.train.string_input_producer(filenames)#生成一个先入先出队列,需要用文件阅读器来读取其数据
3.得到文件名队列后,针对输入文件格式,创建阅读器进行读取
例如:若从CSV文件中读取数据,需要使用TextLineReader和decode_csv来进行读取和解码
若是CIFAR-10 dataset文件,因为每条记录的长度固定,一个字节的标签+3072像素数据
所以此处采用FixedLengthRecordReader()和decode_raw来进行读取和解码
每次read的执行都会从文件中读取一行内容, decode_csv 操作会解析这一行内容并将其转为张量列表。如果输入的参数有缺失,record_default参数可以根据张量的类型来设置默认值。
在调用run或者eval去执行read之前, 你必须调用tf.train.start_queue_runners来将文件名填充到队列。否则read操作会被阻塞到文件名队列中有值为止。(程序挂起就死掉了,只能强制结束进程)
tf.transpose 将张量的维度变化 ,
1.tensorflow 里面的 tensor是先从高维向低维算起的
比如:’x’ is [[[1 2 3]
[4 5 6]]
[[7 8 9]
[10 11 12]]]
x的维数就是[2,2,3]
而perm的意思就是将tensor对应的不同的维数之间变换
比如perm = [2,1,0],则原tensor = [3, 2,2],全部倒过来
perm = [0,2,1],则原tensor = [2,3,2], 后两维置换
tf.transpose(x, perm=[0, 2, 1]) ==>
[[[1 4]
[2 5]
[3 6]]
[[7 10]
[8 11]
[9 12]]]
而不是
[[[1 3 2]
[4 6 5]]
[[7 9 8]
[10 12 11]]]
本例中将读取数据单独写到一个函数中
[python] view
plain copy
<strong>def read_cifar10(filename_queue):</strong>
"""Reads and parses(解析) examples from CIFAR10 data files
Args:
filename_queue:A queue of strings with the filenames to read from
Returns:
An object representing a single example, with the following fields:
height:行数32
width:列数32
depth:颜色通道数3
key:a scalar string Tensor describing the filename & record number for this example
label: an int32 Tensor with the label in the range 0~9
uint8 image: a [height, width, depth] uint8 Tensor with the image data
"""
class CIFAR10Record:
pass
result=CIFAR10Record()
#CIFAR10数据库中图片的维度
label_bytes=1 #2 for CIFAR-100
result.height=32
result.width=32
result.depth=3
image_bytes=result.height*result.width*result.depth
#每个记录都由一个字节的标签和3072字节的图像数据组成,长度固定
record_bytes=label_bytes+image_bytes
#read a record, getting filenames from the filename_queue
reader=tf.FixedLengthRecordReader(record_bytes=record_bytes)
result.key,value=reader.read(filename_queue)#注意这里read每次只读取一行!
<span style="white-space:pre"> </span>
#Convert from a string to a vector of uint8 that is record_bytes long
record_bytes=tf.decode_raw(value,tf.uint8)#decode_raw可以将一个字符串转换为一个uint8的张量
#The first bytes represent the label, which we convert from uint8->int32
result.label=tf.cast(tf.strided_slice(record_bytes,[0],[label_bytes]),tf.int32)
#将剩下的图像数据部分reshape为【depth,height,width】的形式
depth_major=tf.reshape(tf.strided_slice(record_bytes,[label_bytes],[label_bytes+image_bytes]),[result.depth,result.height,result.width])
#from【depth,height,width】to【height,width,depth】
result.uint8image=tf.transpose(depth_major,[1,2,0])
return result #返回的是一个类的对象!
read_cifar10返回了一个训练样本,包括result.label和reaule.uint8image两个数据成员
4.预处理
针对输入进来的一个样本,进行的预处理可以使加噪,添加失真,翻转等
[python] view
plain copy
read_input=read_cifar10(filename_queue)
reshaped_image=tf.cast(read_input.uint8image,tf.float32)
height=IMAGE_SIZE
width=IMAGE_SIZE
#Image processing for training the network. Note the many random
#distrotions applied to the image 预处理图片,添加噪声,失真等。
#Randomly crop(裁剪) a [height,width]section of the image
distorted_image=tf.random_crop(reshaped_image,[height,width,3])
#随机水平翻转图片,50%的概率
distorted_image=tf.image.random_flip_left_right(distorted_image)
#在图片的RGB加上一个随机的delta,delta<=max_dalta
distorted_image=tf.image.random_brightness(distorted_image,max_delta=63)
#contrast就是对图片的RGB三个channel,分别算出整张图片的mean,然后分别对相应channel的每一个像素做
#x = (x-mean) * contrast_factor + mean 其中对于random_contrast函数,contrast_factor随机取自
#[lower, upper]
distorted_image=tf.image.random_contrast(distorted_image,lower=0.2,upper=1.8)
#减去均值像素,并除以像素方差 (图片标准化)
float_image=tf.image.per_image_standardization(distorted_image)
#set the shapes of tensors
float_image.set_shape([height,width,3])
read_input.label.set_shape([1])
#确保随机乱序有好的混合效果
min_fraction_of_examples_in_queue=0.4
min_queue_examples= int(NUM_EXAMPLES_PER_EPOCH_FOR_TRAIN* min_fraction_of_examples_in_queue)
print('Filling queue with %d CIFAR images before starting to train.'% min_queue_examples+'This will take a few minutes.')
#Generate a batch of images and labels by building up a queue of examples
return _generate_image_and_label_batch(float_image,read_input.label,min_queue_examples,batch_size,shuffle=True)
5.得到样本队列
在数据输入管线的末端,我们需要有另一个队列来执行输入样本的training, evaluation, inference,要对样本进行批处理
所以使用tf.train.shuffle_batch函数用16个不同的reader读到的样本组成batch返回
[python] view
plain copy
def _generate_image_and_label_batch(image,label,min_queue_examples,batch_size,shuffle):
"""
Construct a queued batch of images and labels.
:param image: 3-D Tensor of[Height, width,3] of type.float32
:param label:1-D Tensor of type.int32
:param min_queue_examples: int32,minimum number of samples to retain in the queue that provides of batches of examples
:param batch_size: Number of images per batch
:param shuffle: boolean indicating whether to use shuffling queue (乱序)
:return:
images: Images. 4D tensor of [batch_size,height,width,3]size
labels: Labels.1D tensor of [batch_size]size
"""
#Create a queue that shuffles the examples, and then
#read 'batch_size' images +labels from the example queue\
<strong> num_preprocess_threads=16</strong>
#读取图片加上预处理要花费不少时间,所以我们在16个独自线程上运行它们,which fill a TensorFlow queue
#这种方案可以保证同一时刻只在一个文件中进行读取操作(但读取速度依然优于单线程),而不是同时读取多个文件
#优点是:
#避免了两个不同的线程从同一个文件中读取同一个样本
#避免了过多的磁盘搜索操作
if shuffle:
#创建bathces of ‘batch_size’个图片和'batch_size'个labels
images,label_batch=tf.train.shuffle_batch(
[image,label],
batch_size=batch_size,
num_threads=num_preprocess_threads,
capacity=min_queue_examples+3*batch_size,#capacity必须比min_after_dequeue大
min_after_dequeue=min_queue_examples) #min_after_dequeue 定义了我们会从多大的buffer中随机采样
#大的值意味着更好的乱序但更慢的开始,和更多内存占用
else: #不乱序
images,label_batch=tf.train.batch(
[image,label],
batch_size=batch_size,
num_threads=num_preprocess_threads,
capacity=min_queue_examples+3*batch_size)
#display the training images in the visualizer
tf.summary.image('images',images)
return images,tf.reshape(label_batch,[batch_size])
线程和队列
队列就是tensorFlow图中的节点,这是一种有状态的节点,就像变量一样,其他节点可以修改它的内容。
具体来说,其他节点可以把新元素插入到队列后端(rear),也可以把前端元素删除
队列的使用:
队列类型有先进先出(FIFO Queue),或者是随机的(RandomShuffleQueue)
FIFO Que
创建一个先进先出队列,以及一个“出队,+1,入队”操作:
[python] view
plain copy
import tensorflow as tf
#创建的图:一个先入先出队列,以及初始化,出队,+1,入队操作
q = tf.FIFOQueue(3, "float")
init = q.enqueue_many(([0.1, 0.2, 0.3],))
x = q.dequeue()
y = x + 1
q_inc = q.enqueue([y])
#开启一个session,session是会话,会话的潜在含义是状态保持,各种tensor的状态保持
with tf.Session() as sess:
sess.run(init)
for i in range(2):
sess.run(q_inc)
quelen = sess.run(q.size())
for i in range(quelen):
print (sess.run(q.dequeue()))
输出结果:
0.3
1.1
1.2
注意先入先出的规则!
一个典型的输入结构:是使用一个RandomShuffleQueue来作为模型训练的输入,多个线程准备训练样本,并且把这些样本推入队列,一个训练线程执行一个训练操作,此操作会从队列中移出最小批次的样本(mini-batches)
之前的例子中,入队操作都在主线程中进行,Session中可以多个线程一起运行。 在数据输入的应用场景中,入队操作从硬盘上读取输入,放到内存当中,速度较慢。 使用QueueRunner可以创建一系列新的线程进行入队操作,让主线程继续使用数据。如果在训练神经网络的场景中,就是训练网络和读取数据是异步的,主线程在训练网络,另一个线程在将数据从硬盘读入内存。
再举一个例子:
[python] view
plain copy
import tensorflow as tf
import sys
q=tf.FIFOQueue(1000,"float")
#计数器
counter=tf.Variable(0.0)
#操作:给计数器加一
increment_op=tf.assign_add(counter,tf.constant(1.0))
#操作:将计数器加入队列
enqueue_op=q.enqueue(counter)
#创建一个队列管理器QueueRunner,用这两个操作向q中添加元素,目前我们只使用一个线程:
qr=tf.train.QueueRunner(q,enqueue_ops=[increment_op,enqueue_op]*1)
#主线程:
sess=tf.Session()
sess.run(tf.global_variables_initializer())
enqueue_threads=qr.create_threads(sess,start=True) #启动入队线程
#主线程:
for i in range(0,5):
print(sess.run(q.dequeue()))
结果是:2.0
172.0
225.0
272.0
367.0
并不是如普通计数器一样的1,2,3,4,5,原因就是+1操作和入队操作不同步!可能+1操作执行了很多次之后,才会进行一次入队操作,并且出队结束后,本应程序要结束,但是因为入队线程没有显示结束,所以,整个程序就跟挂起一样,也结束不了。
Tensorflow 的session对象是支持多线程的,因此多个线程可以很方便地使用同一个会话(session),并且并行地执行操作。
然而,在Python程序实现并行运算并不容易,所有线程都必须被同步终止,异常必须能被正常地捕获并报告,会话终止的时候,队列必须能被正确地关闭。
所幸TensorFlow提供了两个类来帮助多线程的实现:tf.Coordinator和 tf.QueueRunner。从设计上这两个类必须被一起使用。Coordinator类可以用来同时停止多个工作线程并且向那个在等待所有工作线程终止的程序报告异常。QueueRunner类用来协调多个工作线程同时将多个张量推入同一个队列中。
使用tf.train.Coordinator来终止其他线程,Coordinator类主要有如下几个方法:
should_stop():如果线程应该停止则返回True
request_stop(<exception>):请求该线程停止
join(<list of threads>):等待被指定的线程终止
加入Coordinator后上述例子变为:
[python] view
plain copy
import tensorflow as tf
import sys
q=tf.FIFOQueue(1000,"float")
#计数器
counter=tf.Variable(0.0)
#操作:给计数器加一
increment_op=tf.assign_add(counter,tf.constant(1.0))
#操作:将计数器加入队列
enqueue_op=q.enqueue(counter)
#创建一个队列管理器QueueRunner,用这两个操作向q中添加元素,目前我们只使用一个线程:
qr=tf.train.QueueRunner(q,enqueue_ops=[increment_op,enqueue_op]*1)
#主线程:
sess=tf.Session()
sess.run(tf.global_variables_initializer())
coord=tf.train.Coordinator()
enqueue_threads=qr.create_threads(sess,coord=coord,start=True) #启动入队线程,Coordinator是线程的参数
#主线程:
for i in range(0,5):
print(sess.run(q.dequeue()))
coord.request_stop() #通知其他线程关闭
coord.join(enqueue_threads)#其他所有线程关之后,这一函数才能返回
返回结果为:3.0
28.0
48.0
73.0
94.0

相关文章推荐
- 实现BIN文件数据读取的TCL脚本分析
- Tensorflow从文件读取数据
- tensorflow之从文件中读取数据(适用场景:大规模数据集,亲测有效~)
- tensorflow中bin数据读取之深入理解(6)---《深度学习》
- 嵌入式 如何使用jlink从flash中读取数据保存为bin文件到本地
- c写个linux的小程序,从bin文件中读取数据,打印结构体中的成员变量。
- Tensorflow从文件读取数据
- jsp中从db.properties文件中读取数据
- java从文件中读取数据然后插入到数据库表中
- EBOOT通过bin文件形式读取、下载LOGO----韦伯篇之自我分析
- [导入]ASP.NET中上传并读取Excel文件数据
- c#读取文件,重新建立文件,把读取的数据放入到文件中去
- Matlab读取和保存TXT文件数据
- C++ 简单读写文本文件、统计文件的行数、读取文件数据到数组
- JAVA读取properties文件内的数据
- java解析properties 从a文件读取数据到b文件里
- PHP读取目录下所有文件,并通过ajax返回json格式的数据
- 读取外部存储的文件数据Environment.getExternalStorageDirectory()
- php读取二进制流(C语言结构体struct数据文件)的深入解析
- 使用Apache POI读取Excel文件,将读取的数据转换成json写入文本文件