[转]Enabling CRUD Operations in ASP.NET Web API 1
2017-10-25 09:56
399 查看
本文转自:https://docs.microsoft.com/en-us/aspnet/web-api/overview/older-versions/creating-a-web-api-that-supports-crud-operations
by Mike Wasson+
Download Completed Project+
This tutorial shows how to support CRUD operations in an HTTP service using ASP.NET Web API.+
Web API 1 (also works with Web API 2)
1
CRUD stands for "Create, Read, Update, and Delete," which are the four basic database operations. Many HTTP services also model CRUD operations through REST or REST-like APIs.+
In this tutorial, you will build a very simple web API to manage a list of products. Each product will contain a name, price, and category (such as "toys" or "hardware"), plus a product ID.+
The products API will expose following methods.+
Notice that some of the URIs include the product ID in path. For example, to get the product whose ID is 28, the client sends a GET request for
GET retrieves the representation of the resource at a specified URI. GET should have no side effects on the server.
PUT updates a resource at a specified URI. PUT can also be used to create a new resource at a specified URI, if the server allows clients to specify new URIs. For this tutorial, the API will not support creation through PUT.
POST creates a new resource. The server assigns the URI for the new object and returns this URI as part of the response message.
DELETE deletes a resource at a specified URI.
+
Note: The PUT method replaces the entire product entity. That is, the client is expected to send a complete representation of the updated product. If you want to support partial updates, the PATCH method is preferred. This tutorial does not implement PATCH.+
In the Templates pane, select Installed Templates and expand the Visual C# node. Under Visual C#, select Web. In the list of project templates, select ASP.NET MVC 4 Web Application. Name the project "ProductStore" and click OK.+

+
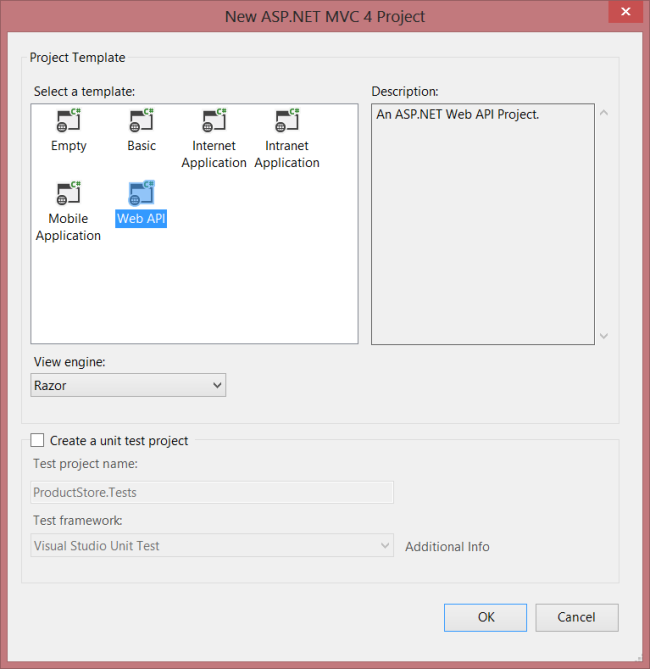
In the New ASP.NET MVC 4 Project dialog, select Web API and click OK.+
+
For the ProductStore API, our data consists of products, so we'll create a new class named
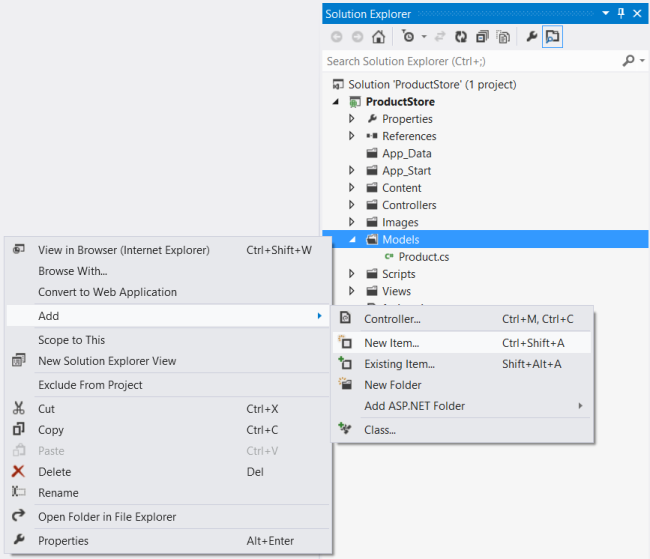
If Solution Explorer is not already visible, click the View menu and select Solution Explorer. In Solution Explorer, right-click the Models folder. From the context meny, select Add, then select Class. Name the class "Product".+

+
Add the following properties to the
C# Copy
In Solution Explorer, right-click the Models folder. Select Add, then select New Item.+
+
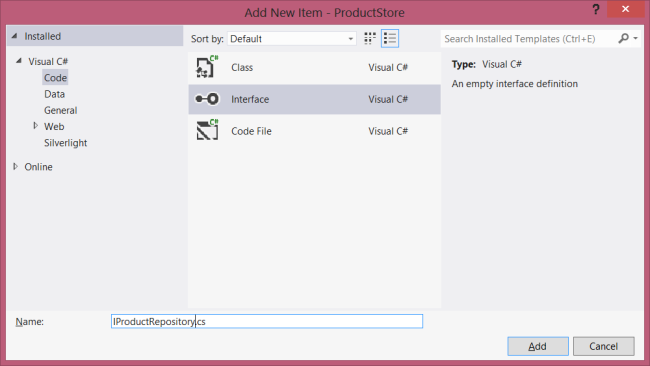
In the Templates pane, select Installed Templates and expand the C# node. Under C#, select Code. In the list of code templates, select Interface. Name the interface "IProductRepository".+
+
Add the following implementation:+
C# Copy
Now add another class to the Models folder, named "ProductRepository." This class will implement the
C# Copy
The repository keeps the list in local memory. This is OK for a tutorial, but in a real application, you would store the data externally, either a database or in cloud storage. The repository pattern will make it easier to change the implementation later.+
HomeController is a traditional ASP.NET MVC controller. It is responsible for serving HTML pages for the site, and is not directly related to our web API.
ValuesController is an example WebAPI controller.
+
Go ahead and delete ValuesController, by right-clicking the file in Solution Explorer and selecting Delete. Now add a new controller, as follows:+
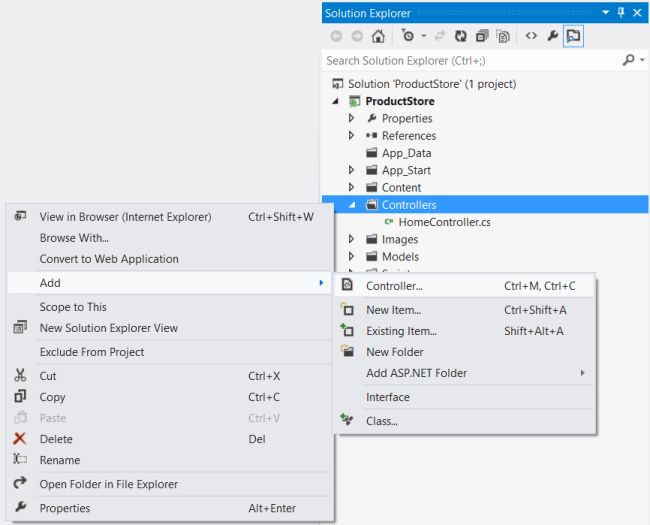
In Solution Explorer, right-click the the Controllers folder. Select Add and then select Controller.+
+
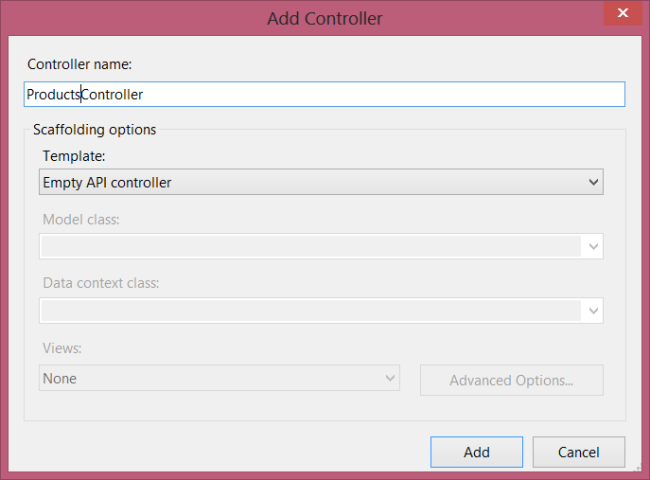
In the Add Controller wizard, name the controller "ProductsController". In the Template drop-down list, select Empty API Controller. Then click Add.+
+
Note+
It is not necessary to put your contollers into a folder named Controllers. The folder name is not important; it is simply a convenient way to organize your source files.+
The Add Controller wizard will create a file named ProductsController.cs in the Controllers folder. If this file is not open already, double-click the file to open it. Add the following using statement:+
C# Copy
Add a field that holds an IProductRepository instance.+
C# Copy
Note+
Calling
To get the list of all products, add this method to the
C# Copy
The method name starts with "Get", so by convention it maps to GET requests. Also, because the method has no parameters, it maps to a URI that does not contain an "id" segment in the path.+
To get a product by ID, add this method to the
C# Copy
This method name also starts with "Get", but the method has a parameter named id. This parameter is mapped to the "id" segment of the URI path. The ASP.NET Web API framework automatically converts the ID to the correct data type (int) for the parameter.+
The GetProduct method throws an exception of type HttpResponseException if id is not valid. This exception will be translated by the framework into a 404 (Not Found) error.+
Finally, add a method to find products by category:+
C# Copy
If the request URI has a query string, Web API tries to match the query parameters to parameters on the controller method. Therefore, a URI of the form "api/products?category=category" will map to this method.+
C# Copy
Note two things about this method:+
The method name starts with "Post...". To create a new product, the client sends an HTTP POST request.
The method takes a parameter of type Product. In Web API, parameters with complex types are deserialized from the request body. Therefore, we expect the client to send a serialized representation of a product object, in either XML or JSON format.
+
This implementation will work, but it is not quite complete. Ideally, we would like the HTTP response to include the following:+
Response code: By default, the Web API framework sets the response status code to 200 (OK). But according to the HTTP/1.1 protocol, when a POST request results in the creation of a resource, the server should reply with status 201 (Created).
Location: When the server creates a resource, it should include the URI of the new resource in the Location header of the response.
+
ASP.NET Web API makes it easy to manipulate the HTTP response message. Here is the improved implementation:+
C# Copy
Notice that the method return type is now HttpResponseMessage. By returning an HttpResponseMessage instead of a Product, we can control the details of the HTTP response message, including the status code and the Location header.+
The CreateResponse method creates an HttpResponseMessage and automatically writes a serialized representation of the Product object into the body fo the response message.+
Note+
This example does not validate the
C# Copy
The method name starts with "Put...", so Web API matches it to PUT requests. The method takes two parameters, the product ID and the updated product. The id parameter is taken from the URI path, and the product parameter is deserialized from the request body. By default, the ASP.NET Web API framework takes simple parameter types from the route and complex types from the request body.+
C# Copy
If a DELETE request succeeds, it can return status 200 (OK) with an entity-body that describes the status; status 202 (Accepted) if the deletion is still pending; or status 204 (No Content) with no entity body. In this case, the
by Mike Wasson+
Download Completed Project+
This tutorial shows how to support CRUD operations in an HTTP service using ASP.NET Web API.+
Software versions used in the tutorial
Visual Studio 2012Web API 1 (also works with Web API 2)
1
CRUD stands for "Create, Read, Update, and Delete," which are the four basic database operations. Many HTTP services also model CRUD operations through REST or REST-like APIs.+
In this tutorial, you will build a very simple web API to manage a list of products. Each product will contain a name, price, and category (such as "toys" or "hardware"), plus a product ID.+
The products API will expose following methods.+
| Action | HTTP method | Relative URI |
|---|---|---|
| Get a list of all products | GET | /api/products |
| Get a product by ID | GET | /api/products/id |
| Get a product by category | GET | /api/products?category=category |
| Create a new product | POST | /api/products |
| Update a product | PUT | /api/products/id |
| Delete a product | DELETE | /api/products/id |
http://hostname/api/products/28.+
Resources
The products API defines URIs for two resource types:+| Resource | URI |
|---|---|
| The list of all the products. | /api/products |
| An individual product. | /api/products/id |
Methods
The four main HTTP methods (GET, PUT, POST, and DELETE) can be mapped to CRUD operations as follows:+GET retrieves the representation of the resource at a specified URI. GET should have no side effects on the server.
PUT updates a resource at a specified URI. PUT can also be used to create a new resource at a specified URI, if the server allows clients to specify new URIs. For this tutorial, the API will not support creation through PUT.
POST creates a new resource. The server assigns the URI for the new object and returns this URI as part of the response message.
DELETE deletes a resource at a specified URI.
+
Note: The PUT method replaces the entire product entity. That is, the client is expected to send a complete representation of the updated product. If you want to support partial updates, the PATCH method is preferred. This tutorial does not implement PATCH.+
Create a New Web API Project
Start by running Visual Studio and select New Project from the Start page. Or, from the File menu, select New and then Project.+In the Templates pane, select Installed Templates and expand the Visual C# node. Under Visual C#, select Web. In the list of project templates, select ASP.NET MVC 4 Web Application. Name the project "ProductStore" and click OK.+
+
In the New ASP.NET MVC 4 Project dialog, select Web API and click OK.+
+
Adding a Model
A model is an object that represents the data in your application. In ASP.NET Web API, you can use strongly typed CLR objects as models, and they will automatically be serialized to XML or JSON for the client.+For the ProductStore API, our data consists of products, so we'll create a new class named
Product.+
If Solution Explorer is not already visible, click the View menu and select Solution Explorer. In Solution Explorer, right-click the Models folder. From the context meny, select Add, then select Class. Name the class "Product".+
+
Add the following properties to the
Productclass.+
C# Copy
namespace ProductStore.Models
{
public class Product
{
public int Id { get; set; }
public string Name { get; set; }
public string Category { get; set; }
public decimal Price { get; set; }
}
}
Adding a Repository
We need to store a collection of products. It's a good idea to separate the collection from our service implementation. That way, we can change the backing store without rewriting the service class. This type of design is called the repository pattern. Start by defining a generic interface for the repository.+In Solution Explorer, right-click the Models folder. Select Add, then select New Item.+
+
In the Templates pane, select Installed Templates and expand the C# node. Under C#, select Code. In the list of code templates, select Interface. Name the interface "IProductRepository".+
+
Add the following implementation:+
C# Copy
namespace ProductStore.Models
{
public interface IProductRepository
{
IEnumerable<Product> GetAll();
Product Get(int id);
Product Add(Product item);
void Remove(int id);
bool Update(Product item);
}
}
Now add another class to the Models folder, named "ProductRepository." This class will implement the
IProductRespositoryinterface. Add the following implementation:+
C# Copy
namespace ProductStore.Models
{
public class ProductRepository : IProductRepository
{
private List<Product> products = new List<Product>();
private int _nextId = 1;

public ProductRepository()
{
Add(new Product { Name = "Tomato soup", Category = "Groceries", Price = 1.39M });
Add(new Product { Name = "Yo-yo", Category = "Toys", Price = 3.75M });
Add(new Product { Name = "Hammer", Category = "Hardware", Price = 16.99M });
}

public IEnumerable<Product> GetAll()
{
return products;
}

public Product Get(int id)
{
return products.Find(p => p.Id == id);
}

public Product Add(Product item)
{
if (item == null)
{
throw new ArgumentNullException("item");
}
item.Id = _nextId++;
products.Add(item);
return item;
}

public void Remove(int id)
{
products.RemoveAll(p => p.Id == id);
}

public bool Update(Product item)
{
if (item == null)
{
throw new ArgumentNullException("item");
}
int index = products.FindIndex(p => p.Id == item.Id);
if (index == -1)
{
return false;
}
products.RemoveAt(index);
products.Add(item);
return true;
}
}
}
The repository keeps the list in local memory. This is OK for a tutorial, but in a real application, you would store the data externally, either a database or in cloud storage. The repository pattern will make it easier to change the implementation later.+
Adding a Web API Controller
If you have worked with ASP.NET MVC, then you are already familiar with controllers. In ASP.NET Web API, a controller is a class that handles HTTP requests from the client. The New Project wizard created two controllers for you when it created the project. To see them, expand the Controllers folder in Solution Explorer.+HomeController is a traditional ASP.NET MVC controller. It is responsible for serving HTML pages for the site, and is not directly related to our web API.
ValuesController is an example WebAPI controller.
+
Go ahead and delete ValuesController, by right-clicking the file in Solution Explorer and selecting Delete. Now add a new controller, as follows:+
In Solution Explorer, right-click the the Controllers folder. Select Add and then select Controller.+
+
In the Add Controller wizard, name the controller "ProductsController". In the Template drop-down list, select Empty API Controller. Then click Add.+
+
Note+
It is not necessary to put your contollers into a folder named Controllers. The folder name is not important; it is simply a convenient way to organize your source files.+
The Add Controller wizard will create a file named ProductsController.cs in the Controllers folder. If this file is not open already, double-click the file to open it. Add the following using statement:+
C# Copy
using ProductStore.Models;
Add a field that holds an IProductRepository instance.+
C# Copy
public class ProductsController : ApiController
{
static readonly IProductRepository repository = new ProductRepository();
}
Note+
Calling
new ProductRepository()in the controller is not the best design, because it ties the controller to a particular implementation of
IProductRepository. For a better approach, see Using the Web API Dependency Resolver.+
Getting a Resource
The ProductStore API will expose several "read" actions as HTTP GET methods. Each action will correspond to a method in theProductsControllerclass.+
| Action | HTTP method | Relative URI |
|---|---|---|
| Get a list of all products | GET | /api/products |
| Get a product by ID | GET | /api/products/id |
| Get a product by category | GET | /api/products?category=category |
ProductsControllerclass:+
C# Copy
public class ProductsController : ApiController
{
public IEnumerable<Product> GetAllProducts()
{
return repository.GetAll();
}
// ....
}
The method name starts with "Get", so by convention it maps to GET requests. Also, because the method has no parameters, it maps to a URI that does not contain an "id" segment in the path.+
To get a product by ID, add this method to the
ProductsControllerclass:+
C# Copy
public Product GetProduct(int id)
{
Product item = repository.Get(id);
if (item == null)
{
throw new HttpResponseException(HttpStatusCode.NotFound);
}
return item;
}
This method name also starts with "Get", but the method has a parameter named id. This parameter is mapped to the "id" segment of the URI path. The ASP.NET Web API framework automatically converts the ID to the correct data type (int) for the parameter.+
The GetProduct method throws an exception of type HttpResponseException if id is not valid. This exception will be translated by the framework into a 404 (Not Found) error.+
Finally, add a method to find products by category:+
C# Copy
public IEnumerable<Product> GetProductsByCategory(string category)
{
return repository.GetAll().Where(
p => string.Equals(p.Category, category, StringComparison.OrdinalIgnoreCase));
}
If the request URI has a query string, Web API tries to match the query parameters to parameters on the controller method. Therefore, a URI of the form "api/products?category=category" will map to this method.+
Creating a Resource
Next, we'll add a method to theProductsControllerclass to create a new product. Here is a simple implementation of the method:+
C# Copy
// Not the final implementation!
public Product PostProduct(Product item)
{
item = repository.Add(item);
return item;
}
Note two things about this method:+
The method name starts with "Post...". To create a new product, the client sends an HTTP POST request.
The method takes a parameter of type Product. In Web API, parameters with complex types are deserialized from the request body. Therefore, we expect the client to send a serialized representation of a product object, in either XML or JSON format.
+
This implementation will work, but it is not quite complete. Ideally, we would like the HTTP response to include the following:+
Response code: By default, the Web API framework sets the response status code to 200 (OK). But according to the HTTP/1.1 protocol, when a POST request results in the creation of a resource, the server should reply with status 201 (Created).
Location: When the server creates a resource, it should include the URI of the new resource in the Location header of the response.
+
ASP.NET Web API makes it easy to manipulate the HTTP response message. Here is the improved implementation:+
C# Copy
public HttpResponseMessage PostProduct(Product item)
{
item = repository.Add(item);
var response = Request.CreateResponse<Product>(HttpStatusCode.Created, item);

string uri = Url.Link("DefaultApi", new { id = item.Id });
response.Headers.Location = new Uri(uri);
return response;
}
Notice that the method return type is now HttpResponseMessage. By returning an HttpResponseMessage instead of a Product, we can control the details of the HTTP response message, including the status code and the Location header.+
The CreateResponse method creates an HttpResponseMessage and automatically writes a serialized representation of the Product object into the body fo the response message.+
Note+
This example does not validate the
Product. For information about model validation, see Model Validation in ASP.NET Web API.+
Updating a Resource
Updating a product with PUT is straightforward:+C# Copy
public void PutProduct(int id, Product product)
{
product.Id = id;
if (!repository.Update(product))
{
throw new HttpResponseException(HttpStatusCode.NotFound);
}
}
The method name starts with "Put...", so Web API matches it to PUT requests. The method takes two parameters, the product ID and the updated product. The id parameter is taken from the URI path, and the product parameter is deserialized from the request body. By default, the ASP.NET Web API framework takes simple parameter types from the route and complex types from the request body.+
Deleting a Resource
To delete a resourse, define a "Delete..." method.+C# Copy
public void DeleteProduct(int id)
{
Product item = repository.Get(id);
if (item == null)
{
throw new HttpResponseException(HttpStatusCode.NotFound);
}

repository.Remove(id);
}
If a DELETE request succeeds, it can return status 200 (OK) with an entity-body that describes the status; status 202 (Accepted) if the deletion is still pending; or status 204 (No Content) with no entity body. In this case, the
DeleteProductmethod has a
voidreturn type, so ASP.NET Web API automatically translates this into status code 204 (No Content).

相关文章推荐
- CRUD Operations In ASP.NET MVC 5 Using ADO.NET
- Asp.Net Web API 2第二课——CRUD操作
- ASP.Net Web API 输出缓存 转载 -- Output caching in ASP.NET Web API
- 页面压缩 Enabling Gzip and Deflate HTTP Compression in ASP.NET pages(转)
- File Upload using jQuery AJAX in ASP.NET Web API or Http handler (AJAX上传文件通过Web API或 http handler)
- Asp.Net Web API 2第十八课——Working with Entity Relations in OData
- Asp.Net Web API 2(CRUD操作)第二课
- [转]Support Composite Key in ASP.NET Web API OData
- ASP.NET Web API 基本操作(CRUD)
- Long Time Operations in ASP.NET
- Asp.Net Web API 2第十六课——Parameter Binding in ASP.NET Web API(参数绑定)
- Asp.Net Web API 2第二课——CRUD操作
- ASP.NET Web API 基本操作(CRUD)
- ASP.NET Web API 基本操作(CRUD)
- 【转】Long Time Operations in ASP.NET
- Asp.Net Web API 2第二课——CRUD操作
- Exception Handling in ASP.NET Web API webapi异常处理
- [转]Supporting OData Query Options in ASP.NET Web API 2