让ros机器人行走、建图、路径规划、定位和导航
2017-10-11 20:53
429 查看
准备导航所需要的包。
a.ros-kinetic-gampping :我们不需要修改包内的东西,所以直接安装可执行文件就好了。
b.安装雷达的驱动(我的是robopack),直接将提供的ros驱动包拷贝到工作空间中,
c.安装导航定位包,navigation 进入git:https://github.com/ros-planning/navigation/tree/indigo-devel,下载和自己ros版本匹配的包,解压到自己的工作空间中,
indigo的navigation包会出现一个依赖问题,:Orocos-bfl not found while installing navigation stack ROS indigo + Ubuntu 14.04
d.由于导航包在/cmd_val下发布的移动数据加速度会过于不友好,所以我们需要对速度做平滑处理,其实就是控制加速,一般通过滤波即可实现,在此我们采用turtlebot的平滑包即可,
安装平滑包yocs_velocity_smoother,具体的平滑算法和输入切换请自己阅读源码。
所有的包准包好后,我们去准备启动所需的launch文件,首先是机器人地盘的启动文件base_controller.launch:
2.然后去准备建图包的启动文件gmapping.launch
3,导航包(move_base)和定位(amcl)的启动文件:savvy_amcl.launch
4.导航的配置参数如下:
base_local_planner_params.yaml
costmap_common_params.yaml
global_costmap_params.yaml
local_costmap_params.yaml
四,准备好以上所有的启动文件和配置参数后,我们开始创建地图和导航,
1.创建地图:
2.开始导航
然后指定导航目标,开始自己慢慢玩吧,不过因为我的TF变换主要是里程计更新的,车体打滑或者地盘电机震荡都会积累误差,所以我们必须添加视觉里成计或者闭环检测。
a.ros-kinetic-gampping :我们不需要修改包内的东西,所以直接安装可执行文件就好了。
sudo apt-get install ros-kinetic-slam-gmapping
b.安装雷达的驱动(我的是robopack),直接将提供的ros驱动包拷贝到工作空间中,
c.安装导航定位包,navigation 进入git:https://github.com/ros-planning/navigation/tree/indigo-devel,下载和自己ros版本匹配的包,解压到自己的工作空间中,
cd ~/catkin_ws
catkin_make
indigo的navigation包会出现一个依赖问题,:Orocos-bfl not found while installing navigation stack ROS indigo + Ubuntu 14.04
解决方法:
rosdep install --from-paths src --ignore-src --rosdistro indigo -y
d.由于导航包在/cmd_val下发布的移动数据加速度会过于不友好,所以我们需要对速度做平滑处理,其实就是控制加速,一般通过滤波即可实现,在此我们采用turtlebot的平滑包即可,
安装平滑包yocs_velocity_smoother,具体的平滑算法和输入切换请自己阅读源码。
apt-get install ros-indigo-yocs-velocity-smoother
所有的包准包好后,我们去准备启动所需的launch文件,首先是机器人地盘的启动文件base_controller.launch:
<launch>

<param name="use_sim_time" value="false" />

<node name="link_laser" pkg="tf" type="static_transform_publisher" args="0.15 0 0.15 0 0 0 base_link laser 50"/>
<node name="link_footprint" pkg="tf" type="static_transform_publisher" args="0 0 0 0 0 0 base_link base_footprint 50"/>

<node pkg="odom_tf_package" type="tf_broadcaster_node" name="serial_send_recevice" output="screen"/>

<include file="$(find odom_tf_package)/launch/include/rplidar_ros.launch.xml">
</include>

<arg name="node_name"             value="velocity_smoother"/>
<arg name="nodelet_manager_name"  value="nodelet_manager"/>
<arg name="config_file"           value="$(find odom_tf_package)/config/yocs_velocity_smoother.yaml"/>
<arg name="raw_cmd_vel_topic"     value="cmd_vel"/>
<arg name="smooth_cmd_vel_topic"  value="smoother_cmd_vel"/>
<arg name="robot_cmd_vel_topic"   value="robot_cmd_vel"/>
<arg name="odom_topic"            value="odom"/>

<!-- nodelet manager -->
<node pkg="nodelet" type="nodelet" name="$(arg nodelet_manager_name)" args="manager"/>

<!-- velocity smoother -->
<include file="$(find yocs_velocity_smoother)/launch/velocity_smoother.launch">
<arg name="node_name"             value="$(arg node_name)"/>
<arg name="nodelet_manager_name"  value="$(arg nodelet_manager_name)"/>
<arg name="config_file"           value="$(arg config_file)"/>
<arg name="raw_cmd_vel_topic"     value="$(arg raw_cmd_vel_topic)"/>
<arg name="smooth_cmd_vel_topic"  value="$(arg smooth_cmd_vel_topic)"/>
<arg name="robot_cmd_vel_topic"   value="$(arg robot_cmd_vel_topic)"/>
<arg name="odom_topic"            value="$(arg odom_topic)"/>
</include>
</launch>
2.然后去准备建图包的启动文件gmapping.launch
<launch>

<arg name="scan_topic" default="scan" />

<node pkg="gmapping" type="slam_gmapping" name="slam_gmapping" output="screen" clear_params="true">

<!--because my used rtabmap_ros -->
<param name="odom_frame" value="/odom""/>
<!--param name="odom_frame" value="/base_controller/odom""/-->
<param name="map_update_interval" value="30.0"/>

<!-- Set maxUrange < actual maximum range of the Laser -->
<param name="maxRange" value="5.0"/>
<param name="maxUrange" value="4.5"/>
<param name="sigma" value="0.05"/>
<param name="kernelSize" value="1"/>
<param name="lstep" value="0.05"/>
<param name="astep" value="0.05"/>
<param name="iterations" value="5"/>
<param name="lsigma" value="0.075"/>
<param name="ogain" value="3.0"/>
<param name="lskip" value="0"/>
<param name="srr" value="0.01"/>
<param name="srt" value="0.02"/>
<param name="str" value="0.01"/>
<param name="stt" value="0.02"/>
<param name="linearUpdate" value="0.5"/>
<param name="angularUpdate" value="0.436"/>
<param name="temporalUpdate" value="-1.0"/>
<param name="resampleThreshold" value="0.5"/>
<param name="particles" value="80"/>
<!--
<param name="xmin" value="-50.0"/>
<param name="ymin" value="-50.0"/>
<param name="xmax" value="50.0"/>
<param name="ymax" value="50.0"/>
make the starting size small for the benefit of the Android client's memory...
-->
<param name="xmin" value="-1.0"/>
<param name="ymin" value="-1.0"/>
<param name="xmax" value="1.0"/>
<param name="ymax" value="1.0"/>

<param name="delta" value="0.05"/>
<param name="llsamplerange" value="0.01"/>
<param name="llsamplestep" value="0.01"/>
<param name="lasamplerange" value="0.005"/>
<param name="lasamplestep" value="0.005"/>
<remap from="scan" to="$(arg scan_topic)"/>
</node>
</launch>
3,导航包(move_base)和定位(amcl)的启动文件:savvy_amcl.launch
<launch>

<param name="use_sim_time" value="false" />

<!-- Set the name of the map yaml file: can be overridden on the command line. -->
<arg name="map" default="map.yaml" />

<!--node name="map_odom" pkg="tf" type="static_transform_publisher" args="0 0 0 0 0 0 map odom 50"/-->

<!-- Run the map server with the desired map -->
<node name="map_server" pkg="map_server" type="map_server" args="$(find savvy)/maps/$(arg map)"/>

<!-- The move_base node -->
<include file="$(find savvy)/launch/move_base_amcl.launch" />

<!--zxw add Fire up AMCL-->
<include file="$(find savvy)/launch/tb_amcl.launch" />

</launch>
move_base_amcl.launch:
<launch>

<node pkg="move_base" type="move_base" respawn="false" name="move_base" output="screen" clear_params="true">
<rosparam file="$(find savvy)/config/savvyconfig/costmap_common_params.yaml" command="load" ns="global_costmap" />
<rosparam file="$(find savvy)/config/savvyconfig/costmap_common_params.yaml" command="load" ns="local_costmap" />
<rosparam file="$(find savvy)/config/savvyconfig/local_costmap_params.yaml" command="load" />
<rosparam file="$(find savvy)/config/savvyconfig/global_costmap_params.yaml" command="load" />
<rosparam file="$(find savvy)/config/savvyconfig/base_local_planner_params.yaml" command="load" />

<rosparam file="$(find savvy)/config/nav_obstacles_params.yaml" command="load" />
</node>

</launch>
tb_amcl.launch:
<launch>

<arg name="use_map_topic" default="false"/>

<arg name="scan_topic" default="scan"/>

<node pkg="amcl" type="amcl" name="amcl" clear_params="true">

<param name="use_map_topic" value="$(arg use_map_topic)"/>
<!-- Publish scans from best pose at a max of 10 Hz -->
<param name="odom_model_type" value="diff"/>
<param name="odom_alpha5" value="0.1"/>
<param name="gui_publish_rate" value="10.0"/>
<param name="laser_max_beams" value="60"/>
<param name="laser_max_range" value="12.0"/>
<param name="min_particles" value="500"/>
<param name="max_particles" value="2000"/>
<param name="kld_err" value="0.05"/>
<param name="kld_z" value="0.99"/>
<param name="odom_alpha1" value="0.2"/>
<param name="odom_alpha2" value="0.2"/>
<!-- translation std dev, m -->
<param name="odom_alpha3" value="0.2"/>
<param name="odom_alpha4" value="0.2"/>
<param name="laser_z_hit" value="0.5"/>
<param name="laser_z_short" value="0.05"/>
<param name="laser_z_max" value="0.05"/>
<param name="laser_z_rand" value="0.5"/>
<param name="laser_sigma_hit" value="0.2"/>
<param name="laser_lambda_short" value="0.1"/>
<param name="laser_model_type" value="likelihood_field"/>
<!-- <param name="laser_model_type" value="beam"/> -->
<param name="laser_likelihood_max_dist" value="2.0"/>
<param name="update_min_d" value="0.25"/>
<param name="update_min_a" value="0.2"/>

<param name="odom_frame_id" value="odom"/>

<param name="resample_interval" value="1"/>
<!-- Increase tolerance because the computer can get quite busy -->
<param name="transform_tolerance" value="1.0"/>
<param name="recovery_alpha_slow" value="0.0"/>
<param name="recovery_alpha_fast" value="0.0"/>
<remap from="scan" to="$(arg scan_topic)"/>
</node>
</launch>
4.导航的配置参数如下:
base_local_planner_params.yaml
controller_frequency: 2.0
recovery_behavior_enabled: false
clearing_rotation_allowed: false

TrajectoryPlannerROS:
max_vel_x: 0.3
min_vel_x: 0.05
max_vel_y: 0.0  # zero for a differential drive robot
min_vel_y: 0.0
min_in_place_vel_theta: 0.5
escape_vel: -0.1
acc_lim_x: 2.5
acc_lim_y: 0.0 # zero for a differential drive robot
acc_lim_theta: 3.2

holonomic_robot: false
yaw_goal_tolerance: 0.1 # about 6 degrees
xy_goal_tolerance: 0.15  # 10 cm
latch_xy_goal_tolerance: false
pdist_scale: 0.8
gdist_scale: 0.6
meter_scoring: true

heading_lookahead: 0.325
heading_scoring: false
heading_scoring_timestep: 0.8
occdist_scale: 0.1
oscillation_reset_dist: 0.05
publish_cost_grid_pc: false
prune_plan: true

sim_time: 2.5
sim_granularity: 0.025
angular_sim_granularity: 0.025
vx_samples: 8
vy_samples: 0 # zero for a differential drive robot
vtheta_samples: 20
dwa: true
simple_attractor: false
costmap_common_params.yaml
obstacle_range: 2.5
raytrace_range: 3.0
robot_radius: 0.30
inflation_radius: 0.15
max_obstacle_height: 0.6
min_obstacle_height: 0.0
observation_sources: scan
scan: {data_type: LaserScan, topic: /scan, marking: true, clearing: true, expected_update_rate: 0}
global_costmap_params.yaml
global_costmap:
global_frame: /map
robot_base_frame: /base_link
update_frequency: 1.0
publish_frequency: 0
static_map: true
rolling_window: false
resolution: 0.01
transform_tolerance: 0.5
map_type: costmap
local_costmap_params.yaml
local_costmap:
global_frame: /odom
robot_base_frame: /base_link
update_frequency: 1.0
publish_frequency: 1.0
static_map: false
rolling_window: true
width: 6.0
height: 6.0
resolution: 0.01
transform_tolerance: 0.5
map_type: costmap
四,准备好以上所有的启动文件和配置参数后,我们开始创建地图和导航,
1.创建地图:
roslaunch savvy base_controller.launch   //启动地盘控制器
roslaunch savvy gmapping.launch
roscd savvy/maps/
rosrun map_server map_saver -f mymap

然后会产生以下地图文件
mymap.pgm  mymap.yaml
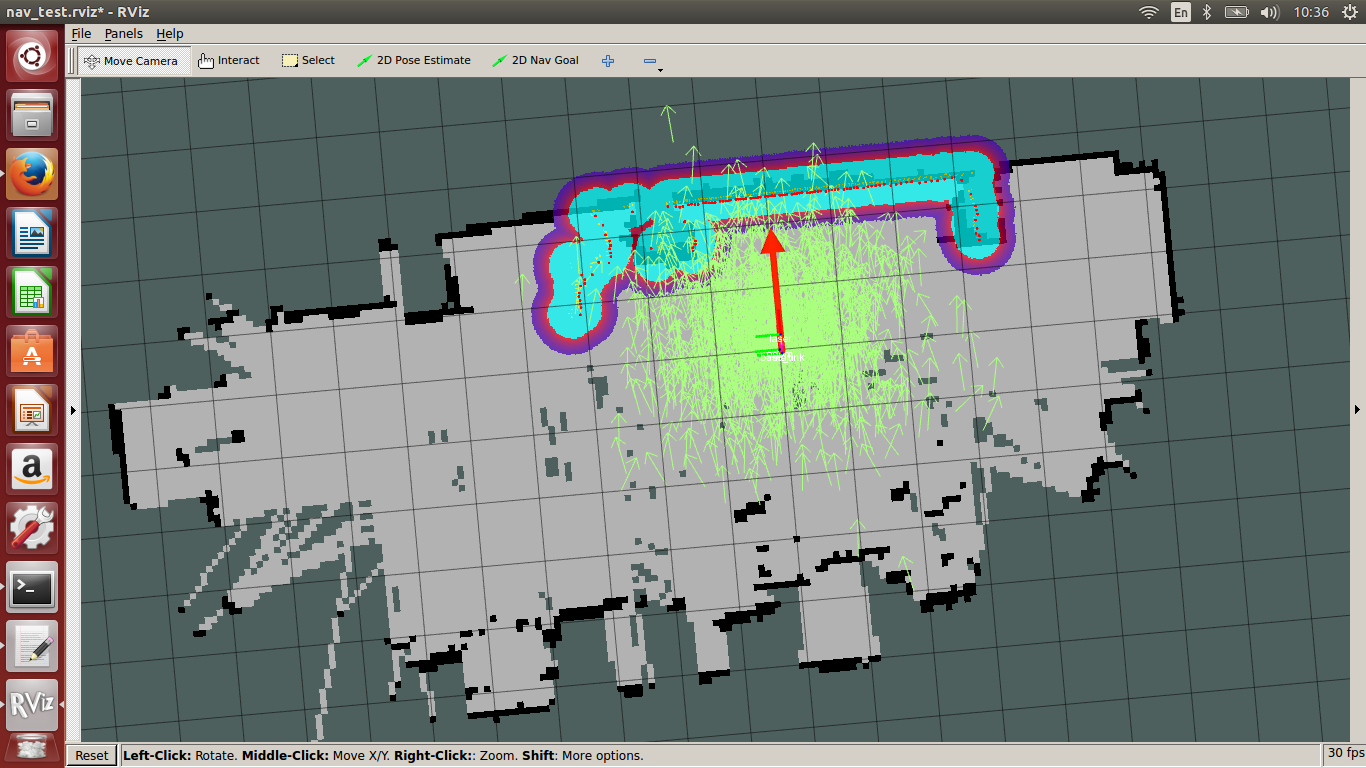
2.开始导航
roslaunch savvy base_controller.launch //启动地盘控制器
roslaunch savvy savvy_amcl.launch map:=mymap.yaml
rosrun rviz rviz -d `rospack find savvy`/nav_test.rviz
然后指定导航目标,开始自己慢慢玩吧,不过因为我的TF变换主要是里程计更新的,车体打滑或者地盘电机震荡都会积累误差,所以我们必须添加视觉里成计或者闭环检测。

相关文章推荐
- 【ROS】移动机器人导航仿真(3)——定位(amcl)和路径规划(move_base)
- ROS探索总结(十三)(十四)(十五)——导航与定位框架 move_base(路径规划) amcl(导航与定位)
- 机器人自主定位导航 ROS真的好用吗?优缺点剖析
- 机器人自主定位导航 ROS真的好用吗?优缺点剖析
- ROS的优势与不足(除了ROS 机器人自主定位导航还能怎么做?)
- 定位、目的地显示、路径规划、导航
- ROS学习(五)导航、路径规划、SLAM
- 机器人路径规划_人工势场法
- 基于导航定位的多机器人写作研究(2)
- 随手笔记:百度地图定位路线规划导航。
- ROS 学习系列 -- RViz 实时观测机器人建立导航2D封闭空间地图过程 (SLAM)
- SLAMTEC—思岚科技首次亮相CES赋予机器人自主定位导航方案
- 导航和路径规划-论文心得
- 如何利用ROS MoveIt快速搭建机器人运动规划平台?
- ROS 学习系列 -- RViz 实时观测机器人建立导航2D封闭空间地图过程 (SLAM)
- 在ROS(indigo)中读取手机GPS用于机器人定位~GPS2BT在ubuntu和window系统下的使用方法~
- 机器人路径规划_蚁群算法
- Android百度地图实例详解之仿摩拜单车APP(包括附近车辆、规划路径、行驶距离、行驶轨迹记录,导航等)
- ROS探索总结(十三)——导航与定位框架
- ROS 学习系列 -- RViz 实时观测机器人建立导航2D封闭空间地图过程 (SLAM)