LNMP Keepalived Haproxy 笔记
2017-10-10 22:52
239 查看
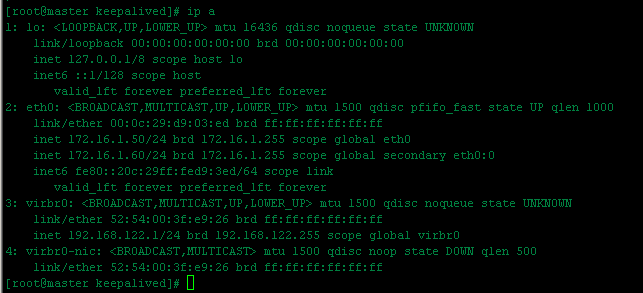
以下内容只是本人实验的记录笔记。以下内容是参照某真实案例中的部分内容所攒写,当然本人对Linux各应用系统不是很熟悉,大家将就看看,有错的请指出。由于本人是在VMWare上仿照生产网络环境搭建的架构,为贪图方便,故所有服务器IP都同一网络,在生产环境中管理、应用等都是不同网段并且是从实体网络设备上隔离,下图大概的架构图。

Haproxy 安装
# cd /home
# tar haproxy-1.5.8.tar.gz
# cd haproxy-1.5.8
# make TARGET=linux26 ARCH=x86_64 -->TARGET是指定内核版本,ARCH指定CPU架构,我使用的是64bit系统
# make install
# mkdir /etc/haproxy
# cp examples/haproxy.cfg /etc/haproxy
# cp examples/haproxy.init /etc/init.d/haproxy
# chmod +x /etc/init.d/haproxy
# ln -s /usr/local/sbin/haproxy /usr/sbin/
# mkdir /usr/share/haproxy
编辑配置文件(两台haproxy配置文件相同)
# this config needs haproxy-1.5.8
global
log 127.0.0.1 local0 #日志输出配置,所有日志都记录在本机,通过local0输出
log 127.0.0.1 local1 notice
#log loghost local0 info
maxconn 4096 #最大连接数
chroot /usr/share/haproxy #改变当前工作目录。
uid 99 #所属用户的uid
gid 99 #所属运行的gid
daemon #以后台形式运行haproxy
#debug
#quiet
defaults
log global
mode http #默认的模式mode { tcp|http|health },tcp是4层,http是7层,health只会返回OK
# option httplog
option dontlognull
retries 3 #两次连接失败就认为是服务器不可用
option redispatch #当serverId对应的服务器挂掉后,强制定向到其他健康的服务器
option abortonclose #当服务器负载很高的时候,自动结束掉当前队列处理比较久的链接
maxconn 2000 #默认的最大连接数
timeout connect 5000 #连接超时
timeout client 50000 #客户端超时
timeout server 50000 #服务器超时
timeout check 5s #心跳检测超时
listen www.master.com 172.16.1.60:80 #设定对外服务器的名称或是IP,对外服务器时使用80 Port
# option httpchk *
balance leastconn #banlance roundrobin 轮询,balance source 保存session值,支持static-rr,leastconn,first,uri等参数
option httplog
cookie SERVERID insert indirect nocache
server slave2 172.16.1.52:80 cookie server01 check inter 2000 fall 3
server slave3 172.16.1.53:80 cookie server02 check inter 2000 fall 3
server slave4 172.16.1.54:80 cookie server03 check inter 2000 fall 3
capture cookie ASPSESSION len 32
timeout server 20000
option httpclose # disable keep-alive
option checkcache # block response if set-cookie & cacheable
rspidel ^Set-cookie:\ IP= # do not let this cookie tell our internal IP address
listen admin_stats #haproxy服务状态
bind 172.16.1.60:8888
option httplog
stats auth admin:admin
stats uri /stats
stats admin if TRUE
stats hide-version
stats refresh 5s
listen HA-Mysql 172.16.1.60:23306 # Mysql高可用性服务
mode tcp
option mysql-check user haproxy # 需要在被监控的机器上的mysql新建一个无密码用户haproxy(此可以随便建: create user 'haproxy'@'%' identified by ''; )
balance roundrobin
server slave2db01 172.16.1.52:3306 weight 1 check inter 12000 rise 3 fall 2
server slave3db02 172.16.1.53:3306 weight 1 check inter 12000 rise 3 fall 2
server slave3db03 172.16.1.54:3306 weight 1 check inter 12000 rise 3 fall 2
option tcpka
启动haproxy服务,查看状态: service haproxy start

HAProxy故障说明:
[ALERT] 164/110030 (11606) : Starting proxy linuxyw.com: cannot bind socket
这个问题,其实就是因为你的haproxy没有得到VIP的原因,而你的配置文件又绑定了VIP地址,所以会提示以上错误。当然,你也要确保你的haproxy服务器做了hearbeat或keepalived,绑定VIP,要不就无法高可用了。
解决方法:
修改内核参数: /etc/sysctl.conf
net.ipv4.ip_nonlocal_bind=1
保存结果,使结果生效
sysctl -p
或者使用echo进去,前提是sysctl.conf文件中没有本条参数:
echo 'net.ipv4.ip_nonlocal_bind = 1'>>/etc/sysctl.conf
net.ipv4.ip_nonlocal_bind=1 意思是启动haproxy的时候,允许忽视VIP的存在
---------------------------------------------
keepalive 安装与配置
安装与配置keepalived (wget http://www.keepalived.org/software/keepalived1.2.22.tar.gz )


[root@master keepalived-1.2.22]# cp /usr/local/etc/rc.d/init.d/keepalived /etc/init.d/
[root@master keepalived-1.2.22]# cp /usr/local/etc/sysconfig/keepalived /etc/sysconfig/
[root@master keepalived-1.2.22]# mkdir /etc/keepalived -p
[root@master keepalived-1.2.22]# cp /usr/local/etc/keepalived/keepalived.conf /etc/keepalived/
[root@master keepalived-1.2.22]# cp /usr/local/sbin/keepalived /usr/sbin/
[root@master keepalived-1.2.22]# /etc/init.d/keepalived start
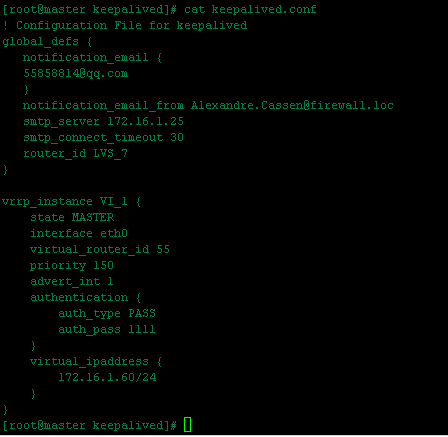

global_defs {
notification_email {
55858814@qq.com
}
notification_email_from Alexandre.Cassen@firewall.loc
smtp_server 172.16.1.25
smtp_connect_timeout 30
router_id LVS_7
}
vrrp_instance VI_1 {
state MASTER #设置为主服务器
interface eth0 #监听网络接口
virtual_router_id 55 #主、备必须一样相当于VR(虚拟路由器)ID
priority 150 #(主、备机取不同的优先级,主机值较大,备份机值较小,值越大优先级越高)
advert_int 1 #VRRP Multicast广播周期秒数
authentication {
auth_type PASS #VRRP认证方式,主备必须一致
auth_pass 1111 #(密码)
}
virtual_ipaddress {
172.16.1.60/24 #VRRP HA虚拟地址
}
}
vrrp_instance VI_2 {
state BACKUP
interface eth0
virtual_router_id 56
priority 200
advert_int 1
authentication {
auth_type PASS
auth_pass 1111
}
virtual_ipaddress {
172.16.1.61/24
}
}
查看状态
--------------------------------------------------------------------------------------
Nginx安装
#tarzxvf nginx-1.6.2.tar.gz
#cd nginx-1.6.2
#useradd -s/sbin/nologin nginx -->创建不登录用户
# ./configure--user=nginx --group=nginx --prefix=/opt/nginx
# make && makeinstall
/opt/nginx/conf/nginx.conf 文件配置如下(三台Web服务配置文件相同):
[root@slave2 conf]#cat nginx.conf
#user nobody;
worker_processes 2;
error_log logs/error.log;
pid logs/nginx.pid;
events {
worker_connections 1024;
}
http {
include mime.types;
default_type application/octet-stream;
log_format main '$remote_addr - $remote_user [$time_local]"$request" '
'$status$body_bytes_sent "$http_referer" '
'"$http_user_agent" "$http_x_forwarded_for"';
access_log logs/access.log main;
sendfile on;
tcp_nopush on;
keepalive_timeout 65;
#gzip on;
server {
listen 80;
server_name master.com;
root html/www;
index index.html index.htm;
rewrite ^/(.*)http://www.master.com/$1 permanent; #ip防问301跳转第二种方法,permanent永久跳转;
}
server{
listen 80;
server_name www.master.com master.com; #第一个虚拟服务器,增加master.com别名实现跳转(第一种方法)
root html/www;
index index.html index.htm;
}
server{
listen 80;
server_name bbs.master.com; #第二个虚拟服务器
root html/bbs;
index index.html index.htm;
}
server{
listen 80;
server_name blog.master.com; #第三个虚拟服务器
root html/blog;
index index.html index.htm;
}
}
######################################################################################
# 第二第配置nginx.conf写法
#mkdir/opt/nginx/conf/extra -->建立extra文件夹用于存放各类server.confserver

# 修改nginx.conf配置如下:
[root@slave2 conf]#cat nginx.conf
#user nobody;
worker_processes 2;
error_log logs/error.log;
#error_log logs/error.log notice;
#error_log logs/error.log info;
pid logs/nginx.pid;
events {
worker_connections 1024;
}
http {
include mime.types;
default_type application/octet-stream;
log_format main '$remote_addr - $remote_user [$time_local]"$request" '
'$status$body_bytes_sent "$http_referer" '
'"$http_user_agent" "$http_x_forwarded_for"';
access_log logs/access.log main;
sendfile on;
#tcp_nopush on;
keepalive_timeout 65;
#gzip on;
include extra/www.conf;-->加载配置文件
include extra/blog.conf;-->加载配置文件
include extra/bbs.conf;-->加载配置文件
}
#nginx 增加对PHP支持需安装如下软件:
libmcrypt-2.5.8.tar.gz
mhash-0.9.9.9.tar.gz
libiconv-1.14.tar.gz
php-fpm-5.3.3-47.el6.x86_64.rpm-->此为nginx需用php-fpm,端口为9000,启动命令 service php-fpm start
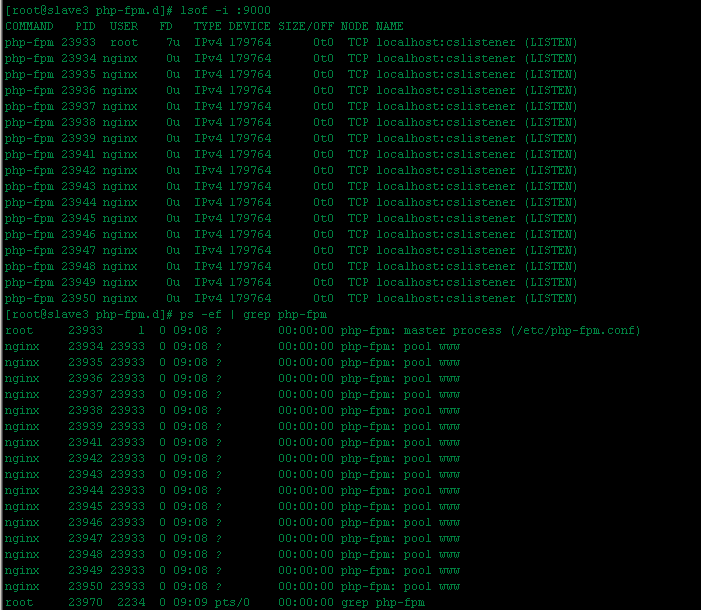
php-fpm的配置文件/etc/php-fpm.d/www.conf
#各类配置如下:
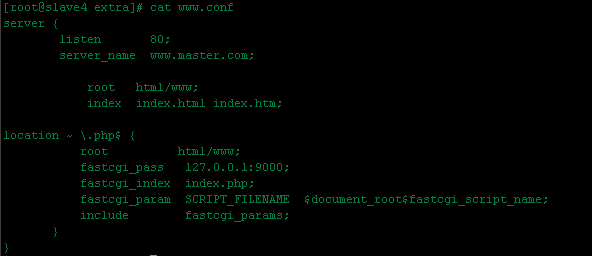

备注:1). 原配置文件对php支持语句为:fastcgi_param SCRIPT_FILENAME /scripts$fastcgi_script_name;
2). 必须改为:fastcgi_param SCRIPT_FILENAME $document_root$fastcgi_script_name;
3). 通过location指令,将所有以php为后缀的文件都给给127.0.0.1:9000来处理,而这里的ip address和端口就是FastCGI进程监听的IP Address和端口;
*如果没有php-fpm没有或是启动 nginx对PHP文件报File not found.错
#####################################################################################
#/opt/nginx/sbin/nginx-s reload -->重新加载服务器
#/opt/nginx/sbin/nginx->服务器启动
#/opt/nginx/sbin/nginx-t ->检查语法
# ps -ef | grep nginx/ # lsof -i :80 / #netstat -lntcp | grep 80

-------------------------------------------------------------------
Mysql主从服务器
1.主从服务器分别作以下操作:
1.1、版本一致
1.2、初始化表,并在后台启动mysql
1.3、修改root的密码
2、修改主服务器master:
#vi /etc/my.cnf
[mysqld]
log_bin=mysql-bin //[必须]启用二进制日志
server-id=222 //[必须]服务器唯一ID,默认是1,一般取IP最后一段
3、修改从服务器slave:
#vi /etc/my.cnf
[mysqld]
log_bin=mysql-bin //[不是必须]启用二进制日志
server-id=226 //[必须]服务器唯一ID,默认是1,一般取IP最后一段
4、重启两台服务器的mysql
/etc/init.d/mysql restart
5、在主服务器上建立帐户并授权slave:
GRANTREPLICATION SLAVE ON *.* TO 'slave'@'172.16.1.53' IDENTIFIED BY 'password';
GRANTREPLICATION SLAVE ON *.* TO 'slave'@'172.16.1.52' IDENTIFIED BY 'password';
6、登录主服务器的mysql,查询master的状态
mysql>show masterstatus;

7、配置从服务器Slave:
mysql> CHANGEMASTER TO MASTER_HOST='172.16.1.54',
master_user ='slave',
master_password ='password',
master_log_file ='mysql-bin.00002',
master_log_pos = 191;
8、检查从服务器复制功能状态:
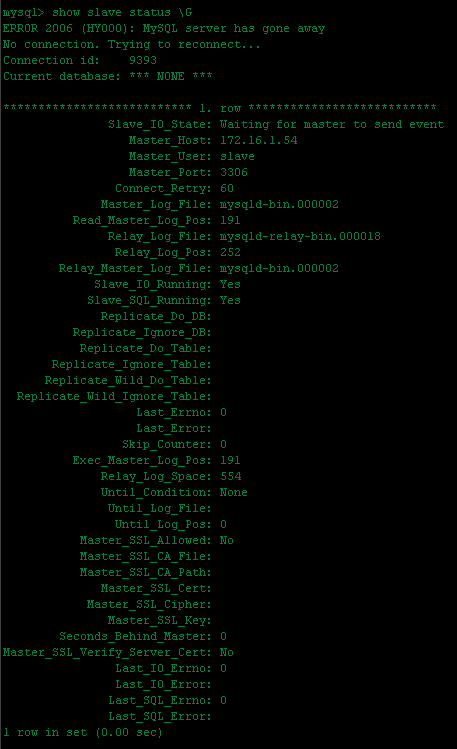
mysql>show slave status \G

9.Mysql开启远程登录
(1)通过MySQL用户去限制访问
权限系统目的:
MySQL基于安全考虑root账户一般只能本地访问,但是在开发过程中可能需要打开root的远程访问权限,今天介绍的就是如何开启和关闭Mysql远程访问
MySQL权限系统的主要功能是证实连接到一台给定主机的用户,并且赋予该用户在数据库上的SELECT、INSERT、UPDATE和DELETE权限。
附加的功能包括有匿名的用户并对于MySQL特定的功能例如LOAD DATA INFILE进行授权及管理操作的能力。
权限系统原理:
MySQL权限系统保证所有的用户只执行允许做的事情。当你连接MySQL服务器时,你的身份由你从那儿连接的主机和你指定的用户名来决定。
连接后发出请求后,系统根据你的身份和你想做什么来授予权限。
MySQL在认定身份中考虑你的主机名和用户名字,是因为几乎没有原因假定一个给定的用户在因特网上属于同一个人。
例如,从office.com连接的用户joe不一定和从elsewhere.com连接的joe是同一个人。
MySQL通过允许你区分在不同的主机上碰巧有同样名字的用户来处理它:你可以对joe从office.com进行的连接授与一个权限集,而为joe从elsewhere.com的连接授予一个不同的权限集。
阶段1:服务器检查是否允许你连接。
阶段2:假定你能连接,服务器检查你发出的每个请求。看你是否有足够的权限实施它。
例如,如果你从数据库表中选择(select)行或从数据库删除表,服务器确定你对表有SELECT权限或对数据库有DROP权限。 如果连接时你的权限被更改了(通过你和其它人),这些更改不一定立即对你发出的下一个语句生效。MySQL权限是保存在cache中,这个时候就你需要执行
flush privileges;
开启远程访问:
- 更新用户
mysql>use mysql;
mysql>update userset host = "%" where user = "root";
mysql>flushprivileges;
- 添加用户
mysql>use mysql;
mysql>insert intouser(host, user, password) values("%", "root",password("yourpassword"))
mysql>grant all privilegeson *.* to 'root'@'%' with grant option #赋予任何主机访问数据库权限
mysql>flush privileges;
-关闭远程访问:
mysql> use mysql;
mysql>update userset host = "localhost" where user = "root" and host="%";
mysql> flushprivileges;
- 查看用户权限:
mysql> useinformation_schema;
mysql> select *from user_privileges;
查看当前mysql用户:
mysql>use mysql;
mysql>select user, hostfrom user;
更新用户:
mysql> updatemysql.user set password=password('新密码') whereUser="phplamp" and Host="localhost";
mysql> flushprivileges;
删除用户:
mysql> DELETEFROM user WHERE User="phplamp" and Host="localhost";
mysql> flushprivileges;
user host指定方法:
Host值可以是主机名或IP号,或’localhost’指出本地主机。
你可以在Host列值使用通配符字符“%”和“_”。
host值’%’匹配任何主机名,空Host值等价于’%’。它们的含义与LIKE操作符的模式匹配操作相同。例如,’%’的Host值与所有主机名匹配,而’%.mysql.com’匹配mysql.com域的所有主机。
##############################################################################################
MySQL从5.1升级至5.6会出现 Mysql创建用户出错:ERROR1054 (42S22): Unknown column 'plugin' in 'mysql.user'
mysql> create userqzwx identified by 'qzwx';
ERROR 1054 (42S22):Unknown column 'plugin' in 'mysql.user'
经排查,发现是5.16版本mysql.user表的没有plugin,而升级数据库的时候,mysql.user表没有升级,才导致字段缺少,可以通过以下方法修改mysql.user表:
mysql>use mysql;
mysql>ALTER TABLEuser ADD Create_tablespace_priv ENUM('N','Y') NOT NULL DEFAULT 'N' AFTERTrigger_priv;
mysql>ALTER TABLEuser ADD plugin CHAR(64) NULL AFTER max_user_connections;
mysql>ALTER TABLEuser ADD authentication_string TEXT NULL DEFAULT NULL AFTER plugin;
mysql>ALTER TABLEuser ADD password_expired ENUM('N','Y') NOT NULL DEFAULT 'N' AFTERauthentication_string;
############################################################################################
MYSQL5.1升级至5.6
备份数据库,升级MySQL通常不会丢失数据,但保险起见,我们需要做这一步。输入命令: mysqldump -u xxx -h xxx -P 3306 -p --all-databases > databases.sql
停止MySQL服务:service mysqld stop
卸载旧版MySQL,输入命令 yum remove mysql mysql-* -y
移除命令执行后,可再看看是否有残余的mysql,输入命令:yum list installed | grep mysql
如果有,可输入命令删除:rum remove mysql-libs
下载安装最新的rpm文件: rpm -Uvh http://repo.mysql.com/mysql-community-release-el6-5.noarch.rpm
安装MySQL,输入命令:yum install mysql-community-server
检查安装完成的版本
*升级后mysql不能启动,要检查/etc/my.cnf 配置文件以及删除/var/lib/mysql下面log文件,如ibdata1 ib_logfile0 ib_logfile1
* 升级后slave主机不能连接master主机,要先重置slave配置文件以及删除/var/lib/mysql下面的log文档,命令reset slave;再重新加载连接master配置
Mysql问题解决方案
起动bin-log 日志,master不能启动并出现以下如下问题:
2016-09-07 08:45:2521038 [ERROR] Failed to open log (file './mysql-bin.000004', errno 2)
2016-09-07 08:45:2521038 [ERROR] Could not open log file
2016-09-07 08:45:2521038 [ERROR] Can't init tc log
2016-09-07 08:45:2521038 [ERROR] Aborting
解决方法:进入mysql目录删除 mysql-bin.index 文件,让系统重新建立mysql-bin.index
MySQL主从失败 错误Got fatal error 1236解决方法show slave status错误:
mysql> show slave status\G
Master_Log_File: mysql-bin.000001
Read_Master_Log_Pos: 120
Slave_IO_Running: No.....
Last_IO_Error: Got fatal error 1236 from master when reading data from binary log:
'Client requested master to start replication from impossible position'查看Mysql Log[root@host03log]# cat mysqld.log
2016-09-07 10:31:3518240 [ERROR] Error reading packet from server: Could not find first log filename in binary log index file (server_errno=1236)
2016-09-07 10:31:3518240 [ERROR] Slave I/O: Got fatal error 1236 from master when reading datafrom binary log: 'Could not find first log file name in binary log index file',Error_code: 1236
2016-09-07 10:31:3518240 [Note] Slave I/O thread exiting, read up to log 'log-bin.000002',position 120
2016-09-07 10:31:3518240 [Warning] Slave SQL: If a crash happens this configuration does notguarantee that the relay log info will be consistent, Error_code: 0
2016-09-07 10:31:3518240 [Note] Slave SQL thread initialized, starting replication in log'log-bin.000002' at position 120, relay log './mysqld-relay-bin.000001'position: 4
解決方法:
[root@host03 log]#mysqlbinlog /opt/mysql/data01/mysql-bin.000001 > test.txt
[root@host03 log]#cat test.txt
/*!50530 SET@@SESSION.PSEUDO_SLAVE_MODE=1*/;
/*!40019 SET@@session.max_insert_delayed_threads=0*/;
/*!50003 SET@OLD_COMPLETION_TYPE=@@COMPLETION_TYPE,COMPLETION_TYPE=0*/;
DELIMITER /*!*/;
# at 4
#160907 10:31:34server id 43 end_log_pos 120 CRC32 0xeec57cc1 Start:binlog v 4, server v 5.6.32-log created 160907 10:31:34 at startup
# Warning: this binlogis either in use or was not closed properly.
ROLLBACK/*!*/;
BINLOG '
BnzPVw8rAAAAdAAAAHgAAAABAAQANS42LjMyLWxvZwAAAAAAAAAAAAAAAAAAAAAAAAAAAAAAAAAA
AAAAAAAAAAAAAAAAAAAGfM9XEzgNAAgAEgAEBAQEEgAAXAAEGggAAAAICAgCAAAACgoKGRkAAcF8
xe4=
'/*!*/;
DELIMITER ;
# End of log file
ROLLBACK /* added bymysqlbinlog */;
/*!50003 SETCOMPLETION_TYPE=@OLD_COMPLETION_TYPE*/;
/*!50530 SET@@SESSION.PSEUDO_SLAVE_MODE=0*/;
mysql> stop slave;
Query OK, 0 rows affected (0.00 sec)
mysql> change master to master_log_file='mysql-bin.000001',master_log_pos=4;
Query OK, 0 rows affected (0.06 sec)
mysql> start slave;
Query OK, 0 rows affected (0.00 sec)
Slave_IO_Running: Yes
Slave_SQL_Running: Yes
出现以目两项表明正常运行
管理日志常用命令
mysql> show binlog events;

mysql> show binlog events in 'mysql-bin.000001';

mysql> show binlog events in 'mysql-bin.000001' from 120;

Haproxy 安装
# cd /home
# tar haproxy-1.5.8.tar.gz
# cd haproxy-1.5.8
# make TARGET=linux26 ARCH=x86_64 -->TARGET是指定内核版本,ARCH指定CPU架构,我使用的是64bit系统
# make install
# mkdir /etc/haproxy
# cp examples/haproxy.cfg /etc/haproxy
# cp examples/haproxy.init /etc/init.d/haproxy
# chmod +x /etc/init.d/haproxy
# ln -s /usr/local/sbin/haproxy /usr/sbin/
# mkdir /usr/share/haproxy
编辑配置文件(两台haproxy配置文件相同)
# this config needs haproxy-1.5.8
global
log 127.0.0.1 local0 #日志输出配置,所有日志都记录在本机,通过local0输出
log 127.0.0.1 local1 notice
#log loghost local0 info
maxconn 4096 #最大连接数
chroot /usr/share/haproxy #改变当前工作目录。
uid 99 #所属用户的uid
gid 99 #所属运行的gid
daemon #以后台形式运行haproxy
#debug
#quiet
defaults
log global
mode http #默认的模式mode { tcp|http|health },tcp是4层,http是7层,health只会返回OK
# option httplog
option dontlognull
retries 3 #两次连接失败就认为是服务器不可用
option redispatch #当serverId对应的服务器挂掉后,强制定向到其他健康的服务器
option abortonclose #当服务器负载很高的时候,自动结束掉当前队列处理比较久的链接
maxconn 2000 #默认的最大连接数
timeout connect 5000 #连接超时
timeout client 50000 #客户端超时
timeout server 50000 #服务器超时
timeout check 5s #心跳检测超时
listen www.master.com 172.16.1.60:80 #设定对外服务器的名称或是IP,对外服务器时使用80 Port
# option httpchk *
balance leastconn #banlance roundrobin 轮询,balance source 保存session值,支持static-rr,leastconn,first,uri等参数
option httplog
cookie SERVERID insert indirect nocache
server slave2 172.16.1.52:80 cookie server01 check inter 2000 fall 3
server slave3 172.16.1.53:80 cookie server02 check inter 2000 fall 3
server slave4 172.16.1.54:80 cookie server03 check inter 2000 fall 3
capture cookie ASPSESSION len 32
timeout server 20000
option httpclose # disable keep-alive
option checkcache # block response if set-cookie & cacheable
rspidel ^Set-cookie:\ IP= # do not let this cookie tell our internal IP address
listen admin_stats #haproxy服务状态
bind 172.16.1.60:8888
option httplog
stats auth admin:admin
stats uri /stats
stats admin if TRUE
stats hide-version
stats refresh 5s
listen HA-Mysql 172.16.1.60:23306 # Mysql高可用性服务
mode tcp
option mysql-check user haproxy # 需要在被监控的机器上的mysql新建一个无密码用户haproxy(此可以随便建: create user 'haproxy'@'%' identified by ''; )
balance roundrobin
server slave2db01 172.16.1.52:3306 weight 1 check inter 12000 rise 3 fall 2
server slave3db02 172.16.1.53:3306 weight 1 check inter 12000 rise 3 fall 2
server slave3db03 172.16.1.54:3306 weight 1 check inter 12000 rise 3 fall 2
option tcpka
启动haproxy服务,查看状态: service haproxy start
HAProxy故障说明:
[ALERT] 164/110030 (11606) : Starting proxy linuxyw.com: cannot bind socket
这个问题,其实就是因为你的haproxy没有得到VIP的原因,而你的配置文件又绑定了VIP地址,所以会提示以上错误。当然,你也要确保你的haproxy服务器做了hearbeat或keepalived,绑定VIP,要不就无法高可用了。
解决方法:
修改内核参数: /etc/sysctl.conf
net.ipv4.ip_nonlocal_bind=1
保存结果,使结果生效
sysctl -p
或者使用echo进去,前提是sysctl.conf文件中没有本条参数:
echo 'net.ipv4.ip_nonlocal_bind = 1'>>/etc/sysctl.conf
net.ipv4.ip_nonlocal_bind=1 意思是启动haproxy的时候,允许忽视VIP的存在
---------------------------------------------
keepalive 安装与配置
安装与配置keepalived (wget http://www.keepalived.org/software/keepalived1.2.22.tar.gz )
[root@master keepalived-1.2.22]# cp /usr/local/etc/rc.d/init.d/keepalived /etc/init.d/
[root@master keepalived-1.2.22]# cp /usr/local/etc/sysconfig/keepalived /etc/sysconfig/
[root@master keepalived-1.2.22]# mkdir /etc/keepalived -p
[root@master keepalived-1.2.22]# cp /usr/local/etc/keepalived/keepalived.conf /etc/keepalived/
[root@master keepalived-1.2.22]# cp /usr/local/sbin/keepalived /usr/sbin/
[root@master keepalived-1.2.22]# /etc/init.d/keepalived start
global_defs {
notification_email {
55858814@qq.com
}
notification_email_from Alexandre.Cassen@firewall.loc
smtp_server 172.16.1.25
smtp_connect_timeout 30
router_id LVS_7
}
vrrp_instance VI_1 {
state MASTER #设置为主服务器
interface eth0 #监听网络接口
virtual_router_id 55 #主、备必须一样相当于VR(虚拟路由器)ID
priority 150 #(主、备机取不同的优先级,主机值较大,备份机值较小,值越大优先级越高)
advert_int 1 #VRRP Multicast广播周期秒数
authentication {
auth_type PASS #VRRP认证方式,主备必须一致
auth_pass 1111 #(密码)
}
virtual_ipaddress {
172.16.1.60/24 #VRRP HA虚拟地址
}
}
vrrp_instance VI_2 {
state BACKUP
interface eth0
virtual_router_id 56
priority 200
advert_int 1
authentication {
auth_type PASS
auth_pass 1111
}
virtual_ipaddress {
172.16.1.61/24
}
}
查看状态
--------------------------------------------------------------------------------------
Nginx安装
#tarzxvf nginx-1.6.2.tar.gz
#cd nginx-1.6.2
#useradd -s/sbin/nologin nginx -->创建不登录用户
# ./configure--user=nginx --group=nginx --prefix=/opt/nginx
# make && makeinstall
/opt/nginx/conf/nginx.conf 文件配置如下(三台Web服务配置文件相同):
[root@slave2 conf]#cat nginx.conf
#user nobody;
worker_processes 2;
error_log logs/error.log;
pid logs/nginx.pid;
events {
worker_connections 1024;
}
http {
include mime.types;
default_type application/octet-stream;
log_format main '$remote_addr - $remote_user [$time_local]"$request" '
'$status$body_bytes_sent "$http_referer" '
'"$http_user_agent" "$http_x_forwarded_for"';
access_log logs/access.log main;
sendfile on;
tcp_nopush on;
keepalive_timeout 65;
#gzip on;
server {
listen 80;
server_name master.com;
root html/www;
index index.html index.htm;
rewrite ^/(.*)http://www.master.com/$1 permanent; #ip防问301跳转第二种方法,permanent永久跳转;
}
server{
listen 80;
server_name www.master.com master.com; #第一个虚拟服务器,增加master.com别名实现跳转(第一种方法)
root html/www;
index index.html index.htm;
}
server{
listen 80;
server_name bbs.master.com; #第二个虚拟服务器
root html/bbs;
index index.html index.htm;
}
server{
listen 80;
server_name blog.master.com; #第三个虚拟服务器
root html/blog;
index index.html index.htm;
}
}
######################################################################################
# 第二第配置nginx.conf写法
#mkdir/opt/nginx/conf/extra -->建立extra文件夹用于存放各类server.confserver
# 修改nginx.conf配置如下:
[root@slave2 conf]#cat nginx.conf
#user nobody;
worker_processes 2;
error_log logs/error.log;
#error_log logs/error.log notice;
#error_log logs/error.log info;
pid logs/nginx.pid;
events {
worker_connections 1024;
}
http {
include mime.types;
default_type application/octet-stream;
log_format main '$remote_addr - $remote_user [$time_local]"$request" '
'$status$body_bytes_sent "$http_referer" '
'"$http_user_agent" "$http_x_forwarded_for"';
access_log logs/access.log main;
sendfile on;
#tcp_nopush on;
keepalive_timeout 65;
#gzip on;
include extra/www.conf;-->加载配置文件
include extra/blog.conf;-->加载配置文件
include extra/bbs.conf;-->加载配置文件
}
#nginx 增加对PHP支持需安装如下软件:
libmcrypt-2.5.8.tar.gz
mhash-0.9.9.9.tar.gz
libiconv-1.14.tar.gz
php-fpm-5.3.3-47.el6.x86_64.rpm-->此为nginx需用php-fpm,端口为9000,启动命令 service php-fpm start
php-fpm的配置文件/etc/php-fpm.d/www.conf
#各类配置如下:
备注:1). 原配置文件对php支持语句为:fastcgi_param SCRIPT_FILENAME /scripts$fastcgi_script_name;
2). 必须改为:fastcgi_param SCRIPT_FILENAME $document_root$fastcgi_script_name;
3). 通过location指令,将所有以php为后缀的文件都给给127.0.0.1:9000来处理,而这里的ip address和端口就是FastCGI进程监听的IP Address和端口;
*如果没有php-fpm没有或是启动 nginx对PHP文件报File not found.错
#####################################################################################
#/opt/nginx/sbin/nginx-s reload -->重新加载服务器
#/opt/nginx/sbin/nginx->服务器启动
#/opt/nginx/sbin/nginx-t ->检查语法
# ps -ef | grep nginx/ # lsof -i :80 / #netstat -lntcp | grep 80
-------------------------------------------------------------------
Mysql主从服务器
1.主从服务器分别作以下操作:
1.1、版本一致
1.2、初始化表,并在后台启动mysql
1.3、修改root的密码
2、修改主服务器master:
#vi /etc/my.cnf
[mysqld]
log_bin=mysql-bin //[必须]启用二进制日志
server-id=222 //[必须]服务器唯一ID,默认是1,一般取IP最后一段
3、修改从服务器slave:
#vi /etc/my.cnf
[mysqld]
log_bin=mysql-bin //[不是必须]启用二进制日志
server-id=226 //[必须]服务器唯一ID,默认是1,一般取IP最后一段
4、重启两台服务器的mysql
/etc/init.d/mysql restart
5、在主服务器上建立帐户并授权slave:
GRANTREPLICATION SLAVE ON *.* TO 'slave'@'172.16.1.53' IDENTIFIED BY 'password';
GRANTREPLICATION SLAVE ON *.* TO 'slave'@'172.16.1.52' IDENTIFIED BY 'password';
6、登录主服务器的mysql,查询master的状态
mysql>show masterstatus;
7、配置从服务器Slave:
mysql> CHANGEMASTER TO MASTER_HOST='172.16.1.54',
master_user ='slave',
master_password ='password',
master_log_file ='mysql-bin.00002',
master_log_pos = 191;
8、检查从服务器复制功能状态:
mysql>show slave status \G
9.Mysql开启远程登录
(1)通过MySQL用户去限制访问
权限系统目的:
MySQL基于安全考虑root账户一般只能本地访问,但是在开发过程中可能需要打开root的远程访问权限,今天介绍的就是如何开启和关闭Mysql远程访问
MySQL权限系统的主要功能是证实连接到一台给定主机的用户,并且赋予该用户在数据库上的SELECT、INSERT、UPDATE和DELETE权限。
附加的功能包括有匿名的用户并对于MySQL特定的功能例如LOAD DATA INFILE进行授权及管理操作的能力。
权限系统原理:
MySQL权限系统保证所有的用户只执行允许做的事情。当你连接MySQL服务器时,你的身份由你从那儿连接的主机和你指定的用户名来决定。
连接后发出请求后,系统根据你的身份和你想做什么来授予权限。
MySQL在认定身份中考虑你的主机名和用户名字,是因为几乎没有原因假定一个给定的用户在因特网上属于同一个人。
例如,从office.com连接的用户joe不一定和从elsewhere.com连接的joe是同一个人。
MySQL通过允许你区分在不同的主机上碰巧有同样名字的用户来处理它:你可以对joe从office.com进行的连接授与一个权限集,而为joe从elsewhere.com的连接授予一个不同的权限集。
阶段1:服务器检查是否允许你连接。
阶段2:假定你能连接,服务器检查你发出的每个请求。看你是否有足够的权限实施它。
例如,如果你从数据库表中选择(select)行或从数据库删除表,服务器确定你对表有SELECT权限或对数据库有DROP权限。 如果连接时你的权限被更改了(通过你和其它人),这些更改不一定立即对你发出的下一个语句生效。MySQL权限是保存在cache中,这个时候就你需要执行
flush privileges;
开启远程访问:
- 更新用户
mysql>use mysql;
mysql>update userset host = "%" where user = "root";
mysql>flushprivileges;
- 添加用户
mysql>use mysql;
mysql>insert intouser(host, user, password) values("%", "root",password("yourpassword"))
mysql>grant all privilegeson *.* to 'root'@'%' with grant option #赋予任何主机访问数据库权限
mysql>flush privileges;
-关闭远程访问:
mysql> use mysql;
mysql>update userset host = "localhost" where user = "root" and host="%";
mysql> flushprivileges;
- 查看用户权限:
mysql> useinformation_schema;
mysql> select *from user_privileges;
查看当前mysql用户:
mysql>use mysql;
mysql>select user, hostfrom user;
更新用户:
mysql> updatemysql.user set password=password('新密码') whereUser="phplamp" and Host="localhost";
mysql> flushprivileges;
删除用户:
mysql> DELETEFROM user WHERE User="phplamp" and Host="localhost";
mysql> flushprivileges;
user host指定方法:
Host值可以是主机名或IP号,或’localhost’指出本地主机。
你可以在Host列值使用通配符字符“%”和“_”。
host值’%’匹配任何主机名,空Host值等价于’%’。它们的含义与LIKE操作符的模式匹配操作相同。例如,’%’的Host值与所有主机名匹配,而’%.mysql.com’匹配mysql.com域的所有主机。
##############################################################################################
MySQL从5.1升级至5.6会出现 Mysql创建用户出错:ERROR1054 (42S22): Unknown column 'plugin' in 'mysql.user'
mysql> create userqzwx identified by 'qzwx';
ERROR 1054 (42S22):Unknown column 'plugin' in 'mysql.user'
经排查,发现是5.16版本mysql.user表的没有plugin,而升级数据库的时候,mysql.user表没有升级,才导致字段缺少,可以通过以下方法修改mysql.user表:
mysql>use mysql;
mysql>ALTER TABLEuser ADD Create_tablespace_priv ENUM('N','Y') NOT NULL DEFAULT 'N' AFTERTrigger_priv;
mysql>ALTER TABLEuser ADD plugin CHAR(64) NULL AFTER max_user_connections;
mysql>ALTER TABLEuser ADD authentication_string TEXT NULL DEFAULT NULL AFTER plugin;
mysql>ALTER TABLEuser ADD password_expired ENUM('N','Y') NOT NULL DEFAULT 'N' AFTERauthentication_string;
############################################################################################
MYSQL5.1升级至5.6
备份数据库,升级MySQL通常不会丢失数据,但保险起见,我们需要做这一步。输入命令: mysqldump -u xxx -h xxx -P 3306 -p --all-databases > databases.sql
停止MySQL服务:service mysqld stop
卸载旧版MySQL,输入命令 yum remove mysql mysql-* -y
移除命令执行后,可再看看是否有残余的mysql,输入命令:yum list installed | grep mysql
如果有,可输入命令删除:rum remove mysql-libs
下载安装最新的rpm文件: rpm -Uvh http://repo.mysql.com/mysql-community-release-el6-5.noarch.rpm
安装MySQL,输入命令:yum install mysql-community-server
检查安装完成的版本
*升级后mysql不能启动,要检查/etc/my.cnf 配置文件以及删除/var/lib/mysql下面log文件,如ibdata1 ib_logfile0 ib_logfile1
* 升级后slave主机不能连接master主机,要先重置slave配置文件以及删除/var/lib/mysql下面的log文档,命令reset slave;再重新加载连接master配置
Mysql问题解决方案
起动bin-log 日志,master不能启动并出现以下如下问题:
2016-09-07 08:45:2521038 [ERROR] Failed to open log (file './mysql-bin.000004', errno 2)
2016-09-07 08:45:2521038 [ERROR] Could not open log file
2016-09-07 08:45:2521038 [ERROR] Can't init tc log
2016-09-07 08:45:2521038 [ERROR] Aborting
解决方法:进入mysql目录删除 mysql-bin.index 文件,让系统重新建立mysql-bin.index
MySQL主从失败 错误Got fatal error 1236解决方法show slave status错误:
mysql> show slave status\G
Master_Log_File: mysql-bin.000001
Read_Master_Log_Pos: 120
Slave_IO_Running: No.....
Last_IO_Error: Got fatal error 1236 from master when reading data from binary log:
'Client requested master to start replication from impossible position'查看Mysql Log[root@host03log]# cat mysqld.log
2016-09-07 10:31:3518240 [ERROR] Error reading packet from server: Could not find first log filename in binary log index file (server_errno=1236)
2016-09-07 10:31:3518240 [ERROR] Slave I/O: Got fatal error 1236 from master when reading datafrom binary log: 'Could not find first log file name in binary log index file',Error_code: 1236
2016-09-07 10:31:3518240 [Note] Slave I/O thread exiting, read up to log 'log-bin.000002',position 120
2016-09-07 10:31:3518240 [Warning] Slave SQL: If a crash happens this configuration does notguarantee that the relay log info will be consistent, Error_code: 0
2016-09-07 10:31:3518240 [Note] Slave SQL thread initialized, starting replication in log'log-bin.000002' at position 120, relay log './mysqld-relay-bin.000001'position: 4
解決方法:
[root@host03 log]#mysqlbinlog /opt/mysql/data01/mysql-bin.000001 > test.txt
[root@host03 log]#cat test.txt
/*!50530 SET@@SESSION.PSEUDO_SLAVE_MODE=1*/;
/*!40019 SET@@session.max_insert_delayed_threads=0*/;
/*!50003 SET@OLD_COMPLETION_TYPE=@@COMPLETION_TYPE,COMPLETION_TYPE=0*/;
DELIMITER /*!*/;
# at 4
#160907 10:31:34server id 43 end_log_pos 120 CRC32 0xeec57cc1 Start:binlog v 4, server v 5.6.32-log created 160907 10:31:34 at startup
# Warning: this binlogis either in use or was not closed properly.
ROLLBACK/*!*/;
BINLOG '
BnzPVw8rAAAAdAAAAHgAAAABAAQANS42LjMyLWxvZwAAAAAAAAAAAAAAAAAAAAAAAAAAAAAAAAAA
AAAAAAAAAAAAAAAAAAAGfM9XEzgNAAgAEgAEBAQEEgAAXAAEGggAAAAICAgCAAAACgoKGRkAAcF8
xe4=
'/*!*/;
DELIMITER ;
# End of log file
ROLLBACK /* added bymysqlbinlog */;
/*!50003 SETCOMPLETION_TYPE=@OLD_COMPLETION_TYPE*/;
/*!50530 SET@@SESSION.PSEUDO_SLAVE_MODE=0*/;
mysql> stop slave;
Query OK, 0 rows affected (0.00 sec)
mysql> change master to master_log_file='mysql-bin.000001',master_log_pos=4;
Query OK, 0 rows affected (0.06 sec)
mysql> start slave;
Query OK, 0 rows affected (0.00 sec)
Slave_IO_Running: Yes
Slave_SQL_Running: Yes
出现以目两项表明正常运行
管理日志常用命令
mysql> show binlog events;
mysql> show binlog events in 'mysql-bin.000001';
mysql> show binlog events in 'mysql-bin.000001' from 120;

相关文章推荐
- 反向代理服务器(haproxy+keepalived)实验笔记
- 实现基于Keepalived+Haproxy+Varnish+LNMP企业级架构
- 实现基于Keepalived+Haproxy+Varnish+LNMP企业级架构
- Redhat5下haproxy+keepalived+nginx配置笔记
- 用haproxy结合keepalived实现基于LNMP的负载均衡和高可用
- 运维笔记43 使用saltstack配置完整线上服务(haproxy+keepalived,nginx+php+memcache,mysql主从)
- 基于Keepalived+Haproxy+Varnish+LNMP企业级架构
- 中型网站架构部署笔记----HAproxy+keepalived
- keepalived+haproxy+varnish+lnmp企业级架构测试
- Centos6.3下haproxy+keepalived+apache配置笔记
- Haproxy+keepalived实现高可用负载均衡
- MySQL 5.5 keepalived + haproxy + MHA 自动容灾
- HaProxy+Keepalived+Mycat高可用群集配置
- keepalived实现haproxy高可用详解 推荐
- mq+Haproxy+keepalived+mysql
- HAProxy+Varnish+LNMP实现高可用负载均衡动静分离集群部署 推荐
- keepalived+haproxy构建高可用负载均衡
- LNMP笔记:解决mail函数不能发送邮件
- debian下完成 haproxy +keepalived 高可用web集群架构
- Haproxy+Keepalived配置WEB负载均衡及动静分离