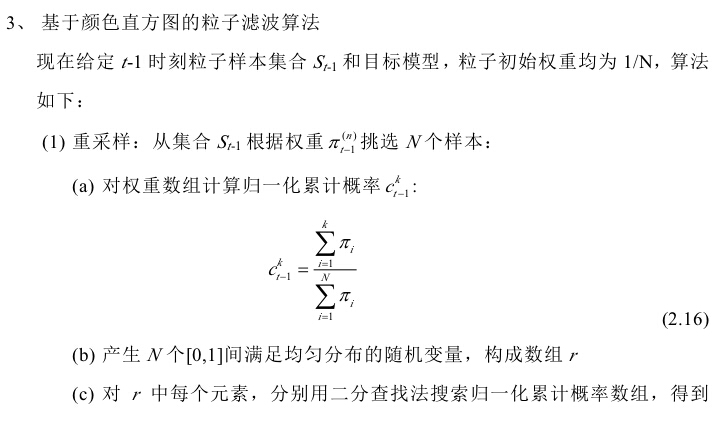
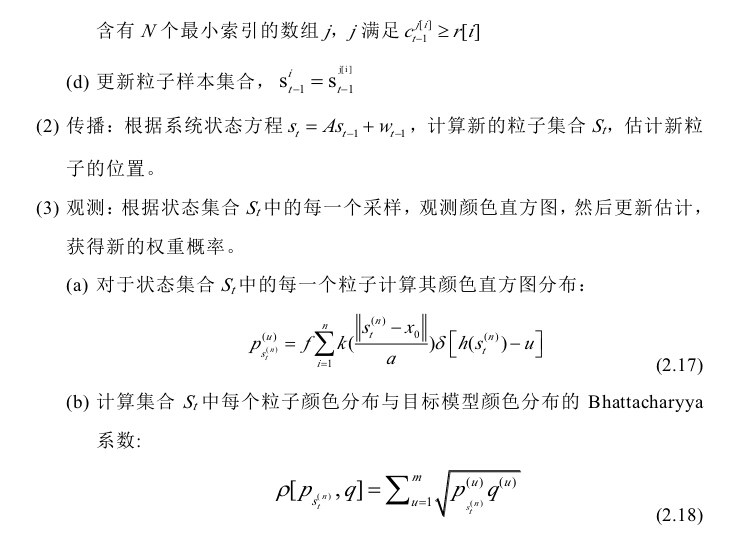
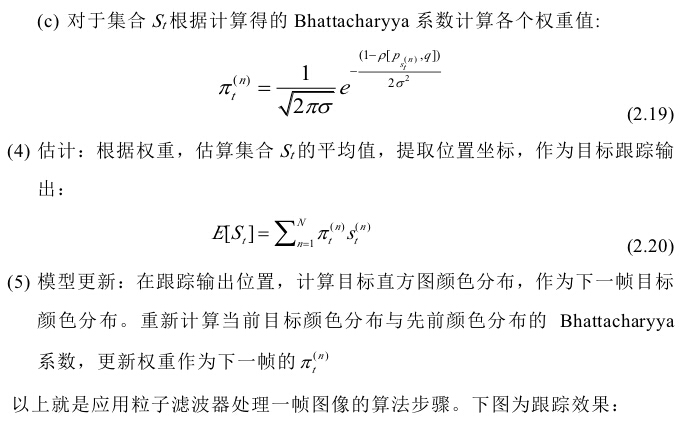
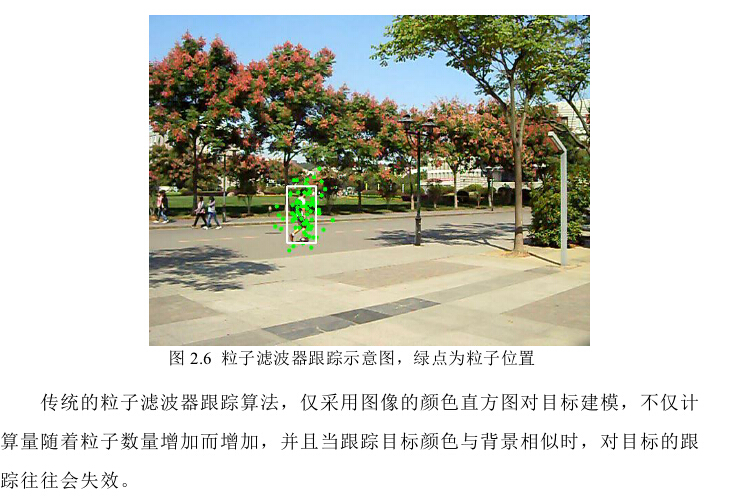
基于粒子滤波器的目标跟踪算法及实现
2017-10-09 16:00
766 查看
原文地址:http://blog.csdn.net/jinshengtao/article/details/30970733 http://blog.csdn.net/jinshengtao?viewmode=contents
推荐大家看论文《An adaptive color-based particle filter》
这次我直接截图我的硕士毕业论文的第二章的一部分,应该讲得比较详细了。最后给出我当时在pudn找到的最适合学习的实现代码
代码实现:
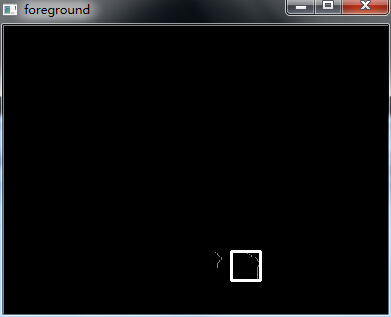
运行方式:按P停止,在前景窗口鼠标点击目标,会自动生成外接矩形,再次按P,对该选定目标进行跟踪。
[cpp] view
plain copy
// TwoLevel.cpp : 定义控制台应用程序的入口点。
//
/************************************************************************/
/*参考文献real-time Multiple Objects Tracking with Occlusion Handling in Dynamic Scenes */
/************************************************************************/
#include "stdafx.h"
#include <cv.h>
#include <cxcore.h>
#include <highgui.h>
#include <math.h>
# include <time.h>
#include <iostream>
using namespace std;
#define B(image,x,y) ((uchar*)(image->imageData + image->widthStep*(y)))[(x)*3] //B
#define G(image,x,y) ((uchar*)(image->imageData + image->widthStep*(y)))[(x)*3+1] //G
#define R(image,x,y) ((uchar*)(image->imageData + image->widthStep*(y)))[(x)*3+2] //R
#define S(image,x,y) ((uchar*)(image->imageData + image->widthStep*(y)))[(x)]
#define Num 10 //帧差的间隔
#define T 40 //Tf
#define Re 30 //
#define ai 0.08 //学习率
#define CONTOUR_MAX_AREA 10000
#define CONTOUR_MIN_AREA 50
# define R_BIN 8 /* 红色分量的直方图条数 */
# define G_BIN 8 /* 绿色分量的直方图条数 */
# define B_BIN 8 /* 兰色分量的直方图条数 */
# define R_SHIFT 5 /* 与上述直方图条数对应 */
# define G_SHIFT 5 /* 的R、G、B分量左移位数 */
# define B_SHIFT 5 /* log2( 256/8 )为移动位数 */
/*
采用Park and Miller方法产生[0,1]之间均匀分布的伪随机数
算法详细描述见:
[1] NUMERICAL RECIPES IN C: THE ART OF SCIENTIFIC COMPUTING.
Cambridge University Press. 1992. pp.278-279.
[2] Park, S.K., and Miller, K.W. 1988, Communications of the ACM,
vol. 31, pp. 1192–1201.
*/
#define IA 16807
#define IM 2147483647
#define AM (1.0/IM)
#define IQ 127773
#define IR 2836
#define MASK 123459876
typedef struct __SpaceState { /* 状态空间变量 */
int xt; /* x坐标位置 */
int yt; /* x坐标位置 */
float v_xt; /* x方向运动速度 */
float v_yt; /* y方向运动速度 */
int Hxt; /* x方向半窗宽 */
int Hyt; /* y方向半窗宽 */
float at_dot; /* 尺度变换速度 */
} SPACESTATE;
bool pause=false;//是否暂停
bool track = false;//是否跟踪
IplImage *curframe=NULL;
IplImage *pBackImg=NULL;
IplImage *pFrontImg=NULL;
IplImage *pTrackImg =NULL;
unsigned char * img;//把iplimg改到char* 便于计算
int xin,yin;//跟踪时输入的中心点
int xout,yout;//跟踪时得到的输出中心点
int Wid,Hei;//图像的大小
int WidIn,HeiIn;//输入的半宽与半高
int WidOut,HeiOut;//输出的半宽与半高
long ran_seed = 802163120; /* 随机数种子,为全局变量,设置缺省值 */
float DELTA_T = (float)0.05; /* 帧频,可以为30,25,15,10等 */
int POSITION_DISTURB = 15; /* 位置扰动幅度 */
float VELOCITY_DISTURB = 40.0; /* 速度扰动幅值 */
float SCALE_DISTURB = 0.0; /* 窗宽高扰动幅度 */
float SCALE_CHANGE_D = (float)0.001; /* 尺度变换速度扰动幅度 */
int NParticle = 75; /* 粒子个数 */
float * ModelHist = NULL; /* 模型直方图 */
SPACESTATE * states = NULL; /* 状态数组 */
float * weights = NULL; /* 每个粒子的权重 */
int nbin; /* 直方图条数 */
float Pi_Thres = (float)0.90; /* 权重阈值 */
float Weight_Thres = (float)0.0001; /* 最大权重阈值,用来判断是否目标丢失 */
/*
设置种子数
一般利用系统时间来进行设置,也可以直接传入一个long型整数
*/
long set_seed( long setvalue )
{
if ( setvalue != 0 ) /* 如果传入的参数setvalue!=0,设置该数为种子 */
ran_seed = setvalue;
else /* 否则,利用系统时间为种子数 */
{
ran_seed = time(NULL);
}
return( ran_seed );
}
/*
计算一幅图像中某个区域的彩色直方图分布
输入参数:
int x0, y0: 指定图像区域的中心点
int Wx, Hy: 指定图像区域的半宽和半高
unsigned char * image:图像数据,按从左至右,从上至下的顺序扫描,
颜色排列次序:RGB, RGB, ...
(或者:YUV, YUV, ...)
int W, H: 图像的宽和高
输出参数:
float * ColorHist: 彩色直方图,颜色索引按:
i = r * G_BIN * B_BIN + g * B_BIN + b排列
int bins: 彩色直方图的条数R_BIN*G_BIN*B_BIN(这里取8x8x8=512)
*/
void CalcuColorHistogram( int x0, int y0, int Wx, int Hy,
unsigned char * image, int W, int H,
float * ColorHist, int bins )
{
int x_begin, y_begin; /* 指定图像区域的左上角坐标 */
int y_end, x_end;
int x, y, i, index;
int r, g, b;
float k, r2, f;
int a2;
for ( i = 0; i < bins; i++ ) /* 直方图各个值赋0 */
ColorHist[i] = 0.0;
/* 考虑特殊情况:x0, y0在图像外面,或者,Wx<=0, Hy<=0 */
/* 此时强制令彩色直方图为0 */
if ( ( x0 < 0 ) || (x0 >= W) || ( y0 < 0 ) || ( y0 >= H )
|| ( Wx <= 0 ) || ( Hy <= 0 ) ) return;
x_begin = x0 - Wx; /* 计算实际高宽和区域起始点 */
y_begin = y0 - Hy;
if ( x_begin < 0 ) x_begin = 0;
if ( y_begin < 0 ) y_begin = 0;
x_end = x0 + Wx;
y_end = y0 + Hy;
if ( x_end >= W ) x_end = W-1;
if ( y_end >= H ) y_end = H-1;
a2 = Wx*Wx+Hy*Hy; /* 计算核函数半径平方a^2 */
f = 0.0; /* 归一化系数 */
for ( y = y_begin; y <= y_end; y++ )
for ( x = x_begin; x <= x_end; x++ )
{
r = image[(y*W+x)*3] >> R_SHIFT; /* 计算直方图 */
g = image[(y*W+x)*3+1] >> G_SHIFT; /*移位位数根据R、G、B条数 */
b = image[(y*W+x)*3+2] >> B_SHIFT;
index = r * G_BIN * B_BIN + g * B_BIN + b;
r2 = (float)(((y-y0)*(y-y0)+(x-x0)*(x-x0))*1.0/a2); /* 计算半径平方r^2 */
k = 1 - r2; /* 核函数k(r) = 1-r^2, |r| < 1; 其他值 k(r) = 0 */
f = f + k;
ColorHist[index] = ColorHist[index] + k; /* 计算核密度加权彩色直方图 */
}
for ( i = 0; i < bins; i++ ) /* 归一化直方图 */
ColorHist[i] = ColorHist[i]/f;
return;
}
/*
计算Bhattacharyya系数
输入参数:
float * p, * q: 两个彩色直方图密度估计
int bins: 直方图条数
返回值:
Bhattacharyya系数
*/
float CalcuBhattacharyya( float * p, float * q, int bins )
{
int i;
float rho;
rho = 0.0;
for ( i = 0; i < bins; i++ )
rho = (float)(rho + sqrt( p[i]*q[i] ));
return( rho );
}
/*# define RECIP_SIGMA 3.98942280401 / * 1/(sqrt(2*pi)*sigma), 这里sigma = 0.1 * /*/
# define SIGMA2 0.02 /* 2*sigma^2, 这里sigma = 0.1 */
float CalcuWeightedPi( float rho )
{
float pi_n, d2;
d2 = 1 - rho;
//pi_n = (float)(RECIP_SIGMA * exp( - d2/SIGMA2 ));
pi_n = (float)(exp( - d2/SIGMA2 ));
return( pi_n );
}
/*
采用Park and Miller方法产生[0,1]之间均匀分布的伪随机数
算法详细描述见:
[1] NUMERICAL RECIPES IN C: THE ART OF SCIENTIFIC COMPUTING.
Cambridge University Press. 1992. pp.278-279.
[2] Park, S.K., and Miller, K.W. 1988, Communications of the ACM,
vol. 31, pp. 1192–1201.
*/
float ran0(long *idum)
{
long k;
float ans;
/* *idum ^= MASK;*/ /* XORing with MASK allows use of zero and other */
k=(*idum)/IQ; /* simple bit patterns for idum. */
*idum=IA*(*idum-k*IQ)-IR*k; /* Compute idum=(IA*idum) % IM without over- */
if (*idum < 0) *idum += IM; /* flows by Schrage’s method. */
ans=AM*(*idum); /* Convert idum to a floating result. */
/* *idum ^= MASK;*/ /* Unmask before return. */
return ans;
}
/*
获得一个[0,1]之间均匀分布的随机数
*/
float rand0_1()
{
return( ran0( &ran_seed ) );
}
/*
获得一个x - N(u,sigma)Gaussian分布的随机数
*/
float randGaussian( float u, float sigma )
{
float x1, x2, v1, v2;
float s = 100.0;
float y;
/*
使用筛选法产生正态分布N(0,1)的随机数(Box-Mulles方法)
1. 产生[0,1]上均匀随机变量X1,X2
2. 计算V1=2*X1-1,V2=2*X2-1,s=V1^2+V2^2
3. 若s<=1,转向步骤4,否则转1
4. 计算A=(-2ln(s)/s)^(1/2),y1=V1*A, y2=V2*A
y1,y2为N(0,1)随机变量
*/
while ( s > 1.0 )
{
x1 = rand0_1();
x2 = rand0_1();
v1 = 2 * x1 - 1;
v2 = 2 * x2 - 1;
s = v1*v1 + v2*v2;
}
y = (float)(sqrt( -2.0 * log(s)/s ) * v1);
/*
根据公式
z = sigma * y + u
将y变量转换成N(u,sigma)分布
*/
return( sigma * y + u );
}
/*
初始化系统
int x0, y0: 初始给定的图像目标区域坐标
int Wx, Hy: 目标的半宽高
unsigned char * img:图像数据,RGB形式
int W, H: 图像宽高
*/
int Initialize( int x0, int y0, int Wx, int Hy,
unsigned char * img, int W, int H )
{
int i, j;
float rn[7];
set_seed( 0 ); /* 使用系统时钟作为种子,这个函数在 */
/* 系统初始化时候要调用一次,且仅调用1次 */
//NParticle = 75; /* 采样粒子个数 */
//Pi_Thres = (float)0.90; /* 设置权重阈值 */
states = new SPACESTATE [NParticle]; /* 申请状态数组的空间 */
if ( states == NULL ) return( -2 );
weights = new float [NParticle]; /* 申请粒子权重数组的空间 */
if ( weights == NULL ) return( -3 );
nbin = R_BIN * G_BIN * B_BIN; /* 确定直方图条数 */
ModelHist = new float [nbin]; /* 申请直方图内存 */
if ( ModelHist == NULL ) return( -1 );
/* 计算目标模板直方图 */
CalcuColorHistogram( x0, y0, Wx, Hy, img, W, H, ModelHist, nbin );
/* 初始化粒子状态(以(x0,y0,1,1,Wx,Hy,0.1)为中心呈N(0,0.4)正态分布) */
states[0].xt = x0;
states[0].yt = y0;
states[0].v_xt = (float)0.0; // 1.0
states[0].v_yt = (float)0.0; // 1.0
states[0].Hxt = Wx;
states[0].Hyt = Hy;
states[0].at_dot = (float)0.0; // 0.1
weights[0] = (float)(1.0/NParticle); /* 0.9; */
for ( i = 1; i < NParticle; i++ )
{
for ( j = 0; j < 7; j++ ) rn[j] = randGaussian( 0, (float)0.6 ); /* 产生7个随机高斯分布的数 */
states[i].xt = (int)( states[0].xt + rn[0] * Wx );
states[i].yt = (int)( states[0].yt + rn[1] * Hy );
states[i].v_xt = (float)( states[0].v_xt + rn[2] * VELOCITY_DISTURB );
states[i].v_yt = (float)( states[0].v_yt + rn[3] * VELOCITY_DISTURB );
states[i].Hxt = (int)( states[0].Hxt + rn[4] * SCALE_DISTURB );
states[i].Hyt = (int)( states[0].Hyt + rn[5] * SCALE_DISTURB );
states[i].at_dot = (float)( states[0].at_dot + rn[6] * SCALE_CHANGE_D );
/* 权重统一为1/N,让每个粒子有相等的机会 */
weights[i] = (float)(1.0/NParticle);
}
return( 1 );
}
/*
计算归一化累计概率c'_i
输入参数:
float * weight: 为一个有N个权重(概率)的数组
int N: 数组元素个数
输出参数:
float * cumulateWeight: 为一个有N+1个累计权重的数组,
cumulateWeight[0] = 0;
*/
void NormalizeCumulatedWeight( float * weight, float * cumulateWeight, int N )
{
int i;
for ( i = 0; i < N+1; i++ )
cumulateWeight[i] = 0;
for ( i = 0; i < N; i++ )
cumulateWeight[i+1] = cumulateWeight[i] + weight[i];
for ( i = 0; i < N+1; i++ )
cumulateWeight[i] = cumulateWeight[i]/ cumulateWeight
;
return;
}
/*
折半查找,在数组NCumuWeight
中寻找一个最小的j,使得
NCumuWeight[j] <=v
float v: 一个给定的随机数
float * NCumuWeight: 权重数组
int N: 数组维数
返回值:
数组下标序号
*/
int BinearySearch( float v, float * NCumuWeight, int N )
{
int l, r, m;
l = 0; r = N-1; /* extreme left and extreme right components' indexes */
while ( r >= l)
{
m = (l+r)/2;
if ( v >= NCumuWeight[m] && v < NCumuWeight[m+1] ) return( m );
if ( v < NCumuWeight[m] ) r = m - 1;
else l = m + 1;
}
return( 0 );
}
/*
重新进行重要性采样
输入参数:
float * c: 对应样本权重数组pi(n)
int N: 权重数组、重采样索引数组元素个数
输出参数:
int * ResampleIndex:重采样索引数组
*/
void ImportanceSampling( float * c, int * ResampleIndex, int N )
{
float rnum, * cumulateWeight;
int i, j;
cumulateWeight = new float [N+1]; /* 申请累计权重数组内存,大小为N+1 */
NormalizeCumulatedWeight( c, cumulateWeight, N ); /* 计算累计权重 */
for ( i = 0; i < N; i++ )
{
rnum = rand0_1(); /* 随机产生一个[0,1]间均匀分布的数 */
j = BinearySearch( rnum, cumulateWeight, N+1 ); /* 搜索<=rnum的最小索引j */
if ( j == N ) j--;
ResampleIndex[i] = j; /* 放入重采样索引数组 */
}
delete cumulateWeight;
return;
}
/*
样本选择,从N个输入样本中根据权重重新挑选出N个
输入参数:
SPACESTATE * state: 原始样本集合(共N个)
float * weight: N个原始样本对应的权重
int N: 样本个数
输出参数:
SPACESTATE * state: 更新过的样本集
*/
void ReSelect( SPACESTATE * state, float * weight, int N )
{
SPACESTATE * tmpState;
int i, * rsIdx;
tmpState = new SPACESTATE
;
rsIdx = new int
;
ImportanceSampling( weight, rsIdx, N ); /* 根据权重重新采样 */
for ( i = 0; i < N; i++ )
tmpState[i] = state[rsIdx[i]];//temState为临时变量,其中state[i]用state[rsIdx[i]]来代替
for ( i = 0; i < N; i++ )
state[i] = tmpState[i];
delete[] tmpState;
delete[] rsIdx;
return;
}
/*
传播:根据系统状态方程求取状态预测量
状态方程为: S(t) = A S(t-1) + W(t-1)
W(t-1)为高斯噪声
输入参数:
SPACESTATE * state: 待求的状态量数组
int N: 待求状态个数
输出参数:
SPACESTATE * state: 更新后的预测状态量数组
*/
void Propagate( SPACESTATE * state, int N)
{
int i;
int j;
float rn[7];
/* 对每一个状态向量state[i](共N个)进行更新 */
for ( i = 0; i < N; i++ ) /* 加入均值为0的随机高斯噪声 */
{
for ( j = 0; j < 7; j++ ) rn[j] = randGaussian( 0, (float)0.6 ); /* 产生7个随机高斯分布的数 */
state[i].xt = (int)(state[i].xt + state[i].v_xt * DELTA_T + rn[0] * state[i].Hxt + 0.5);
state[i].yt = (int)(state[i].yt + state[i].v_yt * DELTA_T + rn[1] * state[i].Hyt + 0.5);
state[i].v_xt = (float)(state[i].v_xt + rn[2] * VELOCITY_DISTURB);
state[i].v_yt = (float)(state[i].v_yt + rn[3] * VELOCITY_DISTURB);
state[i].Hxt = (int)(state[i].Hxt+state[i].Hxt*state[i].at_dot + rn[4] * SCALE_DISTURB + 0.5);
state[i].Hyt = (int)(state[i].Hyt+state[i].Hyt*state[i].at_dot + rn[5] * SCALE_DISTURB + 0.5);
state[i].at_dot = (float)(state[i].at_dot + rn[6] * SCALE_CHANGE_D);
cvCircle(pTrackImg,cvPoint(state[i].xt,state[i].yt),3, CV_RGB(0,255,0),-1);
}
return;
}
/*
观测,根据状态集合St中的每一个采样,观测直方图,然后
更新估计量,获得新的权重概率
输入参数:
SPACESTATE * state: 状态量数组
int N: 状态量数组维数
unsigned char * image: 图像数据,按从左至右,从上至下的顺序扫描,
颜色排列次序:RGB, RGB, ...
int W, H: 图像的宽和高
float * ObjectHist: 目标直方图
int hbins: 目标直方图条数
输出参数:
float * weight: 更新后的权重
*/
void Observe( SPACESTATE * state, float * weight, int N,
unsigned char * image, int W, int H,
float * ObjectHist, int hbins )
{
int i;
float * ColorHist;
float rho;
ColorHist = new float[hbins];
for ( i = 0; i < N; i++ )
{
/* (1) 计算彩色直方图分布 */
CalcuColorHistogram( state[i].xt, state[i].yt,state[i].Hxt, state[i].Hyt,
image, W, H, ColorHist, hbins );
/* (2) Bhattacharyya系数 */
rho = CalcuBhattacharyya( ColorHist, ObjectHist, hbins );
/* (3) 根据计算得的Bhattacharyya系数计算各个权重值 */
weight[i] = CalcuWeightedPi( rho );
}
delete ColorHist;
return;
}
/*
估计,根据权重,估计一个状态量作为跟踪输出
输入参数:
SPACESTATE * state: 状态量数组
float * weight: 对应权重
int N: 状态量数组维数
输出参数:
SPACESTATE * EstState: 估计出的状态量
*/
void Estimation( SPACESTATE * state, float * weight, int N,
SPACESTATE & EstState )
{
int i;
float at_dot, Hxt, Hyt, v_xt, v_yt, xt, yt;
float weight_sum;
at_dot = 0;
Hxt = 0; Hyt = 0;
v_xt = 0; v_yt = 0;
xt = 0; yt = 0;
weight_sum = 0;
for ( i = 0; i < N; i++ ) /* 求和 */
{
at_dot += state[i].at_dot * weight[i];
Hxt += state[i].Hxt * weight[i];
Hyt += state[i].Hyt * weight[i];
v_xt += state[i].v_xt * weight[i];
v_yt += state[i].v_yt * weight[i];
xt += state[i].xt * weight[i];
yt += state[i].yt * weight[i];
weight_sum += weight[i];
}
/* 求平均 */
if ( weight_sum <= 0 ) weight_sum = 1; /* 防止被0除,一般不会发生 */
EstState.at_dot = at_dot/weight_sum;
EstState.Hxt = (int)(Hxt/weight_sum + 0.5 );
EstState.Hyt = (int)(Hyt/weight_sum + 0.5 );
EstState.v_xt = v_xt/weight_sum;
EstState.v_yt = v_yt/weight_sum;
EstState.xt = (int)(xt/weight_sum + 0.5 );
EstState.yt = (int)(yt/weight_sum + 0.5 );
return;
}
/************************************************************
模型更新
输入参数:
SPACESTATE EstState: 状态量的估计值
float * TargetHist: 目标直方图
int bins: 直方图条数
float PiT: 阈值(权重阈值)
unsigned char * img: 图像数据,RGB形式
int W, H: 图像宽高
输出:
float * TargetHist: 更新的目标直方图
************************************************************/
# define ALPHA_COEFFICIENT 0.2 /* 目标模型更新权重取0.1-0.3 */
int ModelUpdate( SPACESTATE EstState, float * TargetHist, int bins, float PiT,
unsigned char * img, int W, int H )
{
float * EstHist, Bha, Pi_E;
int i, rvalue = -1;
EstHist = new float [bins];
/* (1)在估计值处计算目标直方图 */
CalcuColorHistogram( EstState.xt, EstState.yt, EstState.Hxt,
EstState.Hyt, img, W, H, EstHist, bins );
/* (2)计算Bhattacharyya系数 */
Bha = CalcuBhattacharyya( EstHist, TargetHist, bins );
/* (3)计算概率权重 */
Pi_E = CalcuWeightedPi( Bha );
if ( Pi_E > PiT )
{
for ( i = 0; i < bins; i++ )
{
TargetHist[i] = (float)((1.0 - ALPHA_COEFFICIENT) * TargetHist[i]
+ ALPHA_COEFFICIENT * EstHist[i]);
}
rvalue = 1;
}
delete EstHist;
return( rvalue );
}
/*
系统清除
*/
void ClearAll()
{
if ( ModelHist != NULL ) delete [] ModelHist;
if ( states != NULL ) delete [] states;
if ( weights != NULL ) delete [] weights;
return;
}
/**********************************************************************
基于彩色直方图的粒子滤波算法总流程
输入参数:
unsigned char * img: 图像数据,RGB形式
int W, H: 图像宽高
输出参数:
int &xc, &yc: 找到的图像目标区域中心坐标
int &Wx_h, &Hy_h: 找到的目标的半宽高
float &max_weight: 最大权重值
返回值:
成功1,否则-1
基于彩色直方图的粒子滤波跟踪算法的完整使用方法为:
(1)读取彩色视频中的1帧,并确定初始区域,以此获得该区域的中心点、
目标的半高、宽,和图像数组(RGB形式)、图像高宽参数。
采用初始化函数进行初始化
int Initialize( int x0, int y0, int Wx, int Hy,
unsigned char * img, int W, int H )
(2)循环调用下面函数,直到N帧图像结束
int ColorParticleTracking( unsigned char * image, int W, int H,
int & xc, int & yc, int & Wx_h, int & Hy_h )
每次调用的输出为:目标中心坐标和目标的半高宽
如果函数返回值<0,则表明目标丢失。
(3)清除系统各个变量,结束跟踪
void ClearAll()
**********************************************************************/
int ColorParticleTracking( unsigned char * image, int W, int H,
int & xc, int & yc, int & Wx_h, int & Hy_h,
float & max_weight)
{
SPACESTATE EState;
int i;
/* 选择:选择样本,并进行重采样 */
ReSelect( states, weights, NParticle );
/* 传播:采样状态方程,对状态变量进行预测 */
Propagate( states, NParticle);
/* 观测:对状态量进行更新 */
Observe( states, weights, NParticle, image, W, H,
ModelHist, nbin );
/* 估计:对状态量进行估计,提取位置量 */
Estimation( states, weights, NParticle, EState );
xc = EState.xt;
yc = EState.yt;
Wx_h = EState.Hxt;
Hy_h = EState.Hyt;
/* 模型更新 */
ModelUpdate( EState, ModelHist, nbin, Pi_Thres, image, W, H );
/* 计算最大权重值 */
max_weight = weights[0];
for ( i = 1; i < NParticle; i++ )
max_weight = max_weight < weights[i] ? weights[i] : max_weight;
/* 进行合法性检验,不合法返回-1 */
if ( xc < 0 || yc < 0 || xc >= W || yc >= H ||
Wx_h <= 0 || Hy_h <= 0 ) return( -1 );
else
return( 1 );
}
//把iplimage 转到img 数组中,BGR->RGB
void IplToImge(IplImage* src, int w,int h)
{
int i,j;
for ( j = 0; j < h; j++ ) // 转成正向图像
for ( i = 0; i < w; i++ )
{
img[ ( j*w+i )*3 ] = R(src,i,j);
img[ ( j*w+i )*3+1 ] = G(src,i,j);
img[ ( j*w+i )*3+2 ] = B(src,i,j);
}
}
void mouseHandler(int event, int x, int y, int flags, void* param)//在这里要注意到要再次调用cvShowImage,才能显示方框
{
CvMemStorage* storage = cvCreateMemStorage(0);
CvSeq * contours;
IplImage* pFrontImg1 = 0;
int centerX,centerY;
int delt = 10;
pFrontImg1=cvCloneImage(pFrontImg);//这里也要注意到如果在 cvShowImage("foreground",pFrontImg1)中用pFrontImg产效果,得重新定义并复制
switch(event){
case CV_EVENT_LBUTTONDOWN:
//printf("laskjfkoasfl\n");
//寻找轮廓
if(pause)
{
cvFindContours(pFrontImg,storage,&contours,sizeof(CvContour),CV_RETR_EXTERNAL,
CV_CHAIN_APPROX_SIMPLE);
//在原场景中绘制目标轮廓的外接矩形
for (;contours;contours = contours->h_next)
{
CvRect r = ((CvContour*)contours)->rect;
if(x>r.x&&x<(r.x+r.width)&&y>r.y&&r.y<(r.y+r.height))
{
if (r.height*r.width>CONTOUR_MIN_AREA && r.height*r.width<CONTOUR_MAX_AREA)
{
centerX = r.x+r.width/2;//得到目标中心点
centerY = r.y+r.height/2;
WidIn = r.width/2;//得到目标半宽与半高
HeiIn = r.height/2;
xin = centerX;
yin = centerY;
cvRectangle(pFrontImg1,cvPoint(r.x,r.y),cvPoint(r.x+r.width,r.y+r.height),cvScalar(255,255,255),2,8,0);
//Initial_MeanShift_tracker(centerX,centerY,WidIn,HeiIn,img,Wid,Hei,1./delt); //初始化跟踪变量
/* 初始化跟踪器 */
Initialize( centerX, centerY, WidIn, HeiIn, img, Wid, Hei );
track = true;//进行跟踪
cvShowImage("foreground",pFrontImg1);
return;
}
}
}
}
break;
case CV_EVENT_LBUTTONUP:
printf("Left button up\n");
break;
}
}
//void on_mouse(int event, int x, int y, int flags, void *param)
//{
// if(!image)
// return ;
// if(image->origin)
// {
// image->origin = 0;
// y = image->height - y;
// }
// if(selecting) //正在选择物体
// {
// selection.x = MIN(x,origin.x);
// selection.y = MIN(y,origin.y);
// selection.width = selection.x + CV_IABS(x - origin.x);
// selection.height = selection.y + CV_IABS(y - origin.y);
//
// selection.x = MAX(selection.x ,0);
// selection.y = MAX(selection.y,0);
// selection.width = MIN(selection.width,image->width);
// selection.height = MIN(selection.height,image->height);
// selection.width -= selection.x;
// selection.height -= selection.y;
// }
// switch(event)
// {
// case CV_EVENT_LBUTTONDOWN:
// origin = cvPoint(x,y);
// selection = cvRect(x,y,0,0);
// selecting = 1;
// break;
// case CV_EVENT_LBUTTONUP:
// selecting = 0;
// if(selection.width >0 && selection.height >0)
// selected = 1;
// break;
// }
//}
void main()
{
int FrameNum=0; //帧号
int k=0;
CvCapture *capture = cvCreateFileCapture("test.avi");
char res1[20],res2[20];
//CvCapture *capture = cvCreateFileCapture("test1.avi");
//CvCapture *capture = cvCreateFileCapture("camera1_mov.avi");
IplImage* frame[Num]; //用来存放图像
int i,j;
uchar key = false; //用来设置暂停
float rho_v;//表示相似度
float max_weight;
int sum=0; //用来存放两图像帧差后的值
for (i=0;i<Num;i++)
{
frame[i]=NULL;
}
IplImage *curFrameGray=NULL;
IplImage *frameGray=NULL;
CvMat *Mat_D,*Mat_F; //动态矩阵与帧差后矩阵
int row ,col;
cvNamedWindow("video",1);
cvNamedWindow("background",1);
cvNamedWindow("foreground",1);
cvNamedWindow("tracking",1);
cvSetMouseCallback("tracking",mouseHandler,0);//响应鼠标
while (capture)
{
curframe=cvQueryFrame(capture); //抓取一帧
if(FrameNum<Num)
{
if(FrameNum==0)//第一帧时初始化过程
{
curFrameGray=cvCreateImage(cvGetSize(curframe),IPL_DEPTH_8U,1);
frameGray=cvCreateImage(cvGetSize(curframe),IPL_DEPTH_8U,1);
pBackImg=cvCreateImage(cvGetSize(curframe),IPL_DEPTH_8U,1);
pFrontImg=cvCreateImage(cvGetSize(curframe),IPL_DEPTH_8U,1);
pTrackImg = cvCreateImage(cvGetSize(curframe),IPL_DEPTH_8U,3);
cvSetZero(pFrontImg);
cvCvtColor(curframe,pBackImg,CV_RGB2GRAY);
row=curframe->height;
col=curframe->width;
Mat_D=cvCreateMat(row,col,CV_32FC1);
cvSetZero(Mat_D);
Mat_F=cvCreateMat(row,col,CV_32FC1);
cvSetZero(Mat_F);
Wid = curframe->width;
Hei = curframe->height;
img = new unsigned char [Wid * Hei * 3];
}
frame[k]=cvCloneImage(curframe); //把前num帧存入到图像数组
pTrackImg = cvCloneImage(curframe);
}
else
{
k=FrameNum%Num;
pTrackImg = cvCloneImage(curframe);
IplToImge(curframe,Wid,Hei);
cvCvtColor(curframe,curFrameGray,CV_RGB2GRAY);
cvCvtColor(frame[k],frameGray,CV_RGB2GRAY);
for(i=0;i<curframe->height;i++)
for(j=0;j<curframe->width;j++)
{
sum=S(curFrameGray,j,i)-S(frameGray,j,i);
sum=sum<0 ? -sum : sum;
if(sum>T) //文献中公式(1)
{
CV_MAT_ELEM(*Mat_F,float,i,j)=1;
}
else
{
CV_MAT_ELEM(*Mat_F,float,i,j)=0;
}
if(CV_MAT_ELEM(*Mat_F,float,i,j)!=0)//文献中公式(2)
CV_MAT_ELEM(*Mat_D,float,i,j)=Re;
else{
if(CV_MAT_ELEM(*Mat_D,float,i,j)!=0)
CV_MAT_ELEM(*Mat_D,float,i,j)=CV_MAT_ELEM(*Mat_D,float,i,j)-1;
}
if(CV_MAT_ELEM(*Mat_D,float,i,j)==0.0)
{
//文献中公式(3)
S(pBackImg,j,i)=(uchar)((1-ai)*S(pBackImg,j,i)+ai*S(curFrameGray,j,i));
}
sum=S(curFrameGray,j,i)-S(pBackImg,j,i);//背景差分法
sum=sum<0 ? -sum : sum;
if(sum>40)
{
S(pFrontImg,j,i)=255;
}
else
S(pFrontImg,j,i)=0;
}
frame[k]=cvCloneImage(curframe);
}
FrameNum++;
k++;
cout<<FrameNum<<endl;
//进行形态学滤波,去噪
cvDilate(pFrontImg, pFrontImg, 0, 2);
cvErode(pFrontImg, pFrontImg, 0, 3);
cvDilate(pFrontImg, pFrontImg, 0, 1);
if(track)
{
/* 跟踪一帧 */
rho_v = ColorParticleTracking( img, Wid, Hei, xout, yout, WidOut, HeiOut, max_weight);
/* 画框: 新位置为蓝框 */
if ( rho_v > 0 && max_weight > 0.0001 ) /* 判断是否目标丢失 */
{
cvRectangle(pFrontImg,cvPoint(xout - WidOut,yout - HeiOut),cvPoint(xout+WidOut,yout+HeiOut),cvScalar(255,255,255),2,8,0);
cvRectangle(pTrackImg,cvPoint(xout - WidOut,yout - HeiOut),cvPoint(xout+WidOut,yout+HeiOut),cvScalar(255,255,255),2,8,0);
xin = xout; yin = yout;
WidIn = WidOut; HeiIn = HeiOut;
/*draw_rectangle( pBuffer, Width, Height, xo, Height-yo-1, wo, ho, 0x00ff0000, 2 );
xb = xo; yb = yo;
wb = wo; hb = ho;*/
}
}
cvShowImage("video",curframe);
cvShowImage("foreground",pFrontImg);
cvShowImage("background",pBackImg);
cvShowImage("tracking",pTrackImg);
/*sprintf(res1,"fore%d.jpg",FrameNum);
cvSaveImage(res1,pFrontImg);
sprintf(res2,"ground%d.jpg",FrameNum);
cvSaveImage(res2,pBackImg);*/
cvSetMouseCallback("foreground",mouseHandler,0);//响应鼠标
key = cvWaitKey(1);
if(key == 'p') pause = true;
while(pause)
if(cvWaitKey(0)=='p')
pause = false;
}
cvReleaseImage(&curFrameGray);
cvReleaseImage(&frameGray);
cvReleaseImage(&pBackImg);
cvReleaseImage(&pFrontImg);
cvDestroyAllWindows();
// Clear_MeanShift_tracker();
ClearAll();
}
实验结果:
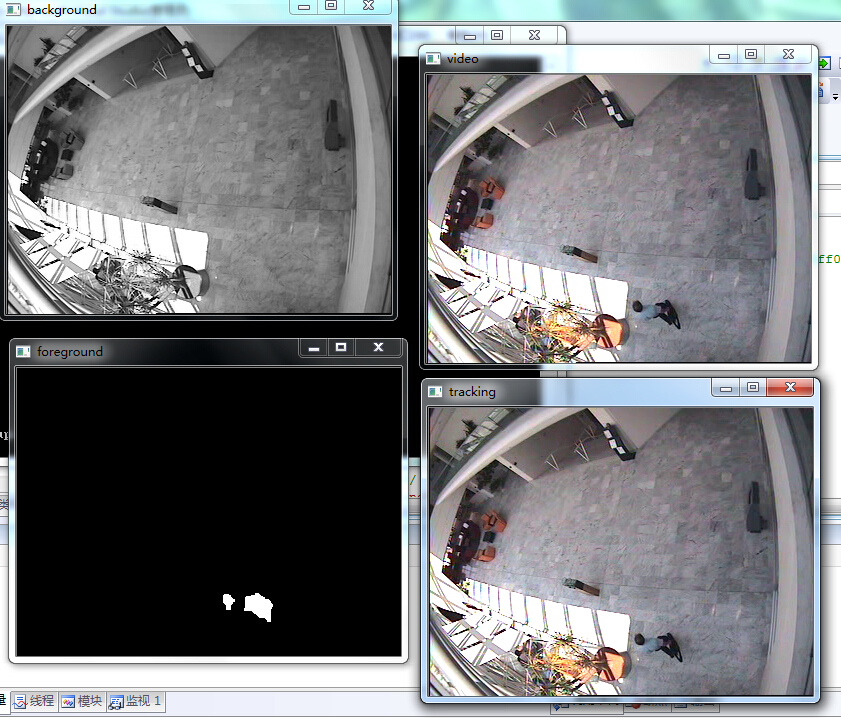
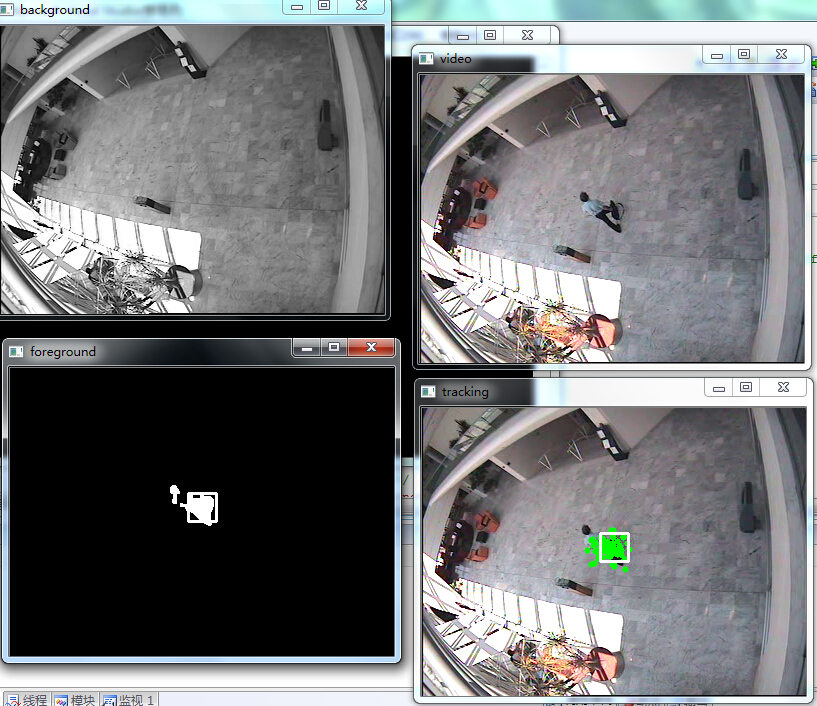
自此,毕业论文涉及的经典算法已经全部给出,我自己提出的破算法就不献丑了。
马上去华为上班咯,可能搞通信去了,破企业网部门,唉
如果周末有空的话,我还是会继续搞图像处理的,这次下了不少人脸美化、超分辨率修正的论文,得好好读读。
另外打个广告,我毕业前自己弄得android app《色盲相机》,下载地址:
木蚂蚁:http://www.mumayi.com/android-631836.html
360: http://zhushou.360.cn/detail/index/soft_id/1780912
网易: http://m.163.com/android/software/32jkam.html
核心思想来自斯坦福大学的课程设计及一个日本老头公开的matlab代码
有空大家给我点点广告哈~~
推荐大家看论文《An adaptive color-based particle filter》
这次我直接截图我的硕士毕业论文的第二章的一部分,应该讲得比较详细了。最后给出我当时在pudn找到的最适合学习的实现代码
代码实现:
运行方式:按P停止,在前景窗口鼠标点击目标,会自动生成外接矩形,再次按P,对该选定目标进行跟踪。
[cpp] view
plain copy
// TwoLevel.cpp : 定义控制台应用程序的入口点。
//
/************************************************************************/
/*参考文献real-time Multiple Objects Tracking with Occlusion Handling in Dynamic Scenes */
/************************************************************************/
#include "stdafx.h"
#include <cv.h>
#include <cxcore.h>
#include <highgui.h>
#include <math.h>
# include <time.h>
#include <iostream>
using namespace std;
#define B(image,x,y) ((uchar*)(image->imageData + image->widthStep*(y)))[(x)*3] //B
#define G(image,x,y) ((uchar*)(image->imageData + image->widthStep*(y)))[(x)*3+1] //G
#define R(image,x,y) ((uchar*)(image->imageData + image->widthStep*(y)))[(x)*3+2] //R
#define S(image,x,y) ((uchar*)(image->imageData + image->widthStep*(y)))[(x)]
#define Num 10 //帧差的间隔
#define T 40 //Tf
#define Re 30 //
#define ai 0.08 //学习率
#define CONTOUR_MAX_AREA 10000
#define CONTOUR_MIN_AREA 50
# define R_BIN 8 /* 红色分量的直方图条数 */
# define G_BIN 8 /* 绿色分量的直方图条数 */
# define B_BIN 8 /* 兰色分量的直方图条数 */
# define R_SHIFT 5 /* 与上述直方图条数对应 */
# define G_SHIFT 5 /* 的R、G、B分量左移位数 */
# define B_SHIFT 5 /* log2( 256/8 )为移动位数 */
/*
采用Park and Miller方法产生[0,1]之间均匀分布的伪随机数
算法详细描述见:
[1] NUMERICAL RECIPES IN C: THE ART OF SCIENTIFIC COMPUTING.
Cambridge University Press. 1992. pp.278-279.
[2] Park, S.K., and Miller, K.W. 1988, Communications of the ACM,
vol. 31, pp. 1192–1201.
*/
#define IA 16807
#define IM 2147483647
#define AM (1.0/IM)
#define IQ 127773
#define IR 2836
#define MASK 123459876
typedef struct __SpaceState { /* 状态空间变量 */
int xt; /* x坐标位置 */
int yt; /* x坐标位置 */
float v_xt; /* x方向运动速度 */
float v_yt; /* y方向运动速度 */
int Hxt; /* x方向半窗宽 */
int Hyt; /* y方向半窗宽 */
float at_dot; /* 尺度变换速度 */
} SPACESTATE;
bool pause=false;//是否暂停
bool track = false;//是否跟踪
IplImage *curframe=NULL;
IplImage *pBackImg=NULL;
IplImage *pFrontImg=NULL;
IplImage *pTrackImg =NULL;
unsigned char * img;//把iplimg改到char* 便于计算
int xin,yin;//跟踪时输入的中心点
int xout,yout;//跟踪时得到的输出中心点
int Wid,Hei;//图像的大小
int WidIn,HeiIn;//输入的半宽与半高
int WidOut,HeiOut;//输出的半宽与半高
long ran_seed = 802163120; /* 随机数种子,为全局变量,设置缺省值 */
float DELTA_T = (float)0.05; /* 帧频,可以为30,25,15,10等 */
int POSITION_DISTURB = 15; /* 位置扰动幅度 */
float VELOCITY_DISTURB = 40.0; /* 速度扰动幅值 */
float SCALE_DISTURB = 0.0; /* 窗宽高扰动幅度 */
float SCALE_CHANGE_D = (float)0.001; /* 尺度变换速度扰动幅度 */
int NParticle = 75; /* 粒子个数 */
float * ModelHist = NULL; /* 模型直方图 */
SPACESTATE * states = NULL; /* 状态数组 */
float * weights = NULL; /* 每个粒子的权重 */
int nbin; /* 直方图条数 */
float Pi_Thres = (float)0.90; /* 权重阈值 */
float Weight_Thres = (float)0.0001; /* 最大权重阈值,用来判断是否目标丢失 */
/*
设置种子数
一般利用系统时间来进行设置,也可以直接传入一个long型整数
*/
long set_seed( long setvalue )
{
if ( setvalue != 0 ) /* 如果传入的参数setvalue!=0,设置该数为种子 */
ran_seed = setvalue;
else /* 否则,利用系统时间为种子数 */
{
ran_seed = time(NULL);
}
return( ran_seed );
}
/*
计算一幅图像中某个区域的彩色直方图分布
输入参数:
int x0, y0: 指定图像区域的中心点
int Wx, Hy: 指定图像区域的半宽和半高
unsigned char * image:图像数据,按从左至右,从上至下的顺序扫描,
颜色排列次序:RGB, RGB, ...
(或者:YUV, YUV, ...)
int W, H: 图像的宽和高
输出参数:
float * ColorHist: 彩色直方图,颜色索引按:
i = r * G_BIN * B_BIN + g * B_BIN + b排列
int bins: 彩色直方图的条数R_BIN*G_BIN*B_BIN(这里取8x8x8=512)
*/
void CalcuColorHistogram( int x0, int y0, int Wx, int Hy,
unsigned char * image, int W, int H,
float * ColorHist, int bins )
{
int x_begin, y_begin; /* 指定图像区域的左上角坐标 */
int y_end, x_end;
int x, y, i, index;
int r, g, b;
float k, r2, f;
int a2;
for ( i = 0; i < bins; i++ ) /* 直方图各个值赋0 */
ColorHist[i] = 0.0;
/* 考虑特殊情况:x0, y0在图像外面,或者,Wx<=0, Hy<=0 */
/* 此时强制令彩色直方图为0 */
if ( ( x0 < 0 ) || (x0 >= W) || ( y0 < 0 ) || ( y0 >= H )
|| ( Wx <= 0 ) || ( Hy <= 0 ) ) return;
x_begin = x0 - Wx; /* 计算实际高宽和区域起始点 */
y_begin = y0 - Hy;
if ( x_begin < 0 ) x_begin = 0;
if ( y_begin < 0 ) y_begin = 0;
x_end = x0 + Wx;
y_end = y0 + Hy;
if ( x_end >= W ) x_end = W-1;
if ( y_end >= H ) y_end = H-1;
a2 = Wx*Wx+Hy*Hy; /* 计算核函数半径平方a^2 */
f = 0.0; /* 归一化系数 */
for ( y = y_begin; y <= y_end; y++ )
for ( x = x_begin; x <= x_end; x++ )
{
r = image[(y*W+x)*3] >> R_SHIFT; /* 计算直方图 */
g = image[(y*W+x)*3+1] >> G_SHIFT; /*移位位数根据R、G、B条数 */
b = image[(y*W+x)*3+2] >> B_SHIFT;
index = r * G_BIN * B_BIN + g * B_BIN + b;
r2 = (float)(((y-y0)*(y-y0)+(x-x0)*(x-x0))*1.0/a2); /* 计算半径平方r^2 */
k = 1 - r2; /* 核函数k(r) = 1-r^2, |r| < 1; 其他值 k(r) = 0 */
f = f + k;
ColorHist[index] = ColorHist[index] + k; /* 计算核密度加权彩色直方图 */
}
for ( i = 0; i < bins; i++ ) /* 归一化直方图 */
ColorHist[i] = ColorHist[i]/f;
return;
}
/*
计算Bhattacharyya系数
输入参数:
float * p, * q: 两个彩色直方图密度估计
int bins: 直方图条数
返回值:
Bhattacharyya系数
*/
float CalcuBhattacharyya( float * p, float * q, int bins )
{
int i;
float rho;
rho = 0.0;
for ( i = 0; i < bins; i++ )
rho = (float)(rho + sqrt( p[i]*q[i] ));
return( rho );
}
/*# define RECIP_SIGMA 3.98942280401 / * 1/(sqrt(2*pi)*sigma), 这里sigma = 0.1 * /*/
# define SIGMA2 0.02 /* 2*sigma^2, 这里sigma = 0.1 */
float CalcuWeightedPi( float rho )
{
float pi_n, d2;
d2 = 1 - rho;
//pi_n = (float)(RECIP_SIGMA * exp( - d2/SIGMA2 ));
pi_n = (float)(exp( - d2/SIGMA2 ));
return( pi_n );
}
/*
采用Park and Miller方法产生[0,1]之间均匀分布的伪随机数
算法详细描述见:
[1] NUMERICAL RECIPES IN C: THE ART OF SCIENTIFIC COMPUTING.
Cambridge University Press. 1992. pp.278-279.
[2] Park, S.K., and Miller, K.W. 1988, Communications of the ACM,
vol. 31, pp. 1192–1201.
*/
float ran0(long *idum)
{
long k;
float ans;
/* *idum ^= MASK;*/ /* XORing with MASK allows use of zero and other */
k=(*idum)/IQ; /* simple bit patterns for idum. */
*idum=IA*(*idum-k*IQ)-IR*k; /* Compute idum=(IA*idum) % IM without over- */
if (*idum < 0) *idum += IM; /* flows by Schrage’s method. */
ans=AM*(*idum); /* Convert idum to a floating result. */
/* *idum ^= MASK;*/ /* Unmask before return. */
return ans;
}
/*
获得一个[0,1]之间均匀分布的随机数
*/
float rand0_1()
{
return( ran0( &ran_seed ) );
}
/*
获得一个x - N(u,sigma)Gaussian分布的随机数
*/
float randGaussian( float u, float sigma )
{
float x1, x2, v1, v2;
float s = 100.0;
float y;
/*
使用筛选法产生正态分布N(0,1)的随机数(Box-Mulles方法)
1. 产生[0,1]上均匀随机变量X1,X2
2. 计算V1=2*X1-1,V2=2*X2-1,s=V1^2+V2^2
3. 若s<=1,转向步骤4,否则转1
4. 计算A=(-2ln(s)/s)^(1/2),y1=V1*A, y2=V2*A
y1,y2为N(0,1)随机变量
*/
while ( s > 1.0 )
{
x1 = rand0_1();
x2 = rand0_1();
v1 = 2 * x1 - 1;
v2 = 2 * x2 - 1;
s = v1*v1 + v2*v2;
}
y = (float)(sqrt( -2.0 * log(s)/s ) * v1);
/*
根据公式
z = sigma * y + u
将y变量转换成N(u,sigma)分布
*/
return( sigma * y + u );
}
/*
初始化系统
int x0, y0: 初始给定的图像目标区域坐标
int Wx, Hy: 目标的半宽高
unsigned char * img:图像数据,RGB形式
int W, H: 图像宽高
*/
int Initialize( int x0, int y0, int Wx, int Hy,
unsigned char * img, int W, int H )
{
int i, j;
float rn[7];
set_seed( 0 ); /* 使用系统时钟作为种子,这个函数在 */
/* 系统初始化时候要调用一次,且仅调用1次 */
//NParticle = 75; /* 采样粒子个数 */
//Pi_Thres = (float)0.90; /* 设置权重阈值 */
states = new SPACESTATE [NParticle]; /* 申请状态数组的空间 */
if ( states == NULL ) return( -2 );
weights = new float [NParticle]; /* 申请粒子权重数组的空间 */
if ( weights == NULL ) return( -3 );
nbin = R_BIN * G_BIN * B_BIN; /* 确定直方图条数 */
ModelHist = new float [nbin]; /* 申请直方图内存 */
if ( ModelHist == NULL ) return( -1 );
/* 计算目标模板直方图 */
CalcuColorHistogram( x0, y0, Wx, Hy, img, W, H, ModelHist, nbin );
/* 初始化粒子状态(以(x0,y0,1,1,Wx,Hy,0.1)为中心呈N(0,0.4)正态分布) */
states[0].xt = x0;
states[0].yt = y0;
states[0].v_xt = (float)0.0; // 1.0
states[0].v_yt = (float)0.0; // 1.0
states[0].Hxt = Wx;
states[0].Hyt = Hy;
states[0].at_dot = (float)0.0; // 0.1
weights[0] = (float)(1.0/NParticle); /* 0.9; */
for ( i = 1; i < NParticle; i++ )
{
for ( j = 0; j < 7; j++ ) rn[j] = randGaussian( 0, (float)0.6 ); /* 产生7个随机高斯分布的数 */
states[i].xt = (int)( states[0].xt + rn[0] * Wx );
states[i].yt = (int)( states[0].yt + rn[1] * Hy );
states[i].v_xt = (float)( states[0].v_xt + rn[2] * VELOCITY_DISTURB );
states[i].v_yt = (float)( states[0].v_yt + rn[3] * VELOCITY_DISTURB );
states[i].Hxt = (int)( states[0].Hxt + rn[4] * SCALE_DISTURB );
states[i].Hyt = (int)( states[0].Hyt + rn[5] * SCALE_DISTURB );
states[i].at_dot = (float)( states[0].at_dot + rn[6] * SCALE_CHANGE_D );
/* 权重统一为1/N,让每个粒子有相等的机会 */
weights[i] = (float)(1.0/NParticle);
}
return( 1 );
}
/*
计算归一化累计概率c'_i
输入参数:
float * weight: 为一个有N个权重(概率)的数组
int N: 数组元素个数
输出参数:
float * cumulateWeight: 为一个有N+1个累计权重的数组,
cumulateWeight[0] = 0;
*/
void NormalizeCumulatedWeight( float * weight, float * cumulateWeight, int N )
{
int i;
for ( i = 0; i < N+1; i++ )
cumulateWeight[i] = 0;
for ( i = 0; i < N; i++ )
cumulateWeight[i+1] = cumulateWeight[i] + weight[i];
for ( i = 0; i < N+1; i++ )
cumulateWeight[i] = cumulateWeight[i]/ cumulateWeight
;
return;
}
/*
折半查找,在数组NCumuWeight
中寻找一个最小的j,使得
NCumuWeight[j] <=v
float v: 一个给定的随机数
float * NCumuWeight: 权重数组
int N: 数组维数
返回值:
数组下标序号
*/
int BinearySearch( float v, float * NCumuWeight, int N )
{
int l, r, m;
l = 0; r = N-1; /* extreme left and extreme right components' indexes */
while ( r >= l)
{
m = (l+r)/2;
if ( v >= NCumuWeight[m] && v < NCumuWeight[m+1] ) return( m );
if ( v < NCumuWeight[m] ) r = m - 1;
else l = m + 1;
}
return( 0 );
}
/*
重新进行重要性采样
输入参数:
float * c: 对应样本权重数组pi(n)
int N: 权重数组、重采样索引数组元素个数
输出参数:
int * ResampleIndex:重采样索引数组
*/
void ImportanceSampling( float * c, int * ResampleIndex, int N )
{
float rnum, * cumulateWeight;
int i, j;
cumulateWeight = new float [N+1]; /* 申请累计权重数组内存,大小为N+1 */
NormalizeCumulatedWeight( c, cumulateWeight, N ); /* 计算累计权重 */
for ( i = 0; i < N; i++ )
{
rnum = rand0_1(); /* 随机产生一个[0,1]间均匀分布的数 */
j = BinearySearch( rnum, cumulateWeight, N+1 ); /* 搜索<=rnum的最小索引j */
if ( j == N ) j--;
ResampleIndex[i] = j; /* 放入重采样索引数组 */
}
delete cumulateWeight;
return;
}
/*
样本选择,从N个输入样本中根据权重重新挑选出N个
输入参数:
SPACESTATE * state: 原始样本集合(共N个)
float * weight: N个原始样本对应的权重
int N: 样本个数
输出参数:
SPACESTATE * state: 更新过的样本集
*/
void ReSelect( SPACESTATE * state, float * weight, int N )
{
SPACESTATE * tmpState;
int i, * rsIdx;
tmpState = new SPACESTATE
;
rsIdx = new int
;
ImportanceSampling( weight, rsIdx, N ); /* 根据权重重新采样 */
for ( i = 0; i < N; i++ )
tmpState[i] = state[rsIdx[i]];//temState为临时变量,其中state[i]用state[rsIdx[i]]来代替
for ( i = 0; i < N; i++ )
state[i] = tmpState[i];
delete[] tmpState;
delete[] rsIdx;
return;
}
/*
传播:根据系统状态方程求取状态预测量
状态方程为: S(t) = A S(t-1) + W(t-1)
W(t-1)为高斯噪声
输入参数:
SPACESTATE * state: 待求的状态量数组
int N: 待求状态个数
输出参数:
SPACESTATE * state: 更新后的预测状态量数组
*/
void Propagate( SPACESTATE * state, int N)
{
int i;
int j;
float rn[7];
/* 对每一个状态向量state[i](共N个)进行更新 */
for ( i = 0; i < N; i++ ) /* 加入均值为0的随机高斯噪声 */
{
for ( j = 0; j < 7; j++ ) rn[j] = randGaussian( 0, (float)0.6 ); /* 产生7个随机高斯分布的数 */
state[i].xt = (int)(state[i].xt + state[i].v_xt * DELTA_T + rn[0] * state[i].Hxt + 0.5);
state[i].yt = (int)(state[i].yt + state[i].v_yt * DELTA_T + rn[1] * state[i].Hyt + 0.5);
state[i].v_xt = (float)(state[i].v_xt + rn[2] * VELOCITY_DISTURB);
state[i].v_yt = (float)(state[i].v_yt + rn[3] * VELOCITY_DISTURB);
state[i].Hxt = (int)(state[i].Hxt+state[i].Hxt*state[i].at_dot + rn[4] * SCALE_DISTURB + 0.5);
state[i].Hyt = (int)(state[i].Hyt+state[i].Hyt*state[i].at_dot + rn[5] * SCALE_DISTURB + 0.5);
state[i].at_dot = (float)(state[i].at_dot + rn[6] * SCALE_CHANGE_D);
cvCircle(pTrackImg,cvPoint(state[i].xt,state[i].yt),3, CV_RGB(0,255,0),-1);
}
return;
}
/*
观测,根据状态集合St中的每一个采样,观测直方图,然后
更新估计量,获得新的权重概率
输入参数:
SPACESTATE * state: 状态量数组
int N: 状态量数组维数
unsigned char * image: 图像数据,按从左至右,从上至下的顺序扫描,
颜色排列次序:RGB, RGB, ...
int W, H: 图像的宽和高
float * ObjectHist: 目标直方图
int hbins: 目标直方图条数
输出参数:
float * weight: 更新后的权重
*/
void Observe( SPACESTATE * state, float * weight, int N,
unsigned char * image, int W, int H,
float * ObjectHist, int hbins )
{
int i;
float * ColorHist;
float rho;
ColorHist = new float[hbins];
for ( i = 0; i < N; i++ )
{
/* (1) 计算彩色直方图分布 */
CalcuColorHistogram( state[i].xt, state[i].yt,state[i].Hxt, state[i].Hyt,
image, W, H, ColorHist, hbins );
/* (2) Bhattacharyya系数 */
rho = CalcuBhattacharyya( ColorHist, ObjectHist, hbins );
/* (3) 根据计算得的Bhattacharyya系数计算各个权重值 */
weight[i] = CalcuWeightedPi( rho );
}
delete ColorHist;
return;
}
/*
估计,根据权重,估计一个状态量作为跟踪输出
输入参数:
SPACESTATE * state: 状态量数组
float * weight: 对应权重
int N: 状态量数组维数
输出参数:
SPACESTATE * EstState: 估计出的状态量
*/
void Estimation( SPACESTATE * state, float * weight, int N,
SPACESTATE & EstState )
{
int i;
float at_dot, Hxt, Hyt, v_xt, v_yt, xt, yt;
float weight_sum;
at_dot = 0;
Hxt = 0; Hyt = 0;
v_xt = 0; v_yt = 0;
xt = 0; yt = 0;
weight_sum = 0;
for ( i = 0; i < N; i++ ) /* 求和 */
{
at_dot += state[i].at_dot * weight[i];
Hxt += state[i].Hxt * weight[i];
Hyt += state[i].Hyt * weight[i];
v_xt += state[i].v_xt * weight[i];
v_yt += state[i].v_yt * weight[i];
xt += state[i].xt * weight[i];
yt += state[i].yt * weight[i];
weight_sum += weight[i];
}
/* 求平均 */
if ( weight_sum <= 0 ) weight_sum = 1; /* 防止被0除,一般不会发生 */
EstState.at_dot = at_dot/weight_sum;
EstState.Hxt = (int)(Hxt/weight_sum + 0.5 );
EstState.Hyt = (int)(Hyt/weight_sum + 0.5 );
EstState.v_xt = v_xt/weight_sum;
EstState.v_yt = v_yt/weight_sum;
EstState.xt = (int)(xt/weight_sum + 0.5 );
EstState.yt = (int)(yt/weight_sum + 0.5 );
return;
}
/************************************************************
模型更新
输入参数:
SPACESTATE EstState: 状态量的估计值
float * TargetHist: 目标直方图
int bins: 直方图条数
float PiT: 阈值(权重阈值)
unsigned char * img: 图像数据,RGB形式
int W, H: 图像宽高
输出:
float * TargetHist: 更新的目标直方图
************************************************************/
# define ALPHA_COEFFICIENT 0.2 /* 目标模型更新权重取0.1-0.3 */
int ModelUpdate( SPACESTATE EstState, float * TargetHist, int bins, float PiT,
unsigned char * img, int W, int H )
{
float * EstHist, Bha, Pi_E;
int i, rvalue = -1;
EstHist = new float [bins];
/* (1)在估计值处计算目标直方图 */
CalcuColorHistogram( EstState.xt, EstState.yt, EstState.Hxt,
EstState.Hyt, img, W, H, EstHist, bins );
/* (2)计算Bhattacharyya系数 */
Bha = CalcuBhattacharyya( EstHist, TargetHist, bins );
/* (3)计算概率权重 */
Pi_E = CalcuWeightedPi( Bha );
if ( Pi_E > PiT )
{
for ( i = 0; i < bins; i++ )
{
TargetHist[i] = (float)((1.0 - ALPHA_COEFFICIENT) * TargetHist[i]
+ ALPHA_COEFFICIENT * EstHist[i]);
}
rvalue = 1;
}
delete EstHist;
return( rvalue );
}
/*
系统清除
*/
void ClearAll()
{
if ( ModelHist != NULL ) delete [] ModelHist;
if ( states != NULL ) delete [] states;
if ( weights != NULL ) delete [] weights;
return;
}
/**********************************************************************
基于彩色直方图的粒子滤波算法总流程
输入参数:
unsigned char * img: 图像数据,RGB形式
int W, H: 图像宽高
输出参数:
int &xc, &yc: 找到的图像目标区域中心坐标
int &Wx_h, &Hy_h: 找到的目标的半宽高
float &max_weight: 最大权重值
返回值:
成功1,否则-1
基于彩色直方图的粒子滤波跟踪算法的完整使用方法为:
(1)读取彩色视频中的1帧,并确定初始区域,以此获得该区域的中心点、
目标的半高、宽,和图像数组(RGB形式)、图像高宽参数。
采用初始化函数进行初始化
int Initialize( int x0, int y0, int Wx, int Hy,
unsigned char * img, int W, int H )
(2)循环调用下面函数,直到N帧图像结束
int ColorParticleTracking( unsigned char * image, int W, int H,
int & xc, int & yc, int & Wx_h, int & Hy_h )
每次调用的输出为:目标中心坐标和目标的半高宽
如果函数返回值<0,则表明目标丢失。
(3)清除系统各个变量,结束跟踪
void ClearAll()
**********************************************************************/
int ColorParticleTracking( unsigned char * image, int W, int H,
int & xc, int & yc, int & Wx_h, int & Hy_h,
float & max_weight)
{
SPACESTATE EState;
int i;
/* 选择:选择样本,并进行重采样 */
ReSelect( states, weights, NParticle );
/* 传播:采样状态方程,对状态变量进行预测 */
Propagate( states, NParticle);
/* 观测:对状态量进行更新 */
Observe( states, weights, NParticle, image, W, H,
ModelHist, nbin );
/* 估计:对状态量进行估计,提取位置量 */
Estimation( states, weights, NParticle, EState );
xc = EState.xt;
yc = EState.yt;
Wx_h = EState.Hxt;
Hy_h = EState.Hyt;
/* 模型更新 */
ModelUpdate( EState, ModelHist, nbin, Pi_Thres, image, W, H );
/* 计算最大权重值 */
max_weight = weights[0];
for ( i = 1; i < NParticle; i++ )
max_weight = max_weight < weights[i] ? weights[i] : max_weight;
/* 进行合法性检验,不合法返回-1 */
if ( xc < 0 || yc < 0 || xc >= W || yc >= H ||
Wx_h <= 0 || Hy_h <= 0 ) return( -1 );
else
return( 1 );
}
//把iplimage 转到img 数组中,BGR->RGB
void IplToImge(IplImage* src, int w,int h)
{
int i,j;
for ( j = 0; j < h; j++ ) // 转成正向图像
for ( i = 0; i < w; i++ )
{
img[ ( j*w+i )*3 ] = R(src,i,j);
img[ ( j*w+i )*3+1 ] = G(src,i,j);
img[ ( j*w+i )*3+2 ] = B(src,i,j);
}
}
void mouseHandler(int event, int x, int y, int flags, void* param)//在这里要注意到要再次调用cvShowImage,才能显示方框
{
CvMemStorage* storage = cvCreateMemStorage(0);
CvSeq * contours;
IplImage* pFrontImg1 = 0;
int centerX,centerY;
int delt = 10;
pFrontImg1=cvCloneImage(pFrontImg);//这里也要注意到如果在 cvShowImage("foreground",pFrontImg1)中用pFrontImg产效果,得重新定义并复制
switch(event){
case CV_EVENT_LBUTTONDOWN:
//printf("laskjfkoasfl\n");
//寻找轮廓
if(pause)
{
cvFindContours(pFrontImg,storage,&contours,sizeof(CvContour),CV_RETR_EXTERNAL,
CV_CHAIN_APPROX_SIMPLE);
//在原场景中绘制目标轮廓的外接矩形
for (;contours;contours = contours->h_next)
{
CvRect r = ((CvContour*)contours)->rect;
if(x>r.x&&x<(r.x+r.width)&&y>r.y&&r.y<(r.y+r.height))
{
if (r.height*r.width>CONTOUR_MIN_AREA && r.height*r.width<CONTOUR_MAX_AREA)
{
centerX = r.x+r.width/2;//得到目标中心点
centerY = r.y+r.height/2;
WidIn = r.width/2;//得到目标半宽与半高
HeiIn = r.height/2;
xin = centerX;
yin = centerY;
cvRectangle(pFrontImg1,cvPoint(r.x,r.y),cvPoint(r.x+r.width,r.y+r.height),cvScalar(255,255,255),2,8,0);
//Initial_MeanShift_tracker(centerX,centerY,WidIn,HeiIn,img,Wid,Hei,1./delt); //初始化跟踪变量
/* 初始化跟踪器 */
Initialize( centerX, centerY, WidIn, HeiIn, img, Wid, Hei );
track = true;//进行跟踪
cvShowImage("foreground",pFrontImg1);
return;
}
}
}
}
break;
case CV_EVENT_LBUTTONUP:
printf("Left button up\n");
break;
}
}
//void on_mouse(int event, int x, int y, int flags, void *param)
//{
// if(!image)
// return ;
// if(image->origin)
// {
// image->origin = 0;
// y = image->height - y;
// }
// if(selecting) //正在选择物体
// {
// selection.x = MIN(x,origin.x);
// selection.y = MIN(y,origin.y);
// selection.width = selection.x + CV_IABS(x - origin.x);
// selection.height = selection.y + CV_IABS(y - origin.y);
//
// selection.x = MAX(selection.x ,0);
// selection.y = MAX(selection.y,0);
// selection.width = MIN(selection.width,image->width);
// selection.height = MIN(selection.height,image->height);
// selection.width -= selection.x;
// selection.height -= selection.y;
// }
// switch(event)
// {
// case CV_EVENT_LBUTTONDOWN:
// origin = cvPoint(x,y);
// selection = cvRect(x,y,0,0);
// selecting = 1;
// break;
// case CV_EVENT_LBUTTONUP:
// selecting = 0;
// if(selection.width >0 && selection.height >0)
// selected = 1;
// break;
// }
//}
void main()
{
int FrameNum=0; //帧号
int k=0;
CvCapture *capture = cvCreateFileCapture("test.avi");
char res1[20],res2[20];
//CvCapture *capture = cvCreateFileCapture("test1.avi");
//CvCapture *capture = cvCreateFileCapture("camera1_mov.avi");
IplImage* frame[Num]; //用来存放图像
int i,j;
uchar key = false; //用来设置暂停
float rho_v;//表示相似度
float max_weight;
int sum=0; //用来存放两图像帧差后的值
for (i=0;i<Num;i++)
{
frame[i]=NULL;
}
IplImage *curFrameGray=NULL;
IplImage *frameGray=NULL;
CvMat *Mat_D,*Mat_F; //动态矩阵与帧差后矩阵
int row ,col;
cvNamedWindow("video",1);
cvNamedWindow("background",1);
cvNamedWindow("foreground",1);
cvNamedWindow("tracking",1);
cvSetMouseCallback("tracking",mouseHandler,0);//响应鼠标
while (capture)
{
curframe=cvQueryFrame(capture); //抓取一帧
if(FrameNum<Num)
{
if(FrameNum==0)//第一帧时初始化过程
{
curFrameGray=cvCreateImage(cvGetSize(curframe),IPL_DEPTH_8U,1);
frameGray=cvCreateImage(cvGetSize(curframe),IPL_DEPTH_8U,1);
pBackImg=cvCreateImage(cvGetSize(curframe),IPL_DEPTH_8U,1);
pFrontImg=cvCreateImage(cvGetSize(curframe),IPL_DEPTH_8U,1);
pTrackImg = cvCreateImage(cvGetSize(curframe),IPL_DEPTH_8U,3);
cvSetZero(pFrontImg);
cvCvtColor(curframe,pBackImg,CV_RGB2GRAY);
row=curframe->height;
col=curframe->width;
Mat_D=cvCreateMat(row,col,CV_32FC1);
cvSetZero(Mat_D);
Mat_F=cvCreateMat(row,col,CV_32FC1);
cvSetZero(Mat_F);
Wid = curframe->width;
Hei = curframe->height;
img = new unsigned char [Wid * Hei * 3];
}
frame[k]=cvCloneImage(curframe); //把前num帧存入到图像数组
pTrackImg = cvCloneImage(curframe);
}
else
{
k=FrameNum%Num;
pTrackImg = cvCloneImage(curframe);
IplToImge(curframe,Wid,Hei);
cvCvtColor(curframe,curFrameGray,CV_RGB2GRAY);
cvCvtColor(frame[k],frameGray,CV_RGB2GRAY);
for(i=0;i<curframe->height;i++)
for(j=0;j<curframe->width;j++)
{
sum=S(curFrameGray,j,i)-S(frameGray,j,i);
sum=sum<0 ? -sum : sum;
if(sum>T) //文献中公式(1)
{
CV_MAT_ELEM(*Mat_F,float,i,j)=1;
}
else
{
CV_MAT_ELEM(*Mat_F,float,i,j)=0;
}
if(CV_MAT_ELEM(*Mat_F,float,i,j)!=0)//文献中公式(2)
CV_MAT_ELEM(*Mat_D,float,i,j)=Re;
else{
if(CV_MAT_ELEM(*Mat_D,float,i,j)!=0)
CV_MAT_ELEM(*Mat_D,float,i,j)=CV_MAT_ELEM(*Mat_D,float,i,j)-1;
}
if(CV_MAT_ELEM(*Mat_D,float,i,j)==0.0)
{
//文献中公式(3)
S(pBackImg,j,i)=(uchar)((1-ai)*S(pBackImg,j,i)+ai*S(curFrameGray,j,i));
}
sum=S(curFrameGray,j,i)-S(pBackImg,j,i);//背景差分法
sum=sum<0 ? -sum : sum;
if(sum>40)
{
S(pFrontImg,j,i)=255;
}
else
S(pFrontImg,j,i)=0;
}
frame[k]=cvCloneImage(curframe);
}
FrameNum++;
k++;
cout<<FrameNum<<endl;
//进行形态学滤波,去噪
cvDilate(pFrontImg, pFrontImg, 0, 2);
cvErode(pFrontImg, pFrontImg, 0, 3);
cvDilate(pFrontImg, pFrontImg, 0, 1);
if(track)
{
/* 跟踪一帧 */
rho_v = ColorParticleTracking( img, Wid, Hei, xout, yout, WidOut, HeiOut, max_weight);
/* 画框: 新位置为蓝框 */
if ( rho_v > 0 && max_weight > 0.0001 ) /* 判断是否目标丢失 */
{
cvRectangle(pFrontImg,cvPoint(xout - WidOut,yout - HeiOut),cvPoint(xout+WidOut,yout+HeiOut),cvScalar(255,255,255),2,8,0);
cvRectangle(pTrackImg,cvPoint(xout - WidOut,yout - HeiOut),cvPoint(xout+WidOut,yout+HeiOut),cvScalar(255,255,255),2,8,0);
xin = xout; yin = yout;
WidIn = WidOut; HeiIn = HeiOut;
/*draw_rectangle( pBuffer, Width, Height, xo, Height-yo-1, wo, ho, 0x00ff0000, 2 );
xb = xo; yb = yo;
wb = wo; hb = ho;*/
}
}
cvShowImage("video",curframe);
cvShowImage("foreground",pFrontImg);
cvShowImage("background",pBackImg);
cvShowImage("tracking",pTrackImg);
/*sprintf(res1,"fore%d.jpg",FrameNum);
cvSaveImage(res1,pFrontImg);
sprintf(res2,"ground%d.jpg",FrameNum);
cvSaveImage(res2,pBackImg);*/
cvSetMouseCallback("foreground",mouseHandler,0);//响应鼠标
key = cvWaitKey(1);
if(key == 'p') pause = true;
while(pause)
if(cvWaitKey(0)=='p')
pause = false;
}
cvReleaseImage(&curFrameGray);
cvReleaseImage(&frameGray);
cvReleaseImage(&pBackImg);
cvReleaseImage(&pFrontImg);
cvDestroyAllWindows();
// Clear_MeanShift_tracker();
ClearAll();
}
实验结果:
自此,毕业论文涉及的经典算法已经全部给出,我自己提出的破算法就不献丑了。
马上去华为上班咯,可能搞通信去了,破企业网部门,唉
如果周末有空的话,我还是会继续搞图像处理的,这次下了不少人脸美化、超分辨率修正的论文,得好好读读。
另外打个广告,我毕业前自己弄得android app《色盲相机》,下载地址:
木蚂蚁:http://www.mumayi.com/android-631836.html
360: http://zhushou.360.cn/detail/index/soft_id/1780912
网易: http://m.163.com/android/software/32jkam.html
核心思想来自斯坦福大学的课程设计及一个日本老头公开的matlab代码
有空大家给我点点广告哈~~

相关文章推荐
- 基于粒子滤波器的目标跟踪算法及实现
- 基于粒子滤波器的目标跟踪算法基础(Rob Hess代码详细解析)第一部分
- 基于MeanShift的目标跟踪算法及实现
- 基于MeanShift的目标跟踪算法及实现
- 基于MeanShift的目标跟踪算法及实现
- 基于TLD算法实现的物体跟踪算法(附单目标+多目标实测图片)
- 基于MeanShift的视频目标跟踪算法及代码实现
- 基于MeanShift的目标跟踪算法及实现
- Opencv基于CamShift算法实现目标跟踪
- 基于MeanShift的目标跟踪算法及实现
- 基于Opencv的目标检测与跟踪阴影去除算法实现
- 基于MeanShift的目标跟踪算法及实现
- 基于MeanShift的目标跟踪算法、实现
- 基于MeanShift的目标跟踪算法及实现
- 基于MeanShift的目标跟踪算法及实现
- 基于MeanShift的目标跟踪算法及实现
- 基于MeanShift的目标跟踪算法及实现
- 基于颜色直方图的粒子滤波目标跟踪MATLAB实现
- 基于MeanShift的目标跟踪算法及实现
- Matlab实现meanshift算法,目标跟踪代码实现