Qt 学习之路 2(91):粒子系统(续)
2017-10-09 11:38
357 查看
粒子的旋转作用于每一个粒子,除此之外,我们还可以设置粒子轨迹的方向。轨迹取决于一个指定的向量空间,该向量空间定义了粒子的速度和加速度,以及一个随机的方向。QML 提供了三个不同的向量空间,用于定义粒子的速度和加速度:
下面我们详细介绍这几种向量空间。
首先,我们讨论
粒子发射角度使用
现在我们设置好了方向,下面继续设置粒子速度。粒子的速度由
640px,那么将
下面是
要运行上面的代码,只需要将上一章的示例程序中
100,因此粒子的平均生命周期为 6.4 秒。另外,我们将发射器的宽度和高度都设置为 1px,意味着所有粒子都会从相同位置发射,也就具有相同的轨迹起点。
接下来我们来看加速度。加速度为每一个粒子增加一个加速度向量,该向量会随时间的流逝而改变速度。例如,我们创建一个类似星轨的轨迹,为了达到这一目的,我们将速度方向修改为 -45 度,并且移除速度变量区间:
加速度方向为 90 度向下,数值为 25:
那么,这段代码的执行结果如下所示:
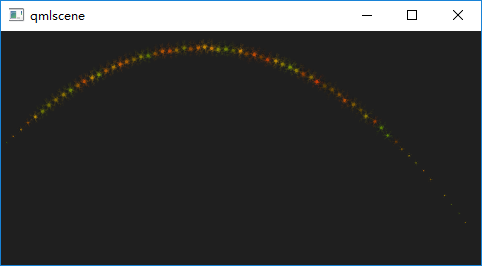
至于为什么这个加速度能够形成这样的轨迹,已经超出了本文的范围,这里不再赘述。
15 度的角。为了设置粒子轨迹,首先我们需要将
为了指定粒子速度为 100px 每秒,我们将
代码运行结果如下:
最后是
x 和 y 坐标指定一个目标点。如果指定的是一个项目,那么这个项目的中心会成为目标点。使用
我们使用
上一章提到,粒子由发射器发射。一旦粒子发射出来,发射器的任务就已经完成,不会再对粒子有任何影响。如果我们需要影响已经发射出的粒子,需要使用影响器(affector)。影响器有很多种类:
在这个例子中,我们利用影响器
3200 毫秒。将
3200 毫秒,粒子又会在其预期的位置重新出现。
影响器
在我们的例子中,粒子从左向右发射,
影响器
上面的代码中,粒子会按照
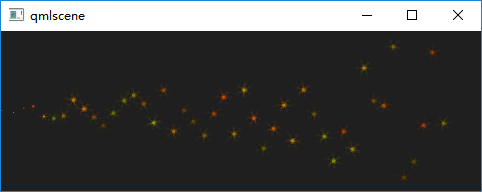
影响器
在这个例子中,所有进入到影响器范围内的粒子都会添加一个加速度,角度是 90 度(向下),取值 50。代码运行结果是:
影响器
运行这段代码,观察粒子轨迹就会发现,一旦进入到影响器的范围内,粒子就像发疯一样到处乱穿,而不是原本按照从左向右的方向保持一个大致的轨迹。
影响器
x 和 y 坐标的浮动区间。例如:
在这个例子中,影响器作用于粒子轨迹的位置属性,轨迹位置会以每秒 200 次的频率,在 y 方向上随机震动。
粒子是用于模拟很多自然现象,比如云、烟、火花等的强有力的工具。Qt 5 内置的粒子系统让我们可以轻松完成这些工作。同时,适当的粒子往往会成为用户界面上最吸引人的部分,尤其对于一些游戏应用,粒子特效更是不可或缺。应该说,游戏才是粒子的最佳应用环境。
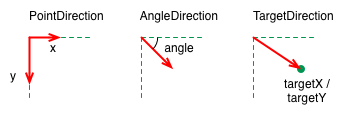
PointDirection:使用 x 和 y 值定义的方向
AngleDirection:使用角度定义的方向
TargetDirection:使用一个目标点坐标定义的方向
下面我们详细介绍这几种向量空间。
首先,我们讨论
AngleDirection。要使用
AngleDirection,我们需要将其赋值给
Emitter的
velocity属性:
| 1 | velocity: AngleDirection { } |
angle属性定义。
angle属性的取值范围是[0, 360),0 为水平向右。在我们例子中,我们希望粒子向右发射,因此
angle设置为 0;粒子发射范围则是 +/-5 度:
| 1 2 3 4 | velocity: AngleDirection { angle: 0 angleVariation: 15 } |
magnitude属性决定。
magnitude单位是像素/秒。如果我们的场景宽度是
640px,那么将
magnitude设置为 100 或许还不错。这意味着,粒子平均需要耗费 6.4 秒时间从场景一端移动到另一端。为了让粒子速度更有趣,我们还要设置
magnitudeVariation属性。这会为该速度设置一个可变的范围区间:
| 12345 | velocity: AngleDirection { ... magnitude: 100 magnitudeVariation: 50} |
Emitter的完整代码。
| 1 2 3 4 5 6 7 8 9 10 11 12 13 14 15 16 | Emitter { id: emitter anchors.left: parent.left anchors.verticalCenter: parent.verticalCenter width: 1; height: 1 system: particleSystem lifeSpan: 6400 lifeSpanVariation: 400 size: 32 velocity: AngleDirection { angle: 0 angleVariation: 15 magnitude: 100 magnitudeVariation: 50 } } |
Emitter替换下即可。根据前面的描述,由于我们将
magnitude设置为
100,因此粒子的平均生命周期为 6.4 秒。另外,我们将发射器的宽度和高度都设置为 1px,意味着所有粒子都会从相同位置发射,也就具有相同的轨迹起点。
接下来我们来看加速度。加速度为每一个粒子增加一个加速度向量,该向量会随时间的流逝而改变速度。例如,我们创建一个类似星轨的轨迹,为了达到这一目的,我们将速度方向修改为 -45 度,并且移除速度变量区间:
| 1234 | velocity: AngleDirection { angle: -45 magnitude: 100} |
| 1 2 3 4 | acceleration: AngleDirection { angle: 90 magnitude: 25 } |
至于为什么这个加速度能够形成这样的轨迹,已经超出了本文的范围,这里不再赘述。
下面介绍另外一种方向的定义。PointDirection使用 x 和 y 值导出向量空间。例如,你想要让粒子轨迹沿着 45 度角的方向,那么就需要将 x 和 y 设置成相同的值。在我们的例子中,我们希望粒子轨迹从左向右,成为一个
15 度的角。为了设置粒子轨迹,首先我们需要将
PointDirection赋值给
Emitter的
velocity属性:
| 1 | velocity: PointDirection { } |
x的值设置为 100。15 度是 90 度的六分之一,因此我们将 y 的变化范围(
yVariation)指定为 100/6:
| 1 2 3 4 5 6 7 8 9 10 11 12 13 14 15 16 | Emitter { id: emitter anchors.left: parent.left anchors.verticalCenter: parent.verticalCenter width: 1; height: 1 system: particles lifeSpan: 6400 lifeSpanVariation: 400 size: 16 velocity: PointDirection { x: 100 y: 0 xVariation: 0 yVariation: 100/6 } } |
最后是
TargetDirection。
TargetDirection使用相对于发射器或某个项目的
x 和 y 坐标指定一个目标点。如果指定的是一个项目,那么这个项目的中心会成为目标点。使用
TargetDirection可以达到一些特殊的效果。例如下面的代码:
| 123456 | velocity: TargetDirection { targetX: 100 targetY: 0 targetVariation: 100/6 magnitude: 100} |
TargetDirection,将目标点的 x 坐标设置为 100,y 坐标为 0,因此这是一个水平轴上的点。
targetVariation值为 100/6,这会形成一个大约 15 度的范围。代码运行结果如下:
上一章提到,粒子由发射器发射。一旦粒子发射出来,发射器的任务就已经完成,不会再对粒子有任何影响。如果我们需要影响已经发射出的粒子,需要使用影响器(affector)。影响器有很多种类:
Age:改变粒子的生命周期,一般用于提前结束粒子的生命周期
Attractor:将粒子吸引到一个指定的点
Friction:按比例降低粒子的当前速度
Gravity:添加一个有一定角度的加速度
Turbulence:为粒子增加一个图像噪音
Wander:随机改变粒子轨迹
GroupGoal:改变粒子组的状态
SpriteGoal:改变精灵粒子的状态
Age可以改变粒子的生命周期,
lifeLeft属性指定粒子还能存活还有多少时间。例如:
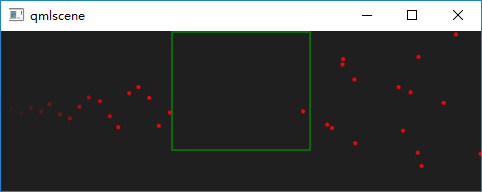
| 1 2 3 4 5 6 7 8 9 10 11 12 13 14 15 16 17 18 19 20 21 22 23 24 25 26 27 28 29 30 31 32 33 34 35 36 37 38 39 40 41 42 43 44 45 46 47 48 49 50 51 52 53 54 55 56 | import QtQuick 2.0 import QtQuick.Particles 2.0 Rectangle { id: root; width: 480; height: 160 color: "#1f1f1f" ParticleSystem { id: particles } Emitter { id: emitter anchors.left: parent.left anchors.verticalCenter: parent.verticalCenter width: 1; height: 1 system: particles lifeSpan: 6400 lifeSpanVariation: 400 size: 16 velocity: TargetDirection { targetX: 100 targetY: 0 targetVariation: 100/6 magnitude: 100 } } Age { anchors.horizontalCenter: parent.horizontalCenter width: 140; height: 120 system: particles advancePosition: true lifeLeft: 3200 once: true Rectangle { anchors.fill: parent color: 'transparent' border.color: 'green' border.width: 2 opacity: 0.8 } } ItemParticle { system: particles delegate: Rectangle { id: rect width: 10 height: 10 color: "red" radius: 10 } } } |
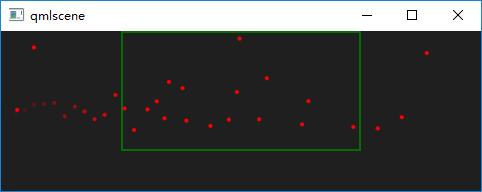
在这个例子中,我们利用影响器
Age,将粒子的生命周期缩短到 3200 毫秒(
lifeLeft指定)。当粒子进入影响器的范围时,其生命周期只剩下
3200 毫秒。将
advancePosition设置为
true,我们会看到一旦粒子的生命周期只剩下
3200 毫秒,粒子又会在其预期的位置重新出现。
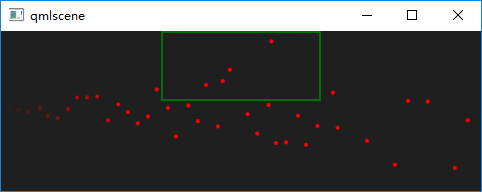
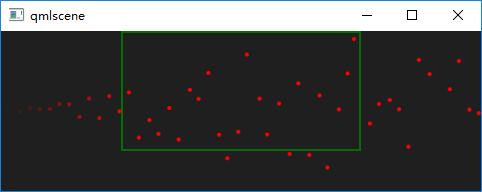
影响器
Attractor将粒子吸引到使用
pointX和
pointY定位的指定点,该点的坐标相对于
Attractor。
strength属性指定
Attractor吸引的强度。
| 123456789101112131415 | Attractor { anchors.horizontalCenter: parent.horizontalCenter width: 160; height: 70 system: particles pointX: 0 pointY: 0 strength: 1.0 Rectangle { anchors.fill: parent color: 'transparent' border.color: 'green' border.width: 2 opacity: 0.8 } } |
Attractor在界面上半部分。只有进入到影响器范围内的粒子才会受到影响,这种轨迹的分离使我们能够清楚地看到影响器的作用。
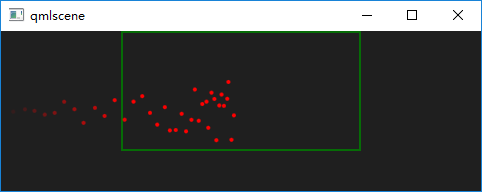
影响器
Friction会按照一定比例降低粒子的速度。例如:
| 1 2 3 4 5 6 7 8 9 10 11 12 13 14 | Friction { anchors.horizontalCenter: parent.horizontalCenter width: 240; height: 120 system: particles factor : 0.8 threshold: 25 Rectangle { anchors.fill: parent color: 'transparent' border.color: 'green' border.width: 2 opacity: 0.8 } } |
factor为 0.8 的比例降低粒子的速度,直到降低到 25 像素/秒(由
threshold属性指定)。其运行结果如下:
影响器
Gravity为粒子添加一个加速度。例如:
| 12345678910111213 | Gravity { width: 240; height: 90 system: particles magnitude: 50 angle: 90 Rectangle { anchors.fill: parent color: 'transparent' border.color: 'green' border.width: 2 opacity: 0.8 } } |
影响器
Turbulence为每个粒子添加一个力向量。每个粒子所获得的随机力向量都是随机的,这由一个噪音图像决定,使用
noiseSource属性可以自定义这个噪音图像。
strength属性定义了作用到粒子上面的向量有多强。例如:
| 1 2 3 4 5 6 7 8 9 10 11 12 13 | Turbulence { anchors.horizontalCenter: parent.horizontalCenter width: 240; height: 120 system: particles strength: 100 Rectangle { anchors.fill: parent color: 'transparent' border.color: 'green' border.width: 2 opacity: 0.8 } } |
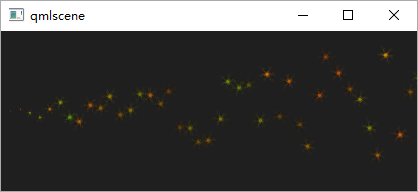
影响器
Wander控制轨迹。
affectedParameter属性指定
Wander可以控制哪一个属性(速度、位置或者加速度等);
pace属性指定每秒该属性变化的最大值;
yVariance和
yVariance指定粒子轨迹
x 和 y 坐标的浮动区间。例如:
| 1 2 3 4 5 6 7 8 9 10 11 12 13 14 15 | Wander { anchors.horizontalCenter: parent.horizontalCenter width: 240; height: 120 system: particles affectedParameter: Wander.Position pace: 200 yVariance: 240 Rectangle { anchors.fill: parent color: 'transparent' border.color: 'green' border.width: 2 opacity: 0.8 } } |
粒子是用于模拟很多自然现象,比如云、烟、火花等的强有力的工具。Qt 5 内置的粒子系统让我们可以轻松完成这些工作。同时,适当的粒子往往会成为用户界面上最吸引人的部分,尤其对于一些游戏应用,粒子特效更是不可或缺。应该说,游戏才是粒子的最佳应用环境。

相关文章推荐
- Qt 学习之路 2(90):粒子系统
- Qt 学习之路 2(24):Qt 绘制系统简介
- 坐标系统 Qt 学习之路 2(28):坐标系统
- 虚幻引擎学习之路:粒子系统篇(一)
- Qt 学习之路:坐标系统
- QT5 学习之路28---坐标系统
- QT5 学习之路24---Qt 绘制系统简介
- Qt 学习之路 2(28):坐标系统
- Qt 学习之路 :Qt 绘制系统简介
- 虚幻引擎学习之路:粒子系统篇(二)
- 虚幻引擎学习之路:新粒子系统Niagara
- Qt 学习之路 :坐标系统
- Qt 学习之路 2(76):QML 和 QtQuick 2
- Qt 学习之路 :MainWindow 简介
- Qt 学习之路 2(17):文件对话框
- 【麦可网】Cocos2d-X跨平台游戏开发学习笔记---第十九课:Cocos2D-X粒子系统1-3
- 萌新的Linux的学习之路(十四)--系统虚拟机管理
- Qt 学习之路 2(84):Repeater
- 微软企业库5.0 学习之路——第十步、使用Unity解耦你的系统—PART1——为什么要使用Unity?
- Qt学习之路【0】:平台的搭建与配置