Qt自定义控件的创建与初步使用(二)之图片上绘制文字、箭头、曲线
2017-10-12 17:47
549 查看
本文目的:编辑自定义控件的界面ui,并在图片上添文字、箭头、曲线、打开、保存等功能。并说明了如何去使用这个编辑好的ui界面控件!
上次简单的说明了如何去创建Qt自定义控件,当时还是对其了解不够深刻,现在看来,QT自定义控件就是你事先把界面写好(一般基于QWidget基类),然后再把它写入QT自定义控件的工程【可参考Qt自定义控件的创建与初步使用(一)这篇博客】中去,最后放到别的工程中,通过简单的拖拽和拷贝就可以用了。那怎么样去做和使用这个自定义的控件呢?又要注意什么呢?具体分为三大步,下面给大家娓娓道来!
配置:Qt creator5.7,Qt 5.7+VS2013(64位)(有人喜欢用后者,全凭个人爱好,我用的是creator),本篇案例的说明用的是Qt5.6(因为本人的电脑装的是Qt5.6,公司的电脑装的是Qt5.7),建议最好用Qt5.7,但实际操作中不会有太大差别。
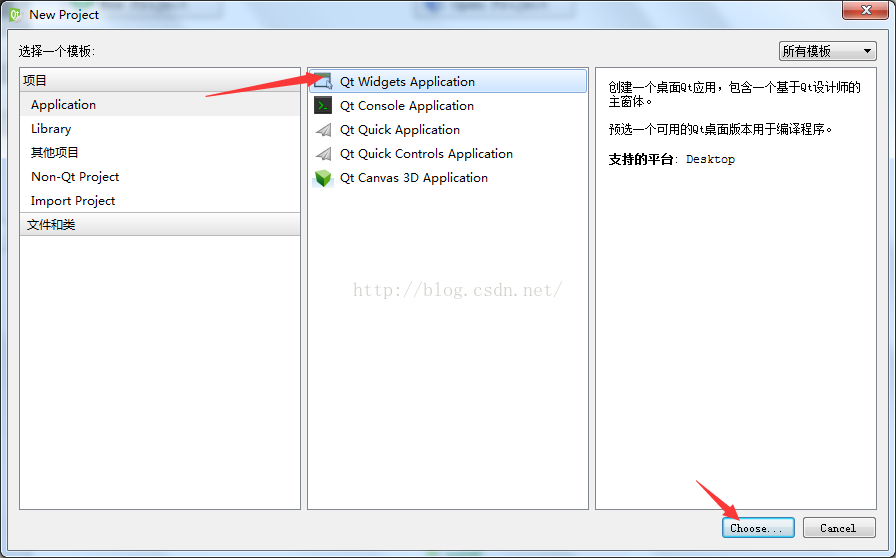
一、建立基类是QWidget的Qt Application工程,把界面写好。
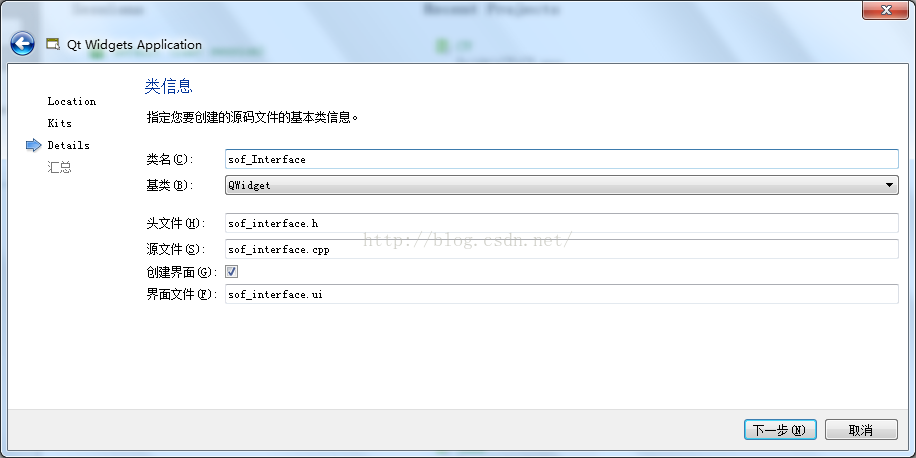
1.建立一个Qt Application工程,命名为 sof_Interface,基类是QWidget,然后一路下一步,这样你就完成了一个工程的创建(先在这个工程上把需要的界面写好)
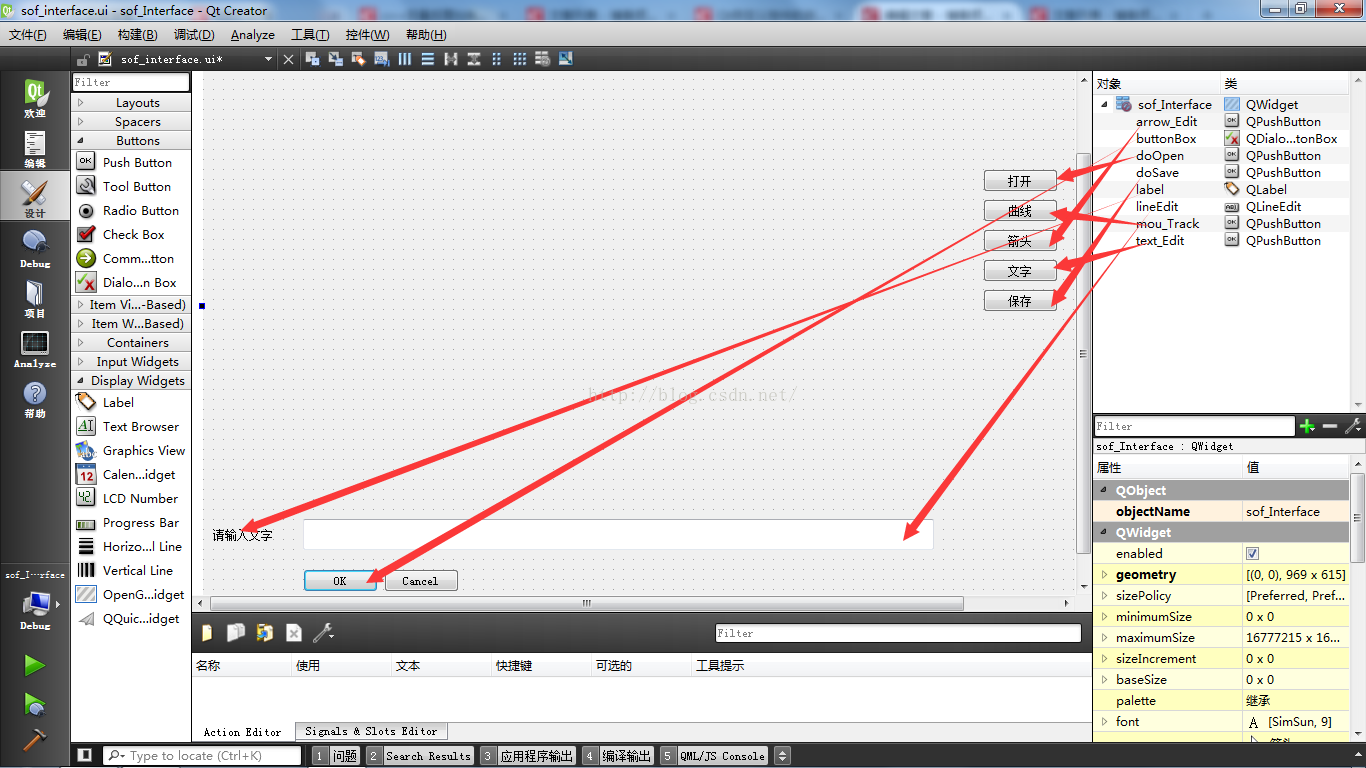
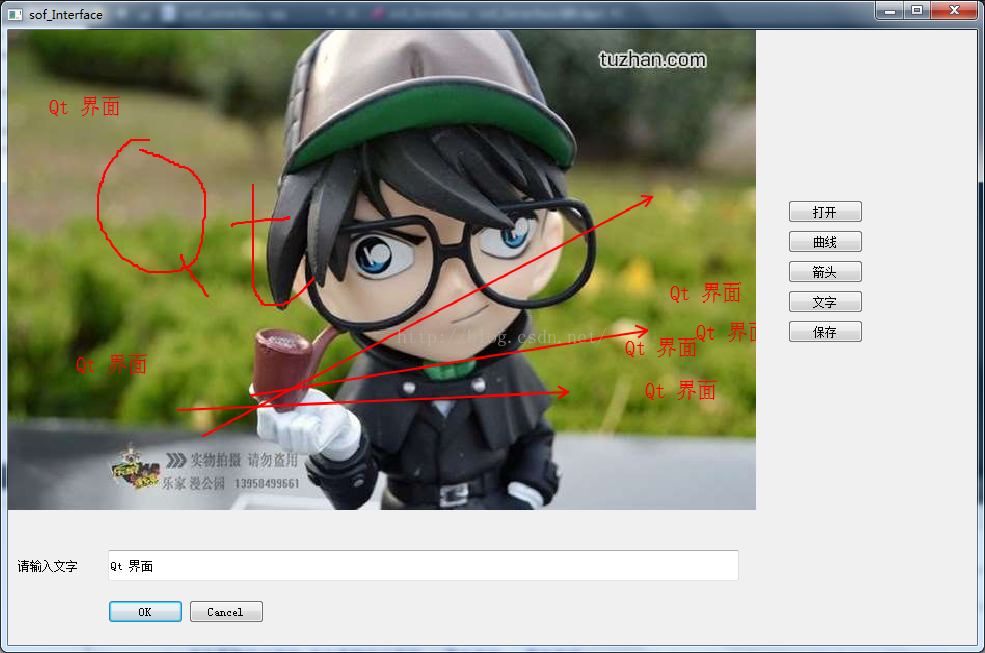
2.打开.ui界面,此处为5个功能:打开图片、保存图片、在图片上添加文字、曲线、箭头符号。拖拽5个pushbotton、1个QLabel、1个QLineEdit、1个QDialogbottonbox,并按图所示排号界面,并选中,右键点击转到槽,从而创建相关的槽函数。并添加代码。
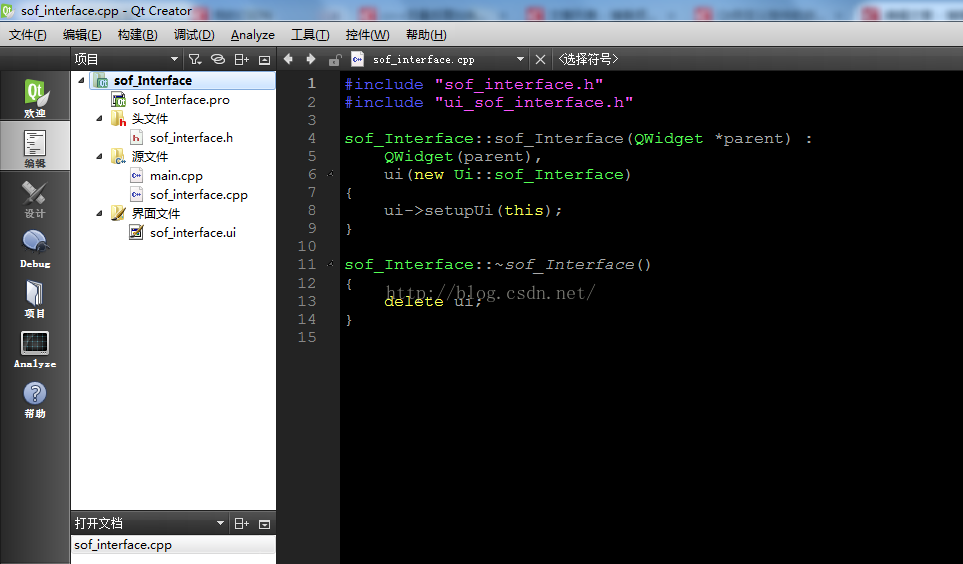
sof_Interface.h代码
[html] view
plain copy
<span style="font-family:Times New Roman;font-size:14px;">#ifndef SOF_INTERFACE_H
#define SOF_INTERFACE_H
#include <QWidget>
#include <QAbstractButton>
namespace Ui {
class sof_Interface;
}
class sof_Interface : public QWidget
{
Q_OBJECT
public:
explicit sof_Interface(QWidget *parent = 0);
~sof_Interface();
void paint(QImage&theImage);
enum Type{
type1,
type2,
type3,
};
private slots:
void on_doOpen_clicked();//打开图片
void on_doSave_clicked();//保存图片
void on_buttonBox_clicked(QAbstractButton *button);//ok、cancel
void on_mou_Track_clicked();//曲线
void on_arrow_Edit_clicked();//箭头
void on_text_Edit_clicked();//文字
private:
Ui::sof_Interface *ui;
QString curFile; //打开文件名
bool isOpen;
Type path_type; //画的图形种类
QImage image,tempImage; //原图、缓存图片
QPixmap pic; //用于显示图片
bool isDrawing;
QPoint begin,end;
QPoint end_pos; //鼠标释放时的位置
QString Text; //存储文字变量
protected:
void mousePressEvent(QMouseEvent *e); //鼠标按下事件
void mouseMoveEvent(QMouseEvent *e); //鼠标移动事件
void mouseReleaseEvent(QMouseEvent *e); //鼠标释放事
void paintEvent(QPaintEvent *); //重绘事件
};
#endif // SOF_INTERFACE_H
</span>
sof_Interface.cpp中代码
[cpp] view
plain copy
<span style="font-family:Times New Roman;font-size:14px;">#include "sof_interface.h"
#include "ui_sof_interface.h"
#include <QFileDialog>
#include <QPainter>
#include <QMessageBox>
#include <QMouseEvent>
#include <QlineEdit>
sof_Interface::sof_Interface(QWidget *parent) :
QWidget(parent),
ui(new Ui::sof_Interface)
{
ui->setupUi(this);
isOpen=false;
path_type=type1;//初始化
isDrawing=false;//初始化
}
sof_Interface::~sof_Interface()
{
delete ui;
}
/////////////////////////////槽函数/////////////////////////////
void sof_Interface::on_doOpen_clicked() //打开图片槽函数
{
QString fileName = QFileDialog::getOpenFileName(
this, "打开图片",
"",
"图片格式 (*.bmp *.jpg *.jpeg *.png)");
if(fileName !=NULL)
{
image.load(fileName);
curFile=fileName;
isOpen=true;
}
update();
}
void sof_Interface::on_doSave_clicked() //保存图片槽函数
{
QString path = QFileDialog::getSaveFileName(
this, tr("保存图片"),
"","图片格式 (*.bmp *.jpg *.jpeg *.png)");
image.save(path);
}
void sof_Interface::on_buttonBox_clicked(QAbstractButton *button) //lineEdit命令行输入槽函数
{
QString str;
if(ui->buttonBox->button(QDialogButtonBox::Ok) == button) //判断按下的是否为"确定”按钮
{
if(!ui->lineEdit->text().isEmpty()) //判断lineEdit是否为空,不为空返回0
{
str += ui->lineEdit->text()+"\n"; //str连接lineEdit中的内容
Text=str; //在图片上写入lineEdit中输入的文字
str="";
}
}
else if(button == ui->buttonBox->button((QDialogButtonBox::Cancel)))
{
ui->lineEdit->clear();
}
}
void sof_Interface::on_mou_Track_clicked() //曲线槽函数
{
path_type=type1;
}
void sof_Interface::on_arrow_Edit_clicked() //箭头槽函数
{
path_type=type2;
}
void sof_Interface::on_text_Edit_clicked() //文字槽函数
{
path_type=type3;
}
////////////////////////////鼠标事件////////////////////////////
void sof_Interface::mousePressEvent(QMouseEvent *e) //鼠标按下事件
{
begin=e->pos();
}
void sof_Interface::mouseMoveEvent(QMouseEvent *e) //鼠标移动事件
{
end=e->pos();
if(path_type==type1) //只有path_type==type1才绘制在image上(原图),这时isDrawing=false;
{
isDrawing=false;
paint(image);
}
else //其他path_type全绘制在tempImage上(缓冲图上)
{
isDrawing=true;
tempImage=image;
paint(tempImage);
}
}
void sof_Interface::mouseReleaseEvent(QMouseEvent *e) //鼠标释放事件
{
end=e->pos();
isDrawing=false;
paint(image);
}
/////////////////////////paintEvent事件////////////////////////////
void sof_Interface::paintEvent(QPaintEvent *)
{
QPainter p(this);
if(isDrawing)
p.drawImage(0,0,tempImage);
else
p.drawImage(0,0,image);
if(isOpen=true) //打开图片操作
{
pic=QPixmap::fromImage(image);
QPainter painter(this);
painter.drawPixmap(0,0,748,480,pic);
}
}
////////////////////////每个画图的函数////////////////////////////
void sof_Interface::paint(QImage &theImage)
{
QPainter pp(&theImage);
pp.setCompositionMode(QPainter::CompositionMode_SourceIn); //设置画刷的组合模式CompositionMode_SourceOut这个模式为目标图像在上。
pp.setPen(QPen(QBrush(Qt::red), 2, Qt::SolidLine)); //设置画笔(颜色,线宽,样式(实线))
pp.setRenderHint(QPainter::Antialiasing, true); //设置线段反锯齿
QFont font = pp.font(); //设置字体
font.setPixelSize(20); //改变字体大小
font.setBold(false); //字体是否加粗
pp.setFont(font); //设置字体
if(path_type==type1) //曲线
{
pp.drawLine(begin,end);
begin=end;
}
if(path_type==type2) //箭头
{
float x1 = begin.x(); //取points[0]起点的x
float y1 = begin.y(); //取points[0]起点的y
float x2 = end.x(); //取points[count-1]终点的x
float y2 = end.y(); //取points[count-1]终点的y
float l = 10.0; //箭头的长度
float a = 0.5; //箭头与线段角度
float x3 = x2 - l * cos(atan2((y2 - y1) , (x2 - x1)) - a);//计算箭头的终点(x3,y3)
float y3 = y2 - l * sin(atan2((y2 - y1) , (x2 - x1)) - a);
float x4 = x2 - l * sin(atan2((x2 - x1) , (y2 - y1)) - a);//计算箭头的终点(x4,y4)
float y4 = y2 - l * cos(atan2((x2 - x1) , (y2 - y1)) - a);
pp.drawLine(x2,y2,x3,y3); //绘制箭头(x2,y2,x3,y3)
pp.drawLine(x2,y2,x4,y4); //绘制箭头(x2,y2,x4,y4)
pp.drawLine(begin,end); //绘制主干箭头(begin,end)
}
if(path_type==type3) //文字
{
pp.drawText(begin.x(),begin.y(),Text);
}
update();
}
</span>
main.pp中代码
[cpp] view
plain copy
<span style="font-family:Times New Roman;font-size:14px;">#include "sof_interface.h"
#include <QApplication>
int main(int argc, char *argv[])
{
QApplication a(argc, argv);
sof_Interface w;
w.show();
return a.exec();
}</span>
3.界面运行效果,还可以保存哦,注意图片格式只能加载.jpg.jpeg.png.bmp,需要扩展的自己在代码中添加吧!当然还可以更改界面背景色等,自己去改哦~这只是个demo。
二、将自己第一步写的sof_Interface工程.h和.cpp的代码拷贝到自定义控件工程的.h和.cpp中即可写成自定义控件工程了,注意代码不能完全粘贴复制哦,注意自己建立工程的类名,除非你和我的一样。然后编译后见一下.dll和.lib,并放到相应的designer中,具体可参考【Qt自定义控件的创建与初步使用(一)这篇博客】。
三、这样你再新建立任意一个工程,你都可以在Qt creator或Qt 设计师中找到自己建立的控件,然后拖拽到工程的ui界面中,最后拷贝自定义控件.h和.cpp到这个新工程的工程目录下,注意和第二大步不一样哦~,就可以编译运行啦。再次就不给效果图啦~
源博客地址:http://blog.csdn.net/panshun888/article/details/52074400
上次简单的说明了如何去创建Qt自定义控件,当时还是对其了解不够深刻,现在看来,QT自定义控件就是你事先把界面写好(一般基于QWidget基类),然后再把它写入QT自定义控件的工程【可参考Qt自定义控件的创建与初步使用(一)这篇博客】中去,最后放到别的工程中,通过简单的拖拽和拷贝就可以用了。那怎么样去做和使用这个自定义的控件呢?又要注意什么呢?具体分为三大步,下面给大家娓娓道来!
配置:Qt creator5.7,Qt 5.7+VS2013(64位)(有人喜欢用后者,全凭个人爱好,我用的是creator),本篇案例的说明用的是Qt5.6(因为本人的电脑装的是Qt5.6,公司的电脑装的是Qt5.7),建议最好用Qt5.7,但实际操作中不会有太大差别。
一、建立基类是QWidget的Qt Application工程,把界面写好。
1.建立一个Qt Application工程,命名为 sof_Interface,基类是QWidget,然后一路下一步,这样你就完成了一个工程的创建(先在这个工程上把需要的界面写好)
2.打开.ui界面,此处为5个功能:打开图片、保存图片、在图片上添加文字、曲线、箭头符号。拖拽5个pushbotton、1个QLabel、1个QLineEdit、1个QDialogbottonbox,并按图所示排号界面,并选中,右键点击转到槽,从而创建相关的槽函数。并添加代码。
sof_Interface.h代码
[html] view
plain copy
<span style="font-family:Times New Roman;font-size:14px;">#ifndef SOF_INTERFACE_H
#define SOF_INTERFACE_H
#include <QWidget>
#include <QAbstractButton>
namespace Ui {
class sof_Interface;
}
class sof_Interface : public QWidget
{
Q_OBJECT
public:
explicit sof_Interface(QWidget *parent = 0);
~sof_Interface();
void paint(QImage&theImage);
enum Type{
type1,
type2,
type3,
};
private slots:
void on_doOpen_clicked();//打开图片
void on_doSave_clicked();//保存图片
void on_buttonBox_clicked(QAbstractButton *button);//ok、cancel
void on_mou_Track_clicked();//曲线
void on_arrow_Edit_clicked();//箭头
void on_text_Edit_clicked();//文字
private:
Ui::sof_Interface *ui;
QString curFile; //打开文件名
bool isOpen;
Type path_type; //画的图形种类
QImage image,tempImage; //原图、缓存图片
QPixmap pic; //用于显示图片
bool isDrawing;
QPoint begin,end;
QPoint end_pos; //鼠标释放时的位置
QString Text; //存储文字变量
protected:
void mousePressEvent(QMouseEvent *e); //鼠标按下事件
void mouseMoveEvent(QMouseEvent *e); //鼠标移动事件
void mouseReleaseEvent(QMouseEvent *e); //鼠标释放事
void paintEvent(QPaintEvent *); //重绘事件
};
#endif // SOF_INTERFACE_H
</span>
sof_Interface.cpp中代码
[cpp] view
plain copy
<span style="font-family:Times New Roman;font-size:14px;">#include "sof_interface.h"
#include "ui_sof_interface.h"
#include <QFileDialog>
#include <QPainter>
#include <QMessageBox>
#include <QMouseEvent>
#include <QlineEdit>
sof_Interface::sof_Interface(QWidget *parent) :
QWidget(parent),
ui(new Ui::sof_Interface)
{
ui->setupUi(this);
isOpen=false;
path_type=type1;//初始化
isDrawing=false;//初始化
}
sof_Interface::~sof_Interface()
{
delete ui;
}
/////////////////////////////槽函数/////////////////////////////
void sof_Interface::on_doOpen_clicked() //打开图片槽函数
{
QString fileName = QFileDialog::getOpenFileName(
this, "打开图片",
"",
"图片格式 (*.bmp *.jpg *.jpeg *.png)");
if(fileName !=NULL)
{
image.load(fileName);
curFile=fileName;
isOpen=true;
}
update();
}
void sof_Interface::on_doSave_clicked() //保存图片槽函数
{
QString path = QFileDialog::getSaveFileName(
this, tr("保存图片"),
"","图片格式 (*.bmp *.jpg *.jpeg *.png)");
image.save(path);
}
void sof_Interface::on_buttonBox_clicked(QAbstractButton *button) //lineEdit命令行输入槽函数
{
QString str;
if(ui->buttonBox->button(QDialogButtonBox::Ok) == button) //判断按下的是否为"确定”按钮
{
if(!ui->lineEdit->text().isEmpty()) //判断lineEdit是否为空,不为空返回0
{
str += ui->lineEdit->text()+"\n"; //str连接lineEdit中的内容
Text=str; //在图片上写入lineEdit中输入的文字
str="";
}
}
else if(button == ui->buttonBox->button((QDialogButtonBox::Cancel)))
{
ui->lineEdit->clear();
}
}
void sof_Interface::on_mou_Track_clicked() //曲线槽函数
{
path_type=type1;
}
void sof_Interface::on_arrow_Edit_clicked() //箭头槽函数
{
path_type=type2;
}
void sof_Interface::on_text_Edit_clicked() //文字槽函数
{
path_type=type3;
}
////////////////////////////鼠标事件////////////////////////////
void sof_Interface::mousePressEvent(QMouseEvent *e) //鼠标按下事件
{
begin=e->pos();
}
void sof_Interface::mouseMoveEvent(QMouseEvent *e) //鼠标移动事件
{
end=e->pos();
if(path_type==type1) //只有path_type==type1才绘制在image上(原图),这时isDrawing=false;
{
isDrawing=false;
paint(image);
}
else //其他path_type全绘制在tempImage上(缓冲图上)
{
isDrawing=true;
tempImage=image;
paint(tempImage);
}
}
void sof_Interface::mouseReleaseEvent(QMouseEvent *e) //鼠标释放事件
{
end=e->pos();
isDrawing=false;
paint(image);
}
/////////////////////////paintEvent事件////////////////////////////
void sof_Interface::paintEvent(QPaintEvent *)
{
QPainter p(this);
if(isDrawing)
p.drawImage(0,0,tempImage);
else
p.drawImage(0,0,image);
if(isOpen=true) //打开图片操作
{
pic=QPixmap::fromImage(image);
QPainter painter(this);
painter.drawPixmap(0,0,748,480,pic);
}
}
////////////////////////每个画图的函数////////////////////////////
void sof_Interface::paint(QImage &theImage)
{
QPainter pp(&theImage);
pp.setCompositionMode(QPainter::CompositionMode_SourceIn); //设置画刷的组合模式CompositionMode_SourceOut这个模式为目标图像在上。
pp.setPen(QPen(QBrush(Qt::red), 2, Qt::SolidLine)); //设置画笔(颜色,线宽,样式(实线))
pp.setRenderHint(QPainter::Antialiasing, true); //设置线段反锯齿
QFont font = pp.font(); //设置字体
font.setPixelSize(20); //改变字体大小
font.setBold(false); //字体是否加粗
pp.setFont(font); //设置字体
if(path_type==type1) //曲线
{
pp.drawLine(begin,end);
begin=end;
}
if(path_type==type2) //箭头
{
float x1 = begin.x(); //取points[0]起点的x
float y1 = begin.y(); //取points[0]起点的y
float x2 = end.x(); //取points[count-1]终点的x
float y2 = end.y(); //取points[count-1]终点的y
float l = 10.0; //箭头的长度
float a = 0.5; //箭头与线段角度
float x3 = x2 - l * cos(atan2((y2 - y1) , (x2 - x1)) - a);//计算箭头的终点(x3,y3)
float y3 = y2 - l * sin(atan2((y2 - y1) , (x2 - x1)) - a);
float x4 = x2 - l * sin(atan2((x2 - x1) , (y2 - y1)) - a);//计算箭头的终点(x4,y4)
float y4 = y2 - l * cos(atan2((x2 - x1) , (y2 - y1)) - a);
pp.drawLine(x2,y2,x3,y3); //绘制箭头(x2,y2,x3,y3)
pp.drawLine(x2,y2,x4,y4); //绘制箭头(x2,y2,x4,y4)
pp.drawLine(begin,end); //绘制主干箭头(begin,end)
}
if(path_type==type3) //文字
{
pp.drawText(begin.x(),begin.y(),Text);
}
update();
}
</span>
main.pp中代码
[cpp] view
plain copy
<span style="font-family:Times New Roman;font-size:14px;">#include "sof_interface.h"
#include <QApplication>
int main(int argc, char *argv[])
{
QApplication a(argc, argv);
sof_Interface w;
w.show();
return a.exec();
}</span>
3.界面运行效果,还可以保存哦,注意图片格式只能加载.jpg.jpeg.png.bmp,需要扩展的自己在代码中添加吧!当然还可以更改界面背景色等,自己去改哦~这只是个demo。
二、将自己第一步写的sof_Interface工程.h和.cpp的代码拷贝到自定义控件工程的.h和.cpp中即可写成自定义控件工程了,注意代码不能完全粘贴复制哦,注意自己建立工程的类名,除非你和我的一样。然后编译后见一下.dll和.lib,并放到相应的designer中,具体可参考【Qt自定义控件的创建与初步使用(一)这篇博客】。
三、这样你再新建立任意一个工程,你都可以在Qt creator或Qt 设计师中找到自己建立的控件,然后拖拽到工程的ui界面中,最后拷贝自定义控件.h和.cpp到这个新工程的工程目录下,注意和第二大步不一样哦~,就可以编译运行啦。再次就不给效果图啦~
源博客地址:http://blog.csdn.net/panshun888/article/details/52074400

相关文章推荐
- Qt自定义控件的创建与初步使用(二)之图片上绘制文字、箭头、曲线
- JavaScript- 使用 atan2 来绘制 箭头 和 曲线
- iOS开发的2D绘制--CoreGraphics的简单使用三(画文字和图片)
- dskinlite(uieasy mfc界面库)使用记录2:绘制动态元素(按钮控件绘制元素动态控制,改变图片和文字)
- JavaScript- 使用 atan2 来绘制 箭头 和 曲线
- Android 使用Canvas在图片上绘制文字的方法
- android使用Canvas在图片上绘制文字
- dskinlite(uieasy mfc界面库)使用记录2:绘制动态元素(按钮控件绘制元素动态控制,改变图片和文字)
- Qt自定义控件的创建与初步使用(一)之自定义控件的创建步骤
- ios-day14-01(使用Quartz 2D绘制基本图形——线、三角形、矩形、圆、圆弧、扇形、文字、图片等)
- Android 使用Canvas在图片上绘制文字
- JavaScript: 使用 atan2 来绘制 箭头 和 曲线
- JavaScript使用atan2来绘制箭头和曲线的实例
- 如何使用php绘制在图片上的正余弦曲线
- Android 使用Canvas在图片上绘制文字
- 使用FileUpload控件上传图片并自动生成缩略图、自动生成带文字和图片的水印图(转)
- 使用FileUpload控件上传图片并自动生成缩略图、自动生成带文字和图片的水印图
- 使用FileUpload控件上传图片并自动生成缩略图、自动生成带文字和图片的水印图
- 使用FileUpload控件上传图片并自动生成缩略图、带文字和图片的水印图
- 使用FileUpload控件上传图片并自动生成缩略图、带文字和图片的水印图