聚合链路与桥接测试
2017-10-07 22:47
155 查看
用途:将主机上的两块网卡绑定在一起,构成一个逻辑端口。
交换机根据用户配置的端口负荷分担策略决定报文从哪一个成员端口发送到对端的交换机。当其中一块网卡发生故障时,则继续使用另外一块正常的网卡。
RHEL5/6叫网卡bonding,需要加载内核模块
RHEL7叫链路聚合,内核自带驱动,需要配置team的master和多个slave
聚合网络的原理
真实的ip地址并不是在物理网卡上设置的,而是把两个或多个物理网卡聚合成一个虚拟的网卡,在虚拟网卡上设置地址,而外部网络访问本机时,就是访问的这个虚拟网卡的地址,虚拟网卡接到数据后经过两个网卡的负载交给服务器处理。如果一块网卡出现问题,则通过另一块传递数据,保证正常通信。聚合网络实验过程中,添加的两块新网卡可以不是active状态,甚至nmcli connect show查看没有新添加的网卡信息。也可以使active状态的网卡。
链路聚合的工作模式
1.active-backup 主备
2.loadbalance 负载均衡
3.RR RoundRobin 轮询
测试环境:
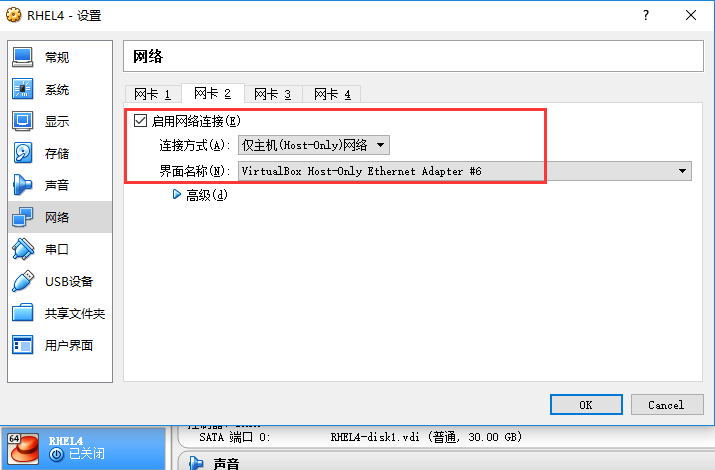
先shutdown 虚拟机,然后再 VirtualBox界面再启用网卡2。
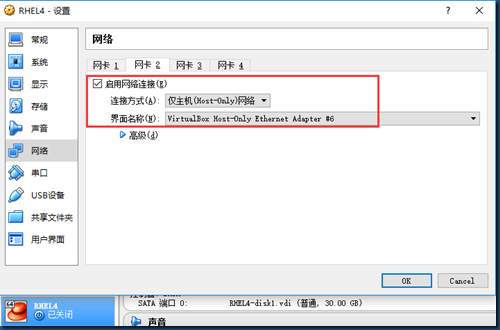
然后启动虚拟机。
2、查看网卡信息
# nmcli connection show 看不到enp0s8,因为无配置文件,如果手动添加配置文件后,就可以看到enp0s8了。其实都没必要为enp0s8和enp0s3造配置文件,因为我们要跟把两块网卡绑定到一块,作为新的team设备,使用新的配置文件。这里只为了测试一个小知识点。
3、添加team设备及配置文件
说明:
# nmcli connection add type team con-name testteamfile ifname testteamdevice config '{"runner":{"name":"activebackup"}}'
testteamfile配置文件名
testteamdevice 绑定的设备名
config ’{运行规则}’。运行规则中出现的所有关键字使用双引号。
"runner":{"name":"activebackup"} 指明运行级别为activebackup
如果添加错误,则使用 nmcli connection delete testteamfile来删除,然后重新再添加。
配置文件添加成功后,会在/etc/sysconfig/network-scripts/目录下生成。
[root@localhost ~]# cd /etc/sysconfig/network-scripts/
[root@localhost network-scripts]# ls ifcfg-*
ifcfg-enp0s3 ifcfg-enp0s8 ifcfg-lo ifcfg-testteamfile
4、为team设备配置IP
5、将两块网卡enp0s3和enp0s8绑定到虚拟网卡上
enp0s3----->testteamslave1------>testteamdevice
enpos8----->testteamslave2------>testteamdevice
可以这么理解:enp0s3和enp0s8被它们的主子master买去做了奴隶,一个取名叫slave1,另一个取名叫slave2。
6、激活虚拟网卡testteamdevice
先启动master,再启动两个slave。
从上边可以看出:testteamdevice,enp0s3,enp0s8 三块网卡的mac地址一样。
三个常用的命令:
1、查看虚拟网卡的状态
2、查看虚拟网卡的端口
验证结果:
同样,再添加team设备的另外一块网卡进来。


为team2设备配置IP地址:
下面把网卡enp0s8转换为桥接设备:
#nmcli connection add type bridge con-name testbrifile ifname testbridevice
#nmcli connection modify testbrifile ipv4.method manual ipv4.addresses "192.168.100.222/24 192.168.100.1" ipv4.dns 192.168.100.1
#nmcli connection add type bridge-slave con-name testbrislave1 ifname enpos8 master testbridevice
#nmcli connection down testbrifile
#nmcli connection up testbrifile
#nmcli connection up testbrislave1
#ping -I testbridevice 192.168.100.111 #-I表示从哪块网卡发出ping
交换机根据用户配置的端口负荷分担策略决定报文从哪一个成员端口发送到对端的交换机。当其中一块网卡发生故障时,则继续使用另外一块正常的网卡。
RHEL5/6叫网卡bonding,需要加载内核模块
RHEL7叫链路聚合,内核自带驱动,需要配置team的master和多个slave
聚合网络的原理
真实的ip地址并不是在物理网卡上设置的,而是把两个或多个物理网卡聚合成一个虚拟的网卡,在虚拟网卡上设置地址,而外部网络访问本机时,就是访问的这个虚拟网卡的地址,虚拟网卡接到数据后经过两个网卡的负载交给服务器处理。如果一块网卡出现问题,则通过另一块传递数据,保证正常通信。聚合网络实验过程中,添加的两块新网卡可以不是active状态,甚至nmcli connect show查看没有新添加的网卡信息。也可以使active状态的网卡。
链路聚合的工作模式
1.active-backup 主备
2.loadbalance 负载均衡
3.RR RoundRobin 轮询
测试环境:
| [root@localhost ~]# ifconfig enp0s3: flags=4163<UP,BROADCAST,RUNNING,MULTICAST> mtu 1500 inet 192.168.100.4 netmask 255.255.255.255 broadcast 192.168.100.4 inet6 fe80::922e:b8be:7ea8:4562 prefixlen 64 scopeid 0x20<link> ether 08:00:27:3e:f6:4d txqueuelen 1000 (Ethernet) RX packets 164 bytes 20454 (19.9 KiB) RX errors 0 dropped 0 overruns 0 frame 0 TX packets 168 bytes 28639 (27.9 KiB) TX errors 0 dropped 0 overruns 0 carrier 0 collisions 0 lo: flags=73<UP,LOOPBACK,RUNNING> mtu 65536 inet 127.0.0.1 netmask 255.0.0.0 inet6 ::1 prefixlen 128 scopeid 0x10<host> loop txqueuelen 1 (Local Loopback) RX packets 82 bytes 8488 (8.2 KiB) RX errors 0 dropped 0 overruns 0 frame 0 TX packets 82 bytes 8488 (8.2 KiB) TX errors 0 dropped 0 overruns 0 carrier 0 collisions 0 virbr0: flags=4099<UP,BROADCAST,MULTICAST> mtu 1500 inet 192.168.122.1 netmask 255.255.255.0 broadcast 192.168.122.255 ether 52:54:00:81:e7:fc txqueuelen 1000 (Ethernet) RX packets 0 bytes 0 (0.0 B) RX errors 0 dropped 0 overruns 0 frame 0 TX packets 0 bytes 0 (0.0 B) TX errors 0 dropped 0 overruns 0 carrier 0 collisions 0 [root@localhost ~]# hostnamectl Static hostname: localhost.localdomain Icon name: computer-vm Chassis: vm Machine ID: c59cb0b9011f459297a11b7b6b3e457b Boot ID: b029771ca9204611abe911f960ea7d51 Virtualization: kvm Operating System: Red Hat Enterprise Linux Server 7.4 (Maipo) CPE OS Name: cpe:/o:redhat:enterprise_linux:7.4:GA:server Kernel: Linux 3.10.0-693.el7.x86_64 Architecture: x86-64 [root@localhost ~]# nmcli connection show NAME UUID TYPE DEVICE enp0s3 59118063-4e4e-403c-ad25-374704d6f6f1 802-3-ethernet enp0s3 virbr0 b7180c81-0027-49ee-ab06-8f34a2df30be bridge virbr0 [root@localhost ~]# |
一、测试主备模式(active-backup)
1、在主机模式再添加一块新的网卡先shutdown 虚拟机,然后再 VirtualBox界面再启用网卡2。
然后启动虚拟机。
2、查看网卡信息
| [root@localhost ~]# nmcli device show | grep -i device --新增网卡为enp0s8 GENERAL.DEVICE: virbr0 GENERAL.DEVICE: enp0s3 GENERAL.DEVICE: enp0s8 GENERAL.DEVICE: lo GENERAL.DEVICE: virbr0-nic [root@localhost ~]# nmcli connection show ---看不到enp0s8,因为无配置文件 NAME UUID TYPE DEVICE enp0s3 59118063-4e4e-403c-ad25-374704d6f6f1 802-3-ethernet enp0s3 virbr0 b4f4c345-d863-41c0-b396-55fd0f67785f bridge virbr0 |
| [root@localhost ~]# nmcli connection add con-name enp0s8 type ethernet ifname enp0s8 Connection 'enp0s8' (b3972183-4a71-4635-b910-02c0530517d3) successfully added. [root@localhost ~]# nmcli connection show NAME UUID TYPE DEVICE enp0s3 59118063-4e4e-403c-ad25-374704d6f6f1 802-3-ethernet enp0s3 enp0s8 b3972183-4a71-4635-b910-02c0530517d3 802-3-ethernet enp0s8 virbr0 b4f4c345-d863-41c0-b396-55fd0f67785f bridge virbr0 |
| [root@localhost ~]# nmcli connection add type team con-name testteamfile ifname testteamdevice config '{"runner":{"name":"activebackup"}}' Connection 'testteamfile' (d2c8f925-8645-4ac5-95e6-6245a4431778) successfully added. [root@localhost ~]# nmcli connection show --如果看不到team设备,说明上一命令有问题。 NAME UUID TYPE DEVICE enp0s3 59118063-4e4e-403c-ad25-374704d6f6f1 802-3-ethernet enp0s3 enp0s8 b3972183-4a71-4635-b910-02c0530517d3 802-3-ethernet enp0s8 testteamfile d2c8f925-8645-4ac5-95e6-6245a4431778 team testteamdevice virbr0 b4f4c345-d863-41c0-b396-55fd0f67785f bridge virbr0 |
# nmcli connection add type team con-name testteamfile ifname testteamdevice config '{"runner":{"name":"activebackup"}}'
testteamfile配置文件名
testteamdevice 绑定的设备名
config ’{运行规则}’。运行规则中出现的所有关键字使用双引号。
"runner":{"name":"activebackup"} 指明运行级别为activebackup
如果添加错误,则使用 nmcli connection delete testteamfile来删除,然后重新再添加。
配置文件添加成功后,会在/etc/sysconfig/network-scripts/目录下生成。
[root@localhost ~]# cd /etc/sysconfig/network-scripts/
[root@localhost network-scripts]# ls ifcfg-*
ifcfg-enp0s3 ifcfg-enp0s8 ifcfg-lo ifcfg-testteamfile
4、为team设备配置IP
| [root@localhost network-scripts]# nmcli connection modify testteamfile ipv4.method manual ipv4.addresses 192.168.100.123/24 ipv4.gateway 192.168.100.100 ipv4.dns 192.168.100.1 connection.autoconnect yes [root@localhost network-scripts]# nmcli connection show NAME UUID TYPE DEVICE enp0s3 59118063-4e4e-403c-ad25-374704d6f6f1 802-3-ethernet enp0s3 enp0s8 b3972183-4a71-4635-b910-02c0530517d3 802-3-ethernet enp0s8 testteamfile d2c8f925-8645-4ac5-95e6-6245a4431778 team testteamdevice virbr0 b4f4c345-d863-41c0-b396-55fd0f67785f bridge virbr0 |
| [root@localhost ~]# nmcli connection add type team-slave con-name testteamslave1 ifname enp0s3 master testteamdevice Connection 'testteamslave1' (506b5fe9-0c3b-4251-b58b-b1a1a53acda4) successfully added. [root@localhost ~]# nmcli connection add type team-slave con-name testteamslave2 ifname enp0s8 master testteamdevice Connection 'testteamslave2' (312ba2d8-7b18-4446-b37f-5de7217a6646) successfully added. [root@localhost ~]# nmcli connection show NAME UUID TYPE DEVICE enp0s3 59118063-4e4e-403c-ad25-374704d6f6f1 802-3-ethernet enp0s3 enp0s8 b3972183-4a71-4635-b910-02c0530517d3 802-3-ethernet enp0s8 virbr0 b4f4c345-d863-41c0-b396-55fd0f67785f bridge virbr0 testteamfile d2c8f925-8645-4ac5-95e6-6245a4431778 team -- testteamslave1 506b5fe9-0c3b-4251-b58b-b1a1a53acda4 802-3-ethernet -- testteamslave2 312ba2d8-7b18-4446-b37f-5de7217a6646 802-3-ethernet -- |
enpos8----->testteamslave2------>testteamdevice
可以这么理解:enp0s3和enp0s8被它们的主子master买去做了奴隶,一个取名叫slave1,另一个取名叫slave2。
6、激活虚拟网卡testteamdevice
| [root@localhost ~]# nmcli connection up testteamfile ---注意启动的是文件,而不是设备 Connection successfully activated (master waiting for slaves) (D-Bus active path: /org/freedesktop/NetworkManager/ActiveConnection/157) [root@localhost ~]# nmcli connection up testteamslave1 [root@localhost ~]# nmcli connection up testteamslave2 |
| [root@localhost ~]# nmcli connection show NAME UUID TYPE DEVICE virbr0-nic 6944d05c-3906-4fc5-84e7-cb46f3e6e2b2 generic virbr0-nic virbr0 05e6ca14-f6f5-4697-bcc0-e13e4b212236 bridge virbr0 enp0s3 7419645c-73a9-423f-bcfd-fccd36773841 802-3-ethernet -- testteamslave2 608bb6f1-099d-459d-9589-5b2f2b28b2d9 802-3-ethernet enp0s8 testteamslave1 90b0d08f-dec2-4a1f-827a-ce198f21fb46 802-3-ethernet enp0s3 testteamfile f2277aa4-a7b3-4166-afaa-dcd60e550d97 team testteamdevice [root@localhost ~]# ifconfig | grep ether ether 08:00:27:57:c1:ff txqueuelen 1000 (Ethernet) ether 08:00:27:57:c1:ff txqueuelen 1000 (Ethernet) ether 08:00:27:57:c1:ff txqueuelen 0 (Ethernet) ether 52:54:00:59:75:9b txqueuelen 0 (Ethernet) [root@localhost ~]# ifconfig enp0s3: flags=4163<UP,BROADCAST,RUNNING,MULTICAST> mtu 1500 ether 08:00:27:57:c1:ff txqueuelen 1000 (Ethernet) RX packets 144 bytes 17362 (16.9 KiB) RX errors 0 dropped 0 overruns 0 frame 0 TX packets 152 bytes 23282 (22.7 KiB) TX errors 0 dropped 0 overruns 0 carrier 0 collisions 0 enp0s8: flags=4163<UP,BROADCAST,RUNNING,MULTICAST> mtu 1500 ether 08:00:27:57:c1:ff txqueuelen 1000 (Ethernet) RX packets 10 bytes 907 (907.0 B) RX errors 0 dropped 5 overruns 0 frame 0 TX packets 0 bytes 0 (0.0 B) TX errors 0 dropped 0 overruns 0 carrier 0 collisions 0 lo: flags=73<UP,LOOPBACK,RUNNING> mtu 65536 inet 127.0.0.1 netmask 255.0.0.0 inet6 ::1 prefixlen 128 scopeid 0x10<host> loop txqueuelen 0 (Local Loopback) RX packets 10 bytes 984 (984.0 B) RX errors 0 dropped 0 overruns 0 frame 0 TX packets 10 bytes 984 (984.0 B) TX errors 0 dropped 0 overruns 0 carrier 0 collisions 0 testteamdevice: flags=4163<UP,BROADCAST,RUNNING,MULTICAST> mtu 1500 inet 192.168.100.123 netmask 255.255.255.0 broadcast 192.168.100.255 inet6 fe80::a00:27ff:fe57:c1ff prefixlen 64 scopeid 0x20<link> ether 08:00:27:57:c1:ff txqueuelen 0 (Ethernet) RX packets 133 bytes 14204 (13.8 KiB) RX errors 0 dropped 4 overruns 0 frame 0 TX packets 116 bytes 17841 (17.4 KiB) TX errors 0 dropped 0 overruns 0 carrier 0 collisions 0 virbr0: flags=4099<UP,BROADCAST,MULTICAST> mtu 1500 inet 192.168.122.1 netmask 255.255.255.0 broadcast 192.168.122.255 ether 52:54:00:59:75:9b txqueuelen 0 (Ethernet) RX packets 0 bytes 0 (0.0 B) RX errors 0 dropped 0 overruns 0 frame 0 TX packets 0 bytes 0 (0.0 B) TX errors 0 dropped 0 overruns 0 carrier 0 collisions 0 You have mail in /var/spool/mail/root |
三个常用的命令:
1、查看虚拟网卡的状态
| [root@localhost ~]# teamdctl testteamdevice state setup: runner: activebackup --运行模式 ports: enp0s3 link watches: link summary: up instance[link_watch_0]: name: ethtool link: up --状态为启动 down count: 0 enp0s8 link watches: link summary: up instance[link_watch_0]: name: ethtool link: up --状态为启动 down count: 0 runner: active port: enp0s3 --当前激活的网卡;testteamdevice设备目前使用的是enp0s3网卡 |
| [root@localhost ~]# teamnl testdevice -h teamnl [options] teamdevname command [command args] -h --help Show this help Commands: ports options getoption OPT_NAME setoption OPT_NAME OPT_VALUE monitor OPT_STYLE [root@localhost ~]# teamnl testteamdevice ports ----查看网卡对应的端口 3: enp0s8: up 1000Mbit FD 2: enp0s3: up 1000Mbit FD [root@localhost ~]# teamnl testteamdevice getoption activeport ---当前使用的网卡端口,当前使用的是enp0s3。 2 |
| [root@localhost ~]# nmcli device disconnect enp0s3 --断开enp0s3 Device 'enp0s3' successfully disconnected. [root@localhost ~]# teamdctl testteamdevice state ---可以虚拟网卡自动连接到时enp0s8网卡上 [root@localhost ~]#teamncl testteamdevice port 3:enp0s8:up 1000Mbit FD |
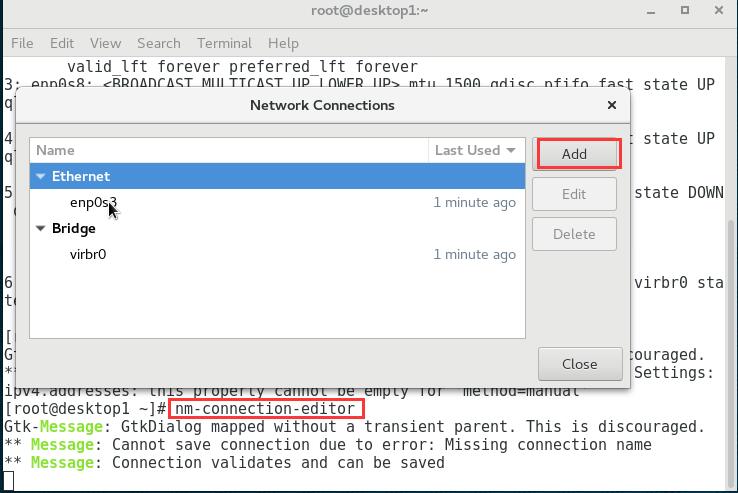
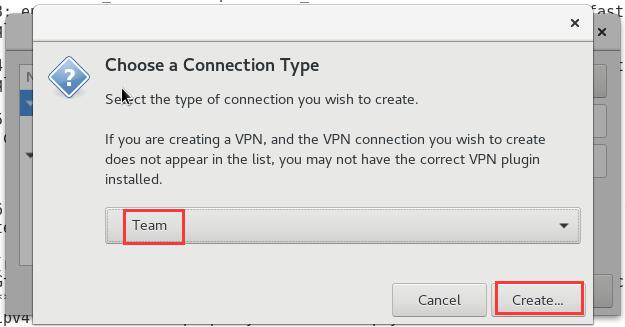
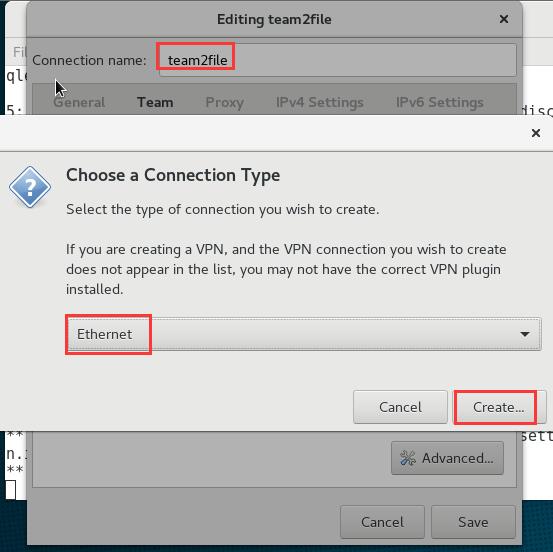
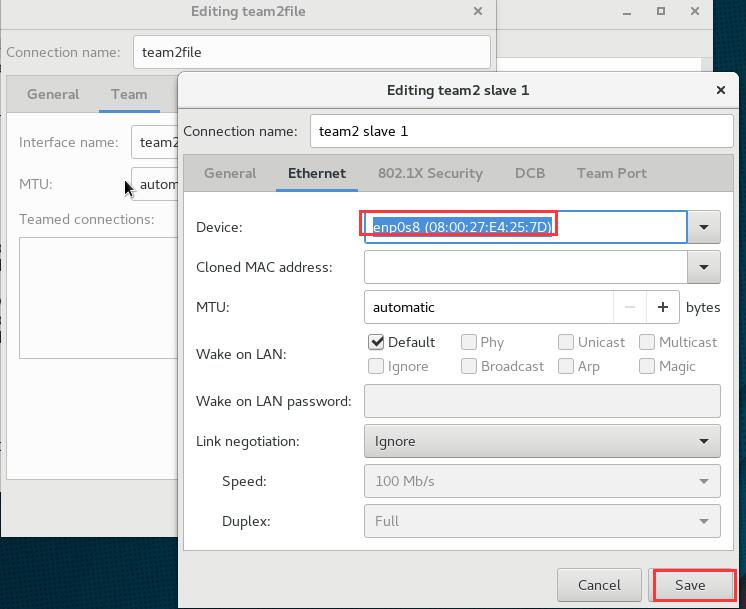
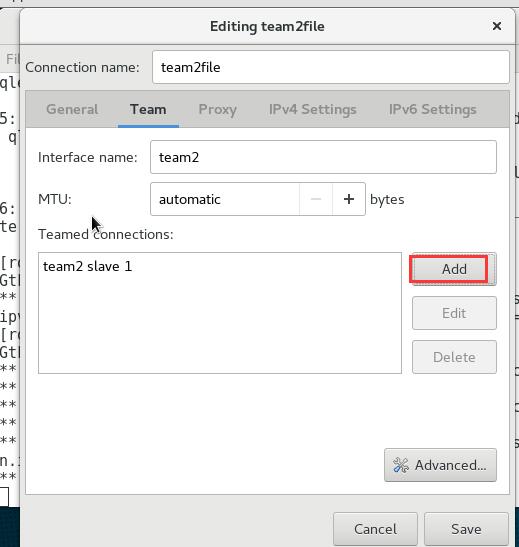
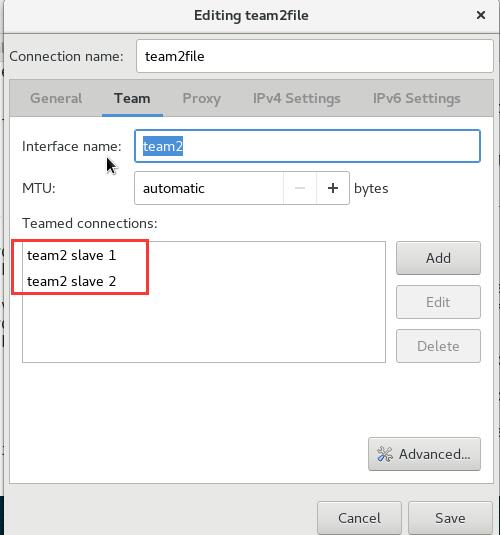
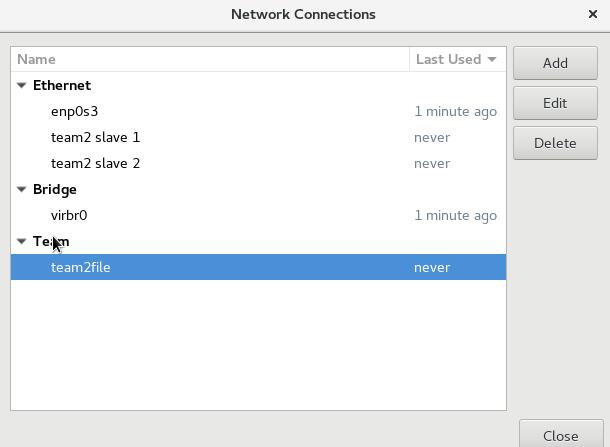
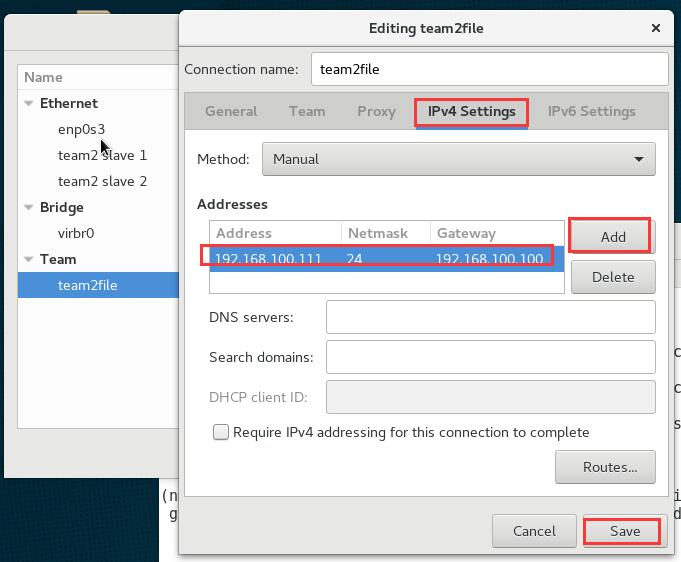
图形化界面配置方式:
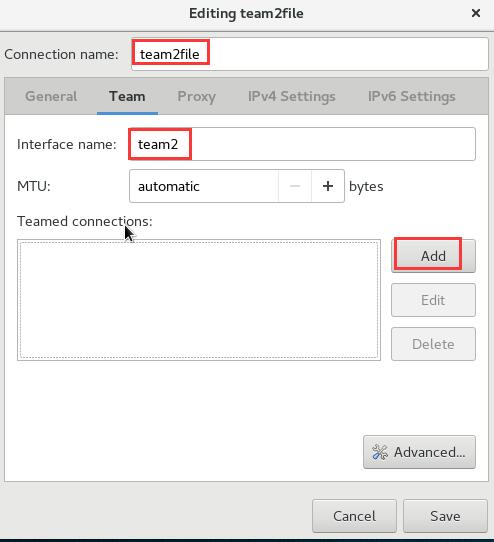
#nm-connection-editor同样,再添加team设备的另外一块网卡进来。
为team2设备配置IP地址:
二、桥接
要求:把本机1的其中一块网卡转换为桥接设备(交换机),其它客户机连接到该设备后能与主机1正常通信。下面把网卡enp0s8转换为桥接设备:
| [root@localhost ~]# nmcli connection show NAME UUID TYPE DEVICE enp0s3 6759482b-076f-4181-9d69-ca6dc0190faa 802-3-ethernet enp0s3 virbr0 4f99dff9-d3fb-461a-b0d6-00297e7584a0 bridge virbr0 [root@localhost ~]# nmcli device show | grep -i device GENERAL.DEVICE: virbr0 GENERAL.DEVICE: enp0s3 GENERAL.DEVICE: enp0s8 GENERAL.DEVICE: lo GENERAL.DEVICE: virbr0-nic [root@localhost ~]# ifconfig enp0s3: flags=4163<UP,BROADCAST,RUNNING,MULTICAST> mtu 1500 inet 192.168.100.111 netmask 255.255.255.0 broadcast 192.168.100.255 inet6 fe80::6ea:59df:4b18:530b prefixlen 64 scopeid 0x20<link> ether 08:00:27:3e:f6:4d txqueuelen 1000 (Ethernet) RX packets 188 bytes 21984 (21.4 KiB) RX errors 0 dropped 0 overruns 0 frame 0 TX packets 246 bytes 38495 (37.5 KiB) TX errors 0 dropped 0 overruns 0 carrier 0 collisions 0 enp0s8: flags=4163<UP,BROADCAST,RUNNING,MULTICAST> mtu 1500 ether 08:00:27:45:59:30 txqueuelen 1000 (Ethernet) RX packets 63 bytes 9404 (9.1 KiB) RX errors 0 dropped 0 overruns 0 frame 0 TX packets 0 bytes 0 (0.0 B) TX errors 0 dropped 0 overruns 0 carrier 0 collisions 0 lo: flags=73<UP,LOOPBACK,RUNNING> mtu 65536 inet 127.0.0.1 netmask 255.0.0.0 inet6 ::1 prefixlen 128 scopeid 0x10<host> loop txqueuelen 1 (Local Loopback) RX packets 84 bytes 9340 (9.1 KiB) RX errors 0 dropped 0 overruns 0 frame 0 TX packets 84 bytes 9340 (9.1 KiB) TX errors 0 dropped 0 overruns 0 carrier 0 collisions 0 virbr0: flags=4099<UP,BROADCAST,MULTICAST> mtu 1500 inet 192.168.122.1 netmask 255.255.255.0 broadcast 192.168.122.255 ether 52:54:00:81:e7:fc txqueuelen 1000 (Ethernet) RX packets 0 bytes 0 (0.0 B) RX errors 0 dropped 0 overruns 0 frame 0 TX packets 0 bytes 0 (0.0 B) TX errors 0 dropped 0 overruns 0 carrier 0 collisions 0 [root@localhost ~]# |
#nmcli connection modify testbrifile ipv4.method manual ipv4.addresses "192.168.100.222/24 192.168.100.1" ipv4.dns 192.168.100.1
#nmcli connection add type bridge-slave con-name testbrislave1 ifname enpos8 master testbridevice
#nmcli connection down testbrifile
#nmcli connection up testbrifile
#nmcli connection up testbrislave1
#ping -I testbridevice 192.168.100.111 #-I表示从哪块网卡发出ping

相关文章推荐
- RHCE——配置链路聚合和桥接
- 网络桥接和链路聚合
- 管理聚合链路和桥接网络(多网卡绑定,redhat liunx 7.0) 基础知识
- 关于在链路聚合下做smart,monitor link的转发测试
- Linux-网络桥接和链路聚合
- 配置链路聚合和桥接
- RHCE7学习笔记29――配置链路聚合和桥接
- 3-2ipv6、链路聚合和桥接、图形化切换
- 链路聚合测试
- 链路聚合etherchannel
- C++设计模式---桥接模式—合成/聚合复用原则
- gstreamer 中 gst-inspect获取信息,gst-launch测试链路示例
- 链路聚合
- 思科、华为交换机链路聚合(LACP)配置实例
- VLC-DSS搭建直播系统中链路断开影响测试
- 链路聚合
- 链路聚合-CISCO
- 路由器链路聚合技术(Eth-Trunk、Ip-Trunk)
- CentOS 7 (聚合链路,GRUB配置文件)
- ENSP静态链路聚合实验配置要点及实例