使用swagger创建功能强大的API
2017-09-29 18:05
274 查看
wagger是什么?swagger官网对其的简介为:Swagger is the world’s largest framework of API developer tools for the OpenAPI Specification(OAS), enabling development across the entire API lifecycle, from design
and documentation, to test and deployment.从中我们可以看到,swagger符合OpenAPI的世界上最流行的API开发工具,它可以跨越API的整个生命周期,从设计到文档,到测试到部署。简单来说,swagger就是一款api生成工具,能够帮助我们构建功能强大的API,我们可以使用swagger来进行测试等等。
下面我们来动手实现一个简单的swagger工程。
为了方便快速,直接新建一个spring boot工程,起名为Swagger。spring boot就是一种简化了的spring的使用方式。不了解spring boot的可以自行百度。如果使用MyEclipse或者TST,IDEA等开发工具,可以直接new->Spring Starter Project.使用Eclipse的可以到spring-boot官网上直接生成项目,然后导入工程。spring-boot项目生成地址:https://start.spring.io/。新建工程时在dependency导航时只需选择web即可。如下:
在更目录下创建controller包和domain包。
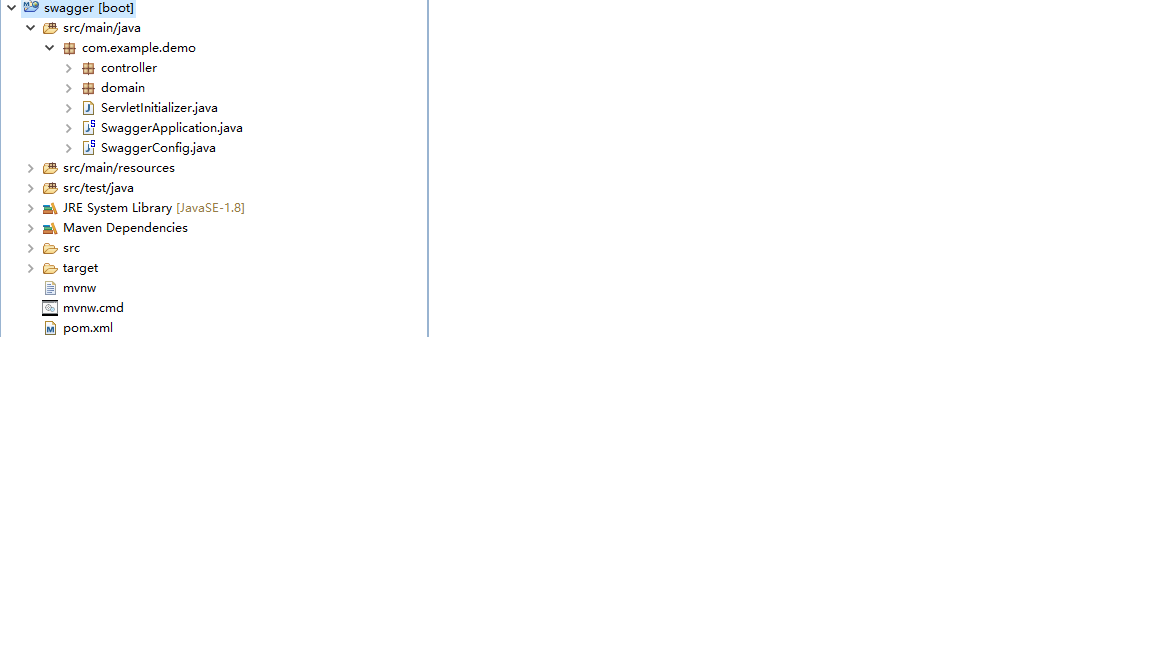
项目建成后,我们的项目结构看起来大概是这样的:
在pom中加入swagger的依赖:
<dependency>
<groupId>io.springfox</groupId>
<artifactId>springfox-swagger2</artifactId>
<version>2.2.2</version>
</dependency>
<dependency>
<groupId>io.springfox</groupId>
<artifactId>springfox-swagger-ui</artifactId>
<version>2.2.2</version>
</dependency>
在controller下创建SwaggerController.java文件。其中用到的一些注解就不详细解释了,稍微懂点英文的一看就懂。不懂的做完这个demo后看到效果也会懂了。
package com.example.demo.controller;
import java.util.HashMap;
import java.util.Map;
import org.springframework.web.bind.annotation.PathVariable;
import org.springframework.web.bind.annotation.RequestBody;
import org.springframework.web.bind.annotation.RequestMapping;
import org.springframework.web.bind.annotation.RequestMethod;
import org.springframework.web.bind.annotation.RestController;
import com.alibaba.fastjson.JSONObject;
import com.example.demo.domain.Student;
import io.swagger.annotations.ApiImplicitParam;
import io.swagger.annotations.ApiOperation;
@RestController
@RequestMapping("/students")
public class SwaggerController {
private static Map<String, Student> students=new HashMap<String, Student>();
@ApiOperation(value="加入一个学生",notes="根据提交的信息加入一个学生")
@ApiImplicitParam(name="student",value="要增加的学生信息",required=true,dataType="Student")
@RequestMapping(value="addStudent",method=RequestMethod.POST)
public String addStudent(@RequestBody Student student){
students.put(student.getStId(), student);
return "add student to students successfully";
}
@RequestMapping(value="/removeStudent/{stId}",method=RequestMethod.DELETE)
@ApiImplicitParam(name="id",required=true,dataType="String")
@ApiOperation(value="删除一个学生",notes="根据学生id删除学生")
public String removeStudent(@PathVariable("stId") String stId){
students.remove(stId);
return "remove student from students successfully";
}
@RequestMapping(value={""},method=RequestMethod.GET)
@ApiOperation(value="获取学生列表",notes="获取所有学生列表")
public String getAllStudent(){
return JSONObject.toJSONString(students);
}
}
在domain下面创建Student.java(省略getter/setter)
public class Student {
private String stId;
private String name;
private String height;
private String weight;
}
在SwaggerApplication.java的同级目录下面新建一个SwaggerConfig.java用来配置Swagger的相关信息。
package com.example.demo;
import org.springframework.context.annotation.Bean;
import org.springframework.context.annotation.Configuration;
import springfox.documentation.builders.ApiInfoBuilder;
import springfox.documentation.builders.PathSelectors;
import springfox.documentation.builders.RequestHandlerSelectors;
import springfox.documentation.service.ApiInfo;
import springfox.documentation.spi.DocumentationType;
import springfox.documentation.spring.web.plugins.Docket;
import springfox.documentation.swagger2.annotations.EnableSwagger2;
@Configuration
@EnableSwagger2
public class SwaggerConfig {
@Bean
public Docket getAPIDocket(){ //创建Swagger容器
return new Docket(DocumentationType.SWAGGER_2)//设置文档类型
.apiInfo(apiInfo())//api的相关描述信息,通常显示在页面的最上方
.select()//返回一个ApiSelectorBuilder,用来构建api容器
.apis(RequestHandlerSelectors.basePackage("com.example.demo.controller"))//设置扫描的包
.paths(PathSelectors.any())//设置扫描那些controller,这里设置扫描全部,可以传入正则表达式
.build();//构建api容器
}
private ApiInfo apiInfo(){
return new ApiInfoBuilder()
.title("张旭升")//标题
.description("使用swagger生成功能强大的API")//描述
.contact("张旭升")//联系信息
.version("1.0")//版本,除此之外还可以设置服务条款,license等信息。
.build();
}
}
在SwaggerConfig类中可能会报The type com.google.common.base.Predicate cannot be resolved的错误,是由于我们的项目中缺少google.common的包。引入google的guava包就可以了。maven依赖如下:
<dependency>
<groupId>com.google.guava</groupId>
<artifactId>guava</artifactId>
<version>22.0</version>
</dependency>
此时这个小demo已经搭建完毕,然后我们可以启动boot项目。直接run as Spring Boot App,或者直接以java application方式运行主类,或者在项目目录下使用mvn spring-boot:run运行项目。
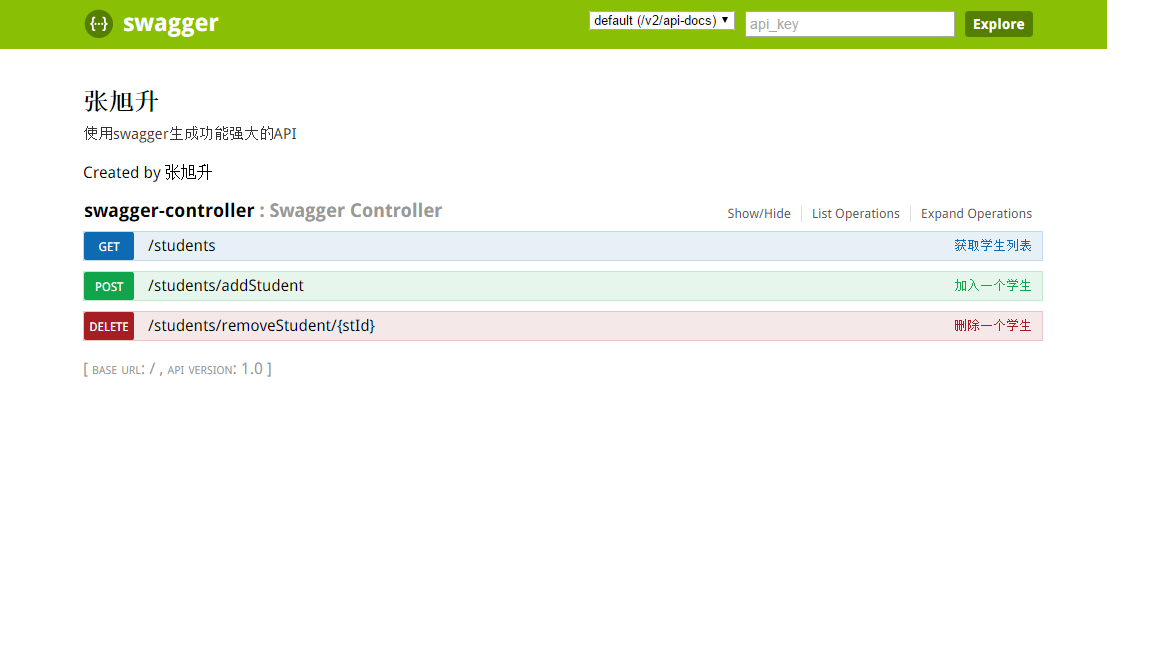
打开浏览器,输入http://localhost:8080/swagger-ui.html。如果你一切正常,界面应该是下面这个样子:
我们可以在接口上看到相关的描述,展开post请求接口,看到如下信息。
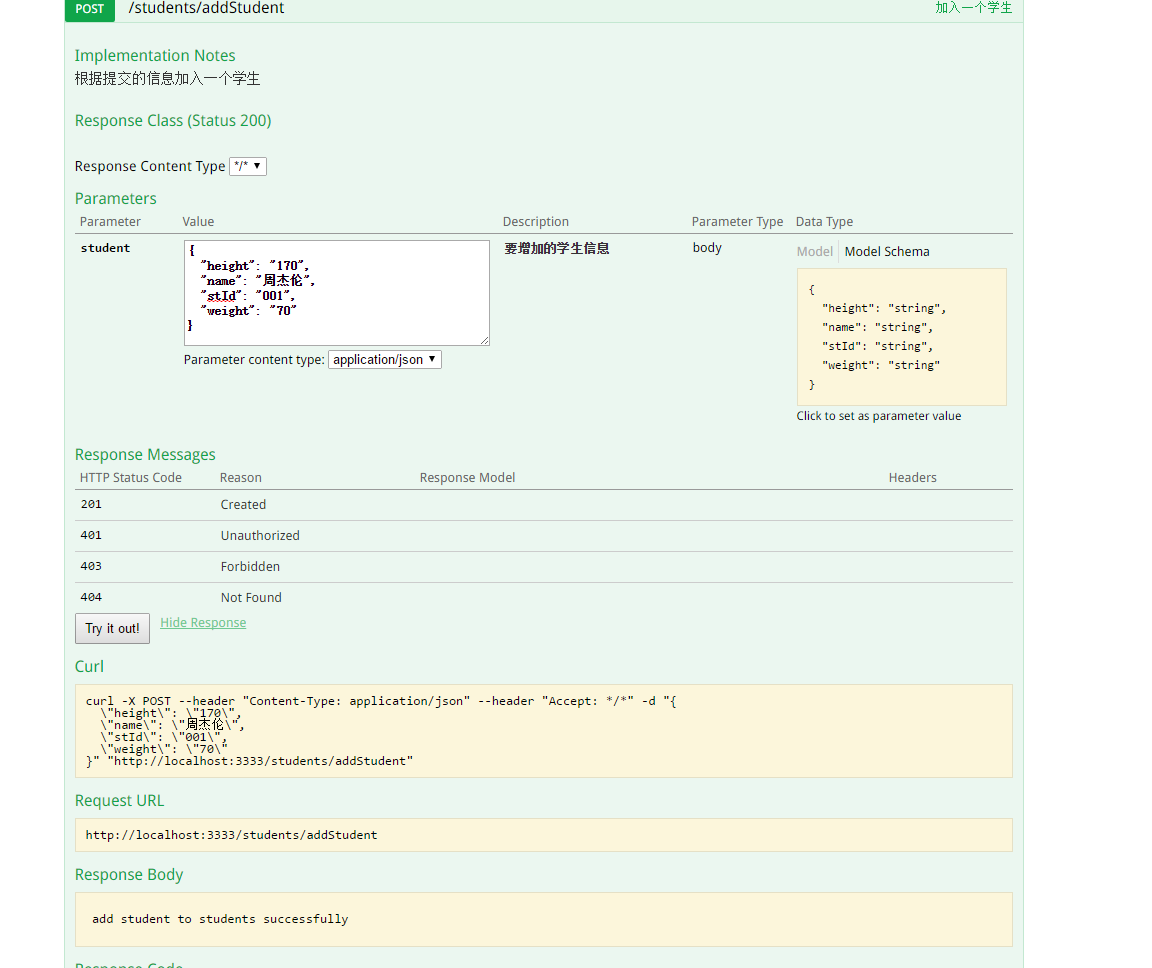
可以看到我们直接对接口进行测试。其他的使用方式类似。
想要了解更多的关于swagger的内容,可以访问swagger官方网站查看相关文档。https://swagger.io/
and documentation, to test and deployment.从中我们可以看到,swagger符合OpenAPI的世界上最流行的API开发工具,它可以跨越API的整个生命周期,从设计到文档,到测试到部署。简单来说,swagger就是一款api生成工具,能够帮助我们构建功能强大的API,我们可以使用swagger来进行测试等等。
下面我们来动手实现一个简单的swagger工程。
为了方便快速,直接新建一个spring boot工程,起名为Swagger。spring boot就是一种简化了的spring的使用方式。不了解spring boot的可以自行百度。如果使用MyEclipse或者TST,IDEA等开发工具,可以直接new->Spring Starter Project.使用Eclipse的可以到spring-boot官网上直接生成项目,然后导入工程。spring-boot项目生成地址:https://start.spring.io/。新建工程时在dependency导航时只需选择web即可。如下:
在更目录下创建controller包和domain包。
项目建成后,我们的项目结构看起来大概是这样的:
在pom中加入swagger的依赖:
<dependency>
<groupId>io.springfox</groupId>
<artifactId>springfox-swagger2</artifactId>
<version>2.2.2</version>
</dependency>
<dependency>
<groupId>io.springfox</groupId>
<artifactId>springfox-swagger-ui</artifactId>
<version>2.2.2</version>
</dependency>
在controller下创建SwaggerController.java文件。其中用到的一些注解就不详细解释了,稍微懂点英文的一看就懂。不懂的做完这个demo后看到效果也会懂了。
package com.example.demo.controller;
import java.util.HashMap;
import java.util.Map;
import org.springframework.web.bind.annotation.PathVariable;
import org.springframework.web.bind.annotation.RequestBody;
import org.springframework.web.bind.annotation.RequestMapping;
import org.springframework.web.bind.annotation.RequestMethod;
import org.springframework.web.bind.annotation.RestController;
import com.alibaba.fastjson.JSONObject;
import com.example.demo.domain.Student;
import io.swagger.annotations.ApiImplicitParam;
import io.swagger.annotations.ApiOperation;
@RestController
@RequestMapping("/students")
public class SwaggerController {
private static Map<String, Student> students=new HashMap<String, Student>();
@ApiOperation(value="加入一个学生",notes="根据提交的信息加入一个学生")
@ApiImplicitParam(name="student",value="要增加的学生信息",required=true,dataType="Student")
@RequestMapping(value="addStudent",method=RequestMethod.POST)
public String addStudent(@RequestBody Student student){
students.put(student.getStId(), student);
return "add student to students successfully";
}
@RequestMapping(value="/removeStudent/{stId}",method=RequestMethod.DELETE)
@ApiImplicitParam(name="id",required=true,dataType="String")
@ApiOperation(value="删除一个学生",notes="根据学生id删除学生")
public String removeStudent(@PathVariable("stId") String stId){
students.remove(stId);
return "remove student from students successfully";
}
@RequestMapping(value={""},method=RequestMethod.GET)
@ApiOperation(value="获取学生列表",notes="获取所有学生列表")
public String getAllStudent(){
return JSONObject.toJSONString(students);
}
}
在domain下面创建Student.java(省略getter/setter)
public class Student {
private String stId;
private String name;
private String height;
private String weight;
}
在SwaggerApplication.java的同级目录下面新建一个SwaggerConfig.java用来配置Swagger的相关信息。
package com.example.demo;
import org.springframework.context.annotation.Bean;
import org.springframework.context.annotation.Configuration;
import springfox.documentation.builders.ApiInfoBuilder;
import springfox.documentation.builders.PathSelectors;
import springfox.documentation.builders.RequestHandlerSelectors;
import springfox.documentation.service.ApiInfo;
import springfox.documentation.spi.DocumentationType;
import springfox.documentation.spring.web.plugins.Docket;
import springfox.documentation.swagger2.annotations.EnableSwagger2;
@Configuration
@EnableSwagger2
public class SwaggerConfig {
@Bean
public Docket getAPIDocket(){ //创建Swagger容器
return new Docket(DocumentationType.SWAGGER_2)//设置文档类型
.apiInfo(apiInfo())//api的相关描述信息,通常显示在页面的最上方
.select()//返回一个ApiSelectorBuilder,用来构建api容器
.apis(RequestHandlerSelectors.basePackage("com.example.demo.controller"))//设置扫描的包
.paths(PathSelectors.any())//设置扫描那些controller,这里设置扫描全部,可以传入正则表达式
.build();//构建api容器
}
private ApiInfo apiInfo(){
return new ApiInfoBuilder()
.title("张旭升")//标题
.description("使用swagger生成功能强大的API")//描述
.contact("张旭升")//联系信息
.version("1.0")//版本,除此之外还可以设置服务条款,license等信息。
.build();
}
}
在SwaggerConfig类中可能会报The type com.google.common.base.Predicate cannot be resolved的错误,是由于我们的项目中缺少google.common的包。引入google的guava包就可以了。maven依赖如下:
<dependency>
<groupId>com.google.guava</groupId>
<artifactId>guava</artifactId>
<version>22.0</version>
</dependency>
此时这个小demo已经搭建完毕,然后我们可以启动boot项目。直接run as Spring Boot App,或者直接以java application方式运行主类,或者在项目目录下使用mvn spring-boot:run运行项目。
打开浏览器,输入http://localhost:8080/swagger-ui.html。如果你一切正常,界面应该是下面这个样子:
我们可以在接口上看到相关的描述,展开post请求接口,看到如下信息。
可以看到我们直接对接口进行测试。其他的使用方式类似。
想要了解更多的关于swagger的内容,可以访问swagger官方网站查看相关文档。https://swagger.io/

相关文章推荐
- 功能强大的swagger-editor的介绍与使用
- 使用AJAX优化客户端——Iconix Pharmaceuticals使用AJAX和J2EE创建功能强大的瘦客户端的实践(译文)
- 使用AJAX和J2EE创建功能强大的瘦客户端
- 使用AJAX优化客户端——Iconix Pharmaceuticals使用AJAX和J2EE创建功能强大的瘦客户端的实践(译文)
- 使用AJAX优化客户端——Iconix Pharmaceuticals使用AJAX和J2EE创建功能强大的瘦客户端的实践(译文)
- 使用AJAX优化客户端——Iconix Pharmaceuticals使用AJAX和J2EE创建功能强大的瘦客户端的实践(译文)
- 使用AJAX优化客户端——Iconix Pharmaceuticals使用AJAX和J2EE创建功能强大的瘦客户端的实践(译文)
- JAR 文件格式的强大功能(java中jar工具的使用)
- 使用 Flash Lite 为移动电话和消费性电子设备创建强大的体验
- JAR 文件格式的强大功能(java中jar工具的使用)
- 使用 SQL SERVER 2005 新增功能--- DDL_DATABASE_LEVEL_EVENTS 数据库级的触发器,创建数据库日志表
- 免费使用Anole示例——动态创建带有排序功能和下拉列表风格的组合框
- 使用Win32 API创建串口通讯程序
- 声卡虚拟示波器简单功能-使用matlab DAQ工具箱中API实现
- No MFC,Only API--状态栏的创建和使用
- 使用Ext中的Grid,Form,Dialog来实现列表,创建,更新,删除,查找和分页功能
- JDK核心API:使用动态代理实现AOP功能
- .net类库虽然强大,据本人查找,好像还不能实现查看磁盘信息的功能!以下是借助API包装的磁盘类
- 使用JFreeChart来创建基于web的带交互功能的PIE图表(一)
- 使用CMS方法开发功能强大的Web程序