疯狂Spring Cloud连载(5)Eureka集群搭建
2017-09-29 18:03
656 查看
摘要: Spring Cloud Eureka 集群 视频
本文节选自《疯狂Spring Cloud微服务架构实战》
京东购买地址:https://item.jd.com/12256011.html
当当网购买地址:http://product.dangdang.com/25201393.html
Spring Cloud教学视频:https://my.oschina.net/JavaLaw/blog/1552993
Spring Cloud电子书:https://my.oschina.net/JavaLaw/blog/1570383
在运行第一个Eureka应用时,服务器实例、服务提供者实例都只是启动了一个,并没有体现高可用的特性,本小节将对前面的Eureka应用进行改造,使其可以进行集群部署。
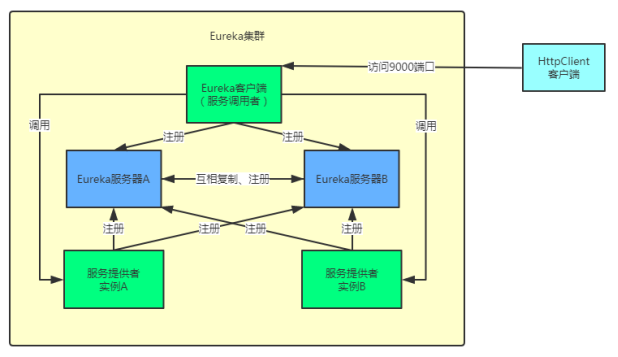
图3-6 集群结构
第一个Eureka应用,使用的是浏览器访问Eureka的服务调用者,而改造后,为了能看到负载均衡的效果,会编写一个HttpClient的REST客户端访问服务调用者发布的服务。
由于本书的开发环境只有一台电脑,操作系统为Windows,如果要构建集群,需要修改hosts文件,为其添加主机名的映射。修改C:\Windows\System32\drivers\etc\hosts文件,添加以下内容:
127.0.0.1 slave1 slave2
代码清单3-10:codes\03\3.3\first-cloud-server\src\main\resources\application.yml
本文节选自《疯狂Spring Cloud微服务架构实战》
京东购买地址:https://item.jd.com/12256011.html
当当网购买地址:http://product.dangdang.com/25201393.html
Spring Cloud教学视频:https://my.oschina.net/JavaLaw/blog/1552993
Spring Cloud电子书:https://my.oschina.net/JavaLaw/blog/1570383
5 Eureka集群搭建
5.1 Eureka集群搭建在运行第一个Eureka应用时,服务器实例、服务提供者实例都只是启动了一个,并没有体现高可用的特性,本小节将对前面的Eureka应用进行改造,使其可以进行集群部署。
5.1.1 本例集群结构图
本例将会运行两个服务器实例、两个服务提供者实例,然后服务调用者请求服务,集群结构如图3-6所示。图3-6 集群结构
第一个Eureka应用,使用的是浏览器访问Eureka的服务调用者,而改造后,为了能看到负载均衡的效果,会编写一个HttpClient的REST客户端访问服务调用者发布的服务。
由于本书的开发环境只有一台电脑,操作系统为Windows,如果要构建集群,需要修改hosts文件,为其添加主机名的映射。修改C:\Windows\System32\drivers\etc\hosts文件,添加以下内容:
127.0.0.1 slave1 slave2
5.1.2 改造服务器端
新建项目“first-cloud-server”,使用Maven配置与连载四的服务器一致,由于需要对同一个应用程序启动两次,因此需要在配置文件中使用profiles(关于profiles已经在连载三中讲述过)。服务器配置文件请见代码清单3-10。代码清单3-10:codes\03\3.3\first-cloud-server\src\main\resources\application.yml
server: port: 8761 spring: application: name: first-cloud-server profiles: slave1 eureka: instance: hostname: slave1 client: serviceUrl: defaultZone: http://slave2:8762/eureka/ --- server: port: 8762 spring: application: name: first-cloud-server profiles: slave2 eureka: instance: hostname: slave2 client: serviceUrl: defaultZone: http://slave1:8761/eureka/[/code] 代码清单3-10中配置了两个profiles,名称分别为slave1和slave2。在slave1中,配置了应用端口为8761,主机名为slave1,当使用salve1这个profiles来启动服务器时,将会向http://slave2:8762/eureka/注册自己。使用salve2来启动服务器,会向http://slave1:8761/eureka/注册自己。简单点说,就是两个服务器启动后,它们会互相注册。
修改启动类,让类在启动时,读取控制台的输入,决定使用哪个profiles来启动服务器,请见代码清单3-11。
代码清单3-11:
codes\03\3.3\first-cloud-server\src\main\java\org\crazyit\cloud\FirstServer.java@SpringBootApplication @EnableEurekaServer public class FirstServer { public static void main(String[] args) { // 读取控制台输入,决定使用哪个profiles Scanner scan = new Scanner(System.in); String profiles = scan.nextLine(); new SpringApplicationBuilder(FirstServer.class).profiles(profiles).run(args); } }
启动类中,先读取控制的输入,再调用profiles方法来设置启动的profles。需要注意的是,第一个启动的服务器会抛出异常,异常原因我们前已经讲述,抛出的异常可不必理会。5.1.3 改造服务提供者
服务提供者也需要启动两个实例,服务提供者的改造与服务端类似,将边载四中的“first-ek-service-provider”复制出来,并改名为“first-cloud-provider”。修改配置文件,将服务提供者注册到两个服务器中,配置文件请见代码清单3-12。
代码清单3-12:codes\03\3.3\first-cloud-provider\src\main\resources\application.ymlspring: application: name: first-cloud-provider eureka: instance: hostname: localhost client: serviceUrl: defaultZone: http://localhost:8761/eureka/,http://localhost:8762/eureka/[/code] 再修改启动类,为了避免端口决定,启动时读取控制台输出,决定使用哪个端口来启动,启动类如代码清单3-13所示。
代码清单3-13:
codes\03\3.3\first-cloud-provider\src\main\java\org\crazyit\cloud\FirstServiceProvider.java@SpringBootApplication @EnableEurekaClient public class FirstServiceProvider { public static void main(String[] args) { // 读取控制台输入的端口,避免端口冲突 Scanner scan = new Scanner(System.in); String port = scan.nextLine(); new SpringApplicationBuilder(FirstServiceProvider.class).properties( "server.port=" + port).run(args); } }
启动类中使用了properties方法来设置启动端口。为了能看到效果,还需要改造控制器,将服务调用者请求的URL保存起来并返回,修改后的控制器请见代码清单3-14。
代码清单3-14:
codes\03\3.3\first-cloud-provider\src\main\java\org\crazyit\cloud\FirstController.java@RestController public class FirstController { @RequestMapping(value = "/person/{personId}", method = RequestMethod.GET, produces = MediaType.APPLICATION_JSON_VALUE) public Person findPerson(@PathVariable("personId") Integer personId, HttpServletRequest request) { Person person = new Person(personId, "Crazyit", 30); // 为了查看结果,将请求的URL设置到Person实例中 person.setMessage(request.getRequestURL().toString()); return person; } }
控制器的findPerson方法,将请求的URL保存到Person实例的message属性中,调用服务后,可以通过message属性来查看请求的URL。5.1.4 改造服务调用者
将连载四中的“first-ek-service-invoker”复制并改名为“first-cloud-invoker”。本例中的服务调用者只需启动一个实例,因此修改下配置文件即可使用,请见代码清单3-15。
代码清单3-15:codes\03\3.3\first-cloud-invoker\src\main\resources\application.ymlserver: port: 9000 spring: application: name: first-cloud-invoker eureka: instance: hostname: localhost client: serviceUrl: defaultZone: http://slave1:8761/eureka/,http://slave2:8761/eureka/[/code] 修改的配置,将服务调用注册到两个服务器上。5.1.5 编写REST客户端进行测试
本例使用的是HttpClient,HttpClient是Apache提供的一个HTTP工具包。新建名称为“first-cloud-rest-client”的项目,在pom.xml中加入以下依赖:<dependency> <groupId>org.apache.httpcomponents</groupId> <artifactId>httpclient</artifactId> <version>4.5.2</version> </dependency>
新建启动类,在main方法中编写调用REST服务的代码,如代码清单3-16所示。
代码清单3-16:
03\3.3\first-cloud-rest-client\src\main\java\org\crazyit\cloud\TestHttpClient.javapublic static void main(String[] args) throws Exception { // 创建默认的HttpClient CloseableHttpClient httpclient = HttpClients.createDefault(); // 调用6次服务并输出结果 for(int i = 0; i < 6; i++) { // 调用 GET 方法请求服务 HttpGet httpget = new HttpGet("http://localhost:9000/router"); // 获取响应 HttpResponse response = httpclient.execute(httpget); // 根据 响应解析出字符串 System.out.println(EntityUtils.toString(response.getEntity())); } }
在main方法,调用了6次9000端口的router服务并输出结果。完成编写后,按以下顺序启动各个组件:
启动两个服务器端,控制台中分别输入“slave1”和“slave2”。
启动两个服务提供者,控制台分别输入8081与8082。
启动服务调用者。
启动了整个集群后,运行TestHttpClient,可以看到输出如下:{"id":1,"name":"Crazyit","age":30,"message":"http://localhost:8081/person/1"} {"id":1,"name":"Crazyit","age":30,"message":"http://localhost:8082/person/1"} {"id":1,"name":"Crazyit","age":30,"message":"http://localhost:8081/person/1"} {"id":1,"name":"Crazyit","age":30,"message":"http://localhost:8082/person/1"} {"id":1,"name":"Crazyit","age":30,"message":"http://localhost:8081/person/1"} {"id":1,"name":"Crazyit","age":30,"message":"http://localhost:8082/person/1"}
根据输出结果可知,8081与8082端口分别被请求了3次,可见已经达到负载均衡的目的,关于负载均衡更详细的内容,将在后面章节中讲解。
本文节选自《疯狂Spring Cloud微服务架构实战》
Spring Cloud教学视频:https://my.oschina.net/JavaLaw/blog/1552993
Spring Cloud电子书:https://my.oschina.net/JavaLaw/blog/1570383
本书代码共享地址:https://gitee.com/yangenxiong/SpringCloud


相关文章推荐
- 疯狂Spring Cloud连载(2)搭建开发环境
- 疯狂Spring Cloud连载(23)Spring Cloud集群使用Zuul
- SpringCloud构建微服务入门架构(二)服务注册与发现Eureka集群搭建
- 疯狂Spring Cloud连载(4)第一个Eureka程序
- spring cloud eureka搭建dcos上集群
- 疯狂Spring Cloud连载(2)开发环境搭建
- Spring Cloud入门二:eureka集群
- 【Spring Cloud】Eureka服务注册中心搭建
- 【Spring Cloud】Eureka服务注册中心搭建
- 疯狂Spring Cloud连载(16)Hystrix运作流程
- 【微服务架构】SpringCloud之Eureka(注册中心集群篇)(三)
- spring cloud eureka 集群 服务集群 测试
- 四、Spring Cloud - Netflix(Eureka注册中心集群构建代码层面)
- 搭建及使用K8s集群 <k8s 集群部署springcloud 多应用>
- 【Spring Cloud】Eureka服务注册中心搭建
- 疯狂Spring Cloud连载(14)Spring Cloud整合Feign
- 每天学点SpringCloud(三):自定义Eureka集群负载均衡策略
- 疯狂Spring Cloud连载(28)开发消息微服务
- 疯狂Spring Cloud连载(28)开发消息微服务
- 疯狂Spring Cloud连载(12)自定义Feign客户端