IOS控件系列----使用UITableView实现网格布局,自定义显示列数
2017-09-28 19:53
435 查看
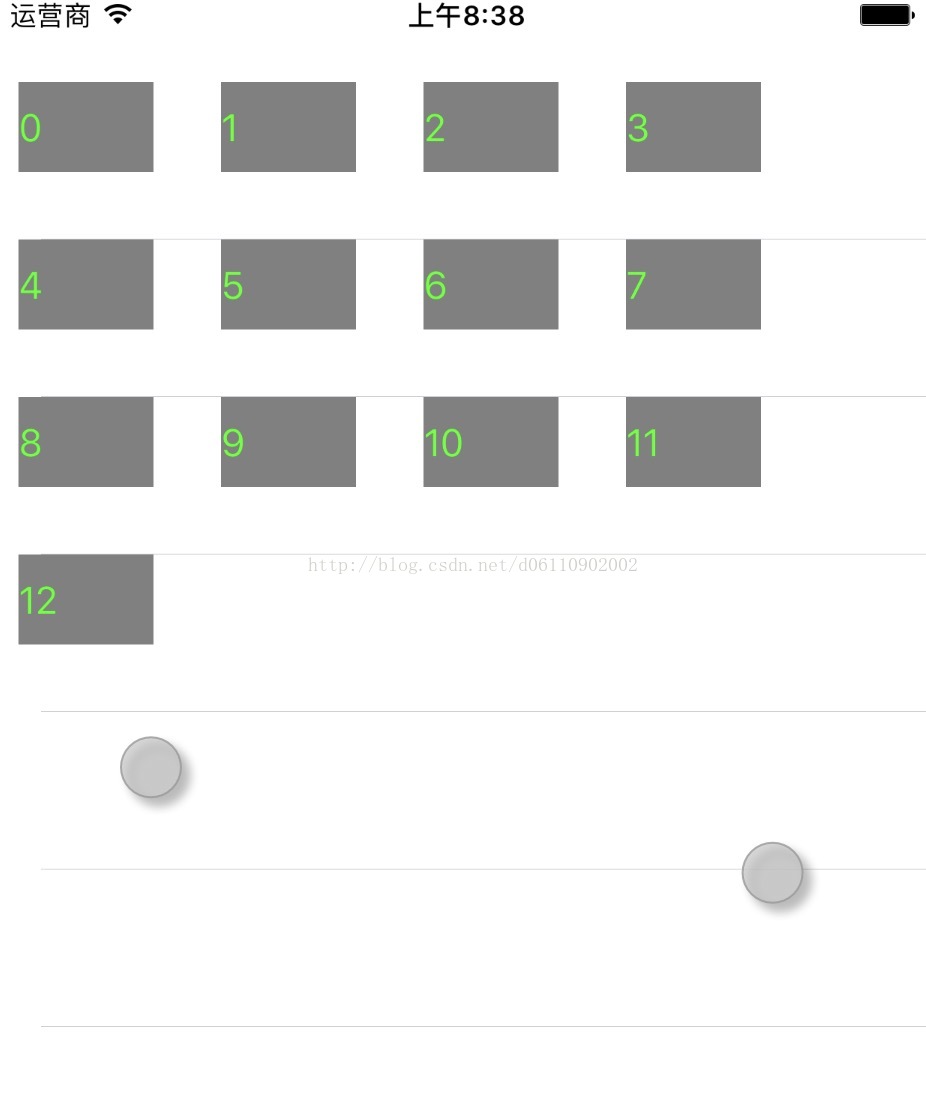
先放一引效果图:
在IOS中达到类似Android中的GridLayout 通常是使用UIConlectionView,这个组件是平果公司已经封装好的,直接实现相应的接口即可。不知道各位道友是否也曾想过用UItableView来撸一个这个东西,这可能会有一点偏执,但对于致力于提高自己的人来说,不安于现状,死喜欢用各种自定义的东西来“折腾”自己也不失为一种方式。
我本人就比较喜欢在闲时撸一些小框架,右边是我的github地址 点击这里有惊喜
想要用UITableView来呈现网格布局需要解决如下几个问题。
问题一:默认的UITableView行数显示的是一个,即显示一个UITableViewCell ,这个东西,不知道各位有使用的时候有没有注意到你不需要设置它的frame ,它也能完美在呆在UIUItabVlew中,只因平果公司为我们做好了,在设置单元格高度的时候,就固定了UITableViewCell的frame
在实现这个接口的时候 ,需要我们返回一个高度值
UITableViewCell 个类扩展于UIView,看到UIView道友可能来兴趣了,在IOS中有了UIView几乎可以干一切“坏事”
UIView有容乃大,
把UITableViewCell当作容器,然后自定义一个UIView作为UITableViewCell的子元素来呈现我们想要呈现的数据即可解决问题一
问题二:列数的展示?
先说一个题外话,UITableView的复用机制,是针对UITableViewCell而言的,对UITableViewCell内容的子元素并未做到复用优化,这里我也没有想到想到优化方案,如果你想到了,请留下你的评论,我们一起交流下
回到主题 --列数的应该是可以定义的,那么当列数设定好之后,相应的显示的行数也应该要进行变化,计算式子如下:
行数 = (数据列表的长度 -1)./ 列数 + 1
本案例代码为:
rowNum = (dataList.count - 1) / colNum + 1
}
//implements protocol
func tableView(_ tableView: UITableView, numberOfRowsInSection section: Int) -> Int {
return rowNum
}
问题三:之前使用UITableView时,将数据打到UITableViewCell上时,是按行进行绑定的,现在是一行显示多列数据就需要重写这个接口
func tableView(_ tableView:
UITableView, cellForRowAt indexPath:
IndexPath) -> UITableViewCell
使其在数据列表中取到正确索引的数据
func tableView(_ tableView: UITableView, cellForRowAt indexPath: IndexPath) -> UITableViewCell {
let cell : UITableViewCell = UITableViewCell()
for i in 0..<colNum {
if indexPath.row * colNum + i >= self.dataList.count {
break;
}
let view : TestView = TestView()
view.label.text = dataList[indexPath.row * colNum + i]
view.label.textColor = UIColor.green
view.frame = CGRect.init(x: i * 90 + 10, y: 0, width: 60, height: 40)
cell.addSubview(view)
}
return cell
}
一些该丢出去的属性,这里未做过多说明,相信你完全有这个能力将其美化,本案例权当抛砖引玉,介绍下设计思路:
完整代码如下:
import UIKit
class ViewController: UIViewController,UITableViewDelegate,UITableViewDataSource {
lazy var tableView : UITableView = {() -> UITableView in
var tabView : UITableView = UITableView.init(frame: CGRect.init(x: 0, y: 40, width: UIScreen.main.bounds.width, height: UIScreen.main.bounds.height))
return tabView
}()
lazy var dataList : Array<String> = {() -> Array<String> in
var arr : Array<String> = Array<String>()
return arr
}()
let colNum : Int = 4
var rowNum : Int = 0
override func viewDidLoad() {
super.viewDidLoad()
initView()
}
func initView() {
tableView.delegate = self
tableView.dataSource = self
self.view.addSubview(tableView)
//初始化数据
for i in 0..<13{
dataList.append(String.init(format: "%d", i))
}
rowNum = (dataList.count - 1) / colNum + 1
}
//implements protocol
func tableView(_ tableView: UITableView, numberOfRowsInSection section: Int) -> Int {
return rowNum
}
//implements protocol
func tableView(_ tableView: UITableView, heightForRowAt indexPath: IndexPath) -> CGFloat {

return 70
}
//implements protocol
func tableView(_ tableView: UITableView, cellForRowAt indexPath: IndexPath) -> UITableViewCell {
let cell : UITableViewCell = UITableViewCell()
for i in 0..<colNum {
if indexPath.row * colNum + i >= self.dataList.count {
break;
}
let view : TestView = TestView()
view.label.text = dataList[indexPath.row * colNum + i]
view.label.textColor = UIColor.green
view.frame = CGRect.init(x: i * 90 + 10, y: 0, width: 60, height: 40)
cell.addSubview(view)
}
return cell
}
override func didReceiveMemoryWarning() {
super.didReceiveMemoryWarning()
// Dispose of any resources that can be recreated.
}
}
在IOS中达到类似Android中的GridLayout 通常是使用UIConlectionView,这个组件是平果公司已经封装好的,直接实现相应的接口即可。不知道各位道友是否也曾想过用UItableView来撸一个这个东西,这可能会有一点偏执,但对于致力于提高自己的人来说,不安于现状,死喜欢用各种自定义的东西来“折腾”自己也不失为一种方式。
我本人就比较喜欢在闲时撸一些小框架,右边是我的github地址 点击这里有惊喜
想要用UITableView来呈现网格布局需要解决如下几个问题。
问题一:默认的UITableView行数显示的是一个,即显示一个UITableViewCell ,这个东西,不知道各位有使用的时候有没有注意到你不需要设置它的frame ,它也能完美在呆在UIUItabVlew中,只因平果公司为我们做好了,在设置单元格高度的时候,就固定了UITableViewCell的frame
在实现这个接口的时候 ,需要我们返回一个高度值
func tableView(_ tableView: UITableView, heightForRowAt indexPath: IndexPath) -> CGFloat {
return 70
}为了解决这个问题,我们曲线救国,既然UITableViewCell不然改变座标,那么我们移动它内部的元素应该就行UITableViewCell 个类扩展于UIView,看到UIView道友可能来兴趣了,在IOS中有了UIView几乎可以干一切“坏事”
UIView有容乃大,
把UITableViewCell当作容器,然后自定义一个UIView作为UITableViewCell的子元素来呈现我们想要呈现的数据即可解决问题一
问题二:列数的展示?
先说一个题外话,UITableView的复用机制,是针对UITableViewCell而言的,对UITableViewCell内容的子元素并未做到复用优化,这里我也没有想到想到优化方案,如果你想到了,请留下你的评论,我们一起交流下
回到主题 --列数的应该是可以定义的,那么当列数设定好之后,相应的显示的行数也应该要进行变化,计算式子如下:
行数 = (数据列表的长度 -1)./ 列数 + 1
本案例代码为:
rowNum = (dataList.count - 1) / colNum + 1
}
//implements protocol
func tableView(_ tableView: UITableView, numberOfRowsInSection section: Int) -> Int {
return rowNum
}
问题三:之前使用UITableView时,将数据打到UITableViewCell上时,是按行进行绑定的,现在是一行显示多列数据就需要重写这个接口
func tableView(_ tableView:
UITableView, cellForRowAt indexPath:
IndexPath) -> UITableViewCell
使其在数据列表中取到正确索引的数据
func tableView(_ tableView: UITableView, cellForRowAt indexPath: IndexPath) -> UITableViewCell {
let cell : UITableViewCell = UITableViewCell()
for i in 0..<colNum {
if indexPath.row * colNum + i >= self.dataList.count {
break;
}
let view : TestView = TestView()
view.label.text = dataList[indexPath.row * colNum + i]
view.label.textColor = UIColor.green
view.frame = CGRect.init(x: i * 90 + 10, y: 0, width: 60, height: 40)
cell.addSubview(view)
}
return cell
}
一些该丢出去的属性,这里未做过多说明,相信你完全有这个能力将其美化,本案例权当抛砖引玉,介绍下设计思路:
完整代码如下:
import UIKit
class ViewController: UIViewController,UITableViewDelegate,UITableViewDataSource {
lazy var tableView : UITableView = {() -> UITableView in
var tabView : UITableView = UITableView.init(frame: CGRect.init(x: 0, y: 40, width: UIScreen.main.bounds.width, height: UIScreen.main.bounds.height))
return tabView
}()
lazy var dataList : Array<String> = {() -> Array<String> in
var arr : Array<String> = Array<String>()
return arr
}()
let colNum : Int = 4
var rowNum : Int = 0
override func viewDidLoad() {
super.viewDidLoad()
initView()
}
func initView() {
tableView.delegate = self
tableView.dataSource = self
self.view.addSubview(tableView)
//初始化数据
for i in 0..<13{
dataList.append(String.init(format: "%d", i))
}
rowNum = (dataList.count - 1) / colNum + 1
}
//implements protocol
func tableView(_ tableView: UITableView, numberOfRowsInSection section: Int) -> Int {
return rowNum
}
//implements protocol
func tableView(_ tableView: UITableView, heightForRowAt indexPath: IndexPath) -> CGFloat { return 70 }
//implements protocol
func tableView(_ tableView: UITableView, cellForRowAt indexPath: IndexPath) -> UITableViewCell {
let cell : UITableViewCell = UITableViewCell()
for i in 0..<colNum {
if indexPath.row * colNum + i >= self.dataList.count {
break;
}
let view : TestView = TestView()
view.label.text = dataList[indexPath.row * colNum + i]
view.label.textColor = UIColor.green
view.frame = CGRect.init(x: i * 90 + 10, y: 0, width: 60, height: 40)
cell.addSubview(view)
}
return cell
}
override func didReceiveMemoryWarning() {
super.didReceiveMemoryWarning()
// Dispose of any resources that can be recreated.
}
}

相关文章推荐
- iOS开发UI基础—24使用纯代码自定义UItableviewcell实现一个简单的微博界面布局
- IOS 开发使用UITableView实现自动布局多个button 按钮
- ios开发UI基础—使用纯代码自定义UItableviewcell实现一个简单的微博界面布局
- IOS 使用CoreText实现表情文本URL等混合显示控件
- ios开发UI篇—使用纯代码自定义UItableviewcell实现一个简单的微博界面布局
- IOS 使用CoreText实现表情文本URL等混合显示控件
- iOS开发UI篇—使用纯代码自定义UItableviewcell实现一个简单的微博界面布局
- Swift - 使用网格(UICollectionView)的自定义布局实现复杂页面
- ios的collection控件的自定义布局实现与设计
- ios开发UI篇—使用纯代码自定义UItableviewcell实现一个简单的微博界面布局
- 自定义自动换行布局控件,实现子控件宽度超出整行时自动换行。setMeasuredDimension的使用
- 实现TextView可最多两行显示、右边控件紧跟TextView效果自定义布局
- 自定义自动换行布局控件,实现子控件宽度超出整行时自动换行。setMeasuredDimension的使用
- iOS - 支持水平 / 垂直显示自动滚动的跑马灯控件 --- SKAutoScrollLabel 的使用和实现
- IOS 使用CoreText实现表情文本URL等混合显示控件
- IOS 使用自定义View实现圆形布局(Swift)
- IOS 使用CoreText实现表情文本URL等混合显示控件
- Swift - 使用网格(UICollectionView)的自定义布局实现复杂页面
- ios开发UI篇—使用纯代码自定义UItableviewcell实现一个简单的微博界面布局
- ios开发UI篇—使用纯代码自定义UItableviewcell实现一个简单的微博界面布局