【MantisBT】之在linux环境上的安装搭建
2017-09-28 14:45
323 查看
在工作中,选用了MantisBT作为公司的BTS工具。MantisBT的作为一款缺陷跟踪管理系统,有以下优点:
开源、 免费;
可与开源的testlink集成,便于统计bug的用例发现率;
具有bug关联功能;
权限设置灵活,不同角色有不同权限;
具有邮件通知功能,每个用户可根据自身的工作特点只订阅相关缺陷状态邮件;
提供多维度,多种表现形式的统计数据;
软件环境:
CentOS 6.5 ;
MantisBT-1.2.18 ;
xampp-linux-x64-5.6.3 ;
注:xampp能快速搭建LAMP环境,提高部署效率。
执行命令:
执行过程:
执行命令:
执行过程,交互的过程如粗体部分。
[root@iserver1 htdocs]#
执行命令:
执行内容, 交互的过程如粗体部分。
至此,LAMP环境搭建完成。
2. 查看xampp运行状态
2. 执行命令,获取mantisbt的安装包:
3. 解压mantisbt的压缩包,执行命令
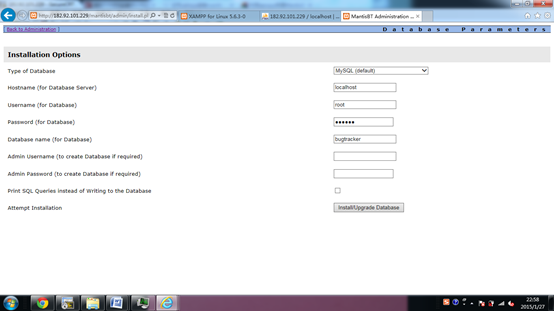
1. 访问http://serverIP/mantisbt/index.php,自动跳转到http://serverIP/mantisbt/admin/install.php页面,在该页面建立mantisbt的数据库;
2. 在以下页面,root的密码为“xx”,直接点击“INSTALL/update database”即可。
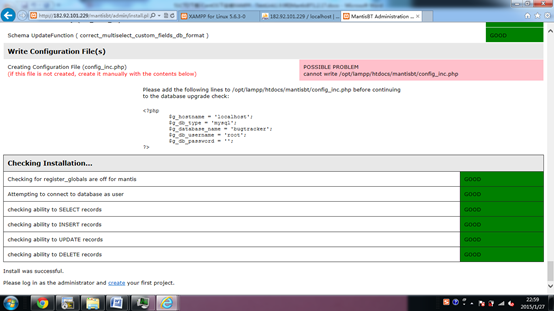
3. 数据库创建成功,通过http://serverIP/phpmyadmin/,可查看bugtracker数据库的创建情况。
执行以下命令:
2. [root@localhost mantisbt]#
执行以下命令:
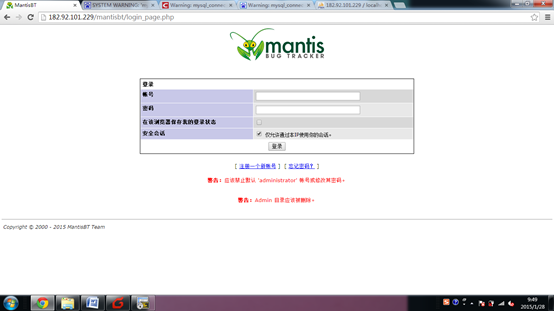
1. 执行命令:
2. 在个人资料内,点击:更改个人设置,选择界面语言:chinese_simplified
3. 界面更新为中文版
2. 在个人资料内,点击:更改个人设置,选择时区:shanghai
测试新用户注册,给管理员发送邮件成功。
至此,MantisBT的安装部署已经完成。
开源、 免费;
可与开源的testlink集成,便于统计bug的用例发现率;
具有bug关联功能;
权限设置灵活,不同角色有不同权限;
具有邮件通知功能,每个用户可根据自身的工作特点只订阅相关缺陷状态邮件;
提供多维度,多种表现形式的统计数据;
软件环境:
CentOS 6.5 ;
MantisBT-1.2.18 ;
xampp-linux-x64-5.6.3 ;
注:xampp能快速搭建LAMP环境,提高部署效率。
1. xampp环境搭建
1.1. 下载xampp安装包
[root@iserver1 tmp]#执行命令:
| wget http://sourceforge.net/projects/xampp/files/XAMPP%20Linux/5.6.3/xampp-linux-x64-5.6.3-0-installer.run |
| http://sourceforge.net/projects/xampp/files/XAMPP%20Linux/5.6.3/xampp-linux-x64-5.6.3-0-installer.run Resolving sourceforge.net... 216.34.181.60 Connecting to sourceforge.net|216.34.181.60|:80... connected. 。。。。。。。 Connecting to jaist.dl.sourceforge.net|150.65.7.130|:80... connected. HTTP request sent, awaiting response... 200 OK Length: 128831805 (123M) [application/x-makeself] Saving to: “xampp-linux-x64-5.6.3-0-installer.run” 100%[=============================================================================================================================>] 128,831,805 4.06M/s in 26s 2015-01-27 21:49:31 (4.71 MB/s) - “xampp-linux-x64-5.6.3-0-installer.run” saved [128831805/128831805] |
1.2. 安装xampp
[root@iserver1 tmp]#执行命令:
| chmod +x xampp-linux-x64-5.6.3-0-installer.run ./xampp-linux-x64-5.6.3-0-installer.run |
| ---------------------------------------------------------------------------- Welcome to the XAMPP Setup Wizard. ---------------------------------------------------------------------------- Select the components you want to install; clear the components you do not want to install. Click Next when you are ready to continue. XAMPP Core Files : Y (Cannot be edited) XAMPP Developer Files [Y/n] :y Is the selection above correct? [Y/n]: y ---------------------------------------------------------------------------- Installation Directory XAMPP will be installed to /opt/lampp Press [Enter] to continue: ---------------------------------------------------------------------------- Setup is now ready to begin installing XAMPP on your computer. Do you want to continue? [Y/n]: y ---------------------------------------------------------------------------- Please wait while Setup installs XAMPP on your computer. Installing 0% ______________ 50% ______________ 100% ######################################### ---------------------------------------------------------------------------- Setup has finished installing XAMPP on your computer. |
1.3. 配置xmapp安全策略
[root@iserver1 htdocs]#执行命令:
| /opt/lampp/xampp security |
| XAMPP: Quick security check... XAMPP: Your XAMPP pages are NOT secured by a password. XAMPP: Do you want to set a password? [yes] yes XAMPP: Password: XXXXX XAMPP: Password (again): XAMPP: Password protection active. Please use 'xampp' as user name! XAMPP: MySQL is accessable via network. XAMPP: Normaly that's not recommended. Do you want me to turn it off? [yes] y XAMPP: Turned off. XAMPP: MySQL has to run before I can check the security. XAMPP: MySQL has to run before I can check the security. XAMPP: MySQL has a root passwort set. Fine! :) XAMPP: The FTP password for user 'daemon' is still set to 'xampp'. XAMPP: Do you want to change the password? [yes] yes XAMPP: Password: XXXXX XAMPP: Password (again): XAMPP: Reload ProFTPD...not running. XAMPP: Done. |
1.4. 运维xampp
1. 设置xampp开机自启,执行以下命令:| ln -s /opt/lampp/lampp /etc/rc.d/rc3.d/S99lampp ln -s /opt/lampp/lampp /etc/rc.d/rc4.d/S99lampp ln -s /opt/lampp/lampp /etc/rc.d/rc5.d/S99lampp |
| [root@localhost ~]# /opt/lampp/lampp start #启动lampp [root@localhost ~]# /opt/lampp/lampp stop #停止lampp [root@localhost htdocs]# /opt/lampp/lampp restart #重启lampp [root@localhost ~]# /opt/lampp/lampp status #查看状态 |
2. 安装部署mantisbt
2.1. 安装mantisbt
2.1.1. 下载mantisbt
1. cd /tmp2. 执行命令,获取mantisbt的安装包:
| wget http://sourceforge.net/projects/mantisbt/files/mantis-stable/1.2.18/mantisbt-1.2.18.tar.gz |
| tar –zxvf mantisbt-1.2.18.tar.gz |
2.1.2. 部署mantisbt
1. 执行命令| mv /tmp/mantisbt-1.2.18 /opt/lampp/htdocs/ |
2.1.3. 创建mantisbt的数据库
1. 访问http://serverIP/mantisbt/index.php,自动跳转到http://serverIP/mantisbt/admin/install.php页面,在该页面建立mantisbt的数据库;2. 在以下页面,root的密码为“xx”,直接点击“INSTALL/update database”即可。
3. 数据库创建成功,通过http://serverIP/phpmyadmin/,可查看bugtracker数据库的创建情况。
2.2. 配置mantisbt
2.2.1. 配置数据库连接
1. [root@localhost mantisbt]#执行以下命令:
| vi config_inc.php 修改数据库连接信息<?php $g_hostname = 'localhost'; $g_db_type = 'mysql'; $g_database_name = 'xx'; #填写设置的数据名称,与2.1.3章节中填写的Database Name一致 $g_db_username = 'xx'; #填写数据库用户名 $g_db_password = 'xx'; #填写数据库密码?> |
执行以下命令:
| cp config_inc.php.sample config_inc.php |
2.2.2. Mantisbt汉化
1. 执行命令:| vi /opt/lampp/htdocs/mantisbt/config_defaults_inc.php 修改:$g_default_language, 将english 改为chinese_simplified |
3. 界面更新为中文版
2.2.3. 设置时区
1. 执行命令:| vi /opt/lampp/htdocs/mantisbt/config_defaults_inc.php 修改为 $g_default_timezone = 'Asia/Shanghai'; |
2.2.4. 配置mantis邮件
1. 执行命令| vi /opt/lampp/htdocs/mantisbt/ config_inc.ini修改邮件配置信息# --- Email Configuration ---$g_phpMailer_method = PHPMAILER_METHOD_SMTP; # or PHPMAILER_METHOD_SMTP, PHPMAILER_METHOD_SENDMAIL$g_smtp_host = 'smtp.ym.163.com'; # used with PHPMAILER_METHOD_SMTP$g_smtp_username = 'mantisbt.admin@xxx.com'; # used with PHPMAILER_METHOD_SMTP$g_smtp_password = 'xxxx'; # used with PHPMAILER_METHOD_SMTP$g_administrator_email = 'mantisbt.admin@xxx.com';$g_webmaster_email = 'mantisbt.admin@[b]xxx.com';[/b]$g_from_email = 'mantisbt.admin@[b]xxx.com'; [/b] # the "From: " field in emails$g_return_path_email = 'mantisbt.admin@[b]xxx.com'; [/b] # the return address for bounced mail# $g_from_name = 'Mantis Bug Tracker';# $g_email_receive_own = OFF;# $g_email_send_using_cronjob = OFF; |
至此,MantisBT的安装部署已经完成。

相关文章推荐
- 工具mantisbt--将mantis安装到已经搭建好的PHP环境下出现的时区问题
- Linux环境搭建以及软件安装
- Linux下Web服务器环境搭建LNMP一键安装包 v2.6
- Linux下安装搭建Memcached集群环境
- Caffe安装笔记一:VMWare11+Ubuntu14.04搭建Linux安装环境
- Hadoop从安装Linux到搭建集群环境
- 【linux j2ee环境搭建】之三:mysql安装
- Linux入门(15)——Ubuntu16.04安装codeblocks搭建C/C++的IDE环境
- linux下android开发环境搭建及NDK安装(转)
- Linux 下开发环境的搭建(软件安装)
- Linux下Web服务器环境搭建LNMP 一键安装LNMP v2.6
- Linux的安装与android环境搭建的常见问题
- 基于Linux安装Apache环境搭建过程及报错解决方案
- linux系统下Apache+mysql+php环境搭建----Mysql的安装和配置
- Linux 开发环境搭建与使用——SlickEdit 的安装与配置
- 【Linux菜鸟成长记(八)】Ubuntu下搭建Java开发环境之安装JDK
- win7中VMware安装CentOs7搭建Linux环境教程
- 【Linux环境搭建】——nginx安装教程
- linux下搭建lamp环境以及安装swoole扩展