linux下svn服务器搭建及创建分支
2017-09-27 16:26
411 查看
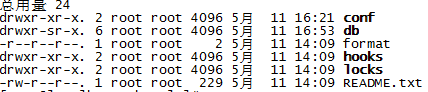
系统环境:Centos 6.5一 搭建svn服务器第一步:通过yum命令安装svnserve,命令如下:>yum -y install subversion此命令会全自动安装svn服务器相关服务和依赖,安装完成会自动停止命令运行若需查看svn安装位置,可以用以下命令:>rpm -ql subversion第二步:创建版本库目录(此仅为目录,为后面创建版本库提供存放位置)选择在var路径下创建版本库,当前处于根目录下,一次性创建如下:>mkdir /var/svn/svnrepos第三步:创建svn版本库在第二步建立的路径基础上,创建版本库,命令如下:>svnadmin create /var/svn/svnrepos/xxxx (xxxx为你预期的版本库名称,可自定义)创建成功后,进入xxx目录下>cd /var/svn/svnrepos/xxxx进入目录,可以看见如下文件信息:
第四步:配置修改svnserve.conf 文件, 该文件配置项分为以下5项:
anon-access: 控制非鉴权用户访问版本库的权限。
auth-access: 控制鉴权用户访问版本库的权限。
password-db: 指定用户名口令文件名。
authz-db:指定权限配置文件名,通过该文件可以实现以路径为基础的访问控制。
realm:指定版本库的认证域,即在登录时提示的认证域名称。若两个版本库的认证域相同,建议使用相同的用户名口令数据文件
2)权限分配
# vi /home/svnroot/repository/authz.conf
[groups]
admin=useradmin
devteamcs = useradmin,user1,user2//这里定义了一个用户组
[/]//对所有的项目,所有的用户都有读权限,admin用户有读写权限
@admin = rw
* = r
进入已经创建好的版本库目录下,也就是前文说创建的xxxx进入conf>cd /var/svn/svnrepos/xxxx/confconf目录下,一共存放三份重要的配置文件,如下:

authz:负责账号权限的管理,控制账号是否读写权限passwd:负责账号和密码的用户名单管理svnserve.conf:svn服务器配置文件细节修改如下:(希望大家严格按照以下信息,不用参考网络上其他资料)修改authz文件信息,如下:>vi authz在文件内容的末尾,添加如下:
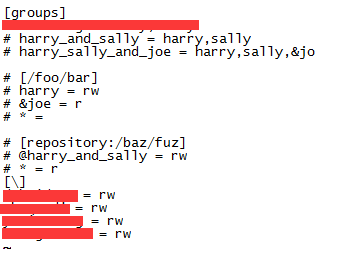
只需在末尾添加,无需在文件其他部分修改和添加任何东西(请忽略groups被我马赛克的地方,那其实也是条无用的记录,我忘记删掉而已),末尾内容如下:[\]账号1 = rw账号2 = rw。。。。。rw表示赋予此账号可读写的权限,请注意[]中的斜杠,一定是反斜杠,有些教程说,需添加版本库名称在括号内,我直接建议就这写,这样写允许访问的权限更大,避免一些错误修改passwd文件信息>vi passwd账号密码文件无需做修改,也是直接将账号和密码信息追加到文件中即可,注意格式为:账号 = 密码例如:admin = 123456修改svnserve.conf(重要)vi svnserve.conf原始文件内容,都被注释掉的,我们只需要去掉4条指定内容前注释即可,如下:
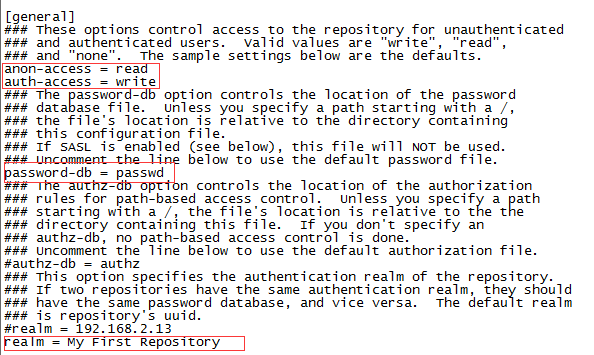
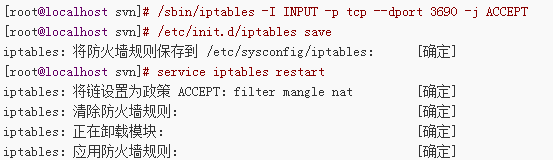
大多数网络资料,都会让大家将authz-db = authz这条给去掉注释,经过我本人多次被坑经验,此条去掉后,虽然svn服务器可以连接,但一直会提示“认证失败”,注释掉即可正常还有多数资料会让大家在realm = My First Repository处填写服务器ip,经过测试,填写后并无什么用处,所以大家去掉注释即可,无需做任何修改到此,配置已经全部完成,账号信息已经添加成功第五步:防火墙开启多数情况下服务器安装完成,配置完成后,无法连接svn服务器,均是防火墙问题,大家按照如下3条命令逐一执行即可>/sbin/iptables -I INPUT -p tcp --dport 3690 -j ACCEPT>/etc/init.d/iptables save>service iptables restart执行结果如下图:
开启端口
命令含义:
–zone #作用域
–add-port=80/tcp #添加端口,格式为:端口/通讯协议
–permanent #永久生效,没有此参数重启后失效
重启防火墙
2
3
2
3
然后保存:
查看打开的端口:
关闭防火墙
1) 永久性生效,重启后不会复原
开启: chkconfig iptables on
关闭: chkconfig iptables off
2) 即时生效,重启后复原
开启: service iptables start
关闭: service iptables stop
六:启动svn服务器在跟目录下,执行如下命令:>svnserve -d -r /var/svn/svnrepos启动成功后,可用ps -aux查看服务启动是否成功七:客户端访问svn服务器在windows客户端,输入地址:svn://ip地址:3690/xxxx (iP地址为你linux的ip,xxxx为前文创建的版本库名称,3690为svn默认端口)弹出输入用户名和密码,输入即可访问二 创建分支1,创建分支
svn copy http://example.com/repos/project/trunk http://example.com/repos/project/branches/beta
2,合并分支到主干
在分支上,获取刚开始的版本号
svn log --stop-on-copy http://example.com/repos/project/branches/search_collect_1108 如得到版本号为:12461
在分支上,获取最新的版本号
svn up
如得到版本号为:12767
切换到主干,然后执行下面命令(后面的路径为,分支的路径。)
svn merge -r 12461:12767 http://example.com/repos/project/branches/search_collect_1108
一、创建分支
1,创建一个分支
svn copy svn://xx.com/repo/trunk svn://xx.com/repo/branches/TRY-something -m 'make branches TRY-something'
2,把工作目录转到分支
svn switch svn://xx.com/repo/branches/TRY-something
当然,也可以再转到主干svn switch svn://xx.com/repo/trunk
二、合并一个分支到主干
1, 查找到分支版本
方法一:cd branch
svn log --stop-on-copy
最后一个r11340就是创建分支时的reversion
方法二:cd trunk
命令:svn -q --stop-on-copy 分支URL,这条命令会查询出自创建分支以后分支上的所有修改,最下面的那个版本号就是我们要找的版本号.
示例:svn log -q --stop-on-copy svn://192.168.1.177/tags/beta_2009_12_24
2, 合并到主干
命令:svn -r 分支版本号:HEAD 分支的URL
解释:HEAD为当前主干上的最新版本
示例:
cd trunk
svn merge -r 12:HEAD svn://192.168.1.177/tags/beta_2009_12_24
解决冲突:
使用svn st | grep ^C 查找合并时的冲突文件,手工解决冲突
使用svn resolved filename 告知svn冲突已解决
使用svn commit -m "" 提示合并后的版本
svn: Aborting commit: '/path/resources/noc' remains in conflict
$ svn revert resources/noc
Reverted 'resources/noc'
-----------------------------------------------------------------------------------------
以下是我的authz,passwd,svnserve.conf文件部分内容
authz:
### This file is an example authorization file for svnserve.
### Its format is identical to that of mod_authz_svn authorization
### files.
### As shown below each section defines authorizations for the path and
### (optional) repository specified by the section name.
### The authorizations follow. An authorization line can refer to:
### - a single user,
### - a group of users defined in a special [groups] section,
### - an alias defined in a special [aliases] section,
### - all authenticated users, using the '$authenticated' token,
### - only anonymous users, using the '$anonymous' token,
### - anyone, using the '*' wildcard.
###
### A match can be inverted by prefixing the rule with '~'. Rules can
### grant read ('r') access, read-write ('rw') access, or no access
### ('').
[aliases]
# joe = /C=XZ/ST=Dessert/L=Snake City/O=Snake Oil, Ltd./OU=Research Institute/CN=Joe Average
[groups]
# harry_and_sally = harry,sally
# harry_sally_and_joe = harry,sally,&joe
admin=root
# [/foo/bar]
# harry = rw
# &joe = r
# * =
# [repository:/baz/fuz]
# @harry_and_sally = rw
# * = r
[/]
@admin=rw
*=
passwd:
### This file is an example password file for svnserve.
### Its format is similar to that of svnserve.conf. As shown in the
### example below it contains one section labelled [users].
### The name and password for each user follow, one account per line.
[users]
# harry = harryssecret
# sally = sallyssecret
root=root
svnserve.conf:
### This file controls the configuration of the svnserve daemon, if you
### use it to allow access to this repository. (If you only allow
### access through http: and/or file: URLs, then this file is
### irrelevant.)
### Visit http://subversion.apache.org/ for more information.
[general]
### The anon-access and auth-access options control access to the
### repository for unauthenticated (a.k.a. anonymous) users and
### authenticated users, respectively.
### Valid values are "write", "read", and "none".
### Setting the value to "none" prohibits both reading and writing;
### "read" allows read-only access, and "write" allows complete
### read/write access to the repository.
### The sample settings below are the defaults and specify that anonymous
### users have read-only access to the repository, while authenticated
### users have read and write access to the repository.
anon-access = none
auth-access = write
### The password-db option controls the location of the password
### database file. Unless you specify a path starting with a /,
### the file's location is relative to the directory containing
### this configuration file.
### If SASL is enabled (see below), this file will NOT be used.
### Uncomment the line below to use the default password file.
password-db = passwd
### The authz-db option controls the location of the authorization
### rules for path-based access control. Unless you specify a path
### starting with a /, the file's location is relative to the the
### directory containing this file. If you don't specify an
### authz-db, no path-based access control is done.
### Uncomment the line below to use the default authorization file.
authz-db = authz
### This option specifies the authentication realm of the repository.
### If two repositories have the same authentication realm, they should
### have the same password database, and vice versa. The default realm
### is repository's uuid.
# realm = My First Repository
### The force-username-case option causes svnserve to case-normalize
### usernames before comparing them against the authorization rules in the
### authz-db file configured above. Valid values are "upper" (to upper-
### case the usernames), "lower" (to lowercase the usernames), and
### "none" (to compare usernames as-is without case conversion, which
### is the default behavior).
# force-username-case = none
[sasl]
### This option specifies whether you want to use the Cyrus SASL
### library for authentication. Default is false.
### This section will be ignored if svnserve is not built with Cyrus
### SASL support; to check, run 'svnserve --version' and look for a line
### reading 'Cyrus SASL authentication is available.'
# use-sasl = true
### These options specify the desired strength of the security layer
### that you want SASL to provide. 0 means no encryption, 1 means
### integrity-checking only, values larger than 1 are correlated
### to the effective key length for encryption (e.g. 128 means 128-bit
### encryption). The values below are the defaults.
# min-encryption = 0
# max-encryption = 256
第四步:配置修改svnserve.conf 文件, 该文件配置项分为以下5项:
anon-access: 控制非鉴权用户访问版本库的权限。
auth-access: 控制鉴权用户访问版本库的权限。
password-db: 指定用户名口令文件名。
authz-db:指定权限配置文件名,通过该文件可以实现以路径为基础的访问控制。
realm:指定版本库的认证域,即在登录时提示的认证域名称。若两个版本库的认证域相同,建议使用相同的用户名口令数据文件
2)权限分配
# vi /home/svnroot/repository/authz.conf
[groups]
admin=useradmin
devteamcs = useradmin,user1,user2//这里定义了一个用户组
[/]//对所有的项目,所有的用户都有读权限,admin用户有读写权限
@admin = rw
* = r
进入已经创建好的版本库目录下,也就是前文说创建的xxxx进入conf>cd /var/svn/svnrepos/xxxx/confconf目录下,一共存放三份重要的配置文件,如下:
authz:负责账号权限的管理,控制账号是否读写权限passwd:负责账号和密码的用户名单管理svnserve.conf:svn服务器配置文件细节修改如下:(希望大家严格按照以下信息,不用参考网络上其他资料)修改authz文件信息,如下:>vi authz在文件内容的末尾,添加如下:
只需在末尾添加,无需在文件其他部分修改和添加任何东西(请忽略groups被我马赛克的地方,那其实也是条无用的记录,我忘记删掉而已),末尾内容如下:[\]账号1 = rw账号2 = rw。。。。。rw表示赋予此账号可读写的权限,请注意[]中的斜杠,一定是反斜杠,有些教程说,需添加版本库名称在括号内,我直接建议就这写,这样写允许访问的权限更大,避免一些错误修改passwd文件信息>vi passwd账号密码文件无需做修改,也是直接将账号和密码信息追加到文件中即可,注意格式为:账号 = 密码例如:admin = 123456修改svnserve.conf(重要)vi svnserve.conf原始文件内容,都被注释掉的,我们只需要去掉4条指定内容前注释即可,如下:
大多数网络资料,都会让大家将authz-db = authz这条给去掉注释,经过我本人多次被坑经验,此条去掉后,虽然svn服务器可以连接,但一直会提示“认证失败”,注释掉即可正常还有多数资料会让大家在realm = My First Repository处填写服务器ip,经过测试,填写后并无什么用处,所以大家去掉注释即可,无需做任何修改到此,配置已经全部完成,账号信息已经添加成功第五步:防火墙开启多数情况下服务器安装完成,配置完成后,无法连接svn服务器,均是防火墙问题,大家按照如下3条命令逐一执行即可>/sbin/iptables -I INPUT -p tcp --dport 3690 -j ACCEPT>/etc/init.d/iptables save>service iptables restart执行结果如下图:
Centos 7 firewall 命令:
查看已经开放的端口:firewall-cmd --list-ports1
开启端口
firewall-cmd --zone=public --add-port=80/tcp --permanent1
命令含义:
–zone #作用域
–add-port=80/tcp #添加端口,格式为:端口/通讯协议
–permanent #永久生效,没有此参数重启后失效
重启防火墙
firewall-cmd --reload #重启firewall
systemctl stop firewalld.service #停止firewall
systemctl disable firewalld.service #禁止firewall开机启动
1
2
3
CentOS 7 以下版本 iptables 命令
如要开放80,22,8080 端口,输入以下命令即可/sbin/iptables -I INPUT -p tcp --dport 80 -j ACCEPT /sbin/iptables -I INPUT -p tcp --dport 22 -j ACCEPT /sbin/iptables -I INPUT -p tcp --dport 8080 -j ACCEPT1
2
3
然后保存:
/etc/rc.d/init.d/iptables save1
查看打开的端口:
/etc/init.d/iptables status1
关闭防火墙
1) 永久性生效,重启后不会复原
开启: chkconfig iptables on
关闭: chkconfig iptables off
2) 即时生效,重启后复原
开启: service iptables start
关闭: service iptables stop
六:启动svn服务器在跟目录下,执行如下命令:>svnserve -d -r /var/svn/svnrepos启动成功后,可用ps -aux查看服务启动是否成功七:客户端访问svn服务器在windows客户端,输入地址:svn://ip地址:3690/xxxx (iP地址为你linux的ip,xxxx为前文创建的版本库名称,3690为svn默认端口)弹出输入用户名和密码,输入即可访问二 创建分支1,创建分支
svn copy http://example.com/repos/project/trunk http://example.com/repos/project/branches/beta
2,合并分支到主干
在分支上,获取刚开始的版本号
svn log --stop-on-copy http://example.com/repos/project/branches/search_collect_1108 如得到版本号为:12461
在分支上,获取最新的版本号
svn up
如得到版本号为:12767
切换到主干,然后执行下面命令(后面的路径为,分支的路径。)
svn merge -r 12461:12767 http://example.com/repos/project/branches/search_collect_1108
一、创建分支
1,创建一个分支
svn copy svn://xx.com/repo/trunk svn://xx.com/repo/branches/TRY-something -m 'make branches TRY-something'
2,把工作目录转到分支
svn switch svn://xx.com/repo/branches/TRY-something
当然,也可以再转到主干svn switch svn://xx.com/repo/trunk
二、合并一个分支到主干
1, 查找到分支版本
方法一:cd branch
svn log --stop-on-copy
最后一个r11340就是创建分支时的reversion
方法二:cd trunk
命令:svn -q --stop-on-copy 分支URL,这条命令会查询出自创建分支以后分支上的所有修改,最下面的那个版本号就是我们要找的版本号.
示例:svn log -q --stop-on-copy svn://192.168.1.177/tags/beta_2009_12_24
2, 合并到主干
命令:svn -r 分支版本号:HEAD 分支的URL
解释:HEAD为当前主干上的最新版本
示例:
cd trunk
svn merge -r 12:HEAD svn://192.168.1.177/tags/beta_2009_12_24
解决冲突:
使用svn st | grep ^C 查找合并时的冲突文件,手工解决冲突
使用svn resolved filename 告知svn冲突已解决
使用svn commit -m "" 提示合并后的版本
svn: Aborting commit: '/path/resources/noc' remains in conflict
$ svn revert resources/noc
Reverted 'resources/noc'
-----------------------------------------------------------------------------------------
以下是我的authz,passwd,svnserve.conf文件部分内容
authz:
### This file is an example authorization file for svnserve.
### Its format is identical to that of mod_authz_svn authorization
### files.
### As shown below each section defines authorizations for the path and
### (optional) repository specified by the section name.
### The authorizations follow. An authorization line can refer to:
### - a single user,
### - a group of users defined in a special [groups] section,
### - an alias defined in a special [aliases] section,
### - all authenticated users, using the '$authenticated' token,
### - only anonymous users, using the '$anonymous' token,
### - anyone, using the '*' wildcard.
###
### A match can be inverted by prefixing the rule with '~'. Rules can
### grant read ('r') access, read-write ('rw') access, or no access
### ('').
[aliases]
# joe = /C=XZ/ST=Dessert/L=Snake City/O=Snake Oil, Ltd./OU=Research Institute/CN=Joe Average
[groups]
# harry_and_sally = harry,sally
# harry_sally_and_joe = harry,sally,&joe
admin=root
# [/foo/bar]
# harry = rw
# &joe = r
# * =
# [repository:/baz/fuz]
# @harry_and_sally = rw
# * = r
[/]
@admin=rw
*=
passwd:
### This file is an example password file for svnserve.
### Its format is similar to that of svnserve.conf. As shown in the
### example below it contains one section labelled [users].
### The name and password for each user follow, one account per line.
[users]
# harry = harryssecret
# sally = sallyssecret
root=root
svnserve.conf:
### This file controls the configuration of the svnserve daemon, if you
### use it to allow access to this repository. (If you only allow
### access through http: and/or file: URLs, then this file is
### irrelevant.)
### Visit http://subversion.apache.org/ for more information.
[general]
### The anon-access and auth-access options control access to the
### repository for unauthenticated (a.k.a. anonymous) users and
### authenticated users, respectively.
### Valid values are "write", "read", and "none".
### Setting the value to "none" prohibits both reading and writing;
### "read" allows read-only access, and "write" allows complete
### read/write access to the repository.
### The sample settings below are the defaults and specify that anonymous
### users have read-only access to the repository, while authenticated
### users have read and write access to the repository.
anon-access = none
auth-access = write
### The password-db option controls the location of the password
### database file. Unless you specify a path starting with a /,
### the file's location is relative to the directory containing
### this configuration file.
### If SASL is enabled (see below), this file will NOT be used.
### Uncomment the line below to use the default password file.
password-db = passwd
### The authz-db option controls the location of the authorization
### rules for path-based access control. Unless you specify a path
### starting with a /, the file's location is relative to the the
### directory containing this file. If you don't specify an
### authz-db, no path-based access control is done.
### Uncomment the line below to use the default authorization file.
authz-db = authz
### This option specifies the authentication realm of the repository.
### If two repositories have the same authentication realm, they should
### have the same password database, and vice versa. The default realm
### is repository's uuid.
# realm = My First Repository
### The force-username-case option causes svnserve to case-normalize
### usernames before comparing them against the authorization rules in the
### authz-db file configured above. Valid values are "upper" (to upper-
### case the usernames), "lower" (to lowercase the usernames), and
### "none" (to compare usernames as-is without case conversion, which
### is the default behavior).
# force-username-case = none
[sasl]
### This option specifies whether you want to use the Cyrus SASL
### library for authentication. Default is false.
### This section will be ignored if svnserve is not built with Cyrus
### SASL support; to check, run 'svnserve --version' and look for a line
### reading 'Cyrus SASL authentication is available.'
# use-sasl = true
### These options specify the desired strength of the security layer
### that you want SASL to provide. 0 means no encryption, 1 means
### integrity-checking only, values larger than 1 are correlated
### to the effective key length for encryption (e.g. 128 means 128-bit
### encryption). The values below are the defaults.
# min-encryption = 0
# max-encryption = 256

相关文章推荐
- linux搭建SVN服务器及用svn创建管理多个项目
- Linux(CentOS) SVN服务器搭建+同步更新+多版本库+开机启动
- linux下搭建SVN服务器完全手册
- Linux下的SVN服务器搭建
- 在linux下搭建SVN服务器,权限+常见错误
- Linux搭建SVN服务器
- Linux下搭建SVN服务器遇到的问题及解决方法
- Linux下的SVN服务器搭建
- Linux下搭建svn服务器
- linux(centos)搭建SVN服务器版本库
- linux(centos)搭建SVN服务器
- Linux中搭建SVN服务器
- linux下svn服务器搭建
- Linux搭建SVN 服务器
- Linux 搭建SVN 服务器
- 在Linux上搭建svn服务器管理项目,Linux系统之间的svn库迁移
- linux下搭建SVN服务器完全手册
- linux(centos)搭建SVN服务器
- linux下SVN服务器如何搭建和使用
- linux(centos)搭建SVN服务器