springboot配置Redis主从服务
2017-09-25 19:55
603 查看
今天学了一下springboot配置redis的主从服务器。根据一主二从三哨兵的原则来搭建一个分布式的缓存服务。主要还是针对redis的一些配置。下面与大家分享一下!
附上对redis的官方介绍
http://redis.majunwei.com/topics/sentinel.html
要想通过springboot搭建redis主从服务,就要先使用redis配置一个主从服务。
从服务器只负责读取,不能写入。如果主服务器宕机,哨兵(sentinel)会在从服务器中选举产生一个主服务器。此时该服务器具有读写权限。
下面我们分步骤来配置主从服务器,依照一主二从三哨兵的原则,我们需要三个redis实例,分别配置如下信息
slaver1的redis.conf文件
slaver2的redis.conf文件
这个主从服务器就配置好了。
启动服务(命令大致如此)
测试一下主从复制的功能
1. 主服务器写入,从服务器可以读取到
2. 从服务器不能写入
注意端口,6379表示主服务器,6377、6378是从服务器
配置文件如下
master的sentinel.conf
slaver1的sentinel.conf
slaver2的sentinel.conf
再次启动redis所有的服务端
分别开启redis的客户端
使用一下命令查看三个redis服务的状态
master
role:master
slaver1
slaver2
将master服务杀死
再次查看master的状态
说明master已经宕机
再观察一段时间,6377的从服务器成为主服务器
恢复主服务器,并设置为master
不清楚内容的可以查看
http://blog.csdn.net/u011521890/article/details/78070773
或者github上面的内容
https://github.com/hpulzl/book_recommend
以上就是redis的主从配置。十分简单!
接下来就要验证一把在springboot中是否配置成功!
验证思路
* 写一个controller方法,用来往redis中新增数据
* 此时关闭redis主服务器,再次调用contoller方法、
* 如果接口依旧可以写入信息,说明配置成功。此时查看redis的其他从服务器,会发现有一个从服务器变成了主服务器。
测试代码:
先查看redis主服务器发现,6377是master服务器
调用本地服务
http://localhost:8080/sample/hi?key=code&value=good
从redis中查询写入信息
我们看到三个redis服务都存在这样的信息
这时kill掉6377的进程
再次请求服务器
http://localhost:8080/sample/hi?key=today&value=iscoding
我们发现数据照样写入了redis中
此时看到6379变成了master
以上就是配置的过程,如有疑问可以参看github
https://github.com/hpulzl/book_recommend
附上对redis的官方介绍
http://redis.majunwei.com/topics/sentinel.html
要想通过springboot搭建redis主从服务,就要先使用redis配置一个主从服务。
测试redis的主从配置
主服务器用于数据的读写,当发生写入操作时,主服务器会自动将数据同步给从服务器。从服务器只负责读取,不能写入。如果主服务器宕机,哨兵(sentinel)会在从服务器中选举产生一个主服务器。此时该服务器具有读写权限。
下面我们分步骤来配置主从服务器,依照一主二从三哨兵的原则,我们需要三个redis实例,分别配置如下信息
redis实例
文件夹名称如下redis_master_s redis_slaver1_s redis_slaver2_s
redis.conf文件
master的redis.conf文件(其余是默认设置)port 6379 daemonize yes # 这个文件夹要改成自己的目录 dir "/Users/vobile_lzl/redis_master_s"
slaver1的redis.conf文件
port 6378
# 主服务器端口为6379
slaveof 127.0.0.1 6379
dir "/Users/vobile_lzl/redis_slaver1_s"
slaver2的redis.conf文件
port 6377
# 主服务器端口为6379
slaveof 127.0.0.1 6379
dir "/Users/vobile_lzl/redis_slaver2_s"
这个主从服务器就配置好了。
启动服务(命令大致如此)
./redis-server redis.conf
测试一下主从复制的功能
1. 主服务器写入,从服务器可以读取到
2. 从服务器不能写入
注意端口,6379表示主服务器,6377、6378是从服务器
127.0.0.1:6379> set name lzl
OK
127.0.0.1:6377> get name
"lzl"
127.0.0.1:6378> get name
"lzl"
# 从服务器不能写入
127.0.0.1:6378> set name lzl
(error) READONLY You can't write against a read only slave.
127.0.0.1:6377> set nam fdk
(error) READONLY You can't write against a read only slave.
sentinel.conf文件
sentinel是哨兵,用于监视主从服务器的运行状况,如果主服务器挂掉,会在从服务器中选举一个作为主服务器。配置文件如下
master的sentinel.conf
port 26379
# 初次配置时的状态,这个sentinel会自动更新
sentinel monitor mymaster 127.0.0.1 6379 2
daemonize yes
logfile "./sentinel_log.log"
slaver1的sentinel.conf
port 26378
# 初次配置时的状态,这个sentinel会自动更新
sentinel monitor mymaster 127.0.0.1 6379 2
daemonize yes
logfile "./sentinel_log.log"
slaver2的sentinel.conf
port 26377
# 初次配置时的状态,这个sentinel会自动更新
sentinel monitor mymaster 127.0.0.1 6379 2
daemonize yes
logfile "./sentinel_log.log"
再次启动redis所有的服务端
./redis-server redis.conf
./redis-server sentinel.conf --sentinel
分别开启redis的客户端
./redis-cli
./redis-cli -h 127.0.0.1 -p 6378
./redis-cli -h 127.0.0.1 -p 6377
使用一下命令查看三个redis服务的状态
info replication
master
role:master
127.0.0.1:6379> info replication
# Replication
role:master
connected_slaves:2
slave0:ip=127.0.0.1,port=6378,state=online,offset=4102,lag=1
slave1:ip=127.0.0.1,port=6377,state=online,offset=4102,lag=1
master_repl_offset:4102
repl_backlog_active:1
repl_backlog_size:1048576
repl_backlog_first_byte_offset:2
repl_backlog_histlen:4101
slaver1
127.0.0.1:6378> info replication
# Replication
role:slave
master_host:127.0.0.1
master_port:6379
master_link_status:up
master_last_io_seconds_ago:0
master_sync_in_progress:0
slave_repl_offset:15931
slave_priority:100
slave_read_only:1
connected_slaves:0
master_repl_offset:0
repl_backlog_active:0
repl_backlog_size:1048576
repl_backlog_first_byte_offset:0
repl_backlog_histlen:0
slaver2
127.0.0.1:6377> info replication
# Replication
role:slave
master_host:127.0.0.1
master_port:6379
master_link_status:up
master_last_io_seconds_ago:1
master_sync_in_progress:0
slave_repl_offset:21629
slave_priority:100
slave_read_only:1
connected_slaves:0
master_repl_offset:0
repl_backlog_active:0
repl_backlog_size:1048576
repl_backlog_first_byte_offset:0
repl_backlog_histlen:0
将master服务杀死
vobile-lzldeMacBook-Pro:~ vobile_lzl$ ps -ef | grep redis
501 13258     1   0  9:52下午 ??         0:00.37 ./redis-server *:6379

kill -9 13258
再次查看master的状态
说明master已经宕机
127.0.0.1:6379> info replication
Could not connect to Redis at 127.0.0.1:6379: Connection refused
再观察一段时间,6377的从服务器成为主服务器
127.0.0.1:6377> info replication
# Replication
role:master
connected_slaves:0
master_repl_offset:0
repl_backlog_active:0
repl_backlog_size:1048576
repl_backlog_first_byte_offset:0
repl_backlog_histlen:0
恢复主服务器,并设置为master
// TODO
springboot中配置主从redis
依旧接着上个项目的内容进行设置。不清楚内容的可以查看
http://blog.csdn.net/u011521890/article/details/78070773
或者github上面的内容
https://github.com/hpulzl/book_recommend
application.properties文件
新增node配置// 主从配置 // name of Redis server 哨兵监听的Redis server的名称 spring.redis.sentinel.master=mymaster // comma-separated list of host:port pairs 哨兵的配置列表 spring.redis.sentinel.nodes=127.0.0.1:26379,127.0.0.1:26378,127.0.0.1:26377
RedisCacheConfig配置
新增RedisSentinelConfiguration代码/**
* redis哨兵配置
* @return
*/
@Bean
public RedisSentinelConfiguration redisSentinelConfiguration(){
RedisSentinelConfiguration configuration = new RedisSentinelConfiguration();
String[] host = redisNodes.split(",");
for(String redisHost : host){
String[] item = redisHost.split(":");
String ip = item[0];
String port = item[1];
configuration.addSentinel(new RedisNode(ip, Integer.parseInt(port)));
}
configuration.setMaster(master);
return configuration;
}
/**
* 连接redis的工厂类
*
* @return
*/
@Bean
public JedisConnectionFactory jedisConnectionFactory() {
//构造方法中注入RedisSentinelConfiguration对象
JedisConnectionFactory factory = new JedisConnectionFactory(redisSentinelConfiguration());
factory.setHostName(host);
factory.setPort(port);
factory.setTimeout(timeout);
factory.setPassword(password);
factory.setDatabase(database);
return factory;
}以上就是redis的主从配置。十分简单!
接下来就要验证一把在springboot中是否配置成功!
验证思路
* 写一个controller方法,用来往redis中新增数据
* 此时关闭redis主服务器,再次调用contoller方法、
* 如果接口依旧可以写入信息,说明配置成功。此时查看redis的其他从服务器,会发现有一个从服务器变成了主服务器。
测试代码:
@RestController
@RequestMapping("sample")
public class SampleController {
@Autowired
private UseRedisDao useRedisDao;
@RequestMapping("hi")
public String sayHello(String key,String value){
useRedisDao.setValue(key,value);
return useRedisDao.getValue(key);
}
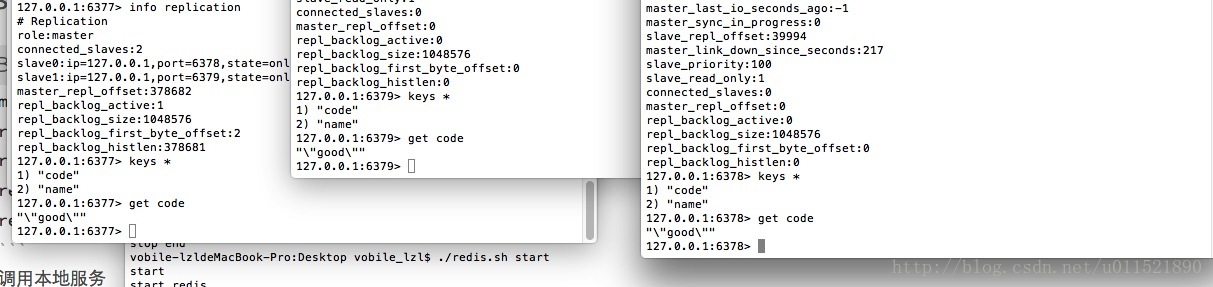
}先查看redis主服务器发现,6377是master服务器
127.0.0.1:6377> info replication
# Replication
role:master
connected_slaves:2
slave0:ip=127.0.0.1,port=6378,state=online,offset=378547,lag=1
slave1:ip=127.0.0.1,port=6379,state=online,offset=378547,lag=1
master_repl_offset:378682
repl_backlog_active:1
repl_backlog_size:1048576
repl_backlog_first_byte_offset:2
repl_backlog_histlen:378681
调用本地服务
http://localhost:8080/sample/hi?key=code&value=good
从redis中查询写入信息
127.0.0.1:6379> keys *
1) "code"
2) "name"
127.0.0.1:6379> get code
"\"good\""
我们看到三个redis服务都存在这样的信息
这时kill掉6377的进程
vobile-lzldeMacBook-Pro:redis_slaver2_s vobile_lzl$ ./redis-cli -p 6377 shutdown
vobile-lzldeMacBook-Pro:redis_slaver2_s vobile_lzl$ ./redis-cli -p 6377
Could not connect to Redis at 127.0.0.1:6377: Connection refused
再次请求服务器
http://localhost:8080/sample/hi?key=today&value=iscoding
我们发现数据照样写入了redis中
127.0.0.1:6378> keys *
1) "code"
2) "name"
3) "today"

127.0.0.1:6379> keys *
1) "code"
2) "name"
3) "today"
此时看到6379变成了master
127.0.0.1:6379> info replication
# Replication
role:master
connected_slaves:1
slave0:ip=127.0.0.1,port=6378,state=online,offset=32419,lag=1
master_repl_offset:32419
repl_backlog_active:1
repl_backlog_size:1048576
repl_backlog_first_byte_offset:2
repl_backlog_histlen:32418
以上就是配置的过程,如有疑问可以参看github
https://github.com/hpulzl/book_recommend

相关文章推荐
- SpringBoot整合redis哨兵主从服务
- springboot中配置主从redis
- SpringBoot整合redis哨兵主从服务
- 通过JMX和Redis在Spring Boot Admin界面显示多个服务某些参数的和
- 55. spring boot 服务配置和部署【从零开始学Spring Boot】
- springboot之redis的配置
- 55. spring boot 服务配置和部署【从零开始学Spring Boot】
- 在SpringBoot中添加Redis及配置方法
- SpringBoot微服务 +tomcat集群+Ngnix负载均衡+Mysql主从复制,读写分离(1)
- SpringBoot 支持 redis 多数据库或redis多服务 自由切换路由,saas多租户支持.
- Spring Cloud Spring Boot mybatis 企业分布式微服务云(六)分布式配置中心【Dalston版】
- 微服务1 Spring Boot中属性配置
- Redis 连接池配置(在 Spring Boot 框架中)
- Spring Boot 部署与服务配置
- Spring Cloud Spring Boot mybatis分布式微服务云架构(三十五)使用Redis做集中式缓存(1)
- [置顶] 在Springboot上使用jedis来操作缓存redis --jedis的配置
- 企业分布式微服务云SpringCloud SpringBoot mybatis (十四)Spring Boot中使用MyBatis注解配置详解
- Spring boot 手动配置redis
- Spring Boot 部署与服务配置
- Redis 主从服务配置