Spring源码阅读-- IOC容器资源定位
2017-09-15 17:35
651 查看
1、环境搭建
工程目录结构: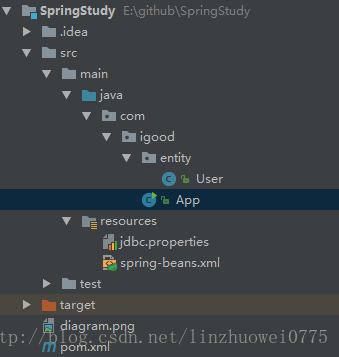
首先我们从最基础的spring开发代码开始,首先上场的是spring配置文件:
<?xml version="1.0" encoding="UTF-8"?>
<beans xmlns="http://www.springframework.org/schema/beans"
xmlns:context="http://www.springframework.org/schema/context"
xmlns:xsi="http://www.w3.org/2001/XMLSchema-instance"
xsi:schemaLocation="http://www.springframework.org/schema/beans http://www.springframework.org/schema/beans/spring-beans-4.3.xsd http://www.springframework.org/schema/context http://www.springframework.org/schema/context/spring-context-4.3.xsd ">

<!-- 引入配置文件 -->
<context:property-placeholder location="classpath:jdbc.properties" />

<bean id="dataSource" class="com.alibaba.druid.pool.DruidDataSource" init-method="init" destroy-method="close">
<!--属性注入-->
<property name="driverClassName" value="${jdbc.driverClassName}"/>
<property name="url" value="${jdbc.url}"/>
<property name="username" value="${jdbc.username}"/>
<property name="password" value="${jdbc.password}"/>
<!-- 连接池最大使用连接数 -->
<property name="maxActive" value="${jdbc.maxActive}"/>
<!-- 初始化连接大小 -->
<property name="initialSize" value="${jdbc.initialSize}"/>
<!-- 获取连接最大等待时间 -->
<property name="maxWait" value="${jdbc.maxWait}"/>
<!-- 连接池最大空闲 -->
<!--  property name="maxIdle" value="${jdbc.maxIdle}"/>-->
<!-- 连接池最小空闲 -->
<property name="minIdle" value="${jdbc.minIdle}"/>
<!-- 自动清除无用连接 -->
<property name="removeAbandoned" value="${jdbc.removeAbandoned}"/>
<!-- 清除无用连接的等待时间 -->
<property name="removeAbandonedTimeout" value="${jdbc.removeAbandonedTimeout}"/>
<!-- 连接属性 -->
<property name="connectionProperties" value="${jdbc.connectionProperties}"/>
</bean>

<bean id="zhangsan"  class="com.igood.entity.User">
<constructor-arg type="java.lang.String">
<value>zhangsan</value>
</constructor-arg>
<constructor-arg type="java.lang.String">
<value>123456</value>
</constructor-arg>
<constructor-arg type="java.lang.Integer">
<value>20</value>
</constructor-arg>
</bean>
<!--给zhangsan这个bean起几个别名,其中有一个别名和原来bean名称相同-->
<alias name="zhangsan" alias="zhangsan,zhang3,alias1"/>

<!--设置名称为wangwu的bean不是懒加载-->
<bean id="wangwu"  class="com.igood.entity.User" lazy-init="false" scope="prototype">
<constructor-arg type="java.lang.String">
<value>wangwu</value>
</constructor-arg>
<constructor-arg type="java.lang.String">
<value>111111</value>
</constructor-arg>
<constructor-arg type="java.lang.Integer">
<value>25</value>
</constructor-arg>
</bean>
</beans>
接着是main函数启动代码
//代码片段1
public static void main(String[] args) {

ClassPathXmlApplicationContext context =
new ClassPathXmlApplicationContext("classpath:spring-beans.xml");
User bean = (User)context.getBean("zhang3");
bean.getUsername();
context.close();
}
在跟踪源码前,先来看一下spring IOC 体系结构相关类的继承关系图:
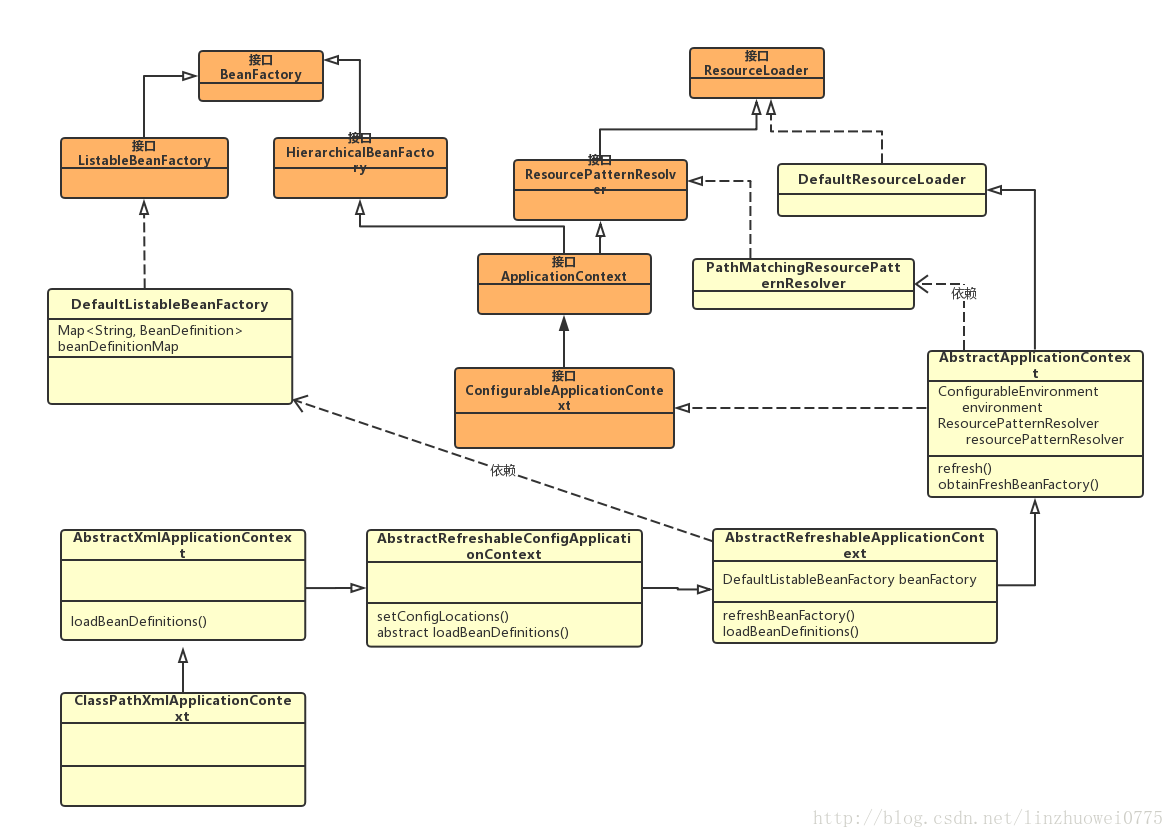
为了思路清晰,类图中只列出比较重要的方法和变量。
好了,开始跟踪spring源码。首先进入ClassPathXmlApplicationContext的构造函数
//代码片段2
public ClassPathXmlApplicationContext(String... configLocations) throws BeansException {
this(configLocations, true, null);
}

public ClassPathXmlApplicationContext(String[] configLocations, boolean refresh, ApplicationContext parent)
throws BeansException {

super(parent);
setConfigLocations(configLocations);
if (refresh) {
refresh();
}
}
一直沿着继承关系查看父类的构造函数,到AbstractApplicationContext
//代码片段3
public AbstractApplicationContext() {
this.resourcePatternResolver = getResourcePatternResolver();
}
protected ResourcePatternResolver getResourcePatternResolver() {
return new PathMatchingResourcePatternResolver(this);
}
从ClassPathXmlApplicationContext的类图可以看出AbstractApplicationContext和PathMatchingResourcePatternResolver实现了ResourceLoader接口,也就是说AbstractApplicationContext也有ResourcePatternResolver的getResource()的能力,但是AbstractApplicationContext不亲自具体实现getResource,而是委派给PathMatchingResourcePatternResolver去做。
2、径路解析
回到“代码片段2”中,ClassPathXmlApplicationContext的构造函数中setConfigLocations,这个函数在父类AbstractRefreshableConfigApplicationContext中实现//代码片段4
public void setConfigLocations(String... locations) {
if (locations != null) {
Assert.noNullElements(locations, "Config locations must not be null");
this.configLocations = new String[locations.length];
for (int i = 0; i < locations.length; i++) {
this.configLocations[i] = resolvePath(locations[i]).trim();
}
}
else {
this.configLocations = null;
}
}
protected String resolvePath(String path) {
return getEnvironment().resolveRequiredPlaceholders(path);
}resolvePath的作用就是将创建ApplicationContext传入进来的locations(classpath: spring-beans.xml)配置文件路径转换为合法的location,就是将路径中包含环境变量转成变量的实际值,比如路径有占位符中的变量替换成变量实际的值。getEnviroment()拿到StandardEnvironment对象来进行占位符{}的替换。
//代码片段5
public class StandardEnvironment extends AbstractEnvironment {
/** System environment property source name: {@value} */
public static final String SYSTEM_ENVIRONMENT_PROPERTY_SOURCE_NAME = "systemEnvironment";

/** JVM system properties property source name: {@value} */
public static final String SYSTEM_PROPERTIES_PROPERTY_SOURCE_NAME = "systemProperties";

@Override
protected void customizePropertySources(MutablePropertySources propertySources) {
propertySources.addLast(new MapPropertySource(SYSTEM_PROPERTIES_PROPERTY_SOURCE_NAME, getSystemProperties()));
propertySources.addLast(new SystemEnvironmentPropertySource(SYSTEM_ENVIRONMENT_PROPERTY_SOURCE_NAME, getSystemEnvironment()));
}

}
StandardEnvironment就是读取操作系统的环境变量和JVM的变量。当传进来的路径中包含这些环境变量就替换成系统中变量的实际值。比如我们传进来的路径是”classpath: JAVAHOME/spring−beans.xml",经过resolveRequiredPlaceholders函数处理就把{JAVA_HOME}替换成你电脑配置的JAVA_HOME环境变量的值,如”classpath:C:/Program Files/Java/jdk1.8.0_91/spring-beans.xml”。
3、容器刷新
好了,资源路径准备好了,我们回到”代码片段2”中的refresh()函数,重头戏都在这个函数里了。这个函数在父类AbstractApplicationContext中实现。//代码片段6
public void refresh() throws BeansException, IllegalStateException {
synchronized (this.startupShutdownMonitor) {
// 刷新工厂之前需要做一些准备工作的啦,就想你在运动之前要做一些准备运动一样哦
prepareRefresh();
// 我会告诉我的子类创造一个工厂,来把我需要创建bean的原料BeanDefinition准备好
ConfigurableListableBeanFactory beanFactory = obtainFreshBeanFactory();
// 原料准备好之后呢,我要声明一些特殊的依赖关系, 所谓依赖,就是我在创造一个bean A的时候,发现它里面有另外一个属性B
// 那么B就是A的依赖,我在创造A的时候,必须先把B创造好,特殊关系的依赖就是指我遇到B的类型,我该放弃呢,还是告诉他直接用
// 现成的(也就是不用再去创造B了)
prepareBeanFactory(beanFactory);
try {
// 这里没啥,就是留给子类做扩展的啦
postProcessBeanFactory(beanFactory);
// 到了这里,工厂已经准备好了,如果你之前告诉过我工厂准备好之后应该干什么事情,这边我就可以满足你的需求哦
// 不信,你去看看BeanFactoryPostProcessors接口是干嘛用的吧==
invokeBeanFactoryPostProcessors(beanFactory);
// 在创建一个bean的前后,我也留给你很多扩展,原理上和上面的工厂扩展差不多的哦
registerBeanPostProcessors(beanFactory);
// 就是处理一些国际化的操作啦,啊?什么是国际化,就是i18n啦,还不懂?你没救了
initMessageSource();
// 我的功能很丰富,除了可以给你创建bean,还可以有事件管理的功能哦,这里我就创建一个管理器(ApplicationEventMulticaster(),
// 用来注册事件(ApplicationEvent)
// 我会将这些事件广播给合适的监听者(ApplicationListener)那边哦
initApplicationEventMulticaster();
// 啥也不干,留给子类扩展啦
onRefresh();
// 前面不是事件管理器搞好了嘛,这边呢,就是把那些事件监听器给注册进来啦,这样来一个新的事件我就知道该发给谁啦
registerListeners();
// 如果某些bean告我我,他想在我工厂创建之初就想初始化(一般要是单件singleton并且lazy-init为false),那么我在这个函数会满足他
finishBeanFactoryInitialization(beanFactory);
// 终于刷新完了,我要开始发布事件了!
finishRefresh();
}
// 什么?刷新的时候报错了?oh my god,我需要做一些清理
catch (BeansException ex) {
logger.warn("Exception encountered during context initialization - cancelling refresh attempt", ex);
// 我需要将我创建的bean销毁掉
destroyBeans();
// 我不再活跃
cancelRefresh(ex);
// 我要告诉你,我出异常了,救我!!
throw ex;
}
finally {
// 一些通用的缓存清掉!!
resetCommonCaches();
}
}
}
protected ConfigurableListableBeanFactory obtainFreshBeanFactory() {
refreshBeanFactory();
ConfigurableListableBeanFactory beanFactory = getBeanFactory();
if (logger.isDebugEnabled()) {
logger.debug("Bean factory for " + getDisplayName() + ": " + beanFactory);
}
return beanFactory;
}refresh()方法主要为 IOC 容器 Bean 的生命周期管理提供条件, Spring IOC 容器载入 Bean 定义资源文件从其子类容器的 refreshBeanFactory()方法启动, 所以整个 refresh()中“ConfigurableListableBeanFactory beanFactory =obtainFreshBeanFactory();” 这句以后代码的都是注册容器的信息源和生命周期事件, 载入过程就是从这句代码启动。
3.1、创建容器
顺着obtainFreshBeanFactory方法,进入到AbstractRefreshableApplicationContext的refreshBeanFactory方法,这个方法的主要功能就是创建默认的IOC容器和Xml配置文件的相关操作。//代码片段7
protected final void refreshBeanFactory() throws BeansException {
if (hasBeanFactory()) {//如果已经有容器, 销毁容器中的 bean, 关闭容器,以保证在 refresh 之后使用的是新建立起来的 IOC 容器
destroyBeans();
closeBeanFactory();
}
try {
DefaultListableBeanFactory beanFactory = createBeanFactory();//创建 IOC 容器了
beanFactory.setSerializationId(getId());
//对 IOC 容器进行定制化, 如设置启动参数, 开启注解的自动装配等
customizeBeanFactory(beanFactory);
// 加载bean的定义,我们用xml描述了各种bean的具体定义,所以这个函数
loadBeanDefinitions(beanFactory);
synchronized (this.beanFactoryMonitor) {
this.beanFactory = beanFactory;
}
}
catch (IOException ex) {
throw new ApplicationContextException("I/O error parsing bean definition source for " + getDisplayName(), ex);
}
}第7行代码
DefaultListableBeanFactory beanFactory = createBeanFactory()为我们新创建一个IOC容器,所谓容器就是一个Map数据结构,进入DefaultListableBeanFactory代码就发现有
private final Map<String, BeanDefinition> beanDefinitionMap = new ConcurrentHashMap<String, BeanDefinition>(256);这个成员变量,spring就是将以bean的名字做key,bean的定义作为值存到这个Map中,这就是我们需要创建bean所需要的原材料。
3.2、加载bean定义
既然容器创建好了,那么第12行代码loadBeanDefinitions(beanFactory)就要为beanFactory容器加载bean定义(BeanDefinition)了。
AbstractRefreshableApplicationContext 中只定义了抽象的 loadBeanDefinitions 方法, 容器真正调用的是其子类 AbstractXmlApplicationContext 对该方法的实现。
//代码片段8
//AbstractXmlApplicationContext实现父类的抽象方法
@Override
protected void loadBeanDefinitions(DefaultListableBeanFactory beanFactory) throws BeansException, IOException {
// Create a new XmlBeanDefinitionReader for the given BeanFactory.
XmlBeanDefinitionReader beanDefinitionReader = new XmlBeanDefinitionReader(beanFactory);

// Configure the bean definition reader with this context's
// resource loading environment.
beanDefinitionReader.setEnvironment(this.getEnvironment());
//设置资源加载器就是容器本身,1、环境搭建小节中“代码片段3”说明AbstractApplicationContext也有资源加载器的能力
beanDefinitionReader.setResourceLoader(this);
beanDefinitionReader.setEntityResolver(new ResourceEntityResolver(this));

// Allow a subclass to provide custom initialization of the reader,
// then proceed with actually loading the bean definitions.
initBeanDefinitionReader(beanDefinitionReader);
loadBeanDefinitions(beanDefinitionReader);
}
方法里定义了一个XmlBeanDefinitionReader类型的对象,这个对象的作用就是读取Xml配置文件。最后一行代码
loadBeanDefinitions(beanDefinitionReader);就是用这个读取器来加载bean定义的。
//代码片段9
protected void loadBeanDefinitions(XmlBeanDefinitionReader reader) throws BeansException, IOException {
Resource[] configResources = getConfigResources();
if (configResources != null) {
reader.loadBeanDefinitions(configResources);
}
String[] configLocations = getConfigLocations();
if (configLocations != null) {
reader.loadBeanDefinitions(configLocations);
}
}
我们会看到有两种方式加载配置文件,一种是从Resource类型的路径中加载,还有一种是从String类型的路径中加载。 由于我们main函数入口是
new ClassPathXmlApplicationContext("classpath:spring-beans.xml");所以new出来ClassPathXmlApplicationContext对象里getConfigResources()是null的,而getConfigLocations()就前面“ 2、径路解析”小节准备的配置文件路径,因此进入到第8行代码,从从String类型的路径中加载xml文件。进入XmlBeanDefinitionReader的loadBeanDefinitions方法:
//代码片段10
public int loadBeanDefinitions(String... locations) throws BeanDefinitionStoreException {
Assert.notNull(locations, "Location array must not be null");
int counter = 0;
for (String location : locations) {
counter += loadBeanDefinitions(location);
}
return counter;
}
loadBeanDefinitions循环从每个路径中加载xml文件。真正加载资源的是它重载函数:
//代码片段11
//真正干活的函数
public int loadBeanDefinitions(String location, Set<Resource> actualResources) throws BeanDefinitionStoreException {
ResourceLoader resourceLoader = getResourceLoader();
if (resourceLoader == null) {
throw new BeanDefinitionStoreException(
"Cannot import bean definitions from location [" + location + "]: no ResourceLoader available");
}

if (resourceLoader instanceof ResourcePatternResolver) {
// Resource pattern matching available.
try {
Resource[] resources = ((ResourcePatternResolver) resourceLoader).getResources(location);
int loadCount = loadBeanDefinitions(resources);
if (actualResources != null) {
for (Resource resource : resources) {
actualResources.add(resource);
}
}
if (logger.isDebugEnabled()) {
logger.debug("Loaded " + loadCount + " bean definitions from location pattern [" + location + "]");
}
return loadCount;
}
catch (IOException ex) {
throw new BeanDefinitionStoreException(
"Could not resolve bean definition resource pattern [" + location + "]", ex);
}
}
else {
// Can only load single resources by absolute URL.
Resource resource = resourceLoader.getResource(location);
int loadCount = loadBeanDefinitions(resource);
if (actualResources != null) {
actualResources.add(resource);
}
if (logger.isDebugEnabled()) {
logger.debug("Loaded " + loadCount + " bean definitions from location [" + location + "]");
}
return loadCount;
}
}
第4行代码
ResourceLoader resourceLoader = getResourceLoader();获取的ResourceLoader对象就是“代码片段8”中
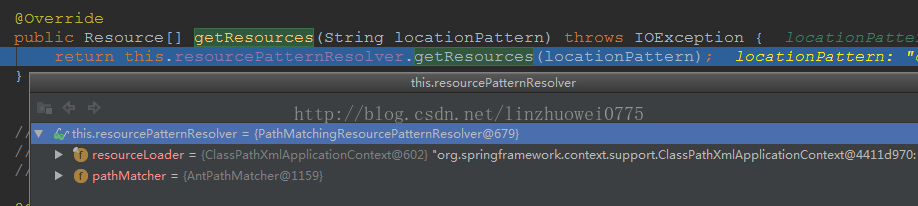
beanDefinitionReader.setResourceLoader(this);,也就是ClassPathXmlApplicationContext类的对象,1、环境搭建小节中“代码片段3”说明AbstractApplicationContext实现ResourcePatternResolver接口,因此作为AbstractApplicationContext的子类ClassPathXmlApplicationContext对象拥有getResource()的能力,但是ClassPathXmlApplicationContext不亲自具体实现getResource,而是委派给PathMatchingResourcePatternResolver去做。因此”代码片段11”中
Resource[] resources = ((ResourcePatternResolver) resourceLoader).getResources(location);最终调用如下图:
4、资源定位
好了,跟踪这么久现在才进入本文的标题真正要说的事。进入PathMatchingResourcePatternResolver类的getResource方法://代码片段12
@Override
public Resource[] getResources(String locationPattern) throws IOException {
Assert.notNull(locationPattern, "Location pattern must not be null");
if (locationPattern.startsWith(CLASSPATH_ALL_URL_PREFIX)) {//处理以classpath*:开头的路径
// a class path resource (multiple resources for same name possible)
if (getPathMatcher().isPattern(locationPattern.substring(CLASSPATH_ALL_URL_PREFIX.length()))) {//路径中包含*或?这样的通配符
// a class path resource pattern
return findPathMatchingResources(locationPattern);
}
else {
//路径中不包含通配符
// all class path resources with the given name
return findAllClassPathResources(locationPattern.substring(CLASSPATH_ALL_URL_PREFIX.length()));
}
}
else {
//处理不以classpath*:开头的路径
// Only look for a pattern after a prefix here
// (to not get fooled by a pattern symbol in a strange prefix).
int prefixEnd = locationPattern.indexOf(":") + 1;
if (getPathMatcher().isPattern(locationPattern.substring(prefixEnd))) {//路径中包含*或?这样的通配符
// a file pattern
return findPathMatchingResources(locationPattern);
}
else {
//路径中不包含通配符
// a single resource with the given name
return new Resource[] {getResourceLoader().getResource(locationPattern)};
}
}
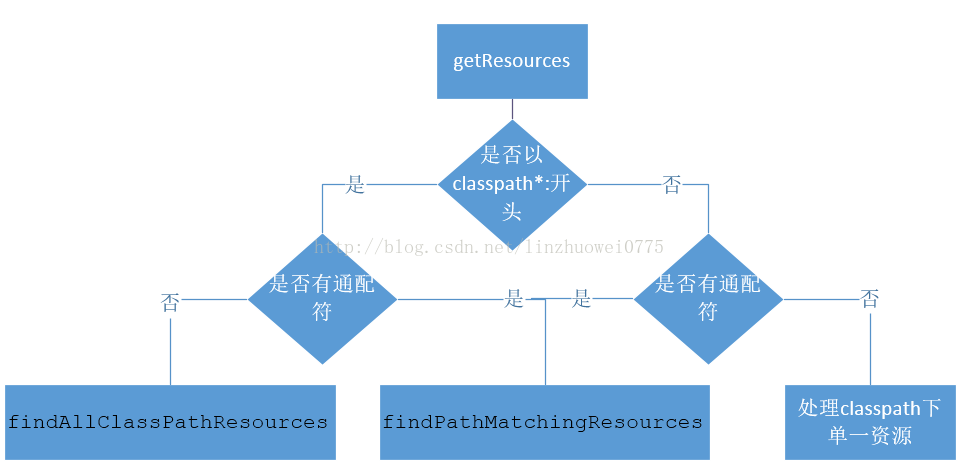
}由上面代码我们可以看出在加载配置文件时,以是否是以classpath*开头分为2种情况处理场景,每种情况类在又根据路径中是否包括通配符进行处理。
4.1、处理以classpath*开头且不包含通配符
进入findAllClassPathResources函数看看
protected Resource[] findAllClassPathResources(String location) throws IOException {
String path = location;
if (path.startsWith("/")) {
path = path.substring(1);
}
Set<Resource> result = doFindAllClassPathResources(path);
if (logger.isDebugEnabled()) {
logger.debug("Resolved classpath location [" + location + "] to resources " + result);
}
return result.toArray(new Resource[result.size()]);
}
protected Set<Resource> doFindAllClassPathResources(String path) throws IOException {
Set<Resource> result = new LinkedHashSet<Resource>(16);
ClassLoader cl = getClassLoader();
Enumeration<URL> resourceUrls = (cl != null ? cl.getResources(path) : ClassLoader.getSystemResources(path));
while (resourceUrls.hasMoreElements()) {
URL url = resourceUrls.nextElement();
result.add(convertClassLoaderURL(url));
}
if ("".equals(path)) {
// The above result is likely to be incomplete, i.e. only containing file system references.
// We need to have pointers to each of the jar files on the classpath as well...
addAllClassLoaderJarRoots(cl, result);
}
return result;
}
跟踪
doFindAllClassPathResources方法中的
ClassLoader cl = getClassLoader();进入到
ClassLoader的getResources()方法:
//ClassLoader.java
public Enumeration<URL> getResources(String name) throws IOException {
@SuppressWarnings("unchecked")
Enumeration<URL>[] tmp = (Enumeration<URL>[]) new Enumeration<?>[2];
if (parent != null) {
//如果存在父加载器,则向上迭代获取资源
tmp[0] = parent.getResources(name);
} else {
//Bootstrap classLoader主要加载JVM自身工作需要的类,位于$JAVA_HOME/jre/lib/下的jar包
tmp[0] = getBootstrapResources(name);
}
tmp[1] = findResources(name);

return new CompoundEnumeration<>(tmp);
}
当前类加载器,如果存在父加载器,则向上迭代获取资源, 因此能加到jar包里面的资源文件。
4.2、处理不以classpath*开头且不包含通配符
就是一行代码new Resource[] {getResourceLoader().getResource(locationPattern)};getResourceLoader()方法获取到就是默认的资源加载器
public ResourceLoader getResourceLoader() {
return this.resourceLoader;
}
public PathMatchingResourcePatternResolver(ClassLoader classLoader) {
this.resourceLoader = new DefaultResourceLoader(classLoader);
}
因此,我们进入
DefaultResourceLoader类的
getResource方法:
public Resource getResource(String location) {
Assert.notNull(location, "Location must not be null");

for (ProtocolResolver protocolResolver : this.protocolResolvers) {
Resource resource = protocolResolver.resolve(location, this);
if (resource != null) {
return resource;
}
}

if (location.startsWith("/")) {
return getResourceByPath(location);
}
else if (location.startsWith(CLASSPATH_URL_PREFIX)) {
//如果以classpath开头,则创建为一个ClassPathResource
return new ClassPathResource(location.substring(CLASSPATH_URL_PREFIX.length()), getClassLoader());
}
else {
try {
// Try to parse the location as a URL...
//以URL的方式加载资源,创建一个UrlResource.
URL url = new URL(location);
return new UrlResource(url);
}
catch (MalformedURLException ex) {
// No URL -> resolve as resource path.
return getResourceByPath(location);
}
}
}
由此可看出,不以“classpath*”的开头路径getResource()仅返回路径(包括jar包)中的一个且仅一个资源;对于多个匹配的也只返回一个。
4.3、路径包含通配符的
protected Resource[] findPathMatchingResources(String locationPattern) throws IOException {
//获取确定的根路径(没有通配符的最长路径),如cn/javass/config-*.xml,则根路径是cn/javass/;
//如cn/**/config.xml,跟路径是cn/
String rootDirPath = determineRootDir(locationPattern);
//含通配符的,如cn/javass/config-*.xml,则subPattern是config-*.xml
String subPattern = locationPattern.substring(rootDirPath.length());
//获取跟路径下所有资源
Resource[] rootDirResources = getResources(rootDirPath);
Set<Resource> result = new LinkedHashSet<Resource>(16);
for (Resource rootDirResource : rootDirResources) {//查找满足通配符的资源
rootDirResource = resolveRootDirResource(rootDirResource);
URL rootDirURL = rootDirResource.getURL();
if (equinoxResolveMethod != null) {
if (rootDirURL.getProtocol().startsWith("bundle")) {
rootDirURL = (URL) ReflectionUtils.invokeMethod(equinoxResolveMethod, null, rootDirURL);
rootDirResource = new UrlResource(rootDirURL);
}
}
if (rootDirURL.getProtocol().startsWith(ResourceUtils.URL_PROTOCOL_VFS)) {
result.addAll(VfsResourceMatchingDelegate.findMatchingResources(rootDirURL, subPattern, getPathMatcher()));
}
else if (ResourceUtils.isJarURL(rootDirURL) || isJarResource(rootDirResource)) {
result.addAll(doFindPathMatchingJarResources(rootDirResource, rootDirURL, subPattern));
}
else {
result.addAll(doFindPathMatchingFileResources(rootDirResource, subPattern));
}
}
if (logger.isDebugEnabled()) {
logger.debug("Resolved location pattern [" + locationPattern + "] to resources " + result);
}
return result.toArray(new Resource[result.size()]);
}
以“classpath*”的开头路径,getResources()加载类路径(包括jar包)中的所有匹配的资源。
至此, Spring IOC 容器在初始化时将配置的 Bean 定义资源文件定位为 Spring 封装的 Resource。
总结
来一张图过一遍代码执行简要过程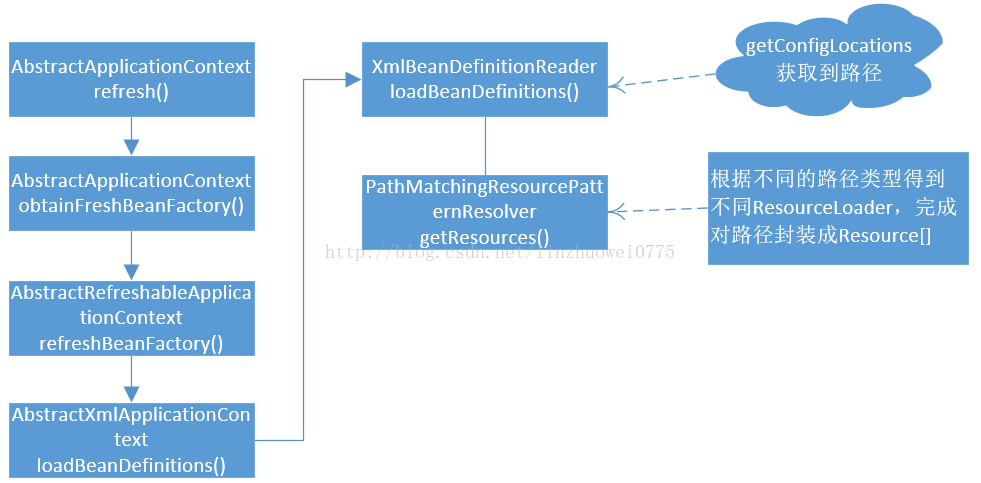
参考
http://blog.csdn.net/ray_seu/article/details/50096889
http://blog.csdn.net/zl3450341/article/details/9306983

相关文章推荐
- Spring IOC 源码阅读之资源定位加载
- Spring IOC 源码阅读之资源定位加载
- Spring源码阅读-- IOC容器资源解析
- Spring源码分析--Ioc容器定位解析资源文件并注册BeanDefinition
- Spring源码解读-Spring IoC容器初始化之资源定位
- Spring源码阅读之IoC容器初始化1 -- Resource定位
- Spring源码学习IOC(4):IoC容器解析Bean定义资源并注册解析后的Bean
- Spring源码阅读(一):IOC容器的初始化
- Spring源码阅读(二)—IOC容器初始化
- Spring源码阅读之IoC容器初始化2 -- BeanDefinition载入与解析
- Spring源码阅读之IoC容器初始化3 -- BeanDefinition在IoC容器中的注册
- Spring源码分析1--IoC容器载入Bean定义资源
- Spring IOC 源码阅读资源加载和注册
- spring IOC源码学习(一):资源定位过程,类加载器的使用
- Spring源码阅读(三)—IOC容器依赖注入
- Spring源码-IOC容器(二)-Bean的定位解析注册
- Spring源码解读-Spring IoC容器初始化之资源注册
- Spring IoC容器在Web环境中的启动源码阅读
- Spring源码阅读--BeanDefinition 在 IOC 容器中的注册
- Spring源码学习IOC(3):IoC容器载入Bean定义资源文件