shiro原理 及 第一个认证shiro
2017-09-14 00:00
148 查看
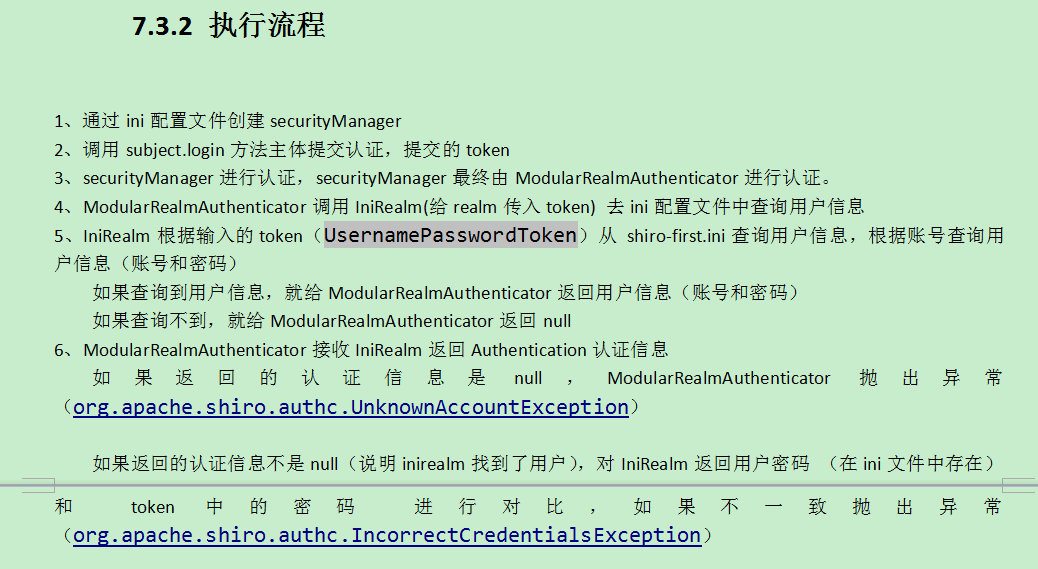
1 shiro的 原理 讲解
2 第一个入门程序
:package com.shi.authentication;
import org.apache.shiro.SecurityUtils;
import org.apache.shiro.authc.UsernamePasswordToken;
import org.apache.shiro.config.IniSecurityManagerFactory;
import org.apache.shiro.util.Factory;
import org.junit.Test;
import org.apache.shiro.mgt.SecurityManager;
import org.apache.shiro.subject.Subject;
/**
* 认证测试
* @author SHF
*
*/
public class AuthenticationTest {
//用户登录和退出
@Test
public void testLoginAndLogout(){
//1 创建securityManager工厂,通过ini配置文件创建securityManage工厂
Factory<SecurityManager> factory=new IniSecurityManagerFactory("classpath:shiro-first.ini");
//2 创建SecurityManager
SecurityManager securityManager=factory.getInstance();
//3 将SecurityManager设置当前的运行环境中
SecurityUtils.setSecurityManager(securityManager);
//4 从SecurityUtils里边创建一个subject
Subject subject=SecurityUtils.getSubject();
//5 在认证提交前准备token(令牌)
UsernamePasswordToken token =new UsernamePasswordToken("zhangsan", "111111");
try {
//6 执行认证提交
subject.login(token);
} catch (Exception e) {
e.printStackTrace();
}
//是否认证通过
boolean isAuthenticated=subject.isAuthenticated();
System.out.println("是否认证通过:"+isAuthenticated);
subject.logout();
//是否认证通过
boolean isAuthenticated2=subject.isAuthenticated();
System.out.println("是否认证通过:"+isAuthenticated2);
}
}
shiro-first.ini
#对用户信息进行设置
[users]
#设置用户名和密码
zhangsan=111111
lisi=222222
jar包:
<project xmlns="http://maven.apache.org/POM/4.0.0" xmlns:xsi="http://www.w3.org/2001/XMLSchema-instance" xsi:schemaLocation="http://maven.apache.org/POM/4.0.0 http://maven.apache.org/xsd/maven-4.0.0.xsd"> <modelVersion>4.0.0</modelVersion>
<groupId>com.shi.shiro</groupId>
<artifactId>Shiro-First</artifactId>
<version>0.0.1-SNAPSHOT</version>
<dependencies>
<dependency>
<groupId>junit</groupId>
<artifactId>junit</artifactId>
<version>4.12</version>
</dependency>
<dependency>
<groupId>commons-beanutils</groupId>
<artifactId>commons-beanutils</artifactId>
<version>1.8.3</version>
</dependency>
<dependency>
<groupId>commons-logging</groupId>
<artifactId>commons-logging</artifactId>
<version>1.1.1</version>
</dependency>
<dependency>
<groupId>org.apache.shiro</groupId>
<artifactId>shiro-core</artifactId>
<version>1.2.3</version>
</dependency>
<dependency>
<groupId>org.slf4j</groupId>
<artifactId>slf4j-log4j12</artifactId>
<version>1.7.7</version>
</dependency>
<dependency>
<groupId>log4j</groupId>
<artifactId>log4j</artifactId>
<version>1.2.12</version>
</dependency>
</dependencies>
</project>
3 自定义realm 实现
package com.shi.realm;

import org.apache.shiro.authc.AuthenticationException;
import org.apache.shiro.authc.AuthenticationInfo;
import org.apache.shiro.authc.AuthenticationToken;
import org.apache.shiro.authc.SimpleAuthenticationInfo;
import org.apache.shiro.authz.AuthorizationInfo;
import org.apache.shiro.realm.AuthorizingRealm;
import org.apache.shiro.subject.PrincipalCollection;

public class CustomRealm extends AuthorizingRealm{

//设置realm的名字
@Override
public void setName(String name) {
super.setName("customRealm");
}

/**
* 用于认证
*/
@Override
protected AuthenticationInfo doGetAuthenticationInfo(AuthenticationToken token) throws AuthenticationException {

//1 从token中取出身份信息(token是用户输入的)
String userCode=(String) token.getPrincipal();

//2 根据用户输入的userCode从数据库查询
//...  模拟数据库中取出的密码是"111111"
String password="111111";

//3 如果 查询不到返回null
if(!"zhangsan".equals(userCode)){
return null;
}

//如果查询到 返回认证信息AuthenticationInfo
SimpleAuthenticationInfo simpleAuthenticationInfo=new SimpleAuthenticationInfo(userCode, password, this.getName());

return simpleAuthenticationInfo;
}

/**
* 用于授权
*/
@Override
protected AuthorizationInfo doGetAuthorizationInfo(PrincipalCollection principals) {
// TODO Auto-generated method stub
return null;
}

}
shiro-realm.ini文件 的配置
[main]
#自定义realm
customRealm=com.shi.realm.CustomRealm
#讲realm设置到securityManager中,相当于spring中的注入
securityManager.realm=$customRealm
测试代码:
// 2  自定义CustomRealm测试
@Test
public void testCustomRealm(){
//1 创建securityManager工厂,通过ini配置文件创建securityManage工厂
Factory<SecurityManager> factory=new IniSecurityManagerFactory("classpath:shiro-realm.ini");

//2 创建SecurityManager
SecurityManager securityManager=factory.getInstance();

//3 将SecurityManager设置当前的运行环境中
SecurityUtils.setSecurityManager(securityManager);

//4 从SecurityUtils里边创建一个subject
Subject subject=SecurityUtils.getSubject();

//5 在认证提交前准备token(令牌)
UsernamePasswordToken token =new UsernamePasswordToken("zhangsan", "111111");

try {
//6 执行认证提交
subject.login(token);
} catch (Exception e) {
e.printStackTrace();
}
//是否认证通过
boolean isAuthenticated=subject.isAuthenticated();
System.out.println("是否认证通过:"+isAuthenticated);

subject.logout();
//是否认证通过
boolean isAuthenticated2=subject.isAuthenticated();
System.out.println("是否认证通过:"+isAuthenticated2);
}

相关文章推荐
- 第一个Shiro案例-简单的登录认证
- Shiro的认证原理(Subject#login的背后故事)
- Web中shiro登录认证原理
- Shiro身份认证授权原理
- 安全认证框架Shiro (二)- shiro过滤器工作原理
- shiro 权限框架认证和授权原理介绍
- shiro 认证filter 的原理
- shiro 权限认证的原理,个人的理解
- Laravel 认证原理及完全自定义认证
- ssh公钥认证原理及设置root外的其他用户登录ssh
- spring-boot(八) springboot整合shiro-登录认证和权限管理
- SpringMVC整合Shiro,Shiro是一个强大易用的Java安全框架,提供了认证、授权、加密和会话管理等功能
- 一头扎进Shiro-权限认证(授权)
- Shiro Review——自定义Realm实现认证
- https原理和iOS的适配(认证)
- 使用shiro框架进行用户登录认证报错(HTTP Status 500 - Authentication failed for token submission )解决
- shiro原理及其运行流程介绍
- Apache Shiro 使用手册(二)Shiro 认证
- Shiro学习随笔【二】身份认证
- OAuth2.0认证和授权原理